Leaderboard


Popular Content
Showing content with the highest reputation since 02/28/2013 in all areas
-
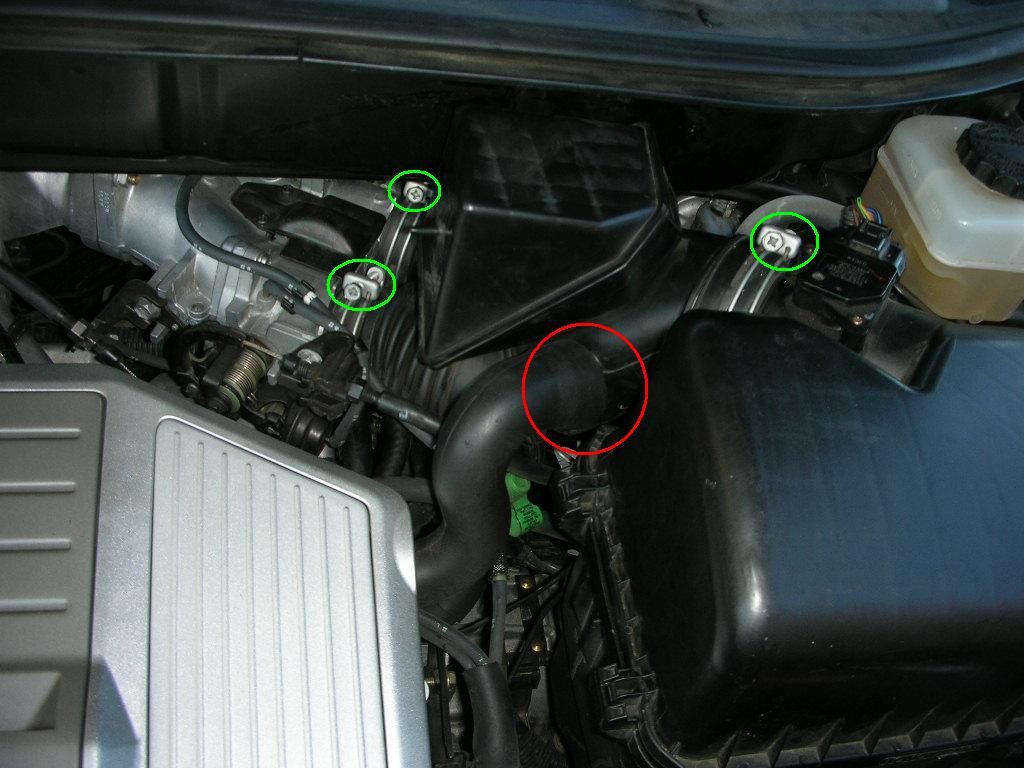
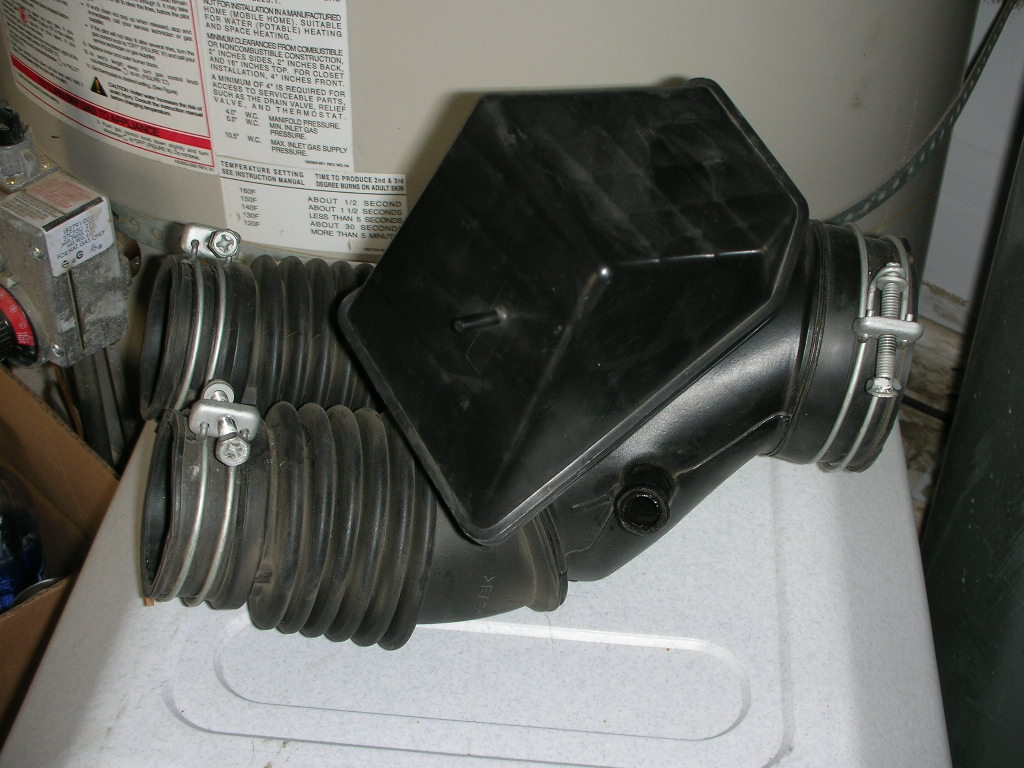
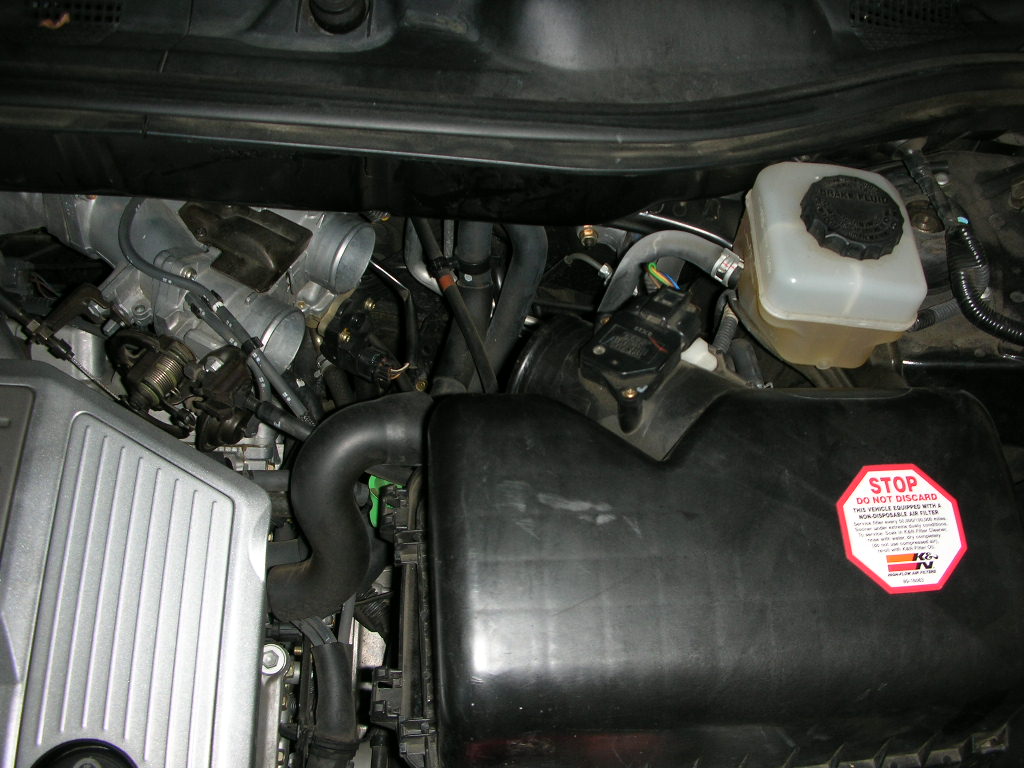
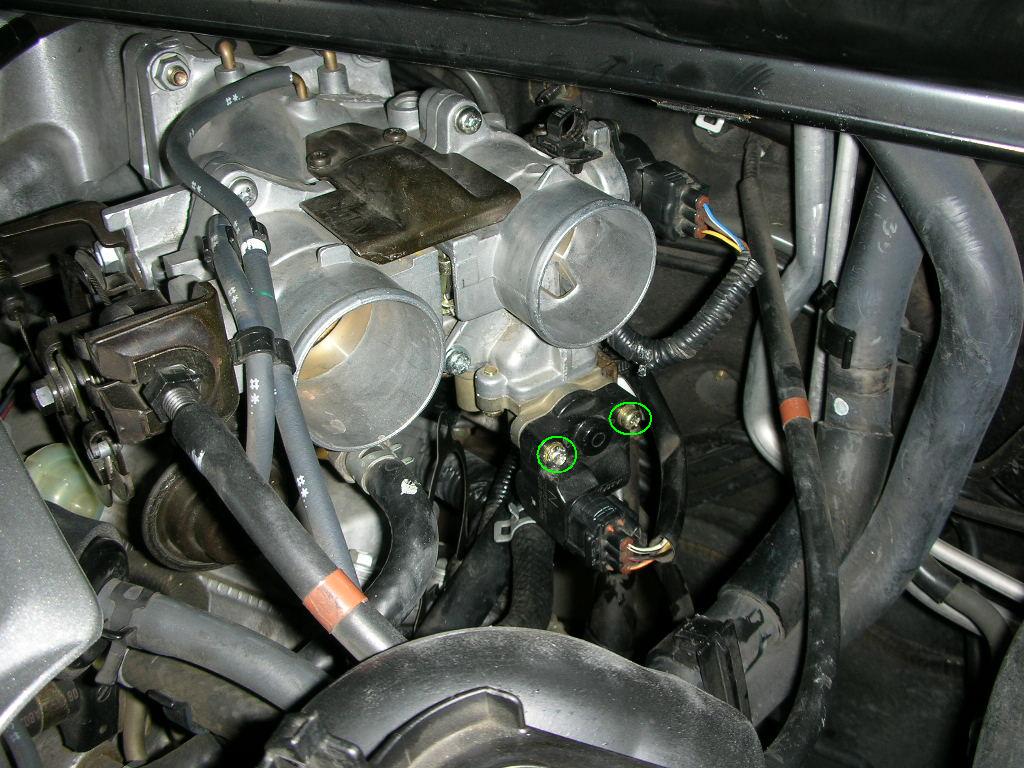
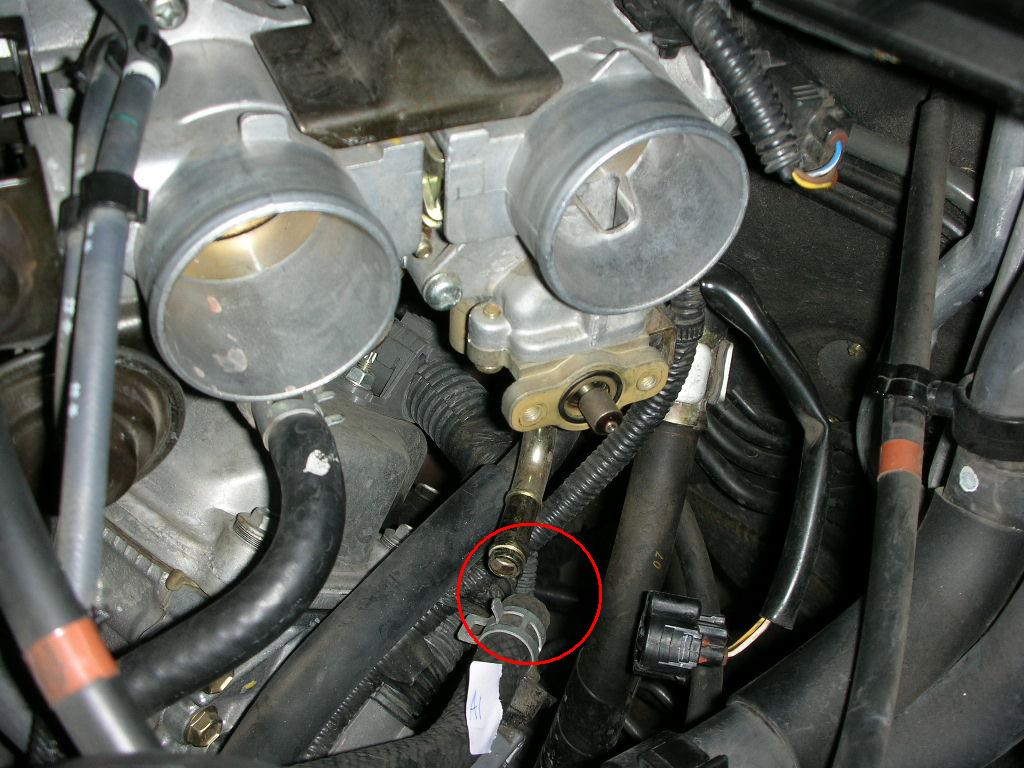
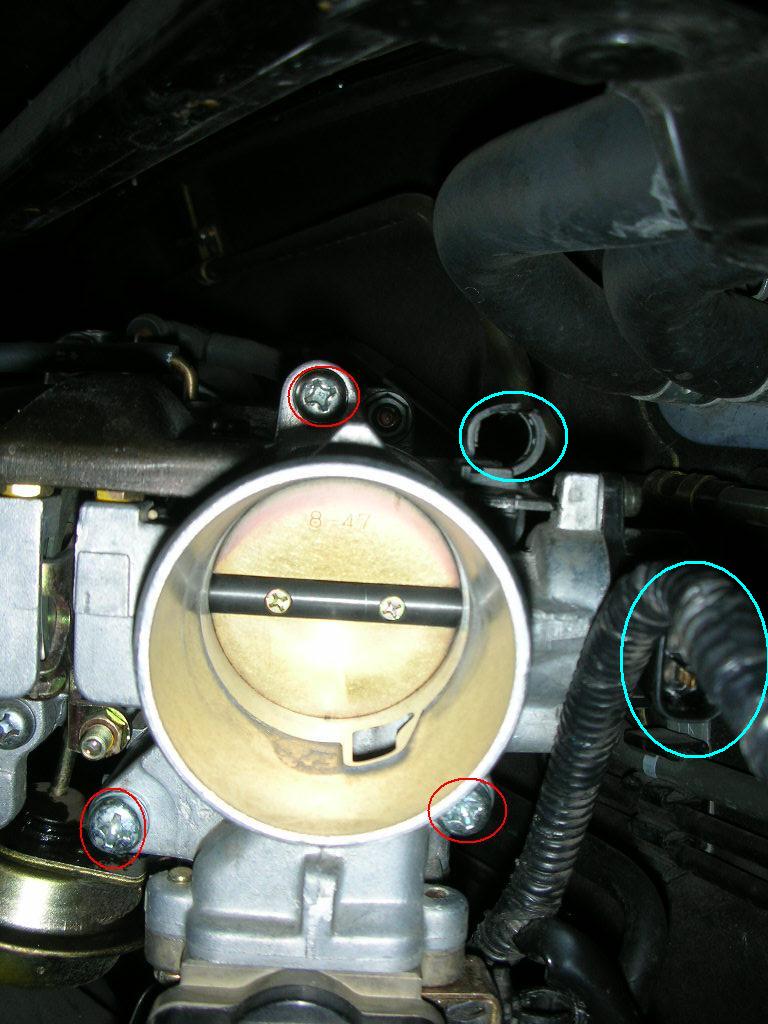
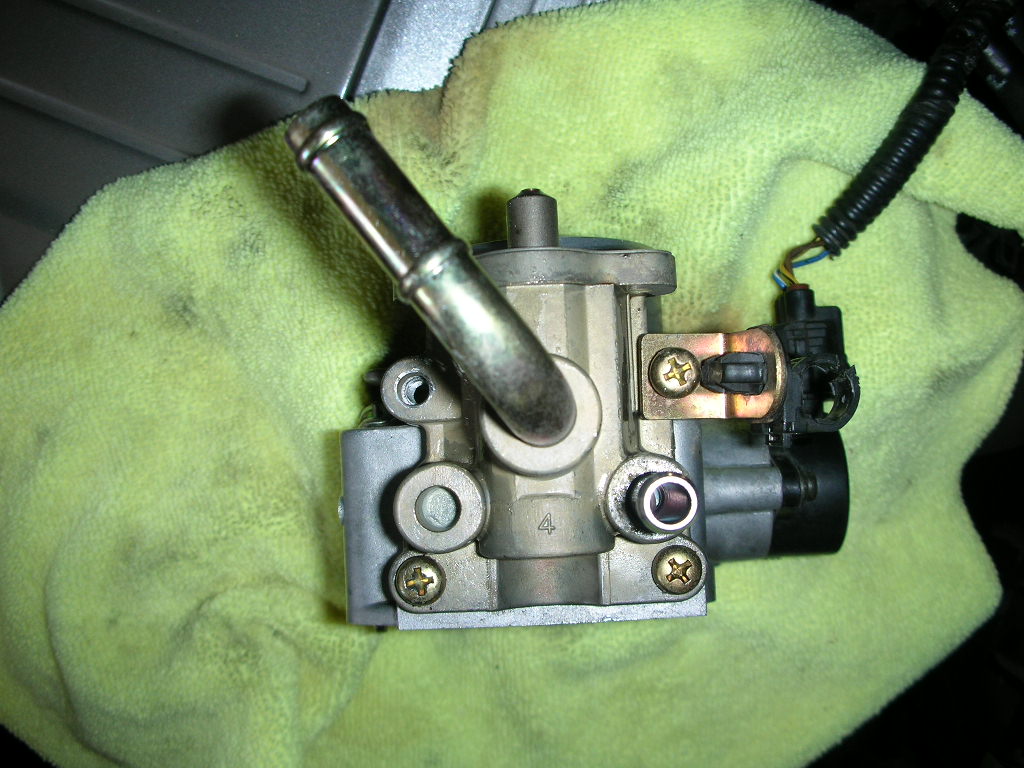
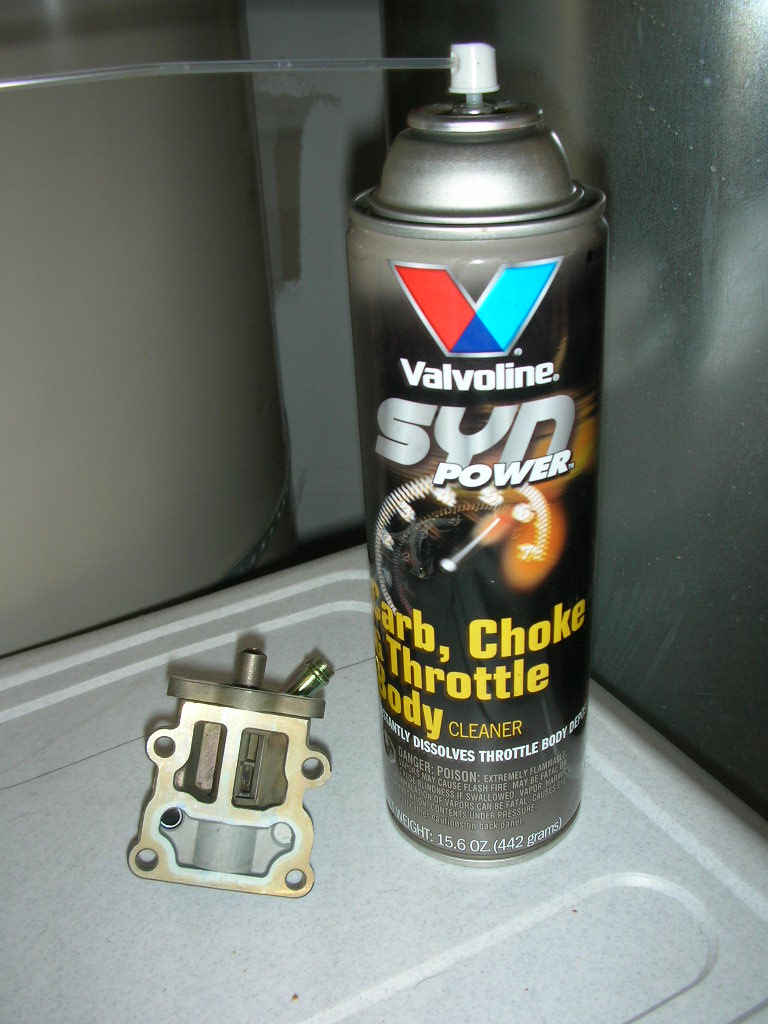
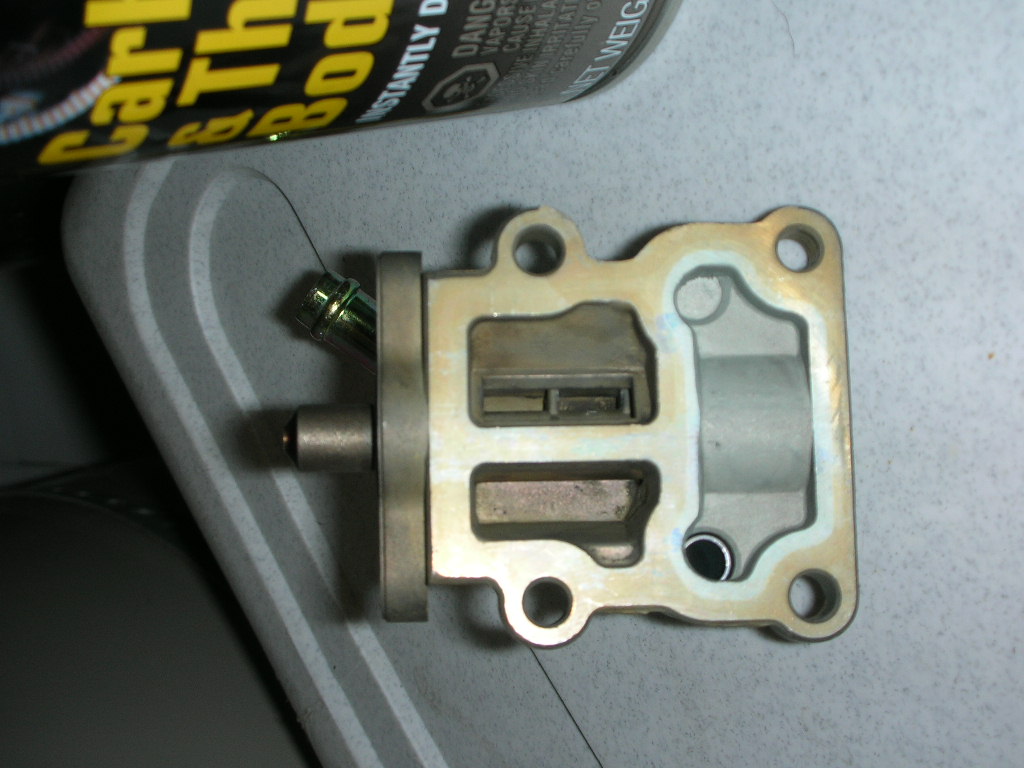
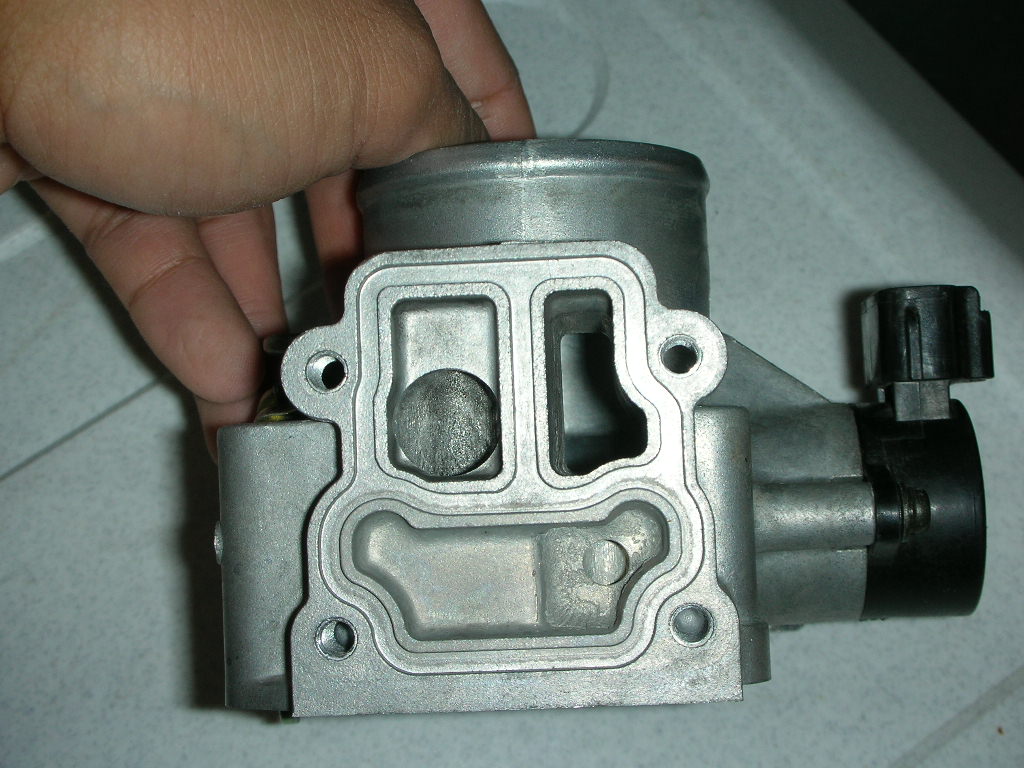
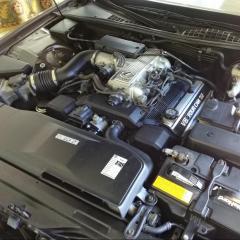
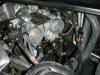
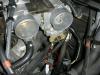
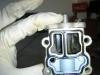
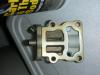
Hello Everyone, I know IACV has been a huge topic on the forum and I have found various pictures in the RX forum and ES forum on the idle air control valve (IACV) or as others call it the idle speed control valve (ISC). However, I have not found a "step by step" posting to date which definitively shows how to clean this thing so that my car stops giving me idling problems. Symptoms I have had included: - low and rough idling that would cause the car engine to start shaking after starting the car - this eventually got worse to the point that when I start my car, it would not idle unless I gave it gas - idling problems for me tended to occur more often after my engine was warm or had been sitting in the sun I hope these series of postings help you fellow LOC members out there. You've certainly helped me in the past so here's my two cents at this common problem. Additionally, the instructions I give are the way in which I have cleaned it myself. As you go about and attempt this, you may find better ways to do so. Please add and refine my instructions/terminology as needed. I am not a professional. I've only changed my oil, air filters, and conducted minor maintenance previously. The bottom line is that if you have the right tools, you should be able to do this. This discovery/ cleaning took me about 2 hours to do cause I ran into problems and there were major steps left out in previous postings that I’ve encountered read. The next time I do this, I believe I can get this done in about an hour or less. Tools Needed: 1) Tightly fitting Philips Screw Driver 2) Carb cleaner that is O2 sensor safe (I've seen CRC. I used Valvoline Carb Cleaner) 3) Locking Grip Pliers (definitely helped me remove the factory tight screws) 4) Small brush for cleaning 5) Towels for cleaning 6) Pliers (help removed brackets holding the hoses) 7) Latex gloves helps with limit the messiness. * I used the same gasket and did not replace it. No problems found. 1) Remove the hose that comes from the engine/motor that connects to the air intake hoses.( Hose is below in red – we’ll refer to this as Hose A) When you pull back the rubber hose covering, you will see that a metal bracket is holding the hose pretty tightly in place. Use the pliers to clasps the two metal pieces together to loosen the bracket and pull the hose loose. You can also do this by hand if it’s easier for you. 2) Upon removing the hose, you will want to remove the two air intake hoses. Loosen the three screws above in green and remove the hose. Below is a picture of the intake hoses removed. 3)After removing the intake hoses, I opened the lid to the air filter and moved this to the side of the car to create more working room. I believe there are two clips on the right holding the lid in place. Just pop the two clips and move the cover to the side. I also took out the air filter and temporarily moved this to the side. 4)After removing the intake hose, the throttle body/IACV/black electric coil is revealed. At this point, I removed the black electric wire from the black coil. Once the electric wire is removed you can remove the black coil from the IACV by removing the two screws. Note, the screws are factory tight so use a tight fitting screw driver to remove the screws. One of my screws was partially stripped from the dealership’s work, so I had to resort to my locking grip pliers which helped out tremendously. After removing the two screws, the black electric piece pops right off. When the black electrical coil is removed from the IACV, it exposes a small pencil sized metal stud. You will also notice a washer that sits on this stud. Don’t lose this washer. Take it and put it aside so it doesn’t fall off when you continue on in the next steps. 5)Additionally, I removed the hose coming out of the IACV. We’ll call this Hose B. This hose can be removed in the same manner by clamping the bracket and pulling the hose out. You will see that the hose is removed below. Below are pictures of before and after. 6)Here is where the fun begins. I initially attempted to remove the four screws attached to the IACV at this point, but found that after an hour, this would be nearly impossible to remove considering the location of the screws were in an extremely tight spot. The only way I would be able to remove the IACV is to remove right throttle body. Not as tough as it sounds. Three screws need to be removed to accomplish this. Again, be careful when removing the screws. Also you will see I removed another electric plug and I also cut a tie wrap. Once you complete these steps, the throttle body/ IACV comes out pretty easily. Note when you remove the throttle body, there will be one LAST hose connected to the IACV. Be careful when you remove this hose as radiator fluid may spill. Some of my fluid spilled out so I just refilled my coolant after I was done. 7)Below is a picture of the bottom view of the IACV. You now can EASILY remove the four screws connecting the IACV to the throttle body . In the picture below, I have already removed one of the screws. Once the four screws are removed the IACV and throttle body separate. Now you can clean both of them with your carb cleaner, brush, towels, cotton swabs etc…. Picture here is before I the cleaning with all the muck inside Pictures after I cleaned the IACV and throttle body This last picture is the post throttle body cleaning 8) Once you are done cleaning, just put back the throttle body/iacv the same way you took it off, and put everything back in reverse order. Ensure the gasket is in place. Also, ensure you put the washer back on the electric coil. Make sure you place hose A & B back and ensure the electric plugs are back in their original position. Once these things are in place, then it's all about putting the air filter/hoses back and you are good to go. If you have lost any coolant, make sure you refill it to a safe level. After completing this cleaning, my car starts up without any problem and idles as if I just purchased the car brand new. Replacing this at a dealership would have costed me $300-400 easily. Let me know if you have any questions. Cheers (Also, I tried to post these as separate replys, but the software combined all my replies into a single reply and did not keep them separated) *Edited the posting to have the pictures follow step by step in sequential order*


 6 points
 -
I was also sold this "invisible" ad on! Only to be told by the dealership "after" that it's not adjustable. So basically it's just a dimly lit thin strip! This should be included. Lexus could and should've done better!4 points
-
3 points
-
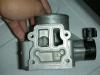
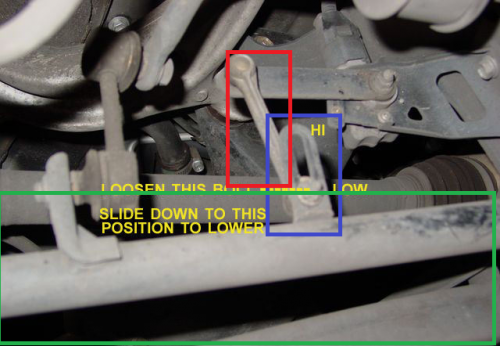
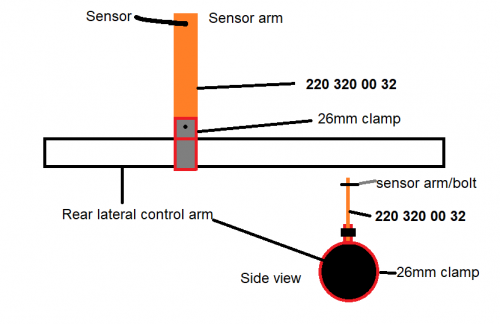
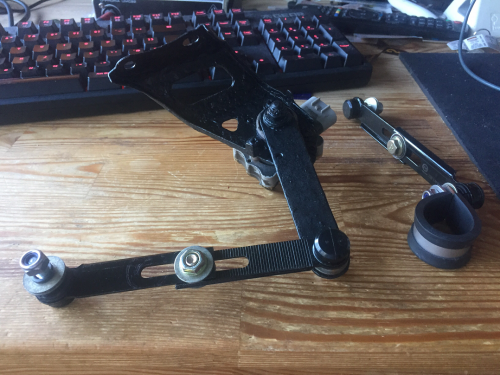
Hi. Some friends of mine suggested that I should post this here for more people to see. Hopefully it'll help people for years to come. You will need: About 50 bucks budget for the balljoint rod and the pipe clamp. Height sensor with bracket. 10mm wrench Washers that fit 10mm/M6 bolts. 10mm/M6 nuts Some smaller (8mm wrench) I own a 2001 LS430. The height sensor control arm's slider has rusted and become damaged over the last 19 or so years. The ball joint rod to the height sensor has also seized too. The height adjustment rod there in the red was seized, and the height slider in the blue was badly corroded and broken off. Rather than buy an entire control arm (green) this is an alterative method to repair it The arm is ~26mm in diameter. Buy yourself one of these pipe clamps in 26mm diameter. Or make one. Shouldn't be expensive. The hole needs to fit a M6/10mm bolt. Grind off the remnants of that slider from the control arm, and slide the pipe clamp over, and put your 10mm/M6 bolt and nut through and secure it in place where the slider used to be. Rather than using the control arm as a slider, we can instead use a sliding ball joint rod such as this one; This is a 220 320 00 32 from Mercedes - a height adjustment rod with a 8mm locking and a 10mm/M6 ball joint bolt. You can pick one up off eBay for cheap. Or find some other M6/10mm adjustable ball joint rod. Look at the diagram and try to imagine it in your head. This is what your bracket and rod/clamps should look like. One day I might snap a picture of what my repair looks like, but I hope you can make out what I mean via the diagram. This repair should be very easy. Maybe some sanding/grinding and surface preperation. The clamp will hold on tight and is easy to replace. The adjustable link rod will last longer and allow for easy adjustment, and less risk of corrosion damage. Hope this helps. This is a fairly easy job and took me less than 2 or so hours to do.
 3 points
 -
Did I mention this?..... I don't like the fact that our governments plan to force us to buy EVs. I wouldn't mind having one, as we already have solar panels and don't pay for electricity, but I think we should be able to choose what we drive (within reason).3 points
-
At the part store they run a load test on the battery that mimics a big draw. If it holds up to a certain voltage it means the battery itself is not weakened yet. As the battery ages it will weaken as in not be able to supply a given amount of cold cranking amps. When its cold the oil thickens some thereby making the engine have to work harder to rotate. Hence the term "cold" cranking amps. I'd say you should investigate why the check engine lamp is lighting up. It could be a sign of what is taking place to cause your car to struggle to crank over. The part store can often "read the code" and determine why the CEL is lighting. My gut tells me your voltage regulator in the alternator is hit and miss. A long time ago that was a little box on the fire wall or fender. These days they are inside of the alternator. It determines how much electricity goes to the engine to keep it running and to the battery to charge it. It only has to be off by a little to keep the engine running but not have extra to charge the battery. Another issue could be a parasitic drain. An out of the ordinary draw on the battery when the car isn't running. In my 04 GS 300 for example the CD changer kept trying to change discs and the seat memory kept activating. Now I could not hear the disc changer nor was the seat memory moving the seat, but they were drawing on the system leading to a weak or dead battery if I didn't drive the car every day. Yet another issue may be short trips don't allow the battery to charge enough. Example; start the car, drive to a store 10 minutes away, finish there, start car and drive 10 minutes to another store. Never giving the engine a good 30-45 minutes to charge the battery back up to the voltage used to start the car can also lead to the hard to crank or dead battery issue. Hope you find it soon and it's a cheap and easy fix.3 points
-
I just purchased a NX200T. During the test drive I did not realize the headrest was a little too far forward. It is sharply angled toward the driver at the top. I am on the shorter side at 5' 6 1/2" tall and have good posture. When I sit in the driver seat with good posture my head is pushed forward about 1/2". I have to lean the seat back so I am slouching to avoid neck discomfort. I asked my dealer, service center and the U.S. corporate office for advice. There was nothing they could do. Very disappointing. The worst part is that the headrest is available outside the US with adjustable forward and aft movement at 4 intervals. I asked a few after market car parts dealers for advice. I was told it is a common problem. I was given many solutions (get another brand car's headrest, cushions, heat the metal and bend the rods, padding, etc.). Some ideas were unsafe and of course illegal I thought. For now I put some 2" cushioning in the seat to bring the rest of the seat inline with the headrest. It is better but not quite there and makes my A/C venting fairly useless, & is a little dorky. After just having paid about 50K for the fully loaded car I want a professional solution to improve the headrest. So far I have not solved it. I am curious if anyone else has had this issue and solved it? Any advice is appreciated. I am 95% happy with the car/SUV and am looking for that last 5% of comfort/fit.3 points
-
No reason to upgrade, Those stock wheels are Classic on the SC 😉3 points
-
But you love the Covid virus? 🙄3 points
-
I just installed the rr racing supercharger. It’s the only way to go bud3 points
-
That one is my son's new puppy. Her brother came home with me Chocolate lab mom, stranger in the night dad Yesterday they played all afternoon.

 3 points
 -
Purchase has been made!...I could not turn down the deal I got & the actual ES...2020 ES 350 'premium' with only 11k miles in Nebula Grey Pearl (windows are already tinted)....over 2 years of full factory warranty remaining; 1 owner, full service history & Lexus CPO. Our 'premium package' in Canada is equipped quite differently than our friends south of the border....with more features / standard equipment. Originally I wanted the UL package....but in these parts, they are very rare (I reached out to 17 Lexus dealers in a 400 mile radius of me...the UL units that are available are 5 to 6 k more & only about 20% are actually at Lexus dealers...the premium pkg checks 95% of the boxes I was looking for....as the expression goes 'don't look a gift horse in the mouth'. I literally have a 6 minute drive to work... I pick the car up this Saturday.3 points
-
I like it when I'm trimming a rose bush, grab one to place in a jar and while heading indoors the Mrs arrives from work so I hand her the rose. Or when I come from work and the dog greets me at the door, tail all wagging-like. And the parrot says "welcome home"…… Or when a nice breeze blows just as the grass cut chore is over and the Mrs brings out a tall glass of ice cold spring water. Or when a new baseball cap fits my noggin just right without adjusting it. Or I step on the bathroom scale expecting to have gained weight but the scale shows I actually lost a little. Or when my son and I went to do the first start after an engine swap, expecting a hard to start issue but ole bessy fires right up. Or when the lawnmover starts first pull……again. Or helping out old people. Or thanking a soldier/veteran. Or tipping the person at the toll booth. Yes I stop and pay in cash so I can do that. Or when the voicemail on your phone was not a robo-call and instead was a friend telling you "hello, here's my new phone number" Or when you sneeze and a perfect stranger says "bless you". Life is short. But smiling makes you live longer. Trouble with being dead is it lasts so long.
 3 points
 -
The cost of dental work, especially deep cleaning by laser and periodontal surgery, but also including implants.3 points
-
That's the view when I pull into the driveway after work. Unseen in the photo is the dog wagging his tail "it's that guy, he's back, yay!!"3 points
-
Update: I think I have got it after all the work, time, and money spent. I started checking again I found an unbelievable vacuum leak around lower intake manifold. replace gasket today runs great thanks for all of the support. something that simple fix. when the engine was swap the starter was replaced. The gasket moved or something apparently cause a vacuum leak. I had no idea a vacuum leak could cause random misfires. I was sure it was an ignition problem.3 points
-
Hi all, I believe I have posted here before a long time ago with my old LS430 LEX, I now have a 2007 LS460L with 110K on it now. I have owned it for a few years now, since 65K miles, and recently I started having acceleration/hesitation problems. I did alot of research, and didn't find very many good answers. I did have the transmission and engine ECU update flashed, with some improvement, but after that didn't solve the problem, I was convinced it was the cylinder head replacement deal, which was way out of my budget with 5 kids....and I thought it was ridiculous that a flagship sedan would need that kind of serious motor work with just 100K on it. Anyway, my mechanic suggested BG 44K fuel system cleaner, NOT available at places like autozone. He sells it for $28 per can, but I found on Ebay for $16.75 and up with free ship. First and foremost, I ALWAYS used quality, premium gas (Shell V-Power or QT), and Techron additive from time to time, so I was super unconvinced about his recommendation. I had even listed my LS for sale, again, convinced that the motor had cylinder issues after reading blogs about LS460 acceleration issues. Also, for the record, I have NO affiliation with BG or anything like that. THIS STUFF WORKS! It truly fixed my hesitation problems, completely. I am no longer selling the car, and am happy again, as it accelerates like it is supposed to. Feel free to read many other peoples reviews on this stuff, its amazing and really seems to work. After i drove it to wrok (25 miles one way) I thought i felt a difference, by the drive home, I KNEW I felt the difference, after the full tank, i was truly smiling. I have ordered 4 more cans for my other vehicles and boat, and suggested it to my friend with a ISF, my brother with an SC430, and my buddy with a Vette. I guess these LS460 cars are just picky after a while and maybe the injectors get gummed up? I don't pretend to be a mechanic, again this was suggested by my Lexus mechanic, After alot of depressing research with no real answer, just wanted to share my experience with any other LS460 owners, as it is a beautiful car, and I was disappointed in what I was thinking the problems I had. It was the best $17 I have recently spent, and if you are having similar weak/lack of acceleration or hesitation issues, i would say TRY IT for less than $20. I believe you can go to BG's site and find a local dealer, again, not autozone or O'Reilly or anything like that, says professional use only lol. Also, need a funnel, comes in a coke can basically. Just my 2 cents, hoping to help out any other LS460 owners out there depressed about their car, it seems most people just said they'd trade it in and buy a new one, but I'm not that rich :)
 3 points
 -
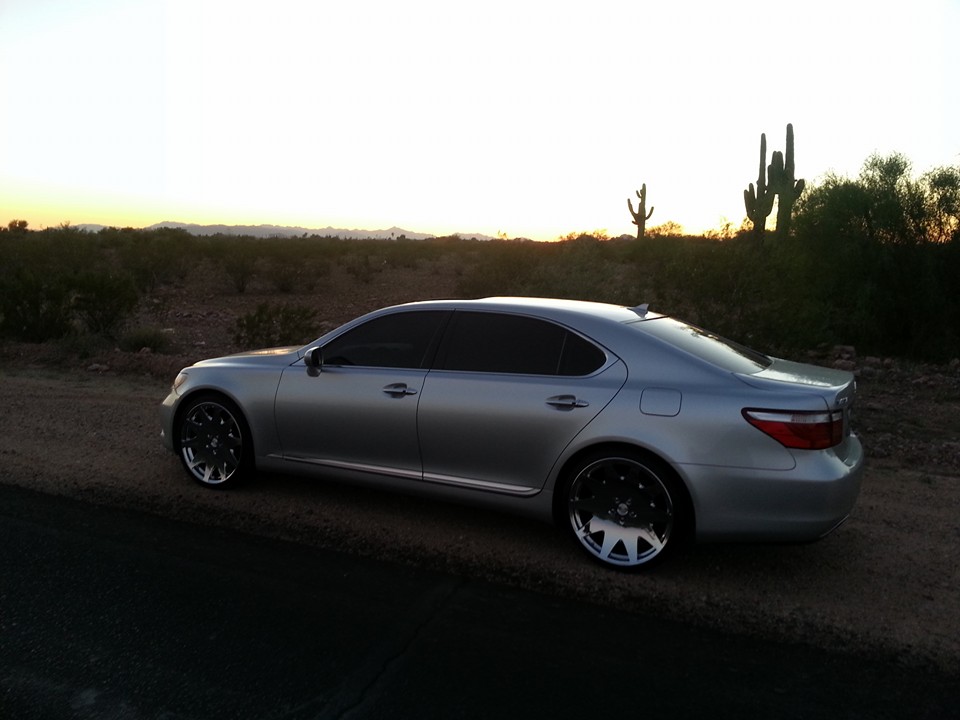
My Daily 😀
 3 points
 -
The Lexus brand cell phone that was a dealer installed option lowered the HVAC fan speed and muted the audio system while a call was in progress. I even connected an aftermarket Nokia CARK-91 phone system I installed in my second (2000) LS400 to mute the audio system but I didn't bother to connect it to lower the HVAC fan speed. Even when a Lexus phone system was never installed, corrosion of the factory installed cell phone harness in the trunk can cause HVAC and audio system issues.3 points
-
20 years ago I swapped a domain name for a Lexus. The love affair started and I am now on my 10th Lexus3 points
-
And Because We All Love Pictures 🙂

 3 points
 -
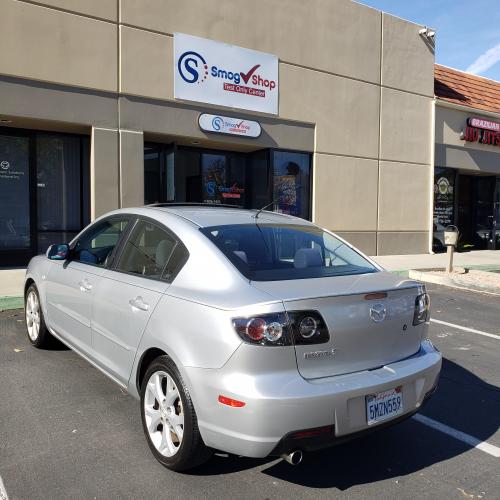
My Lexus is my weekend car. My daily is my 2009 Mazda 3i.
 3 points
 -
Here are a couple of tips I have picked up regarding maximizing fuel efficiency 1. Replace the spark plugs if you have not already, I prefer NGK Iridium plugs 2. Look for Cooper CS5 Grand Touring/Ultimate Touring tires, they are excellent for these cars 3. Use OVERDRIVE on the highway or at speeds in excess of 60 MPH (most say 40-50 MPH, but in my car I have observed minimal difference at those speeds). Note that you can use Overdrive at all speeds and it will keep the RPM's down but from what I have learned at slower speeds this translates to negligible fuel economy gains. 4. Set your ECT mode to NORMAL and not PWR 5. Keep the RPM's as low as possible aka don't floor it 6. Make sure your wheels are balanced and aligned properly and that your tires are also correctly inflated. 7. Mythbusters proved this, KEEP YOUR CAR CLEAN, it does SLIGHTLY affect gas mileage for the positive. 8. Turn off your A/C system if you want, it does affect gas mileage slightly, but its also a comfort, not really necessary unless you want to maximize fuel economy. 9. In reference to replacing the spark plugs, you may also want to consider replacing the ignition coil, distributor cap & rotor, and plug wires if they have not been replaced in quite some time as they can lose spark and cause poor performance, this would be within a general tune-up. 10. Replace the fuel filter, this is commonly missed on every car, and they get NASTY, unclean fuel = bad performance. Also consider getting a professional fuel service done on your car, this can help too, especially if it has not been done in some time.3 points
-
Folks, and Forum Admin, Please make a separate section on the Forum for 2016 RX models. THese have had major changes since 2015. The engine has been tweaked, there are scores of safety improvements and the look is way different. I am sure the issues will be different as well. So please rename the 2010-Present section to say 2010-2015 and keep it separate from 2016 onwards. Thanks.3 points
-
I can answer that. Those zany Brits particularly like "mark" designations: https://en.wikipedia.org/wiki/Mark_(designation Maybe it is a longing for Jaguar sedan series names. In the UK, the model year ranges of the LS400 are referenced thusly: Series 1, Mark 1 = 1990-1992 Series 1, Mark 2 = 1993-1994 Series 2, Mark 3 = 1995-1997 Series 2, Mark 4 = 1998-20003 points
-
Replaced the Y pipe. Almost one month and no more problems.3 points
-
okay guys, I am going to give you a very constructive advice on how to fix this problem.first remove the cluster and if you do not know how go to lexls.com and follow the instructions.then remove the face cover .first grap the tach needle gently and pull untill you hear a pop,again be gentle and do not ge scared.once you hear the pop move the needle clockwise untill it pops again then gently release it.now move the needle slowly counterclock till you sit it over the zero an on the dot and make sure that it sits right on the zero.to check your work move it gently say to the mark 3 then let go it should snap right back to zero,once you have accomplished this ,you are rock & roll baby.the same thing goes for speedometer.back light is not working change cap 212,after making sure your cathodes are okay meaning the bulbs.if not you can get them at a very good price from plano lexus,they are awsome as far as price goes.gas guage slow change cap 142.while you are at it change any bad or weak bulbs ,be the warning ones or the indicator ones such as shifter position.by the way guys the cluster lexus has on the first gen is the 1992,because the psb are so robust,where the 1993 and 1994 are made a little bit on the cheapy side.this job should take about an hour if you how to handle things.good luck and let me know. please make a donation to lexls.com,this guy is great.may god bless his soul.3 points
-
If you really want to know what is not to like about it: I would like a car that drives without polluting. I do not at all mind if it is powered with a battery as long as it is not made in a factory in China using slaves and where the power to the factory come from burning coal. Of course it should not be a battery that would make the car having a much limited range when temperature get down to zero, or some days below that. It would also be needed that the materials to make the battery can be obtained without destroying the planet searching for the materials. Not to forget that there got to be so much of these materials that there is enough to make batteries enough to convert all cars to electric cars. The materials we use to make batteries now are not available in such quantities and the batteries we have now have very limited time where they are holding charge and when no longer really great very expensive to get the materials the batteries are made of out for reuse. That the batteries should be able to keep the power without losing too much when not used a couple of days just like a gasoline car is also useful. Of course it would not be funny if driving through Europe to visit family I would not be able to charge the battery more or less at same speed as filling gasoline on the one I have now. If I am asking too much maybe a battery powered car is not for me. Or anybody else that would like to leave the planet in as good a condition as we received it so our children will not have to repair all the damages we have made to the planet while we were searching for easy found solutions that are actually not solutions. EV cars, the way they are made now, are not polluting less – yes they are – in the streets of my town, but making the batteries, transporting them, charging them with the very “in no way at all” green power where we live actually make EV cars more polluting than driving a well kept little gasoline car. I sure wish that we could find a material that could make batteries last a long time and not just the 6 – 12 years with steadily losing ability to keep charge. It would also be nice if the battery was light and not hard on the tyres that deteriorate more the heavier the car is. If the new batteries were so light that they could be used in air-planes that would really help reduce pollution as the private cars we talk so much about actually are not a major polluter. Why can politicians not understand that even with all they do now for the environment pollution is not going down but increasing? EV cars the way they are now - are for people not thinking about environment: 60% of the electricity in Spain is made from non-renewable s coal, oil, gas; 35% from nuclear; only 5% from renewable sources; just saw that in the electricity bill today. That the 35% from nuclear are not damaging the climate now could put that figure up to 40%. Still 60% of the energy put in electric cars is dirty and utterly polluting. Worldwide numbers are not even that good. This explain why charging an electric car is not really doing any good for the environment. And when the factories making the batteries to electric cars are not informing from where the energy that is used in the factories come from: mean it could be quite a good deal not green, more grey or even black. Considering above-mentioned numbers driving electric cars pollute between 15 and 60% more than if we continued to use the gasoline cars we are driving in now. Would not need new cars with new batteries, just new oil in the engines now and then. https://www.asoc.org/learn/antarctic-ice-and-rising-sea-levels/ But as it maybe already too late to change the way climate is going now, we can just continue the headless way we are used to: https://abcnews.go.com/International/late-prevent-significant-melting-west-antarctic-ice-shelf/story?id=1041447552 points
-
I found several potential causes:2 points
-
The spec sheet that Lexus of Birmingham gave me for the ES300h shows these two add-ons: WOOD TRIM WITH AMBIENT LIGHTING $740. ILLUMINATED DOOR SILLS $400 Can you possibly imagine the sheer excitement as I finally got it home in the garage and hit the automatic garage door opener, and then in the dark, I see this pale blue strip highlighting the edge of the dash? And I only paid $740 bucks plus an additional 4% sales tax? Followed by the thrill of opening the door and seeing a crummy advertisement projected onto my garage floor ("Lexus of Birmingham") for $416. what a RUSH!!2 points
-
Id like to believe im an engineer but thats not the case. From the late 60's to the early 80's I worked for GM as a factory technician (we were called mechanics in those days because we did everything) and, for a few years as an apprentice machinist working for a speed shop blueprinting small block chevy motors (primarily for drag racing). So i do have some experience in the automotive field and im usually very careful in examining wiring schematics and other important data before i start cutting into factory wire looms.2 points
-
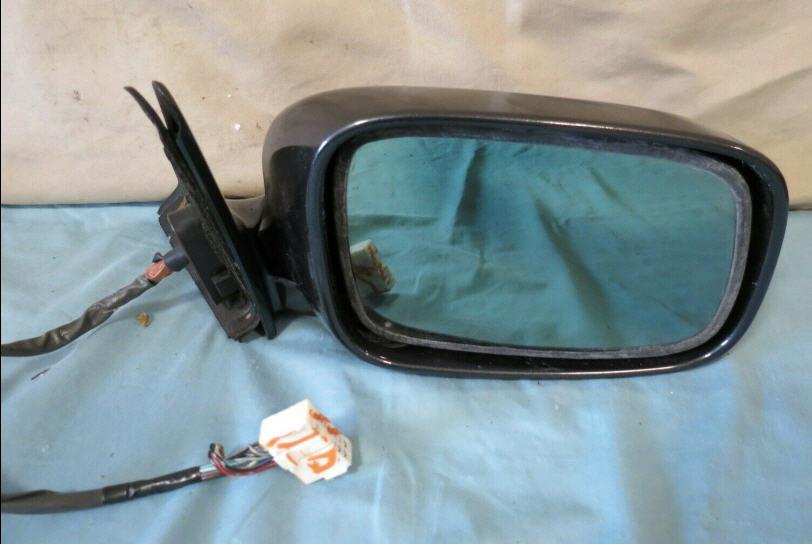
No splicing will be necessary. The mechanic will simply unplug and discard what is left of the exterior mirror harness from the door panel wiring harness. He will then plug the harness for the replacement mirror into the door panel wiring harness. Here is a photo from eBay of a used right side mirror for a 1998-2005 GS. The cable from the mirror attaches to the wiring harness behind the door panel.
 2 points
 -
I've been researching car wraps for a while, possibly for a future body color swap when I eventually get a new car. Apparently, wraps last about 3 years because if a wrap is left on too long, it may be very difficult to remove it. This is true with many types of tapes, even those with very weak adhesion. So before you have a wrap done, I suggest discussing this with the "wrapper".2 points
-
No idea the sticker price but I'd say "if ya gotta ask ya probably can't afford it"…… I typically wait for cars to become old enough to fall into my price range but I doubt I'll live long enough for one of the LES cars 💀2 points
-
Welcome to the Lexus Owners Club Events forum section Its been a while since this section has seen the light of day, so thought it was time to revive it now that we have freedom of movement pretty much in most parts of the free-world. Got an event planned or just want to share one you are attending? Feel free to post up any national or local events relating to Lexus or even just events that will host Lexus cars amongst others. (please note: the Moderation Team reserve the right to remove any content that goes against Lexus Owners Club rules at any time)2 points
-
For Myself it was upgrading from a 1996 Toyota Camry to a 1998 GS 300...Loved the car so much I bought a LS460. I drove the GS for 21 years as a daily driver, The car was sold locally and is still on the road today, Got To Love Lexus ! What is your Story ?2 points
-
I am having a difficult time wrapping my head around any All Electric cars. I get the feeling we are being duped into the belief that electricity is a cleaner and cheaper source of energy. I do of course get the concept but I also must look at the entire picture of where and how electricity is produced, transported and stored which brings us to the actual cost. IMO solar is a wonderful source but not yet up to the full time task where geographical and weather conditions come into play. Wind is also wonderful however when we consider all the costs to build from scratch, erect and maintain windmills it becomes just as costly or more costly than the fossil fuels required to build them. I am no expert here but I have read numerous accounts stating that windmills so far cannot produce enough energy to cover the return of investment over their lifetime. Both sources have their advantages and disadvantages, cleaner in some ways but often more costly when we look at the total picture of initial cost Vs return. An All Electric vehicle will not work here where I live with the high cost of electricity from the power company to my home. Replacing batteries in such vehicles is another daunting thought when they have reached their life expectancy. I think we seem to forget that all manufactured goods, no matter what, cars, computers, gadgets and just about everything else all begin in the ground and must be mined, transported, milled and smelted and this all takes fossil fuels and electricity at every step. Folks here are highly against windmills, solar farms, pipelines, electric transmission lines, cellular towers, and nuclear power generation plants. The complain about the rivers being dammed for Hydro power generation and in the very same breath they complain about high costs of energy, lack of cell service and internet connectivity for all their gadgets. I get the feeling those who are narrow minded expect all this stuff to simply fall from the sky. I have a continual and ongoing debate with a buddy who is an absolute climate activist, the type who thinks cows should be eliminated and all energy should be from renewable sources while he does drive a Prius he also wants milk in his coffee, Leather seats in his cars and SUVs and steak on his table. All electric vehicles are for sure coming along but they are a long way from refined enough to have one parked and plugged up in my driveway. I believe about 75% of all electricity is produced by fossil fuels at present and we have a long way to go for us to rely on other sources before we leave the oil, coal and gas in the ground.2 points
-
Sorry, I didn't understand exactly what you wanted. It is common for forum software to be configured to turn on "follow" by default whenever you post. If you don't want to follow a thread after you post, then immediately turn off following after posting. I assume that this is a forum software configuration setting that could be changed by a forum administrator but many people prefer to automatically follow a thread after posting.2 points
-
I know this is an old thread but I dare write this for those who suffer and try to fix it inexpensively as a DIY job. Recently a friend of mine mentioned about Mark Levinson's amplifier and I posted this to the Clublexus. According to him, the popping/cracking/static noise is mostly caused by the oscillation of the voltage booster at the power supply block. All you need to do is just to replace worn electrolytic capacitors used there.2 points
-
I have that level of tint on my 2002 ls430. The interior really does look pretty much new. It has 185k but looks like maybe 10k. It's a new car to me but the tint was on it when I bought it and I think it had to help keep it so nice.
 2 points
 -
Many vehicles with keyless entry / push button start can be entered by thieves using a cheap amplifier that can be purchased on the Internet. If you park your vehicle near your fob (e.g. in your driveway), one of these amplifiers can be used to amplify the fobs signal - even when the fob is in your pocket - to open the vehicle door. I recently read about thieves in the city where I live capturing/recording signals from fobs as owners exit their vehicles in shopping centers and then opening vehicle doors with the recorded signals after the owners had disappeared from sight. I don't know if car manufacturers are doing anything about this problem. Google "Faraday Cage" for information on how to protect a key fob so its signal can not be captured by thieves.2 points
-
Thanks for the heads up! It seems once they get you past the warranty period they don't care. It's all about business and they will wait until a class action. It used to be if you took care of your car, it would last AND look good! I'll reconsider putting so much $ in a car in the future. Best of luck to you too!2 points
-
Exactly and I've gone through all of the appropriate steps to get assistance from Lexus and they will not help. This is my last Lexus for this reason. I'm going to drive it until there's no paint. It's not very good advertising for them. It's pitiful when I see so many with the same problem. One paint place told me it was bad primer. Good Luck to you.2 points
-
usually the odd connector will be floating around, intended to connect to a component which isn't on that particular model of car/engine but the wiring loom just carries it regardless. If you move it in an arc and look for anything it can fit within that movement area then if not and everything works fine then its a dummy connector. It also doesn't look as though its been connected to anything in a long time looking at the dirt that has built up in it2 points
-
The Safety Connect portion of Lexus Enform is available separately for $139.95/year and there are discounts for multiple year subscriptions: https://secure.drivers.lexus.com/lexusdrivers/lexusenform/subscriptions.do Safety Connect is the service that includes using the emergency "S.O.S." button to speak to a real person at the response center, automatically notifies the response center with your GPS location if you crash, and provides Stolen Vehicle Location service in cooperation with law enforcement agencies. We have multiple year subscriptions to Safety Connect for our two Toyota brand vehicles and will subscribe as long as we own the vehicles. An aspect of Safety Connect that I particularly value is that it has it's own backup battery that can allow it to function even after a crash disables the rest of a vehicle's electrical system. My wife and I have AAA (and Medicare!) cards but we do not regard AAA as providing anything like the automatic and "one button push" services that Safety Connect provides.2 points
-
Hi Brian and welcome to the LOC. You've asked some good questions and have gotten some good answers. I'll try to add some more information for you to take into consideration. I have owned a 2005 ES330, a 2010 ES350, and now a 2013 ES350. All three have been truly great cars, yet each had it's unique qualities. All had and have an excellent ride. The 2013 has been tuned to provide more responsive handling but without sacrificing the Lexus ride and quite cabin. Now, is it as quite and smooth as the 2010 Es was? To me, it is. But to you, you have no referance point other than the ATS. So asking about the ride and quite of the Lexus is of no help because you never drove an older one. Reliability on all Lexus/Toyota products is excellent. Lexus has been the best selling luxury car or in the top three of the best selling luxury cars for the past 5 years. Reliabilaty is a big reason for that. I have never had better service or better technicians service my cars than my Lexus dealer. And in saying that I should tell you that my dealer also sells Cadillac and gives those customers the same high level of service. One of the diffrences with the 2013 ES is the change from a Camry based chasis to using the Toyota Avalon chasis. This frame is longer and more rigid and also gives more interior cabin room. Lexus offers the Mark Levinson premium sound system featuring 19 speakers surrounding the drivers cabin. I think the peak rrms is around 550 watts. (You should look that up) I'm pretty much a snob when it comes to sound systems. I've listened to the Bose system, and in fact I use some Bose products at home. However, the car Bose system does not provide the clarity and range that the Mark Levinson system does. One area where I think the Levinson system is a little weak is the low bass end. The Mark Levinson system comes packaged with the Lexus navigation unit. Back to the ride and road noise for a last remark. Tires make a tremendous difference in the ride and outside noise on any car. As an example, last December when I took deliverly of my 2013, i saw that it had come from the factory with Bridgestone tires. Over the last few years there have been many disscuscions about what tires were best on which cars. I have foud that Michlen Primacy MX4 are by far the best choice for a ES350. They give a smooth ride and oh so quite. So, I had the dealer take off the Bridgestones and put on the Michlens at no charge to me. I have not driven th ATS, and it sounds like a nice ride. But I think if you do some research you may find that the Cadillac product will not hold its value as well as a Lexus. Paul2 points
-
Riiight... This is a discussion forum, this is not owned by Lexus, and its not yours to use as a conduit for your thoughts without accepting the viewpoints of others. If you want to say something to Lexus...and not start a discussion where other people join in and share their opinions...send them an email. However if you want to be taken seriously by Lexus or anyone else I would suggest you work on your typing and writing skills beforehand. And save your opinions about what the forum should and should not be used for to those of us who have spent the last decade building it. A blog is an online publication of one persons thoughts. This is not a blog, it's a discussion forum. Thread closed.2 points
-
Thanks tex2670. Did anyone mention what causes the problem? Mileage related? How many miles on your '07? Just curious, Just saw a post on ClubLexus today with a good explanation (thanks to solotex55 -- no relation):2 points
-
Fixed!! This is the Idler Pulley which is only attached to the front of the water pump. This water pump is driven by an internal idler pulley that operates from the timing belt. The Pulley was $80.00 at Lexus dealer, and I changed along with new serpentine belt. Took all of 10-15 minutes. Thanks for all who helped!!2 points
-
Luxury Motor Works makes/sells the LuxLink module.... Luxury Motor Works However, it won't solve your problem. The module just tells the car when to make the top go down. If the car won't let the top go down, the module can't make the top go down either. For example. If the retractable tonneau cover in the trunk is not extended in place, the car won't let the top go down, and the LuxLink module can't override this...it's essentially just holding the button down for you. However, if there's some interlock that's not letting the car put the top down (like the tonneau cover), the light on the top switch should blink, telling you "Hey, something's not right". If you press and hold the button, and the red light on the switch is on solid but the top isn't moving, it's time to head to the dealer. If the light's blinking, it's probably either the tonneau cover not seated properly in the trunk (make sure BOTH sides are slid all the way in place) or the button in the glove box is in "valet" mode...which disables both the retractable top and the button-on-the-dash trunk release. Good luck and let us know the result.2 points