Leaderboard


Popular Content
Showing content with the highest reputation since 04/27/2017 in all areas
-
I was also sold this "invisible" ad on! Only to be told by the dealership "after" that it's not adjustable. So basically it's just a dimly lit thin strip! This should be included. Lexus could and should've done better!4 points
-
3 points
-
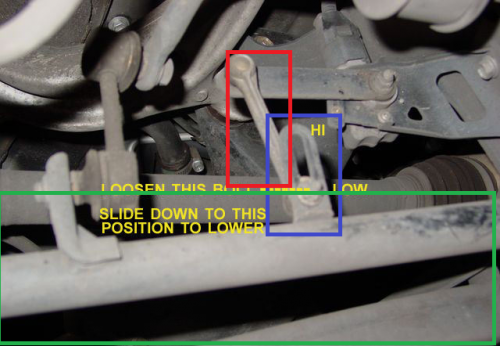
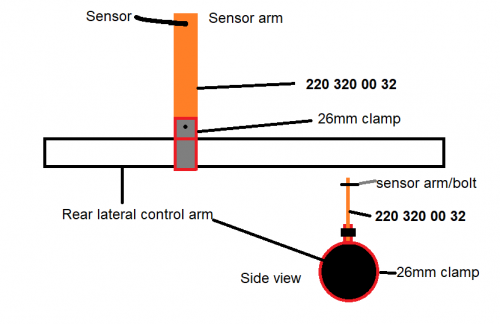
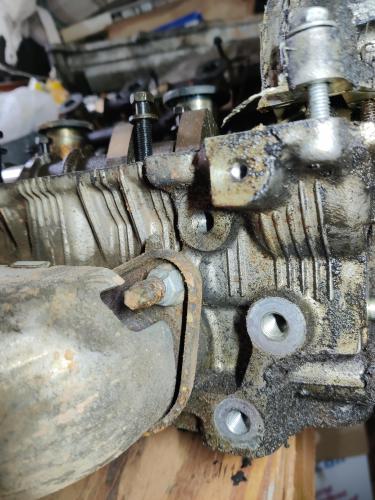
Hi. Some friends of mine suggested that I should post this here for more people to see. Hopefully it'll help people for years to come. You will need: About 50 bucks budget for the balljoint rod and the pipe clamp. Height sensor with bracket. 10mm wrench Washers that fit 10mm/M6 bolts. 10mm/M6 nuts Some smaller (8mm wrench) I own a 2001 LS430. The height sensor control arm's slider has rusted and become damaged over the last 19 or so years. The ball joint rod to the height sensor has also seized too. The height adjustment rod there in the red was seized, and the height slider in the blue was badly corroded and broken off. Rather than buy an entire control arm (green) this is an alterative method to repair it The arm is ~26mm in diameter. Buy yourself one of these pipe clamps in 26mm diameter. Or make one. Shouldn't be expensive. The hole needs to fit a M6/10mm bolt. Grind off the remnants of that slider from the control arm, and slide the pipe clamp over, and put your 10mm/M6 bolt and nut through and secure it in place where the slider used to be. Rather than using the control arm as a slider, we can instead use a sliding ball joint rod such as this one; This is a 220 320 00 32 from Mercedes - a height adjustment rod with a 8mm locking and a 10mm/M6 ball joint bolt. You can pick one up off eBay for cheap. Or find some other M6/10mm adjustable ball joint rod. Look at the diagram and try to imagine it in your head. This is what your bracket and rod/clamps should look like. One day I might snap a picture of what my repair looks like, but I hope you can make out what I mean via the diagram. This repair should be very easy. Maybe some sanding/grinding and surface preperation. The clamp will hold on tight and is easy to replace. The adjustable link rod will last longer and allow for easy adjustment, and less risk of corrosion damage. Hope this helps. This is a fairly easy job and took me less than 2 or so hours to do.
 3 points
 -
Did I mention this?..... I don't like the fact that our governments plan to force us to buy EVs. I wouldn't mind having one, as we already have solar panels and don't pay for electricity, but I think we should be able to choose what we drive (within reason).3 points
-
At the part store they run a load test on the battery that mimics a big draw. If it holds up to a certain voltage it means the battery itself is not weakened yet. As the battery ages it will weaken as in not be able to supply a given amount of cold cranking amps. When its cold the oil thickens some thereby making the engine have to work harder to rotate. Hence the term "cold" cranking amps. I'd say you should investigate why the check engine lamp is lighting up. It could be a sign of what is taking place to cause your car to struggle to crank over. The part store can often "read the code" and determine why the CEL is lighting. My gut tells me your voltage regulator in the alternator is hit and miss. A long time ago that was a little box on the fire wall or fender. These days they are inside of the alternator. It determines how much electricity goes to the engine to keep it running and to the battery to charge it. It only has to be off by a little to keep the engine running but not have extra to charge the battery. Another issue could be a parasitic drain. An out of the ordinary draw on the battery when the car isn't running. In my 04 GS 300 for example the CD changer kept trying to change discs and the seat memory kept activating. Now I could not hear the disc changer nor was the seat memory moving the seat, but they were drawing on the system leading to a weak or dead battery if I didn't drive the car every day. Yet another issue may be short trips don't allow the battery to charge enough. Example; start the car, drive to a store 10 minutes away, finish there, start car and drive 10 minutes to another store. Never giving the engine a good 30-45 minutes to charge the battery back up to the voltage used to start the car can also lead to the hard to crank or dead battery issue. Hope you find it soon and it's a cheap and easy fix.3 points
-
No reason to upgrade, Those stock wheels are Classic on the SC 😉3 points
-
But you love the Covid virus? 🙄3 points
-
I just installed the rr racing supercharger. It’s the only way to go bud3 points
-
That one is my son's new puppy. Her brother came home with me Chocolate lab mom, stranger in the night dad Yesterday they played all afternoon.

 3 points
 -
Purchase has been made!...I could not turn down the deal I got & the actual ES...2020 ES 350 'premium' with only 11k miles in Nebula Grey Pearl (windows are already tinted)....over 2 years of full factory warranty remaining; 1 owner, full service history & Lexus CPO. Our 'premium package' in Canada is equipped quite differently than our friends south of the border....with more features / standard equipment. Originally I wanted the UL package....but in these parts, they are very rare (I reached out to 17 Lexus dealers in a 400 mile radius of me...the UL units that are available are 5 to 6 k more & only about 20% are actually at Lexus dealers...the premium pkg checks 95% of the boxes I was looking for....as the expression goes 'don't look a gift horse in the mouth'. I literally have a 6 minute drive to work... I pick the car up this Saturday.3 points
-
I like it when I'm trimming a rose bush, grab one to place in a jar and while heading indoors the Mrs arrives from work so I hand her the rose. Or when I come from work and the dog greets me at the door, tail all wagging-like. And the parrot says "welcome home"…… Or when a nice breeze blows just as the grass cut chore is over and the Mrs brings out a tall glass of ice cold spring water. Or when a new baseball cap fits my noggin just right without adjusting it. Or I step on the bathroom scale expecting to have gained weight but the scale shows I actually lost a little. Or when my son and I went to do the first start after an engine swap, expecting a hard to start issue but ole bessy fires right up. Or when the lawnmover starts first pull……again. Or helping out old people. Or thanking a soldier/veteran. Or tipping the person at the toll booth. Yes I stop and pay in cash so I can do that. Or when the voicemail on your phone was not a robo-call and instead was a friend telling you "hello, here's my new phone number" Or when you sneeze and a perfect stranger says "bless you". Life is short. But smiling makes you live longer. Trouble with being dead is it lasts so long.
 3 points
 -
The cost of dental work, especially deep cleaning by laser and periodontal surgery, but also including implants.3 points
-
That's the view when I pull into the driveway after work. Unseen in the photo is the dog wagging his tail "it's that guy, he's back, yay!!"3 points
-
Update: I think I have got it after all the work, time, and money spent. I started checking again I found an unbelievable vacuum leak around lower intake manifold. replace gasket today runs great thanks for all of the support. something that simple fix. when the engine was swap the starter was replaced. The gasket moved or something apparently cause a vacuum leak. I had no idea a vacuum leak could cause random misfires. I was sure it was an ignition problem.3 points
-
Hi all, I believe I have posted here before a long time ago with my old LS430 LEX, I now have a 2007 LS460L with 110K on it now. I have owned it for a few years now, since 65K miles, and recently I started having acceleration/hesitation problems. I did alot of research, and didn't find very many good answers. I did have the transmission and engine ECU update flashed, with some improvement, but after that didn't solve the problem, I was convinced it was the cylinder head replacement deal, which was way out of my budget with 5 kids....and I thought it was ridiculous that a flagship sedan would need that kind of serious motor work with just 100K on it. Anyway, my mechanic suggested BG 44K fuel system cleaner, NOT available at places like autozone. He sells it for $28 per can, but I found on Ebay for $16.75 and up with free ship. First and foremost, I ALWAYS used quality, premium gas (Shell V-Power or QT), and Techron additive from time to time, so I was super unconvinced about his recommendation. I had even listed my LS for sale, again, convinced that the motor had cylinder issues after reading blogs about LS460 acceleration issues. Also, for the record, I have NO affiliation with BG or anything like that. THIS STUFF WORKS! It truly fixed my hesitation problems, completely. I am no longer selling the car, and am happy again, as it accelerates like it is supposed to. Feel free to read many other peoples reviews on this stuff, its amazing and really seems to work. After i drove it to wrok (25 miles one way) I thought i felt a difference, by the drive home, I KNEW I felt the difference, after the full tank, i was truly smiling. I have ordered 4 more cans for my other vehicles and boat, and suggested it to my friend with a ISF, my brother with an SC430, and my buddy with a Vette. I guess these LS460 cars are just picky after a while and maybe the injectors get gummed up? I don't pretend to be a mechanic, again this was suggested by my Lexus mechanic, After alot of depressing research with no real answer, just wanted to share my experience with any other LS460 owners, as it is a beautiful car, and I was disappointed in what I was thinking the problems I had. It was the best $17 I have recently spent, and if you are having similar weak/lack of acceleration or hesitation issues, i would say TRY IT for less than $20. I believe you can go to BG's site and find a local dealer, again, not autozone or O'Reilly or anything like that, says professional use only lol. Also, need a funnel, comes in a coke can basically. Just my 2 cents, hoping to help out any other LS460 owners out there depressed about their car, it seems most people just said they'd trade it in and buy a new one, but I'm not that rich :)
 3 points
 -
My Daily 😀
 3 points
 -
The Lexus brand cell phone that was a dealer installed option lowered the HVAC fan speed and muted the audio system while a call was in progress. I even connected an aftermarket Nokia CARK-91 phone system I installed in my second (2000) LS400 to mute the audio system but I didn't bother to connect it to lower the HVAC fan speed. Even when a Lexus phone system was never installed, corrosion of the factory installed cell phone harness in the trunk can cause HVAC and audio system issues.3 points
-
20 years ago I swapped a domain name for a Lexus. The love affair started and I am now on my 10th Lexus3 points
-
And Because We All Love Pictures 🙂


 3 points
 -
My Lexus is my weekend car. My daily is my 2009 Mazda 3i.
 3 points
 -
2 points
-
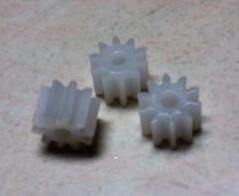
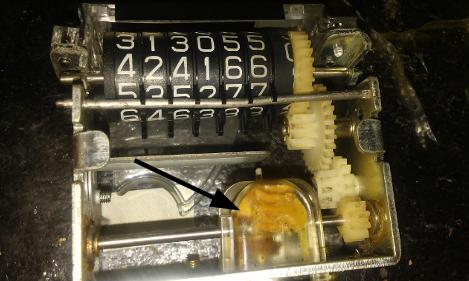
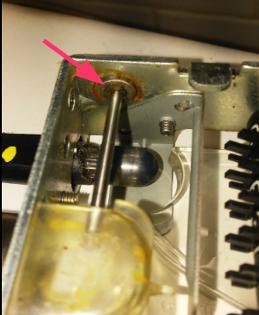
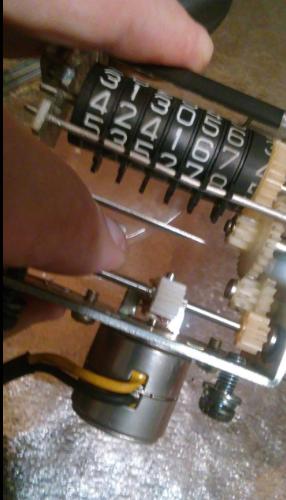
I have not seen this posted here so I'm going to try. Like many, my odometer quit around 160k. Taking it apart I found the spindle gear cracked and in pieces, but the drive gear on the motor was fine. I replaced the spindle gear with a 10 tooth nylon gear I bought off ebay for less than ten dollars and it's still working after a 100 miles. It's important to use a 10 tooth gear, as my first attempt was a 12 tooth gear and that did not work. The hardest part was getting the dash out. Those electrical connectors are tough. If you attempt it be sure to disconnect the battery before starting for at least a few minutes or you run the risk of fouling up your air bag light. Another Couple of tips - In order to get the spindle out you will have to remove a very small e clip (see photo). Be careful, if you push to hard it could go flying and is very hard to find on the floor 😞 . You will also have to ream out the center hole of the gear to get it to fit over the spindle. The spindle is 2mm diameter and even though the gear I bought said it had a 2mm hole it would not fit. I used a 5/64 drill to ream it just slightly and it was a tap fit to get it to the splined shaft area in the middle. I realize the new gear is not a screw type gear like the original gear but it is only 5mm wide so it appears to be working without binding.
 2 points
 -
I changed my oil but haven't changed the transmission oil yet. Haven't had any issues with it till recently. I have owned it for a few months now and it just started to act up by not wanting to shift into fourth gear. So it's been parked for the past week. i have just started reading so much on this vehicle that I'm excited then worried then relieved as I continue to learn more and more. I never had any issue so I would chalk it up to I must not know how to read the dip stick or did I understand it. I am so glad I found this group, the fact that I get replys with their past experiences or some what of a direction that helps. I'm waiting on a mass air flow sensor and new coils already did the plugs. Then with I forgot how many videos I must have watched, but I swear it took me longer to change out 2 of the back plugs then it's takin me on any other vehicle to do plugs, oil and filter for both engine and transmission. They make it so that you have to take your vehicle in to a dealer.2 points
-
I reached out to the place that sold me the car and they recommended a locksmith they use. He provided same day service, cut 4 keys for me, and programmed them All in for $160. Thanks for the help!2 points
-
It's cheap in the view of things. I don't want to have to replace this motor. I shopped for 9 month before buying my SC430. I have done maintenance that it turned out had already been done. I'm not going to call the prior owner with these types of questions. I save those calls for important stuff. So I did all the fluids a week ago. engine oil it was due and I knew it from the miles I had put on. Transmission fluid was perfect when I dropped the pan, no burnt smell, no metal on the magnets in the pan. Cleaned it all anyway, changed the filter and gasket and added 6 quarts back in. But perfect fluid should have been my clue that it had been done. LOL Get back to the differential, and you guessed it, dumped out perfectly clear, like new gear oil. Let it drain anyway and refilled with 2 quarts. I think most people with these cars keep the maintenance tip top. That is a plus in my book. I intend to keep this car so I like knowing where it stands maintenance wise. Yes it costs a little money but I do believe it helps the cars last. And that's why I picked a Lexus and not a Mercedes or other cars of this type of styling. If you want to gamble on maintenance there are plenty of other models of Lexus cars or others out there to do that with. But I bought this car because it's becoming a classic and its got the Toyota drive train. I plan to keep the car the rest of my life and enjoy it for all that time.2 points
-
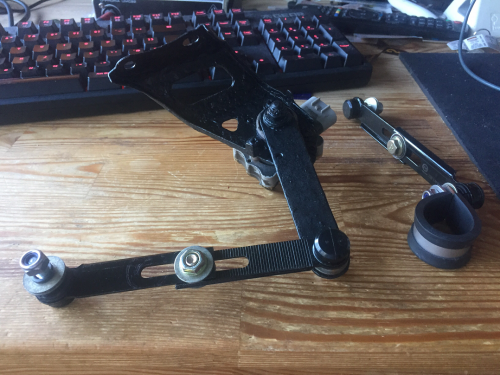
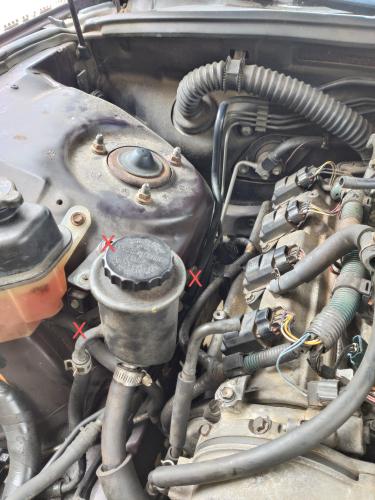
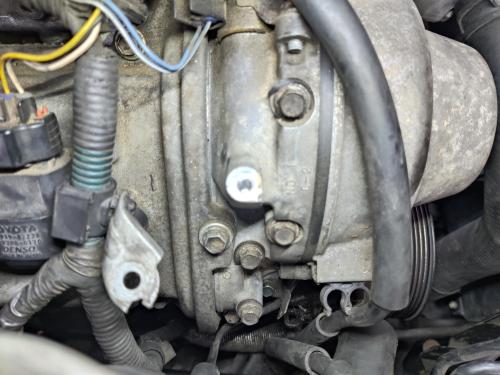
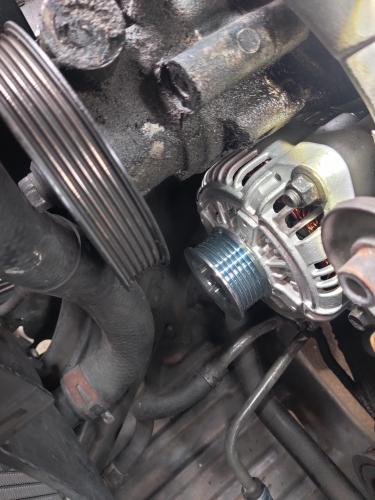
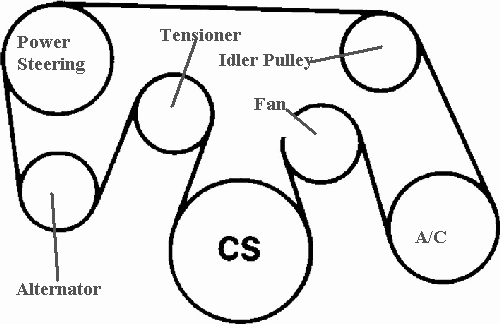
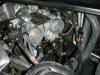
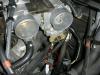
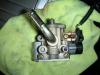
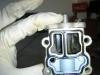
Back again with photos. Full disclosure, some pulleys and wiring brackets are removed in the photos, you do not need to remove anything that hasn't been mentioned, they're just taken off to have a better line-of-sight for the camera. Installation is the reverse of removal, and everything slides together fairly nicely. 1. You'll start by sliding the alternator onto the stud, letting it hang. Don't slide it back until you've plugged in the connector on the back and slid the rubber boot over top. Next, you can shift it back further and get your charging cable attached. There was not torque spec in the manual (that I could find) but good practice is to tighten the nut for the charging cable until you can't move the cable side to side. Slide the boot over top of the charging cable after it has been secured. If you were able to disconnect the wiring bracket on the alternator, reconnect it. If you cut the tape, peel off the old tape and wrap new tape around the mount and harness. Next, slide in your bottom alternator bolt and hinge your alternator side to side, lightly pushing on the bottom bolt to find the threads. Once you have both the nut and bolt lightly seated, you can torque them both to 29 ft-lbf. This is what you should look like at this step. 2. Re-install your power steering pump. The pump will slide straight back, if you meet resistance, double check that your reservoir isn't caught on the cooling hoses attached to the coolant reservoir, and turn the body of the pump on the stud to make sure the mount isn't colliding with the cylinder head. The bolt holes are a bit tricky to find, but for reference, the top hole of the two is directly beneath the widest portion of the valve cover, pictured here: The lower bolt is tucked a bit further and just slightly towards the rear of the vehicle. Here's a photo of the mounting holes on a spare cylinder head I have on the bench: Once all three fasteners are lightly seated on the power steering pump, go ahead and tighten them up. The torque spec is 29 ft-lbf for the two bolts, and 32 ft-lbf for the nut on the front. Go ahead and secure the three bolts holding your pump reservoir in as well. If you're reading this guide ahead of time, the bolt holes are marked with a red "X". Make sure you don't miss the one hiding underneath the coolant feed line. 3. Re-install your belt and cooling fan/ fan clutch. Attached is a photo of the belt routing (you should also have the same routing diagram attached to your hood). Torque spec for the fan clutch nuts is 16 ft-lbf. When you install your belt, make sure it is sitting in the grooves properly by hand. If it is misaligned, it can jump off when you start the engine and damage components. 4. Install your air ducting and vacuum/vent hoses, and reconnect your battery cable. You'll need to go through and re-set your clock, radio presets, and memory seats, but other than that, your job is (almost) done! 5. Check your charging system Your alternator is installed, but verify your system is working before setting off down the road. With the engine running, you should have about 14 DC volts. Double-checking this now is the best way to keep from immediately getting stranded with a dead battery, and while you're checking it, you can listen for any abnormal sounds from your engine. Torque values: Alternator mounting nut and bolt: 29 ft-lbf Power steering bolts: 29 ft-lbf Power steering nut: 32 ft-lbf Fan clutch nuts: 16 ft-lbf
 2 points
 -
Much less likely to get shot due to reaching in glove box2 points
-
OK, All looks good now...Thanks a Mint ^^^2 points
-
My goodness. Haven't read all the back and forth, but 50 years plus of being a mechanic means you should RUN, or have it towed asap from the current shop. Reasons: No car in the history of the planet has 3 coils go bad all at once. Not possible to diagnose injectors unless they are pulled and flow tested. Head gasket problems are relatively easy to diagnose on the V6. Since head gaskets don't blow simultaneously, unless you SERIOUSLY overheated the old girl, the sparkplugs on either bank will be utterly absolutely clean, cleaner than the other bank. Really, the best way to QUICKLY check a bad head gasket is to smell the exhaust. A sweet smell, obvious as hell. Timing problems, more than likely. Car can easily be saved with a competent mechanic. Don't be afraid to pull out of the shop -- money spent is money gone. Which is why is use YELP, etc. Good luck.2 points
-
I like giant Tonka toys
 2 points
 -
I like puppies
 2 points
 -
Exactly, Dave! The technology and geo-politics are changing so fast that you really want to slow down and ask the what-ifs. And with all the extra weight in the various plug-ins, tires will wear faster and generate more heat. Can't forget the Ford Exploder that kept blowing out tires because Ford and Firestone could not settle on a reasonable weight limit for the specified tire (depending on which side you talk to, of course). Engineers are only human...2 points
-
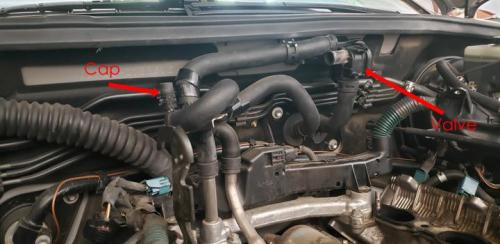
I think that cap is actually a left over tap for some funky hot water defroster.
 2 points
 -
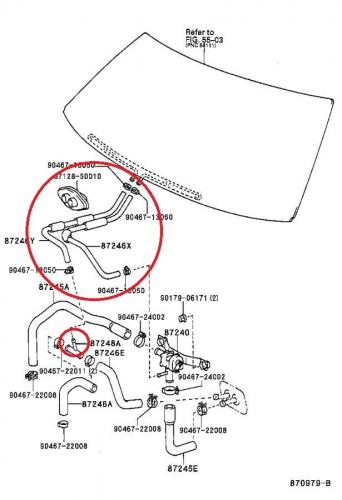
A new one can be found here.... I have used this supplier from their Japan located warehouse. worked well. https://www.amayama.com/en/part/toyota/81740500802 points
-
I've posted this link, quite a few times within the last few years. Should You Get an Extended Warranty for Your Car? - Consumer Reports Essentially, if you insist on buying a known unreliable brand (like Tesla, Mercedes, Audi, BMW, Alfa Romeo, Jeep, Chevrolet, Ford, etc), then an extended warranty may be a good idea. Better yet, skip buying a vehicle from one of the aforementioned companies, altogether. I went through the same type of sales pitches you did when my daughter was buying her first new car, a Subaru. Your intuition is right in that if the salesperson is pushing hard to get you to sign, then the dealership profit margin is almost definitely very high, due to infrequent use of the policy by the consumer. I advised her to keep saying no. One of my sisters recently bought a used Lexus and the sales/finance person did the same thing. She called me and of course, I told her that she should pass. You did the right thing.2 points
-
Very nice! Is that a metal cup? You should also be able to find T-shirts with the Lexus logo. I have a Mazda one. There's a custom t-shirt store nearby. They can apply any kind of image to a shirt or shirts of your choice. I had them make a couple that are super-soft 100% cotton.2 points
-
You should try this for a month: Terra Kai USDA Organic Juce Super Fruit & Veggie Powder, 12.2 Ounces | Costco2 points
-
No manual release, Maybe this will help2 points
-
Here's what I found about the one in Colorado https://www.ksedenvervenues.com/event-locations/ball-arena/club-lexus/ Looks like a cool spot to enjoy a nice meal with friends or colleagues. Welcome to the site.2 points
-
Funny you bring this topic to light...I use them to store parts when I disassemble a watch, Keeps groups of parts separate before cleaning. I also use for small batch paint mixes 🙂2 points
-
Hi, I figured it out. There are 3 connectors to the door ECU. The far right connector that is closest to the door latch was not snug. I believe this is what controlled the auto-up/down feature. I retraced my steps and with help of other's suggestions, I found the problem and the window works now. Thank you.2 points
-
I'm sure a lot of us have heard about Matt Farah's legendary million mile Lexus, but have you heard of the 1,400 Mile 2005 Lexus LS430? Well, it's in the Philippines, and probably one of the lowest mileage examples in the world. See it here on my YouTube channel: https://youtu.be/aDijYmBzzhI https://youtu.be/aDijYmBzzhI
 2 points
 -
I have that level of tint on my 2002 ls430. The interior really does look pretty much new. It has 185k but looks like maybe 10k. It's a new car to me but the tint was on it when I bought it and I think it had to help keep it so nice.
 2 points
 -
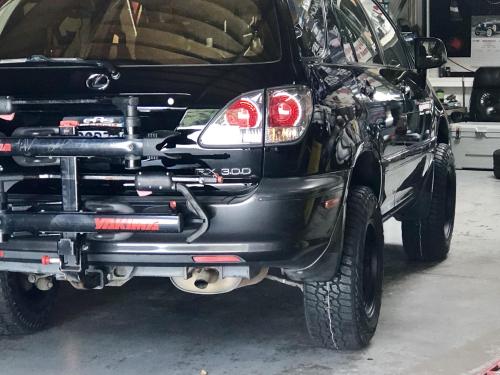
New to foruM I’ve been off-roading my 99 Rx300 for some time. I have some mods and some other stuff


 2 points
 -
Did something today...2 points
-
We got 274,000 miles out of our 2001 RX 300. The engine was running like a top but the transmission failed. With that amount of miles, we sold it to a junkyard. Then I spent two months looking for a replacement. We wanted a 2009 RX. I just can't get around the weird looking 2010 and newer models. All the '09 Rx's I saw were more than we wanted to spend. Then another 2001 RX showed up as a trade in at a local dealership for $2000 with only 125,000 miles on it. Come to find out it had a rebuilt title for a minor front end collision in '04 and the dealership just wanted it gone. So I drove it and as soon as I left their driveway I felt something slip. There was snow and ice about and I was on the way to my mechanic so I thought little about it. After looking over the car my mechanic said If I didn't buy it he would. He really didn't check it out as I would so I really put it to a little extreme use and noticed the tranny slipping again. A friend of mine has a tranny shop and we figured we'd get the tranny replaced for $4200 and pay the $2000 (Damn dealership would not come down anymore) for a total of $6200. We came real close to buying another 1999 RX for $6400 with 145,000 miles and it needed a timing belt replaced. Now we're driving the new to us 2001 RX for a week and a camshaft snaps!! Engine wasted due to metal everywhere.. This was supposed to be my daughter's car to go to college with. What NOW!! I'm sure you can guess, we bought a remanufactured engine that is being installed as I write this. We will not have a $10,000 2001 RX 300!! The moral of the story is keep your RX 330 if its running great and just needs a few things now and then, I hear some of them will go to 350,000 miles.2 points
-
Trevor, Thanks for the info. You were correct, I had not connected the temp sender wire. It is a bugger of a thing to locate and even more difficult to fit the connector when the entire loom is in situ. The sender unit is tucked in behind the plastic spark plug channel. Done now, so everything is fine. Thanks again, Alan.2 points
-
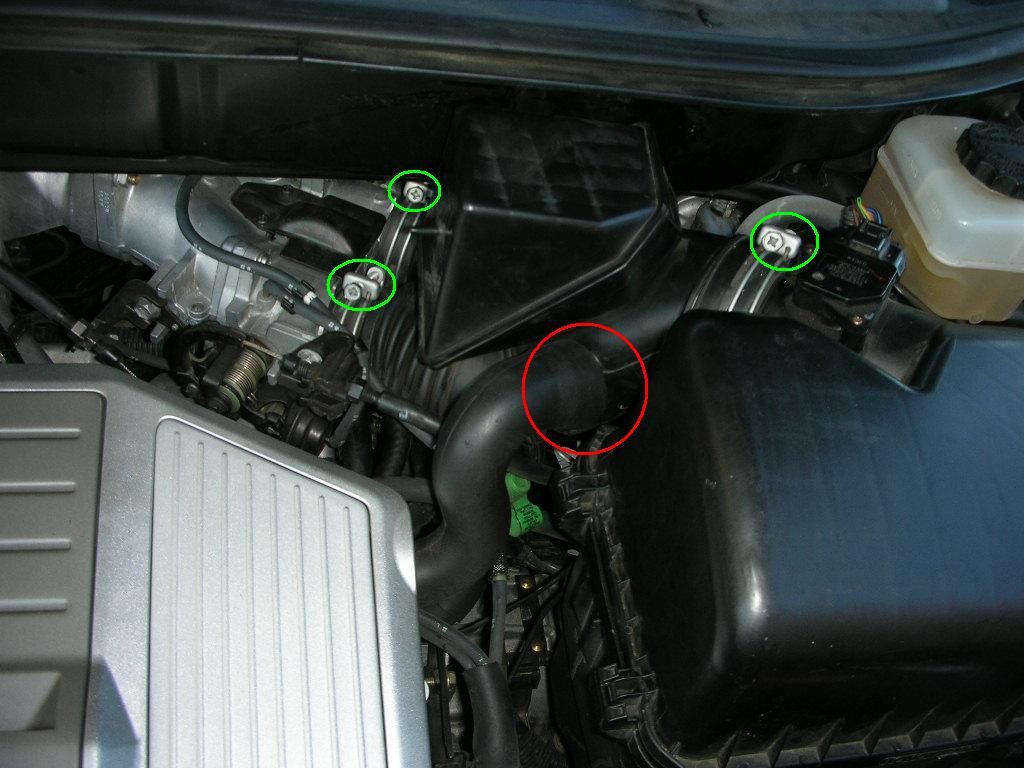
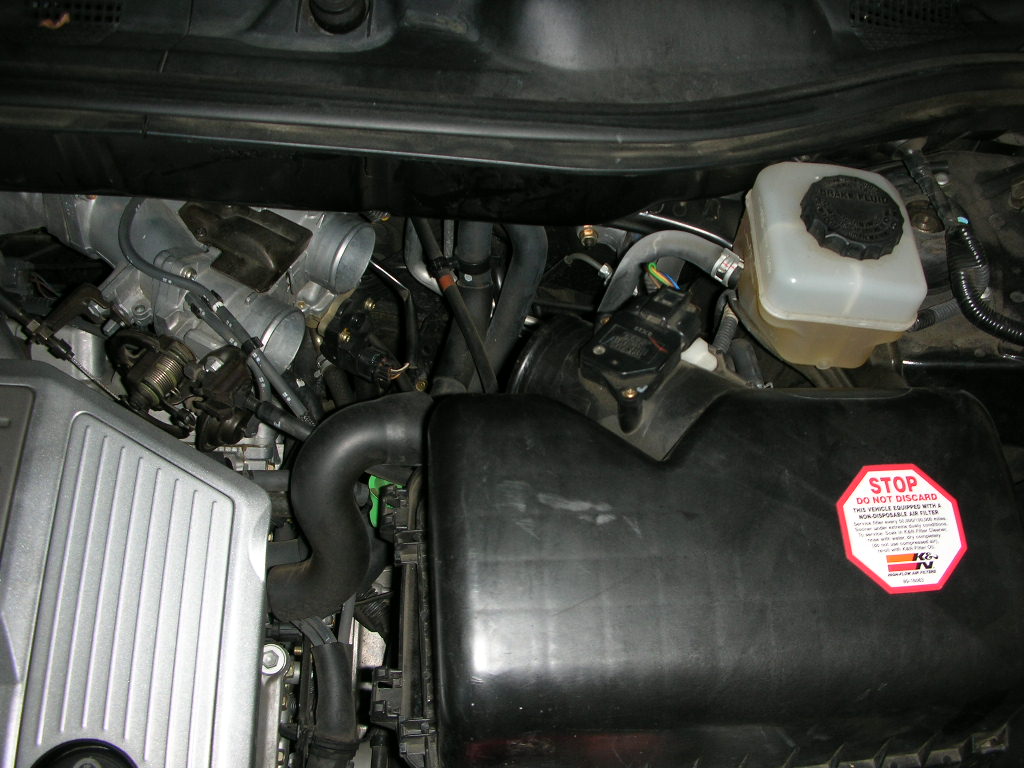
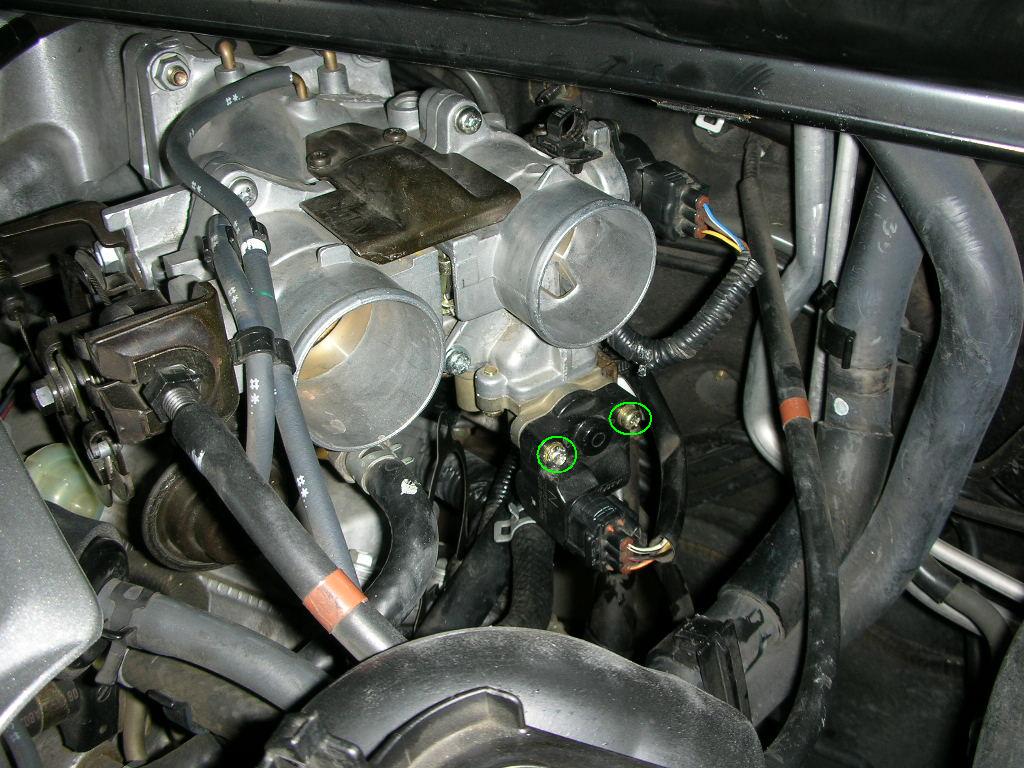
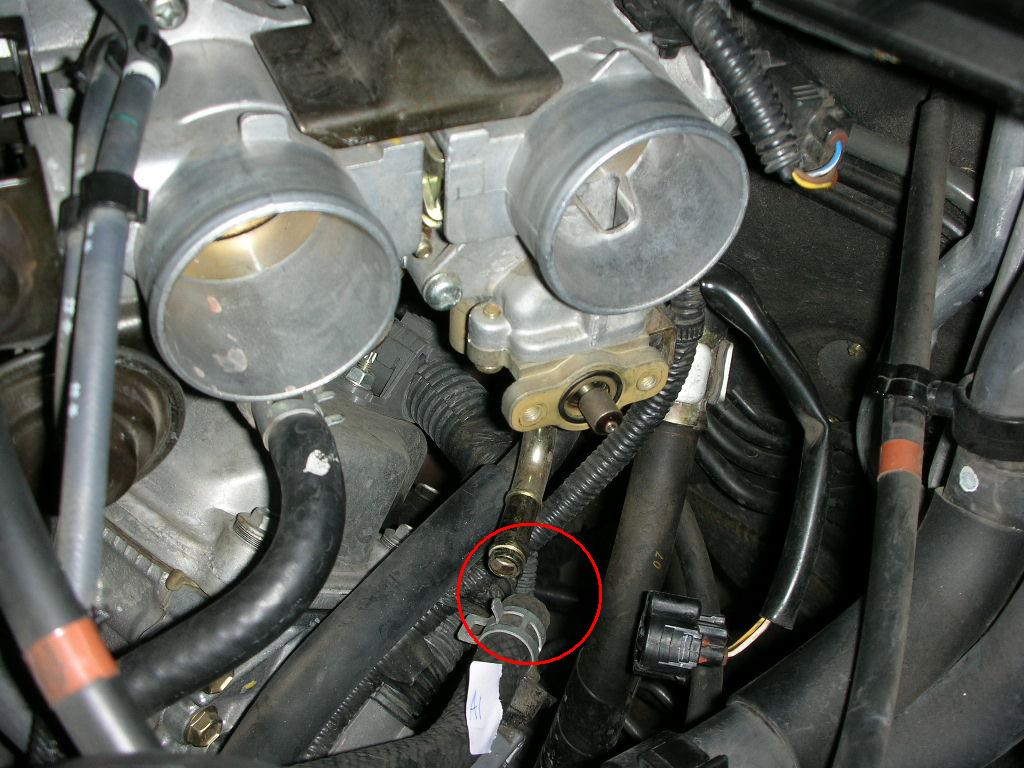
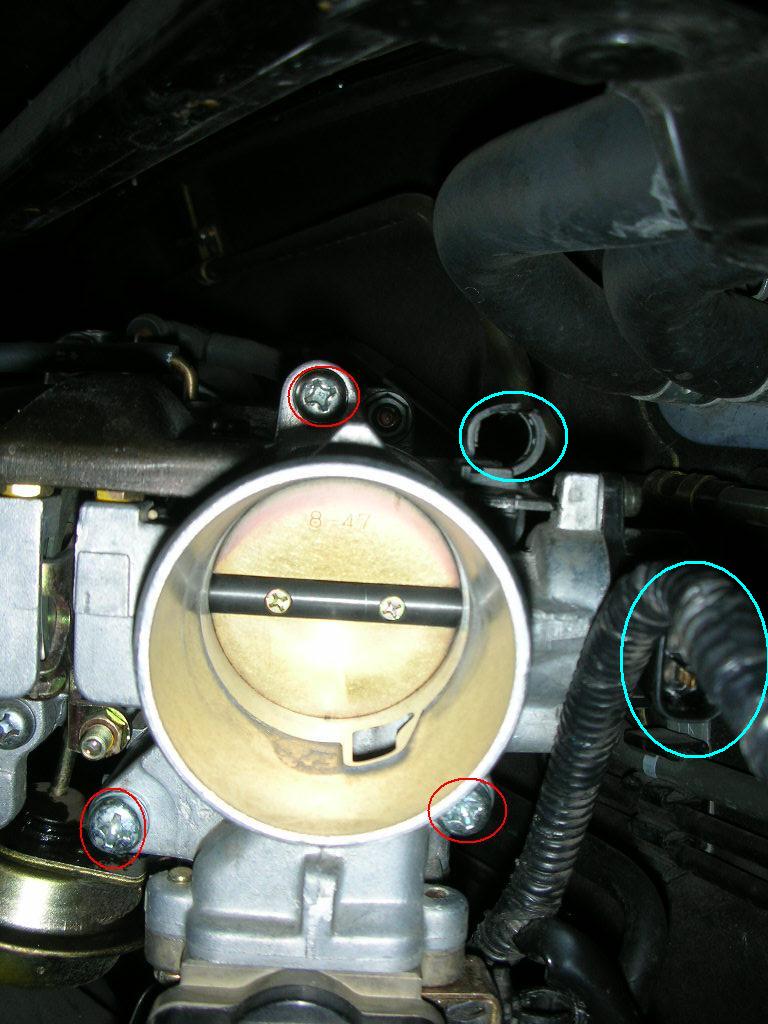
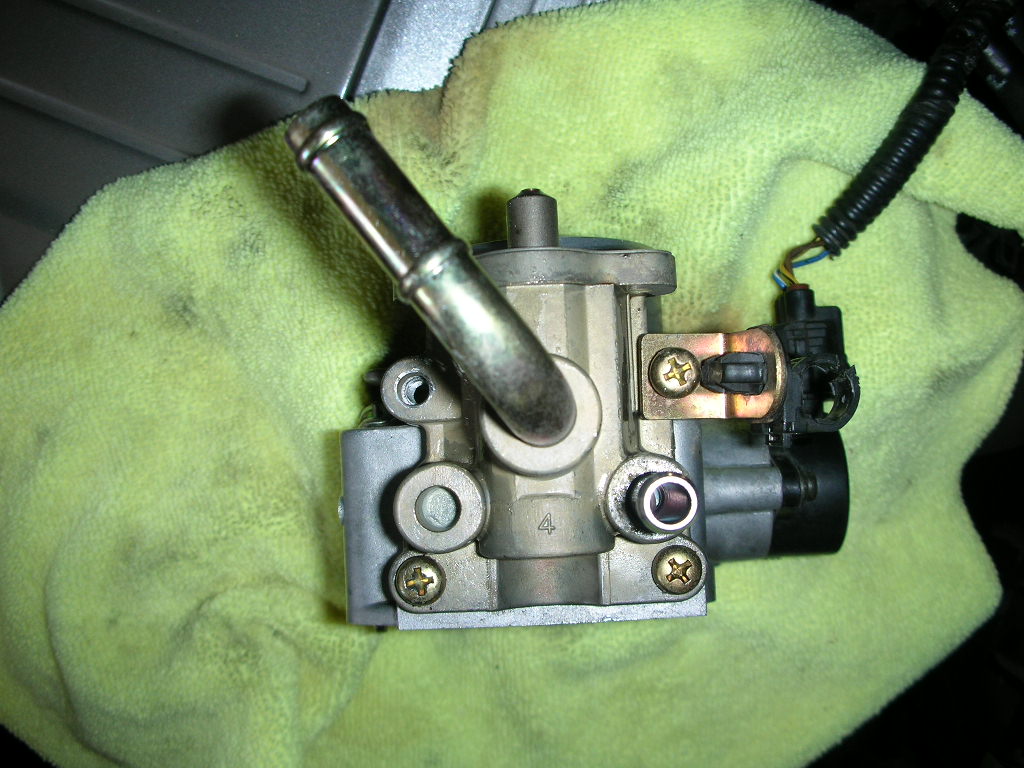
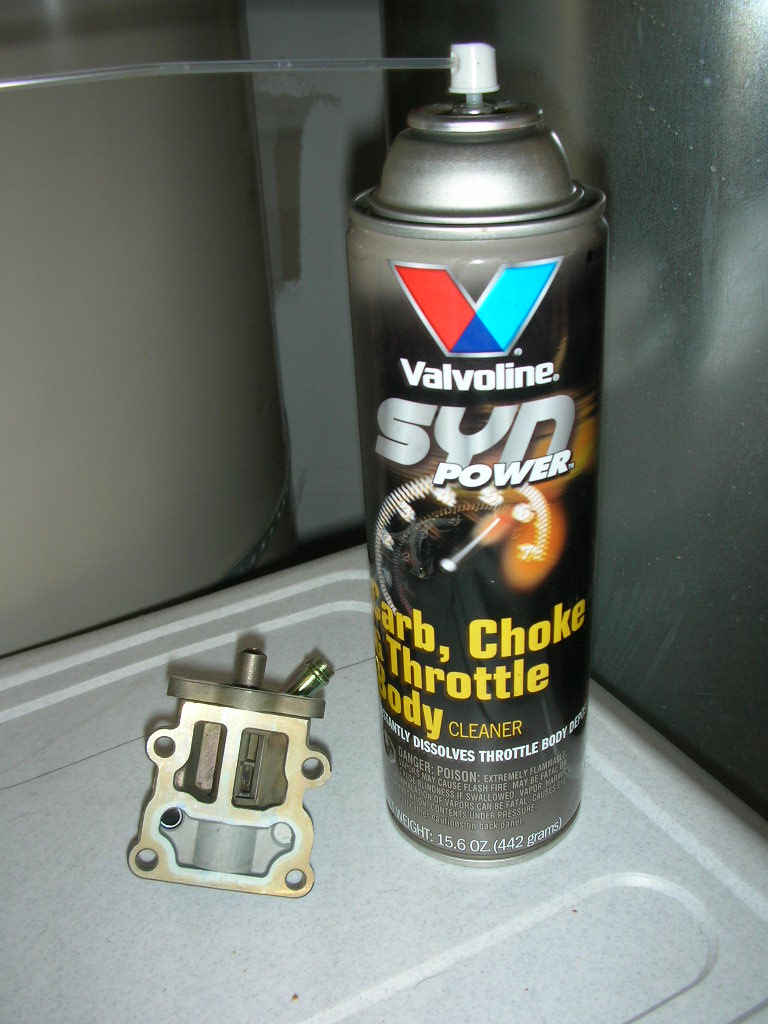
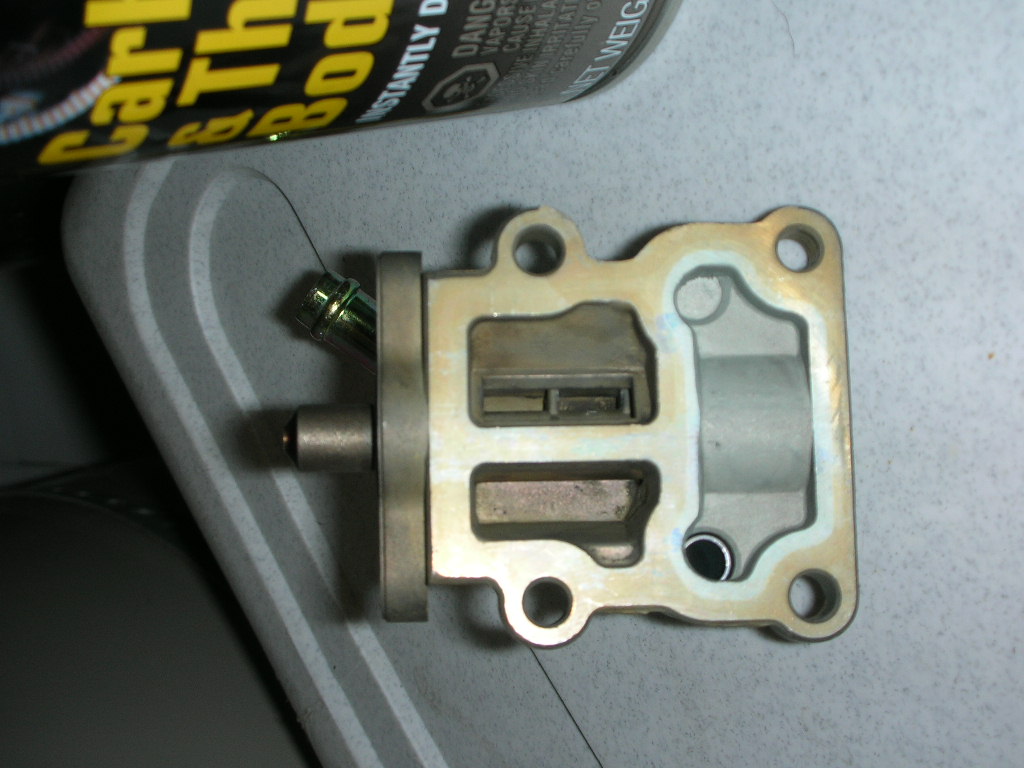
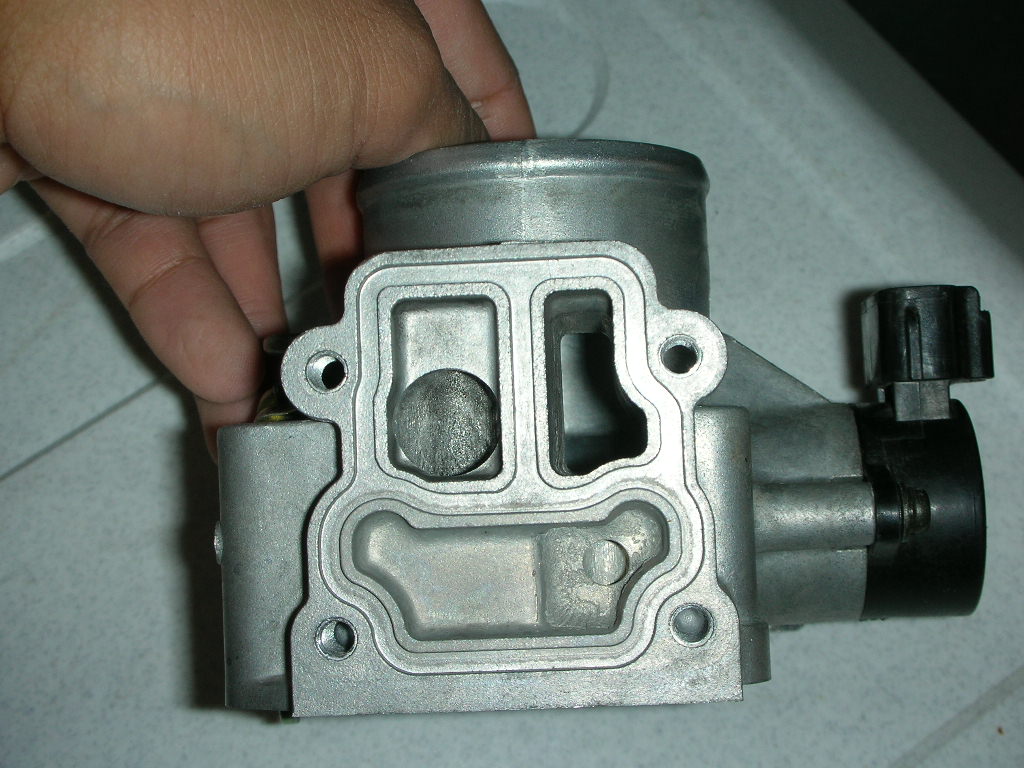
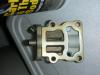
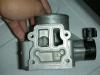
Hello Everyone, I know IACV has been a huge topic on the forum and I have found various pictures in the RX forum and ES forum on the idle air control valve (IACV) or as others call it the idle speed control valve (ISC). However, I have not found a "step by step" posting to date which definitively shows how to clean this thing so that my car stops giving me idling problems. Symptoms I have had included: - low and rough idling that would cause the car engine to start shaking after starting the car - this eventually got worse to the point that when I start my car, it would not idle unless I gave it gas - idling problems for me tended to occur more often after my engine was warm or had been sitting in the sun I hope these series of postings help you fellow LOC members out there. You've certainly helped me in the past so here's my two cents at this common problem. Additionally, the instructions I give are the way in which I have cleaned it myself. As you go about and attempt this, you may find better ways to do so. Please add and refine my instructions/terminology as needed. I am not a professional. I've only changed my oil, air filters, and conducted minor maintenance previously. The bottom line is that if you have the right tools, you should be able to do this. This discovery/ cleaning took me about 2 hours to do cause I ran into problems and there were major steps left out in previous postings that I’ve encountered read. The next time I do this, I believe I can get this done in about an hour or less. Tools Needed: 1) Tightly fitting Philips Screw Driver 2) Carb cleaner that is O2 sensor safe (I've seen CRC. I used Valvoline Carb Cleaner) 3) Locking Grip Pliers (definitely helped me remove the factory tight screws) 4) Small brush for cleaning 5) Towels for cleaning 6) Pliers (help removed brackets holding the hoses) 7) Latex gloves helps with limit the messiness. * I used the same gasket and did not replace it. No problems found. 1) Remove the hose that comes from the engine/motor that connects to the air intake hoses.( Hose is below in red – we’ll refer to this as Hose A) When you pull back the rubber hose covering, you will see that a metal bracket is holding the hose pretty tightly in place. Use the pliers to clasps the two metal pieces together to loosen the bracket and pull the hose loose. You can also do this by hand if it’s easier for you. 2) Upon removing the hose, you will want to remove the two air intake hoses. Loosen the three screws above in green and remove the hose. Below is a picture of the intake hoses removed. 3)After removing the intake hoses, I opened the lid to the air filter and moved this to the side of the car to create more working room. I believe there are two clips on the right holding the lid in place. Just pop the two clips and move the cover to the side. I also took out the air filter and temporarily moved this to the side. 4)After removing the intake hose, the throttle body/IACV/black electric coil is revealed. At this point, I removed the black electric wire from the black coil. Once the electric wire is removed you can remove the black coil from the IACV by removing the two screws. Note, the screws are factory tight so use a tight fitting screw driver to remove the screws. One of my screws was partially stripped from the dealership’s work, so I had to resort to my locking grip pliers which helped out tremendously. After removing the two screws, the black electric piece pops right off. When the black electrical coil is removed from the IACV, it exposes a small pencil sized metal stud. You will also notice a washer that sits on this stud. Don’t lose this washer. Take it and put it aside so it doesn’t fall off when you continue on in the next steps. 5)Additionally, I removed the hose coming out of the IACV. We’ll call this Hose B. This hose can be removed in the same manner by clamping the bracket and pulling the hose out. You will see that the hose is removed below. Below are pictures of before and after. 6)Here is where the fun begins. I initially attempted to remove the four screws attached to the IACV at this point, but found that after an hour, this would be nearly impossible to remove considering the location of the screws were in an extremely tight spot. The only way I would be able to remove the IACV is to remove right throttle body. Not as tough as it sounds. Three screws need to be removed to accomplish this. Again, be careful when removing the screws. Also you will see I removed another electric plug and I also cut a tie wrap. Once you complete these steps, the throttle body/ IACV comes out pretty easily. Note when you remove the throttle body, there will be one LAST hose connected to the IACV. Be careful when you remove this hose as radiator fluid may spill. Some of my fluid spilled out so I just refilled my coolant after I was done. 7)Below is a picture of the bottom view of the IACV. You now can EASILY remove the four screws connecting the IACV to the throttle body . In the picture below, I have already removed one of the screws. Once the four screws are removed the IACV and throttle body separate. Now you can clean both of them with your carb cleaner, brush, towels, cotton swabs etc…. Picture here is before I the cleaning with all the muck inside Pictures after I cleaned the IACV and throttle body This last picture is the post throttle body cleaning 8) Once you are done cleaning, just put back the throttle body/iacv the same way you took it off, and put everything back in reverse order. Ensure the gasket is in place. Also, ensure you put the washer back on the electric coil. Make sure you place hose A & B back and ensure the electric plugs are back in their original position. Once these things are in place, then it's all about putting the air filter/hoses back and you are good to go. If you have lost any coolant, make sure you refill it to a safe level. After completing this cleaning, my car starts up without any problem and idles as if I just purchased the car brand new. Replacing this at a dealership would have costed me $300-400 easily. Let me know if you have any questions. Cheers (Also, I tried to post these as separate replys, but the software combined all my replies into a single reply and did not keep them separated) *Edited the posting to have the pictures follow step by step in sequential order*


 2 points
 -
Incredible shots Steve!!. Looks like a wonderful trip.2 points