


Jeremy M.
-
Posts
41 -
Joined
-
Last visited
-
Days Won
2
Jeremy M.'s Achievements
")


-
Just coming back with an update, as it looks like this is going to turn into a how-to post. I have found other posts on separate forums suggesting the shift solenoids could be the root cause, which was honestly my hope. With that in mind, I drained out the fluid (surprisingly dark, the fluid has been changed regularly and was last drained/filled about two years/20k miles ago). Removing the transmission pan was a tight squeeze against the exhaust mount on the bottom of the bell housing, so that was removed as well. Once that was off, the filter was removed for inspection, and no debris was inside the filter or on the magnets inside the pan. The magnets did have extremely fine metal stuck to them, but no abnormal chunks or aluminum shavings in the pan. Shift solenoids 1-4 and SLT, SLU, and SLN were removed, inspected for flattened o-rings and leaks, and bench tested with jumper leads and a 12V battery. No issues with the solenoids, all of them were activating and none were leaking. With the condition the fluid was in, I expect at least one of the clutch packs will have failed and started welding itself together, cooking the fluid in the process. It's going to be a several week ordeal, but over the next few weekends, I will remove and tear down my transmission, documenting with photos where possible, at the very least leaving an update on what the mode of failure was, as I have had issues finding anyone else's post closed out with a concrete answer.
-
Hi all, back for another misadventure. My brother was borrowing my car, and after a several hour long drive (GA to NC and back), my brother stopped for food and called me saying the car was not going into reverse. Once he was home, I found that in addition to reverse not working, selecting neutral acts as if the car was put in "drive". No transmission codes are present in the vehicle, and with a scan tool, selecting all different gears (Park, Reverse, Neutral, Drive, 4, 3, 2 and Low) the proper gear is displayed by the scan tool. As of the moment, I'm going through the service manual trying to find any information to explain this. Attached are pages out of the manual regarding the transmission. As far as I'm reading, it seems most likely that either a one-way clutch system has failed or a clutch pack has gone out. Also a chance that a solenoid is stuck, but not shorted or in an open circuit, so it avoids throwing a code. If anyone who is more familiar with these automatic transmissions could chip in, I'd like to have a rough idea of what I'm going into so that when I tear apart my transmission it's more "surgical" rather than a shotgun approach of a complete rebuild, which would exceed my budget, especially if I include all new shift solenoids ($300-500 each from Toyota) at-2.pdf at-22.pdf
-
DIY alternator replacement (Deviation from service manual)
Jeremy M. replied to Jeremy M.'s topic in 90 - 00 Lexus LS400
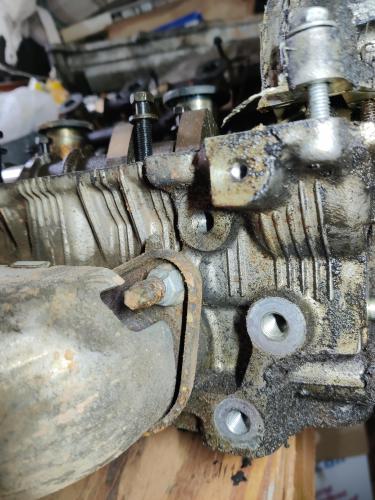
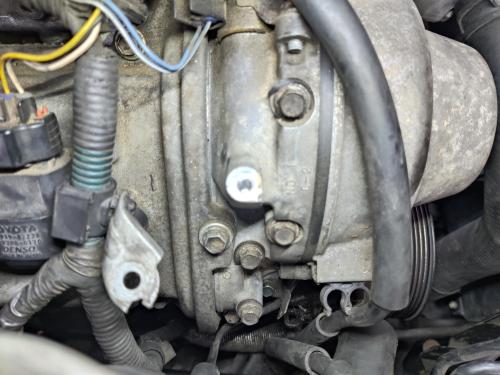
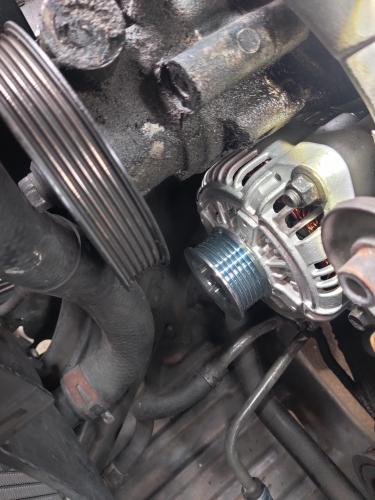
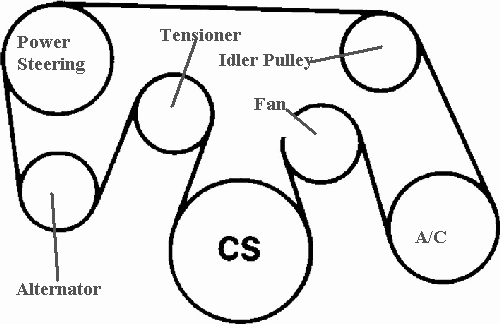
Back again with photos. Full disclosure, some pulleys and wiring brackets are removed in the photos, you do not need to remove anything that hasn't been mentioned, they're just taken off to have a better line-of-sight for the camera. Installation is the reverse of removal, and everything slides together fairly nicely. 1. You'll start by sliding the alternator onto the stud, letting it hang. Don't slide it back until you've plugged in the connector on the back and slid the rubber boot over top. Next, you can shift it back further and get your charging cable attached. There was not torque spec in the manual (that I could find) but good practice is to tighten the nut for the charging cable until you can't move the cable side to side. Slide the boot over top of the charging cable after it has been secured. If you were able to disconnect the wiring bracket on the alternator, reconnect it. If you cut the tape, peel off the old tape and wrap new tape around the mount and harness. Next, slide in your bottom alternator bolt and hinge your alternator side to side, lightly pushing on the bottom bolt to find the threads. Once you have both the nut and bolt lightly seated, you can torque them both to 29 ft-lbf. This is what you should look like at this step. 2. Re-install your power steering pump. The pump will slide straight back, if you meet resistance, double check that your reservoir isn't caught on the cooling hoses attached to the coolant reservoir, and turn the body of the pump on the stud to make sure the mount isn't colliding with the cylinder head. The bolt holes are a bit tricky to find, but for reference, the top hole of the two is directly beneath the widest portion of the valve cover, pictured here: The lower bolt is tucked a bit further and just slightly towards the rear of the vehicle. Here's a photo of the mounting holes on a spare cylinder head I have on the bench: Once all three fasteners are lightly seated on the power steering pump, go ahead and tighten them up. The torque spec is 29 ft-lbf for the two bolts, and 32 ft-lbf for the nut on the front. Go ahead and secure the three bolts holding your pump reservoir in as well. If you're reading this guide ahead of time, the bolt holes are marked with a red "X". Make sure you don't miss the one hiding underneath the coolant feed line. 3. Re-install your belt and cooling fan/ fan clutch. Attached is a photo of the belt routing (you should also have the same routing diagram attached to your hood). Torque spec for the fan clutch nuts is 16 ft-lbf. When you install your belt, make sure it is sitting in the grooves properly by hand. If it is misaligned, it can jump off when you start the engine and damage components. 4. Install your air ducting and vacuum/vent hoses, and reconnect your battery cable. You'll need to go through and re-set your clock, radio presets, and memory seats, but other than that, your job is (almost) done! 5. Check your charging system Your alternator is installed, but verify your system is working before setting off down the road. With the engine running, you should have about 14 DC volts. Double-checking this now is the best way to keep from immediately getting stranded with a dead battery, and while you're checking it, you can listen for any abnormal sounds from your engine. Torque values: Alternator mounting nut and bolt: 29 ft-lbf Power steering bolts: 29 ft-lbf Power steering nut: 32 ft-lbf Fan clutch nuts: 16 ft-lbf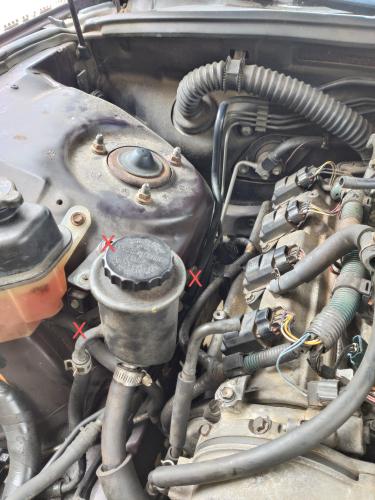
- 1 reply
-
- 2
-

-
Hi all, been the better part of a year since I had reason to pop onto the forums. This post isn't looking for help, but instead offering some friendly advice on doing this job in a different way than the service manual describes (especially for those with back issues like me, because this way, the alternator comes out the top). I recently had my alternator drop out on my '98 LS400 (1UZFE VVT motor), and although I have the service manual, I decided to follow a different path with removing my alternator, because the service manual calls for complete removal of the power steering pump, which I found unnecessary. Instead, I followed the following steps (photos to come at a later date to make it easier to follow along) Tools you'll need- One each 10, 12, and 14mm wrench and socket. (One stubby ratchet or short 12mm wrench will come in handy, but isn't absolutely necessary) also a few extensions. Optional but recommended- One fan clutch removal tool. I have found that this style works best. https://shop.advanceautoparts.com/p/product/22983568 If you don't use a specialty tool like this, you will need a second 12mm wrench. Also recommended is a flex-head ratchet 1. Disconnect negative cable from battery and set away from the terminal to prevent accidentally shorting your electrical system later. 2. Remove all intake ducting, up to the throttle body. There are several vacuum lines attached, as well as a PCC hose. There are also a few 10mm bolts securing the intake. 3. Remove the cooling fan and fan clutch. There are four 12mm nuts holding the fan clutch on the pulley, and this is where you will use the removal tool (if you have it) to make your life easier. You can get away without a specialty tool with loosening each nut by tightening another, and on the last nut, using the box end of a wrench to gain some leverage on a stud where the nut has already been removed. You can pull the fan clutch out the top without removing anything else, just be careful not to hit into the radiator and damage any fins. 4. Remove the serpentine/drive belt. A 14mm wrench on the tensioner, and to loosen the tensioner, you rotate it in the counterclockwise direction. Slip the belt off the idler pulley, and after releasing the tensioner, you can remove the belt. 5. Loosen your power steering pump and reservoir- three 10mm bolts secure the reservoir, and three 14mm nuts and bolts secure the pump. Two fasteners are hidden on the bottom side of the passenger side cylinder head, right towards the front. A flex head ratchet works wonders here, otherwise you'll need extensions to get them from underneath the vehicle. You'll be able to use a ratchet on all these bolts, but not the 14mm nut securing the pump from the front, because it's blocked by the power steering pulley. You will NOT need to remove any hoses, but you will need to flex the reservoir around a bit to shift the whole assembly forward a few inches. 6. Now that the power steering pump is out of the way (it doesn't need to go far, not even off the stud it's mounted on) this is where you'll break out your stubby ratchet/12mm wrench. It's a bit of a tight squeeze, but you should be able to reach down from the top and pull off the rubber boot covering the alternator lug and loosen the 12mm nut securing the charging cable. 7. Once the charging cable is off, remove the bolt and nut securing the alternator to the block (both are 14mm). Now you can shift the alternator forward and access the wiring plug in the back. It's a standard pinch-and-pull removal, but mine, with 25 years of age and gunk, was stuck on pretty well. The last thing to remove is a wiring loom bracket for the oxygen sensor plug. This can come off with some persuasion, but it's ultimately easier to cut the electrical tape securing the wire to the bracket and removing the bracket once the alternator has been removed. 8. Remove the alternator! With the power steering pump shifted forward, you will be able to pull the alternator forward and off the stud, then straight up and out the top, without spilling a drop of fluids. Re-installation steps and torque values will be added to this post at the same time photos are.
- 1 reply
-
- 2
-

-
-
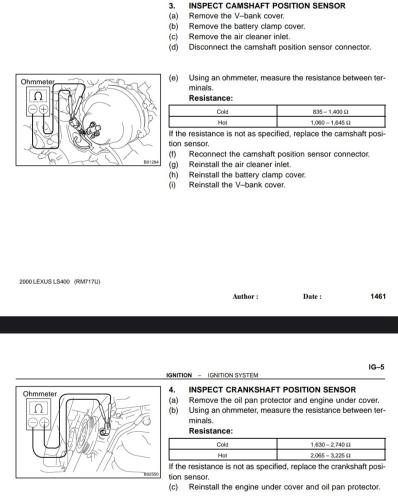
Because you have multiple codes, you have a few different places you can start as far as diagnosing the issue. If you want to address the fuel smell, check along the injectors for a fuel leak, and check fuel pressure at the fuel rails (the factory manual calls for 57 PSI). If you're smelling gas, it is likely leaking and causing a drop in pressure, which will affect the engine most at idle. You can also do a quick check for a vacuum leak along the bank of cylinders that are misfiring (driver's side of engine). You'll spray starting fluid or brake parts cleaner (make sure the label does NOT mention it being non-flammable) along the mating surface of the cylinder head and intake manifold, and listen for a change in the idle. If it smooths out while you provide fuel, you have an intake leak at your manifold gaskets and/or your injector o-rings. If you have cleared the codes and the two VVT codes are coming back, start by checking oil level, then you have two paths to take. First, you can check the two camshaft position sensors and crankshaft sensor, because the correlation between these three sensors will determine the code being set. Attached are sections on the service manual for the sensor inspections. The other path to go on is to check the mechanical operation. If you are confident your new actuators are good (unfortunately you can't consistently rely on this with aftermarket VVT actuators, OEM is HIGHLY recommended), then you need to check your oil pressure to make sure you are getting 4.3 PSI at idle, and 43-85 PSI at 3000 RPMs. You will check you oil pressure by removing the oil pressure sensor and installing a manual gauge. If you have proper oil pressure, and your actuators are good, then one or both of the camshaft phasers are likely bad.
-
That rattling could be a A/C compressor clutch(?) It's hard (impossible) to say what it is from just hearing it, but if you can get eyes on the A/C compressor, you can tell pretty quick if it's the problem- you'll also have either little or no cold air of course. The ticking could very well be from the injectors; my only other suspicion would be valve clearances.
-
Is it only out of the right (passenger) side exhaust tip? I only ask because that strikes me as odd, seeing as how the right and left exhaust tips are connected further upstream. I saw that you suspect an injector is stuck open, so I'd suggest checking your oil, smelling it for gas that has leaked through your piston rings from flooded cylinders, and if it smells off, changing the oil at least one time, possibly multiple times to get rid of any fuel in there. Check the signal to each injector with a multimeter, unplug each connector and have an assistant spin the car over to get a DC voltage reading and to check that there isn't an odd short keeping your injector open. If you can, attach a video of any relevant symptoms, describe the exhaust smell in more detail, etc. in order to get a more complete understanding of what's happening.
-
As long as it's gone, I wouldn't worry about it too much- rod knock wouldn't disappear on you, but that could have been spark knock/detonation. As for the why of it, I'm pretty stumped. Unless you had a fair amount of a very volatile liquid in your fuel rails (low octane fuel etc.) I can't see a reason for detonation.
-
Only specificity is to not be upside down or backwards lol- I did have trouble getting my injectors in without pinching/rolling tearing a couple o-rings, the remanned injectors had some crappy ones. If you're having trouble with one of the injectors springing a leak, I'd recommend OEM o-rings and liberal application of some gasoline-soluble lube. If you're just having trouble getting all four lined up in the rail, I got mine in with good success by roughly lining them up in their holes, placing the rail (without the banjo bolts, if you can help it) over the four injectors (already in the manifold) and double checking that they're straight, then gently and evenly pushing the rail down. Lube is your friend; every time you deal with an o-rings, lots of a high quality lube will help you along and save you from a trip to buy another o-ring. I have used Maxima brand assembly grease for applications like this, albeit less so than I would an oil, so the grease doesn't get in the injector immediately and clog it, and instead dissolves through gradually.
-
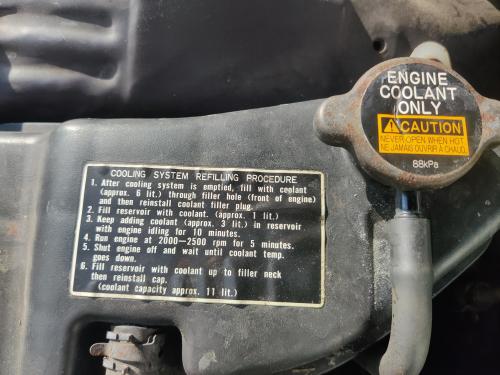
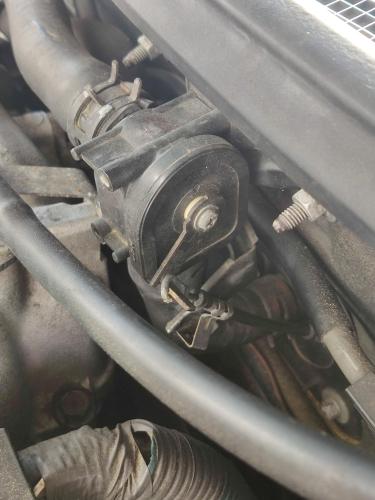
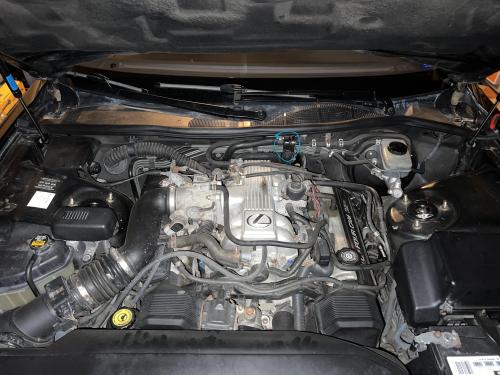
I've never seen the diagram for that water-heated windshield before; it explains why my filling procedure doesn't mention it though ¯\_(ツ)_/¯ As for the heater valve, I've gone and circled the valve in blue in your picture- on top of that, here's a picture of my reservoir sticker, since yours seems to have gone missing. Take note of what position this arm on the side of the valve is in before and after your engine heats up. Mine is labeled, and yours may be as well- if it never opens from the "shut" position, take the cable off and manually open it. Follow the filling procedure first, and make sure not to skimp on time when holding the engine rpms up; those higher rpms are what's going to push the coolant through the heater core (keep your temperature controls set to max heat as well). Lastly, if you still have no hot air coming through by the time you've completed the bleed procedure, and if your valve is being actuated by the cable, I would pull the valve out and physically check that it isn't broken; like any mechanical part, it can fail, but it is somewhat uncommon for them to go bad.
-
I was able to (very uncomfortably) squeeze a hand with a wrench for the back bolt to remove it in the past; if you've got an assistant with smaller hands, they're the best candidate. I actually was never able to get the bracket lined back up assembling it though; I ended up taking the intake manifold off to swing somewhat sideways and reach the bolt.
-
Bouncy ride 2010 rx350 70k miles
Jeremy M. replied to MaggieMay's topic in 10 - 15 Lexus RX350 / RX450h
I can't imagine it being overlooked during an alignment, but it could possibly be worth checking out the ball joints, control arm bushings, etc. If they're bad, they can contribute to a rough ride/a slight pull to one side under the right circumstances. -
There's a bleed location just by the firewall at the top of the engine (at least on mine, I'm unsure about yours); pop the cap off of it and see if the fitting spurts fluid and no bubbles with the car running. If it has bubbles or no coolant comes out, bleed the air from the system. LS400s tend to like being bled parked on an incline (front end higher than the rear). My car also has bleeding instructions printed on the coolant reservoir, check yours and see if it details the procedure. After that, check the heater control valve- it should remain closed until the engine nears or reaches operating temperature, and then the cable will open the valve. If the valve is broken, it's a fairly quick fix, but if the cable doesn't operate, you'll have a bigger issue, as the cable is either broken or the electronic controls are not operating. If you need help locating either the bleeder or the valve, send a couple pictures / a video and I'll try and point them out. I'm more familiar with the 1UZ-FE VVT engine setup, as that's what's in my car, so if you happen to have the same engine, I can be more clear
-
Engine bay dropped bolt in V of engine near back
Jeremy M. replied to Wesley227's topic in General Chat
If you'll forgive the mess in this photo, it shows the valley under the manifold on my 98 LS400; there's no place for a rachet to fall in or anything (worst case I can think of is it vibrating over and tapping on one of the knock sensors, which can be rather sensitive), but if you can take a flexible magnet and fish it out, it would save some odd rattling sounds and general headache for you. A magnet should fit just fine along the openings at the base of the manifold (probably the same place it dropped in, I'd imagine) to fish it back out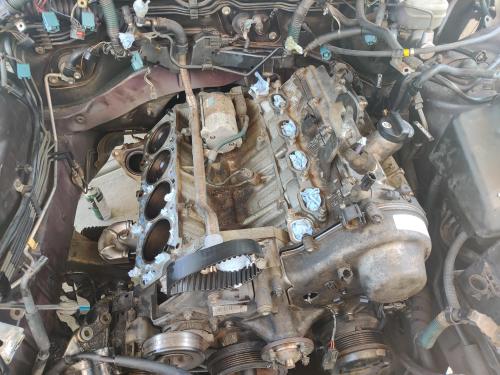
-
For better or worse, I have a fair amount of practice getting my cams in and out lol- I can get through the job in around 7 hours now, although it's still a bear. I'm just hoping to do it all in one go, rather than spill over into the next day because I had to put everything back together again. Thank you for the Excel spreadsheet though, that will definitely save some time and headache writing down and manually entering the values.


