pishta
-
Posts
237 -
Joined
-
Last visited
Content Type
Profiles
Forums
Events
Gallery
Store
Articles
Videos
News & Articles
Everything posted by pishta
-
450 for a 75 buck wheel bearing plus labor, ouch..and it still didnt fix the problem, Iwould have talked to the service manager for diagnosing a repair that didnt help at all, especially after 450. Anyway, water under the bridge. I would look at the calipers, possibly a sticking piston or a rough slider. Good luck.
-
How much are these nowdays? I didnt know they had a OEM softness set? Id do my UCA's but the ball joint is close to death. Ill just get the 200 uppers and maybe do the lower if they sell just the lower.
-
-
I have a 92 LS400 and the rear tint is a joke. It is a film that has to bind to the windshield over the antenna/heater traces, but it is not quality. At night you see 5 sets of headlights in a vertical stack if a car is behind you, totally unacceptable. Question: Is this stock (I cant believe it is) it has no visible seams at the window edges but you can tell it is a film by the way it feels and looks when it goes over a trace. How do i get rid of it, I would rather have no tint than this unsafe trash! I dont want to damage the traces so scraping it off is not practical. Ammonia soak with a vapor barrier taped up, out in the sun to soften and peel off? thanks
-
Did All Ls 400's Come With Keyless Entry? 1st Gen
pishta replied to 2rotor's topic in 90 - 00 Lexus LS400
He has a 1st gen, programming the key via those instructions will not work as they are for 3rd gen (?) I think you have to have both the key and the receiver coded at Lexus to get a new key working, might not be worth it. all it does is unlock the door, you can get an entire car alarm with door locking for the same price. -
This is the stuff/procedure that I would recommend. It is a filler and a dye. Cracked leather will not dye uniformly, you need to fill in the cracks with an elastic filler and then dye area or entire panel for a uniform look. I saw another product on Ebay that was US sourced and was specific to the Lexus LS400 gray interior that I have, but I cant find it anymore. Same type of stuff, a filler and a dye, sealer. Ebay item 140166319788 Thanks for the idea, I am going to try it. Thanks again everyone for the help. How about a few pics before and after and a review of the product. Ill do it if it works.
-
Not the same car but the same symptom. 96 Plymouth Breeze, brakes shuddered badly at low speeds but were not bad at high speed. They would pulse badly just before coming to a stop. I checked the runout and I had .002 inches runout but I didnt check parallelism of the rotors, like they were thicker at some points, causing an increase in friction at a spot, causing the pulsing. $7.50 a piece to turn them, but they were only $32 to replace both! No brainer. Once you warp a rotor it is never the same. You can turn it back to limits but the integrity is lost making a future warp much more probable. My brakes are butter smooth now. My 92 LS400 rear bars that go forward from the hub to the chassis can rotate like they are on bearings, no resistance at all but they are not loose, no movement other than the roataion. Think they are bad? I know the UCA ball joints have a turning torque that has to be >5 inch/lbs to be serviceable (or something like that).
-
92 LS400 Diamond White Pearl 95,400 miles The paint is as good as it was the day she was bought, still have the window sticker in the folder.
-
This is the stuff/procedure that I would recommend. It is a filler and a dye. Cracked leather will not dye uniformly, you need to fill in the cracks with an elastic filler and then dye area or entire panel for a uniform look. I saw another product on Ebay that was US sourced and was specific to the Lexus LS400 gray interior that I have, but I cant find it anymore. Same type of stuff, a filler and a dye, sealer. Ebay item 140166319788
-
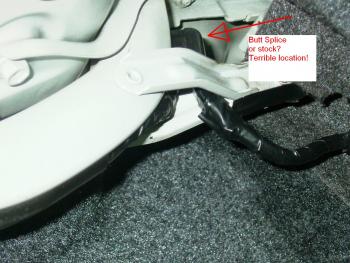
Infamous left hinge pinch point, you got that right! Mine was indicating when I bought it under the condition that he fix it. He (the dealer) did and It was good fo4 3 months. It came back on and sure enough I had a bad bulb. I replaced it (didnt look bad) it lit up and the indicator went out. 2 days later it came back on again with no lamps out. I had heard of a short problem in the trunk of these models so I looked into it, took me about 5 seconds to find a potential trouble spot. The driver side hinge seems to be a raceway for a large bundle of cables and when the trunk is open, they are pinched by the hinge and the hinge stop! There is a plastic cap that seems to protect them slightly, but Mine looked cobbled, possibly a butt splice? I wiggled it and relocated it a little to minimize the pinch and the indicator has not come back on yet. That is a poor piece of engineering right there in an otherwise well built car. The indicator seems to sense a load drop and the pinched wires seem tp play havoc on the sensor.
-
duplicate.....
-
OK, that puts my thinking to shame. Educate me, where does the coolant go in a sealed system? Dos it escape as vapor in a weak/leaking pressure cap? And how does it get to vaporization temp when the stat is under 230+? Im open minded on this.
-
Its not an OBD2 so you cant use a generic scanner, but you can jump the diagnostic port in the motor compartment and count the flashes and decode the symptom. The E1 and the TE1 sockets in the socket need to be jumped and then put the car to ign on, but not start, then count the check engine light flashes. diagnostic code procedure
-
Here is a test. remove the cap start it up, let it idle and turn the AC on, let it get up to temp and see if the fluid level has changed. I had a suburban that never kept water in ot, I would fill it up a liter a week, no leaks, 2 new caps. It had an intake leak that drew water into the intake and vaporized it effortlessly, never saw steam and always had clean plugs!
-
No. A cap that is venting too soon (bad) would not cause the coolant level to drop. Where is the water going? Could it boil out as a vapor, no, i t doesnt get over 230 with coolant to vaporize---Out the tail pipe. You may have a head/intake gasket problem. Get yourself a pressure test cap and pump it up, look/listen for leaks or check the pressure guage to see a leakdown. You may have a high pressure leak that doesnt drip when you shut down but may be dripping away while you drive. I would try some stop leak if you do find a pressure leak, cheap and doesnt hurt anything.
-
Are the Naka speakers individually amplified? thought I saw a set on Ebay that stated such.Might check on wether the amps are working if that is the case. 4 inch is not small if the speakers/enclosures are engineered correctly. Ever hear Bose AM-5's? Small speakers, smallish sub, big sound. And the sub is a free air sub, would a reflex sub be any better?
-
New Hood Struts - How Much Lifting Capacity?
pishta replied to W201 sweden's topic in 90 - 00 Lexus LS400
there is a large thread on replacements. My one good (?) one was only 50 lbs and the bad one was a trombone! I think 100+. My replacements from strongarm would not compress with my weight on them, leaning on them on a bathroom scale, but the leverage of the hood was able to compress them with little more than an old fashioned spring type hood support tension. the hood doesnt fly open either, just a controlled rise. about 30 bucks on ebay for a 93 Ford Mustang rear hatch. I think the part# was 4088. they are an inch shorter but still do the job. -
My guess would be a failing coil. check both with a ohmeter. My wire set is original after 90k and it tested fine with a meter, still within specs and still flexible, no cracks can be seen.
-
Here's some info on your needles and what is happening. First, this is what you would see if you could freeze the flickering in a dead standstill: http://www.lextech.org/images/needlesandna...edlecloseon.jpg The reason for this is here: http://www.lextech.org/images/needlesandna...eheatdamage.jpg Heat damage. non repairable, non reversible. BUT replaceable Now, first let me say that if there are any questions from this post feel free to email me at sales@lextech.org, however I am going to try and be very specific so "everyone" reading can benefit. You ask why your needles don't give you as much trouble with the headlights on. Try this experiment here: go outside and turn your dimmer switch just off of the high position click (full on) down with your headlights off. Didnt make a hill of beans difference did it? NOW keep it in that position and turn the headlights on. They dimmed! That's because the headlight circut will activate the second stage in the dimmer module when on and cut exactly .5 volt from the cluster. This is JUST ENOUGH to give the led's a slight break from "full voltage". That dimmer module is not just a knob, inside are a few chips and some diodes that regulate two lines to the cluster. one of them is full on (no headlights) one is controlled on (headlights on) which no matter what you do will always keep the cluster at .5 volt lower than the other way. Why? Lexus didn't actually plan on this to happen (actually nippendenso since they make the unit). It is simple electronic theory, more easily said "it's the way it is" . See, whan you add a diode inline it drops the voltage of the line exactly .5 to .6 volt. This is one of the characteristics of the diode in an electronic circut. It just happens that you can see this little quirk of electronic technology since the needles that are sufficiently damaged are leaning on the brink of self destruction if that little tiny amount of energy is applied and helps finish overheating them. You guy's wanna know the truth? That .5 volt extra is exactly what does the needles in...Nippendenso designed the clusters to run off of the dimmer module and never took into account what would happen if the headlights were off and bypassed the dimmer section #2 where the module kicks the diode in that saves the extra .5 volt. That's why they work fine with the headlights on. In short......... Design flaw. Why do the needles flicker? -- They "dance" and flicker under the concept of the "flasher module" relay. If anyone has ever seen how a flasher module works, a small thin piece of aluminum is layed against a hot post when the post is "hot" it heats the piece of metal up and it bends away from the pole for about 1 second (just enough time to cool down and return). After the cool down, the metal returns to LS the pole and the process is repeated. It heats back up, pulls away from the pole and cools back down and returns. What you see..... is flashing! the contact touches, pulls away, then cools down and touches again. WHOLA! you have a flasher relay. You also have a flasher needle too As the needle heats up it expands the contacts and they pull away. when they cool down about .4 tenths of a second later they come back, touch again, and bounce back off from expansion by the heat. You basically have a flasher relay going on not by your choice. What this looks like, is a "dance" in the needle. This should clear things up and if you need to ask anything else please feel free to email, I will be happy to help. It helps to get answers from an Engineer rather than a Technician. Techs just open units and replace parts, don't know why they failed, don't care, can't prevent it in the future. Fortunately LLS is made of engineers and every concept is a fully engineered redesign to prevent future problems. OK, so my 92 LS needle are perfect for now, should I run them on the dimmer so they last longer? I can stand the slightly less bright needles if they last longer as I intend to drive this car for a long time, only 90K on it.
-
Why not get a OEM from a wrecking yard? Im sure somewhere in America there is a 430 that was rearended. If you got the glass shop to write you up an invoice that included this glass they would probably honor it. I see Mechanics in their grubs at the yards all the time and they are on the clock, getting replacement parts. Worth a try next time. Doesnt Allstate use OEM parts as quoted in their commercials?
-
Crashed My 95 Ls400, Insurance Is Trying To Fix?! Pix Inside
pishta replied to SC300Drifter's topic in 90 - 00 Lexus LS400
That car is done. My father in laws 98 Cirrus got its rear bumper torn off in a left rear collision, no sheetmetal damage, just bumper and bumper reinforcement..totalled by insurance company, got 5000 check, way less damage than yours, but far less a car too. I just saw a 92 LS today, creamed in the rear driver door by a hit and run, all sheetmetal from rear door back to jacked bumper in about 12 inches, pass rear tire cocked outboard by curb about 45 degrees, interior jacked, broken glass, Guy sold it to a body shop friend for 700 bucks. Says he is going to fix it, HA, a body shop is going to fix the rear driveline, subframe, sheetmetal, door, interior sheared park pawl in the trans, hell no. MAYBE if he back halves the whole car? It did have a clear A/C control I wanted but too late, that was the first thing the buyer looked at! Yours is never going to be the same, Thank Toyota for protecting you and move on... -
How Do I Replace Brake Light Bulb On 1994 Ls400?
pishta replied to Gene's topic in 90 - 00 Lexus LS400
Still have not been able to do either off the Lexus site. '92 LS400, did the rear taillight, left side. Pull corner carpet back, may have to remove the plastic push in anchor(s), unscrew 2 gold 10mm phillips head screws in the silver bracket on side, I also unscrewed the bottom 10mm nut. Pull side out slightly and then pull taillight straight back as it is retained by 2 guidepins on the inboard side of the cluster. 1157LL (long life) bulbs, about 2.99 for 2 at Autozone. -
They are under the cover that says "V8 FOUR CAM 32" on the driver bank and in the same place on the passenger bank. The wires are under the large plastic cover behind the upper radiator hose and under the 2 covers that are in front of each cylinder head. There are a few things that need to be removed before you can do the wires and plugs. You can use Platinum plugs OEM, the new Iridium high cost plugs will not run any better.
-
Do Lexus use a residual valve in their M/C's to keep a little pressure on the front calipers to keep the seals seated? I would jack up the front, start car, apply brakes a few times and then try to spin the front tires. Do they drag? What are your rotors doing, warping? Are you using an approved brake pad compound? I know some cause more heat than others.
-
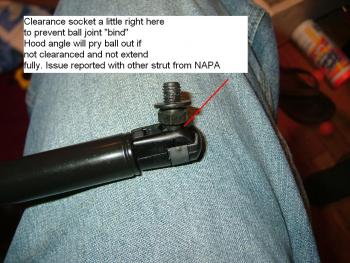
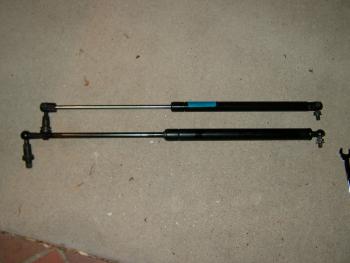
1979-1993 Mustang w/o spoiler has the same strut as well as most period ford wagons for their hatches, , 78-81 Fairmont wagon hatch, etc, check here for applications for you yard walkers. Application Chart for Strong Arm #4408, direct application cross to the Autozone part number piece. Make Model Location Year AMC Hornet Sportabout Hatch 1977-78 FORD Fairmont Sta. Wagon Hatch 1978-81 FORD Granada Sta. Wagon Hatch 1982 FORD LTD Sta. Wagon Hatch 1983-86 FORD Mustang w/o Spoiler Hatch 1979-93 MERCURY Capri w/o Spoiler Hatch 1979-86 MERCURY Cougar Sta. Wagon Hatch 1982 MERCURY Marquis Sta. Wagon Hatch 1983-86 MERCURY Zephyr Sta. Wagon Hatch 1978-81 PLYMOUTH Volare Sta. Wagon (Hatch w/Ball Type End Fittings) Hatch 1976-77 After pouring over these posts and not being able to find any in the posted price ranges, I pulled the trigger on an Ebay auction for these and will post when I get them. for less than $31 bucks shipped I cant lose. If they dont fit, ill bolt them on my Breeze. Looks like they have the 10mm ball socket w/clips already on them. here is the auction number: 190045757754. check them out with some good closeup pictures of the socket ends. OK, got 'em in the mail today and installed them without a hitch..sort of. 2 things that need commenting on: 1. They are shorter by about 1.25 inches. This doesn't seem to be a big deal as it only reduces total hood opening by 3 inches (measured from rad support to bottom of grill: 34"with OEM, 31" with retrofits--{or 32.2}..see note) 2. The ball binds in the socket due to hood angle at full open.This can be attributed to the shorter length of the retrofit strut, as a longer strut would reduce the deflection angle of the ball stud in the socket. This can be seen in picture. This limits total hood travel to the point where the ball binds in the socket, limiting full extension of support by 3/4 inch or 1.22 inches of hood lift. This binding action puts tension on the ball, prying it out of the socket. Although the retaining clips are spring steel, if you hyper extend the hood manually (hard at that!) , you may be able to pop these out of the sockets, possibly what the NAPA strut user found with his aborted install. The fix is to clearance the far edge of the socket with a dremel tool or file to allow the ball to achieve a greater angle of deflection. This will permit maximum extension of the support and allow the support rod to take the hood "stop" stress, not the plastic ball socket. I will do the mod this weekend and report my findings.