


tansupplyman
-
Posts
492 -
Joined
-
Last visited
Content Type
Profiles
Forums
Events
Gallery
Store
Articles
Videos
News & Articles
Everything posted by tansupplyman
-
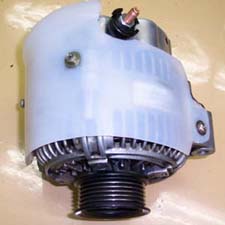
The cover shown here was made from a one gal plastic jug. Remove existing alt. cover-use those 2 screws [w/ large washers] and drill and tap the alum. housing (near the alt mount) for another screw and large washer. Doesn't show--but let the bottom of the jug lap over at the back of the alternator [about 2 "]
-
Driver's side tilt is not as abnormal as you may think. Here is a way to lower the other side about 3/4" if you are interested[rod is 3/8" threaded rod]. Was a thread on this but think it is in the missing ones.

-
You have emission stations in Atl; might want to take it to one of those and see if it passes(out of curiosity); you have to pass emissions there anyway and could you if a cat was bad??
-
Why don't you consider the Delphi XM Roady; should set in front of the gear selector---nothing shows except head(approx 4.5"x2.5"x1"), transmits to one of 8 frequencies on the radio. Hide all wires, etc. You do nothing to the orig. radio.
-

Any Luck With Lexus Covering Dash Problems
tansupplyman replied to 1994400's topic in 90 - 00 Lexus LS400
Fantistic--you have come thru again !!!!! sorry I didn't see it on my post--must have floated to the top and back down again. -
Any Luck With Lexus Covering Dash Problems
tansupplyman replied to 1994400's topic in 90 - 00 Lexus LS400
Again, did anyone save the post on this repair involving the 3 capacitors being bad[and details for checking and repairing] about 3 weeks ago. OR-did it get put in the workshop?? -
hard to see the photo but maybe you could get a 'butt' wire connector in there to connect the ends of the broken wire. You would have to use needle-nose vice grips to have enough leverage to mash the ends together. don't know if this would even work--just an idea.
-
You may have pushed in the mechanics lock on the left side of the dash with your knee---drove me crazy when I did it---you have to unlock it with a key to get the button out. guess the earlier ones have this
-
Consider: Save Impt.(to You) Posts
tansupplyman replied to tansupplyman's topic in Website Suggestions and Feedback
AGAIN: Did anyone save the instrument panel fix [ about the 3 capacitors]? This was a super piece of work !!!!! Or did it get moved to the workshop section? Sure would be nice to have this on file for any future problem. -
Consider: Save Impt.(to You) Posts
tansupplyman replied to tansupplyman's topic in Website Suggestions and Feedback
TRUE----but there may be another 'game' in the future. -
How To Change 93 Ls400 Ignition Housing
tansupplyman replied to nemat's topic in 90 - 00 Lexus LS400
this is in the '93 ser manual--but if you don't have screws--then it is not applicable!! that is all I know--maybe someone else does--I was just looking in the manual--not personal experience. -
Consider: Save Impt.(to You) Posts
tansupplyman replied to tansupplyman's topic in Website Suggestions and Feedback
don't have but 5 individual items--not enough to worry about. thought I should mention this due to current situation. -
don't know on band availability. guess you could call toyota or lexus on that one(may come as a complete unit tho)--I have used nylon zips[after a glue situation] but not on my Lexus-you can't use SS worm clamps due to outofbalance. But you should be able to see if the boot is loose at this point and grease should be visible around where the metal is adjacent to the boot. SO:::::another point the grease could come out is the end cap on the CV joint. it is clamped between the assy and does have an inner gasket against the CV joint. The book says to use sealant around the gasket(both sides I would assume) you have to remove the bolts holding the inner cv joint to the side shaft flanges, then you pry the end cap off with a screwdriver. BUT be careful since the 'innards' can fall out [ring and balls]. you will need to get a plastic pouch of moly grease at a autoparts store.You also should fill the 'dimple' of the end cap with grease. will have get gaskets at a Lexus dealer. then put it back together. FIRST--IMPT. : index the cv joint to the side shafts BEFORE disassemby so things can be assembled exactly as it was !!!!!
-
torque converter unlocking??? that would cause some engine 'braking'; I don't know when it is suppose to unlock !!!!! just a thought!
-
Jim, if it is diff oil--post--more you should know since the diff has to come down.
-
re-read your post--saw you said it was grease ---not diff oil. the grease should be black moly grease. if it is loosen the inner bands, put more grease in the boot. and thoughly clean the places where the boot goes on and the inner edge of the boot--then put permatex #1 or siml on this before you slide back on and clamp. if it is grease it would have to be coming out here if the boot is intact.. anybody else??
-
There are grease seals in the diff housing that contain the diff grease; these are on each side at the side shafts. you have to remove the side shafts, remove the rear cover; there are 'c'clips around each side shaft accessible from the rear--these pull out. almost like old GM products. you will need to use a slide hammer tool that will bolt to 2 opposite bolt holes in the shaft flange[that the inner CV joint bolts to] to pull it out---don't distort the seal cover pressed into the side shaft. The seals pry out , hammer new ones back in. reassemble. Just don't let the rear end run dry before you schedule this!!
-
How To Change 93 Ls400 Ignition Housing
tansupplyman replied to nemat's topic in 90 - 00 Lexus LS400
All it says is: to remove ignition switch: remove the 2 screws in the bottom and the screw at the left back[ holding the wiring harness to the switch. -
suggest you confirm with ins. co. first on OEM glass--may want to write them a letter so you will get a letter back---don't mention the cost; mention OEM, tint, fit etc. Ins. cos. use aftermarket fenders, etc and 'junque yard' items but you can request OEM if you pay the difference. So this may apply to glass--don't want you to be holding the bag. You could take your car to aftermarket people and check tint match[if it came to that]. guess you would have to measure glass thickness at a junq yard unless someone here knows that .
-
I would 'back away' from this car----the old school taught that this was antifreeze--from a leaking headgasket or cracked block; there are ways of confirming this with air pressure and bubbles etc. The cost of a head problem is just too much to consider. Look for a better car----don't start off in the hole !!!!
-
sure wish a rock would hit mine !!!!!! I have 0 ded on my compreh.
-
How To Change 93 Ls400 Ignition Housing
tansupplyman replied to nemat's topic in 90 - 00 Lexus LS400
Don't know exactly what you mean by 'housing', but the plastic piece[squarish] surrounding the ignition switch is held on by 4 clips--2 at bottom and 2 at top. You just use a screwdriver to pry this piece out (carefully). think the manual showed the switch held in by screws........ -
Since joining the forum I have been saving posts ( all or impt. individual responses) that I want to refer back to (something I will have to do or consider in the future, or for my gen. info.). I do that by copy and paste to an e-mail that I send to myself[with the subject listed], then I move it to a folder in my e-mail titled 'Lexus'. That way I have it at a click and don't have to search the forum, etc. Also, I save the links I want; i.e.: cureline, in my favorites in a folder named 'Lexus'. May be a consideration-----at this point in time!!
-
Try BG-44K first; it does wonders for fuel systems,etc. That may not be the problem, but based on my usage(twice a year-in 3 cars) I can recommend that everyone use it.
-
You don't remove anything to replace the antenna--see shop manual copies under 'audio antenna. But, yes, the factory phone stuff is on that side.


