

dcfish
-
Posts
11,490 -
Joined
-
Last visited
-
Days Won
54
Content Type
Profiles
Forums
Events
Gallery
Store
Articles
Videos
News & Articles
Everything posted by dcfish
-
Personally a gs , my wife has a es and I have a gs300 I drive both and she drives the es , we both like the gs better , roomier, more power, feels really solid like a vault [ that is what the wife calls the gs ] They are two totally different cars . Happy shopping!!!!
-

Lighter Doesn't Work.. I Need For Phone Charger...
dcfish replied to kino1161's topic in 93 - 05 Lexus GS300 / GS400 / GS430
GuyTelefunken , You are sooooooooo !!! CORRECT Ya just gotta love it , Keep up the excellent post's , You are a true asset to this board. -
I didn't know this topic existed [ why under ES forums ? ] Anyway thought it was an interesting subject .
-
I suppose this is an off question and somewhat personal , Although we are in a class of our own , Curious !!!! By the way I am a Chef
-
God Bless you are not hurt , but I feel for your baby :(
-
http://www.neosyntheticoil.com/where.htm Lexusfreak here are places to buy NEO SYNTHETIC OIL.
-
I Beleive I paid around $80.00 for a case of 12 , Worth spending the extra dime.
-
Are Gs Yellow Fog Lights Only Yellow Bulbs?
dcfish replied to AUGuy21's topic in 93 - 05 Lexus GS300 / GS400 / GS430
I have a 98 gs300 and the car came with white fogs , I replaced the fogs with yellow bulbs , there is no colored reflector or lens on my car . And it looks and works great . -
http://us.lexusownersclub.com/forums/show....showtopic/10022 Try this link it will get you all the info that you need B)
-
Playing My Own Burned Cd's Can It Work
dcfish replied to lomarica's topic in Audio / Video / Electronics Forums
Try .MP3 and burn at a slower speed like 4x don't do anything on your PC while you are burning and make sure that you have enough space in the folder to buffer the files that you are transfering to disc , make sure that the files are finalized , I am not sure what program you are using to burn , let us know the start to finish process and the type of CDR'S . What program are you using ? :whistles: -
I have the red top also and your right it starts right now , even when it was -40 below in the winter and sat overnight outside[ My oil and coolant had something to do with this ] I beleive the OPTIMA is worth every penny,
-
Has anyone used NEO synthetic oil ? Besides myself .
-
What is wrong with the old cover ? They make plastic weld if it is the mounting holes .
-
Buy one from lexus and do not install , but get the dimensions and lay it out on similar material , then return the unused cover .
-
Do you still have the original cover ? You can always manufacture your own . ;)
-
99lsguy , Minneapolis , And there is always a lex in the lot
-
It could be that the wheels themselves are out of round , that is without the tires on , balancing may help with the tires on but the problem will still exist if it is the wheels , Only a thought
-
Head Lights Looking Foggy From Oxidation?
dcfish replied to soarer479's topic in 92 - 00 Lexus SC300 / SC400
Went to the website and it is said to use on aluminum / headlights ? -
What Coolant Do You Use In Your 2nd Gen Gs300
dcfish replied to dcfish's topic in 93 - 05 Lexus GS300 / GS400 / GS430
Has anybody flushed and filled with anything else ? -
Just wanted to hear what coolant is being used in the 2nd gen gs ? Thank You in advance,
-
http://www.neosyntheticoil.com/race1.htm these are some of the racers using NEO , On each page there is a next page link . Enjoy
-
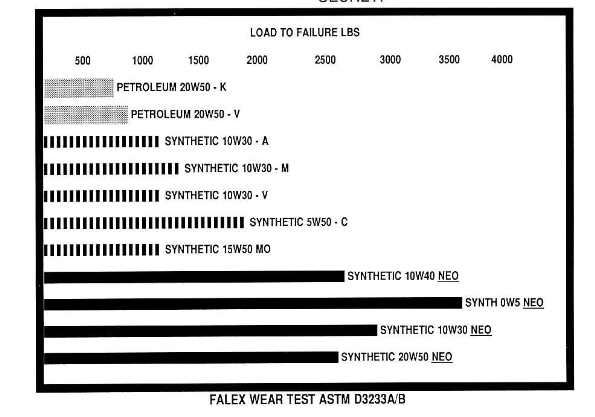
Falex test results
-
The NEO Advantage -------------------------------------------------------------------------------- High performance Eliminates dry starts Turbo rated Optimum protection Long drain intervals No sludge or varnish High film strength Environmentally friendly The NEO SYNTHETIC OIL COMPANY was established in 1970, a period when radial tires were worth a second look after all, and synthetic lubrication was considered science fiction. NEO lubricants are 100% synthetic. We target our formulations to address specific applications--a method that has proven to be successful. Over the last two decades, NEO lubricants have set the standards by which other lubricants are measured, from industrial applications to professional racing programs. NEO synthetic lubricants have exceeded all expectations and have become known as the "technological leader". TECHNOLOGY As we moved through the seventies, eighties and nineties, however, the push for vehicles and equipment to provide more efficient power became more prevalent. Smaller engine displacements with high revving engines and greater horsepower output are being utilized throughout the world. NEO has spent the last 28 years employing scientific knowledge to develop a high tech diester based series of synthetic lubricants, which not only meets today's needs, but incorporates tomorrow's most advanced technology. The lubricants that you will be using in your car tomorrow, we have already developed for the racetrack today. LONG DRAIN INTERVALS Most synthetic manufacturers use a special blend of mineral oils and synthetics to keep their costs down. That is why they have a low drain interval of up to 3 to 7 thousand miles, like most petroleum oils. Not like NEO! We custom make our oils by using only the finest synthetics available, along with our own special blend of synthetic additives to give you the best protection and performance available on the market today. You may pay a little more for NEO, but we offer you an extended drain interval designed to last 3 to 6 times longer than most synthetics and petroleum based oils. It is not uncommon to go 25,000 miles or one year, whichever comes first (with regularly scheduled filter changes). This will save you time and money and give you greater value for your car. PERFORMANCE Increased performance is not a sales pitch statement, but is factually backed by some of the world's largest companies. High tech research, advanced chemistry and positive results have attracted companies like General Motors, Ford and Chrysler, along with some world class car manufacturers. LEADERSHIP NEO synthetic oils have been the leader in synthetics for the past 28 years. In the 70's we were the leader in gear oil technology with 75W90 and 75W140 gear oils, 100% synthetic 2 cycle oils, multi grade motor oils, hi - temp greases, ATF and industrial lubes. In the 80's, we were the leader in manufacturing thinner oils like 5W30, 10W30 and 0W - S motor oils, l0Wt gear oil and higher temperature greases. In the 90's, we are the leader in 0Wt motor oils, extended drain intervals, ATF, 7Wt gear oil, propylene glycol, 570Wt synthetic motor oil and brake fluid. And the list goes on. For the next millenium, we will strive to take that next step beyond, and go where no other synthetic dares to go. ENVIRONMENTALLY OUTSTANDING ALL OF NEO'S PRODUCTS ARE ENVIRONMENTALLY FRIENDLY AND BIODEGRADABLE...AND HAVE BEEN FOR OVER 28 YEARS. Need More Info - Call 800 - 959 - 7757 or Click Below To Send Us E- Mail
-
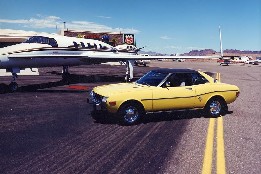
My father- in law sends the oil to me from the manufacturer , He has a dealer license , I have never seen NEO in any store , do a search on google [ neo oil ] and it is one of the first links . The oil is really great stuff , Here is the 74 Toyota Celica with his beechcraft , the toy is still in mint condition.
-
This Guy Should Be Locked Up!
dcfish replied to Natsume's topic in 93 - 05 Lexus GS300 / GS400 / GS430
In reference to mbpqawest's response , being shot and dragged into the car What about the topic starter [locked up and shot ?]


