GoldenStateSilverSport
-
Posts
132 -
Joined
-
Last visited
-
Days Won
4
Content Type
Profiles
Forums
Events
Gallery
Store
Articles
Videos
News & Articles
Everything posted by GoldenStateSilverSport
-
FYI, The buttons/transmitter are compatible with rolling code. I have rolling code at my house.
-
What part are you referring to?
-
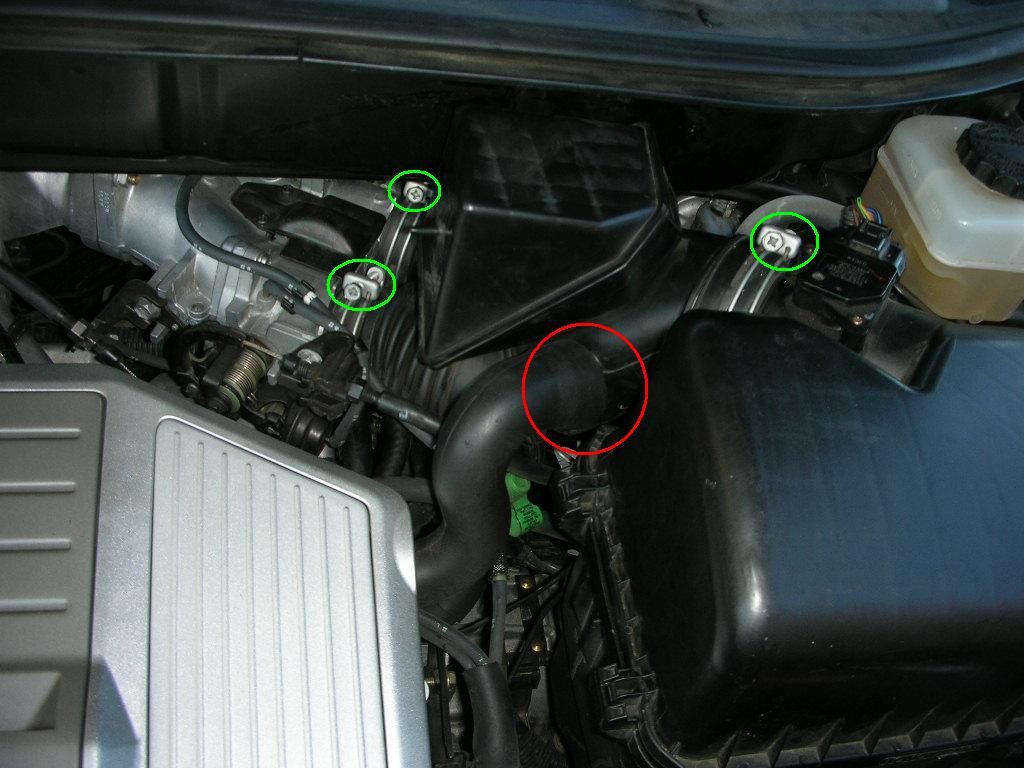
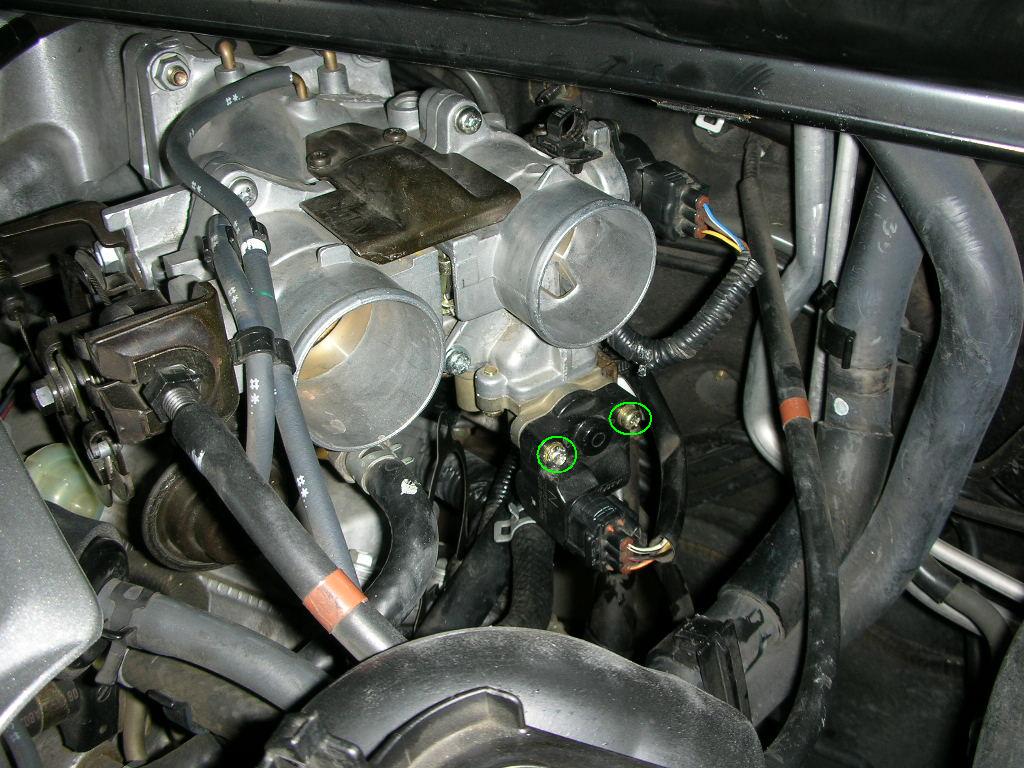
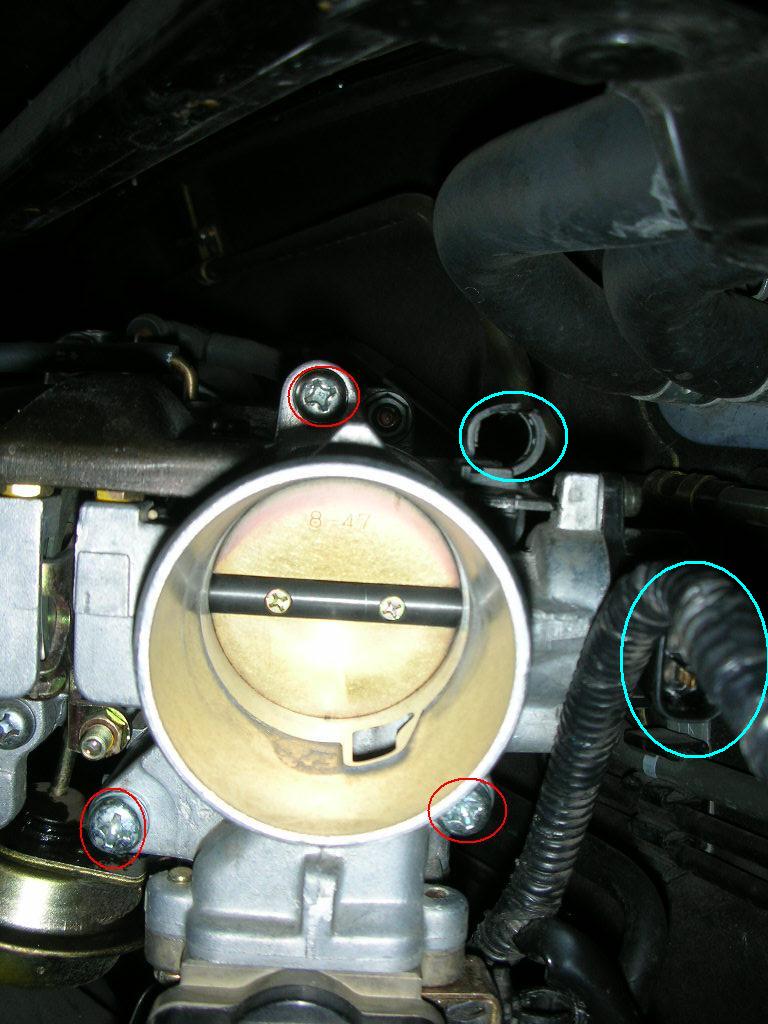
You don't have to take off the black metal piece. Once you remove the three screws holding the throttle body in place (I circled these screws as red in my picture), you just need to grab the throttle body and pull it down and out and it comes out easily. I removed the screws with an electric drill so it was much easier. I actually stripped one of the screws holding the electric coil in place so that is where the locking grip pliers really saved me, otherwise I would have been "screwed"..no pun intended.
-
Very helpful! I am experiencing this very problem. I have 70k on my car and I get this shaking only when I brake from high speeds. Looks like I'll have to get some new rotors and replace them when I get my brake pads replaced.
-
Why Do You Choose Lexus Suv?
GoldenStateSilverSport replied to lexusresearch's topic in 99 - 03 Lexus RX300
The only other car I was considering at the time was an Acura MDX. On paper the MDX was a better bang for the buck with the larger engine, additional seating etc.. However I am very pleased with my RX300 and would not change my mind if I was given the chance. * Lexus consistently tops customer sat surveys every year * Reliability * It's smoothness is unmatched * You won't find this quality in an American car * BMWs are over prices and the maintenance is $$$ * This car will last me a lifetime =] -
By the way, I've been driving my car for 2+ days now after performing this cleaning and I can happily say I have not received any idling problems anymore. The car starts and idles perfectly now. Cheers!
-
Well, black does match everthing =P. I have black all weather floors mats in my car and am loving it. I am running the black on black scheme so it obviously matches. I personally think black would look just fine in your car. Additionally, black hides dirt better and over time the mat will still look clean as opposed to buying a lighter color mat and having those turn black over time.
-
Kind of hard to tell how these will look on the actual car at night on both sides. LEDs are getting placed on more and more nex gen cars now. Not bad
-
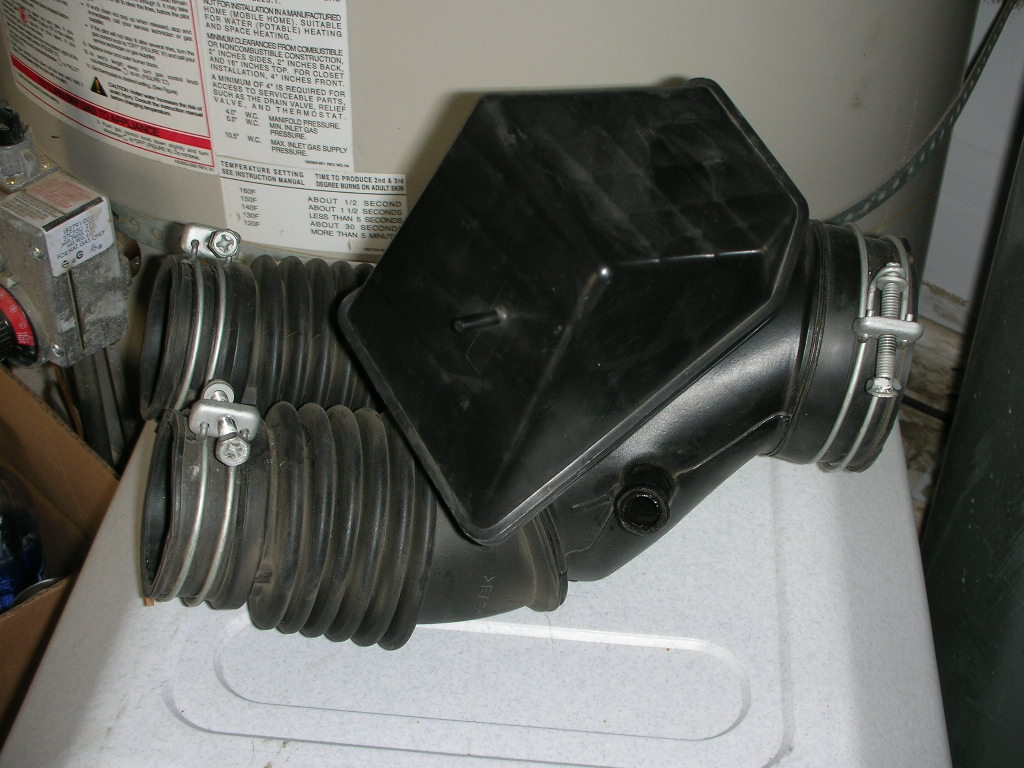
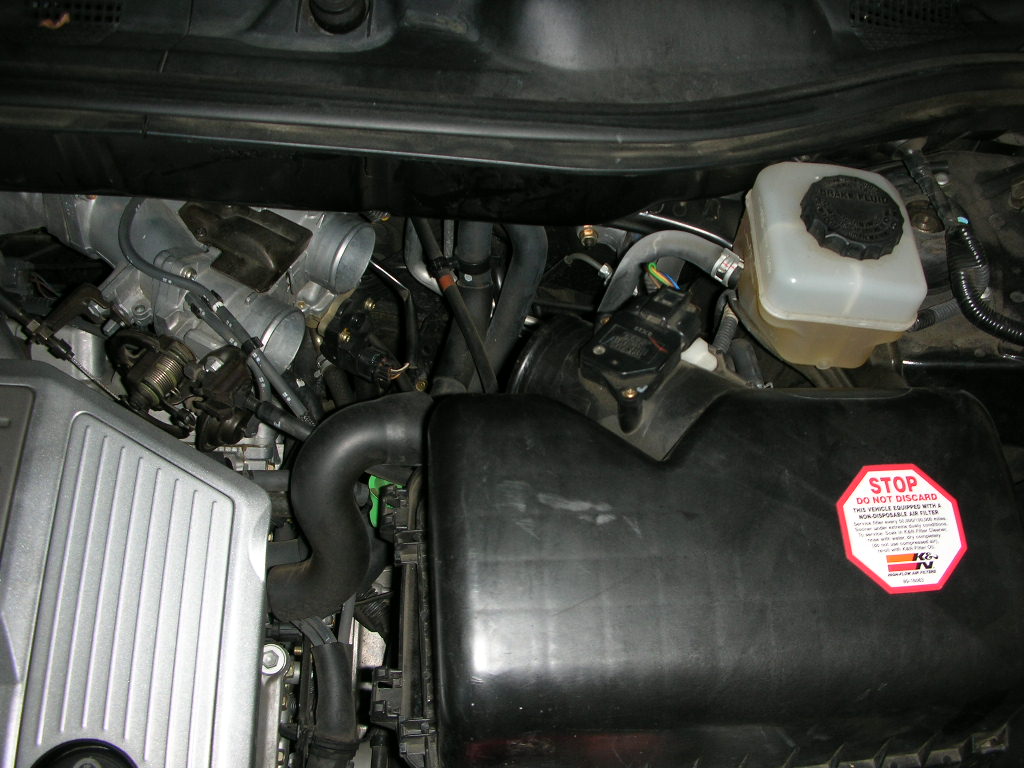
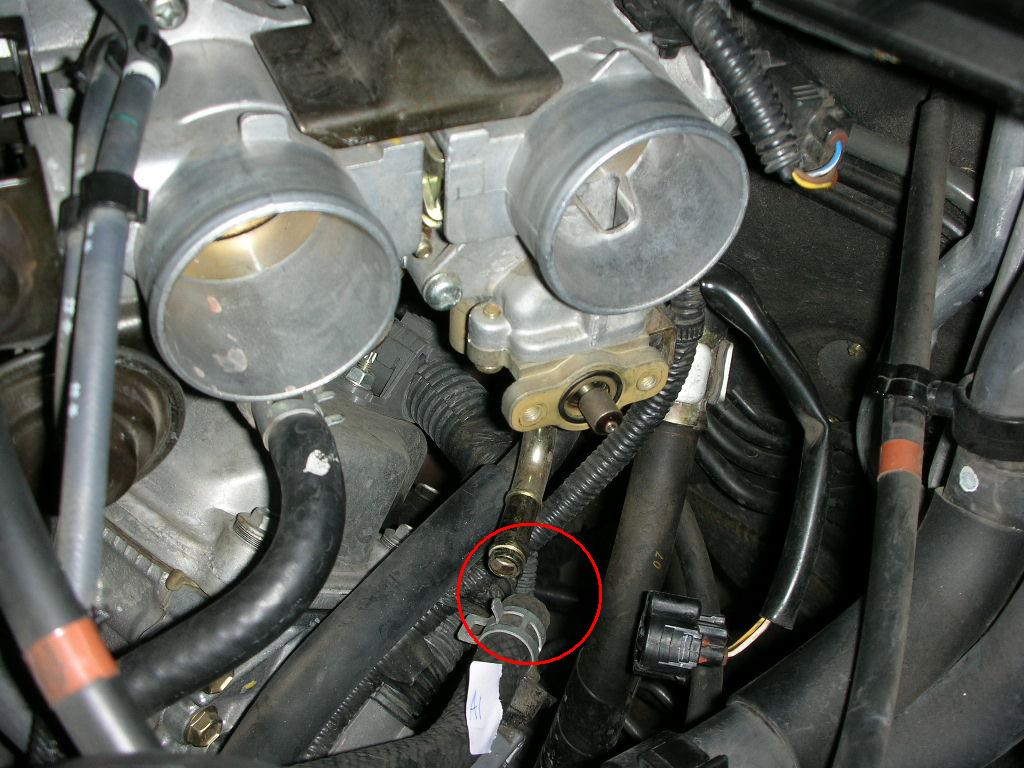
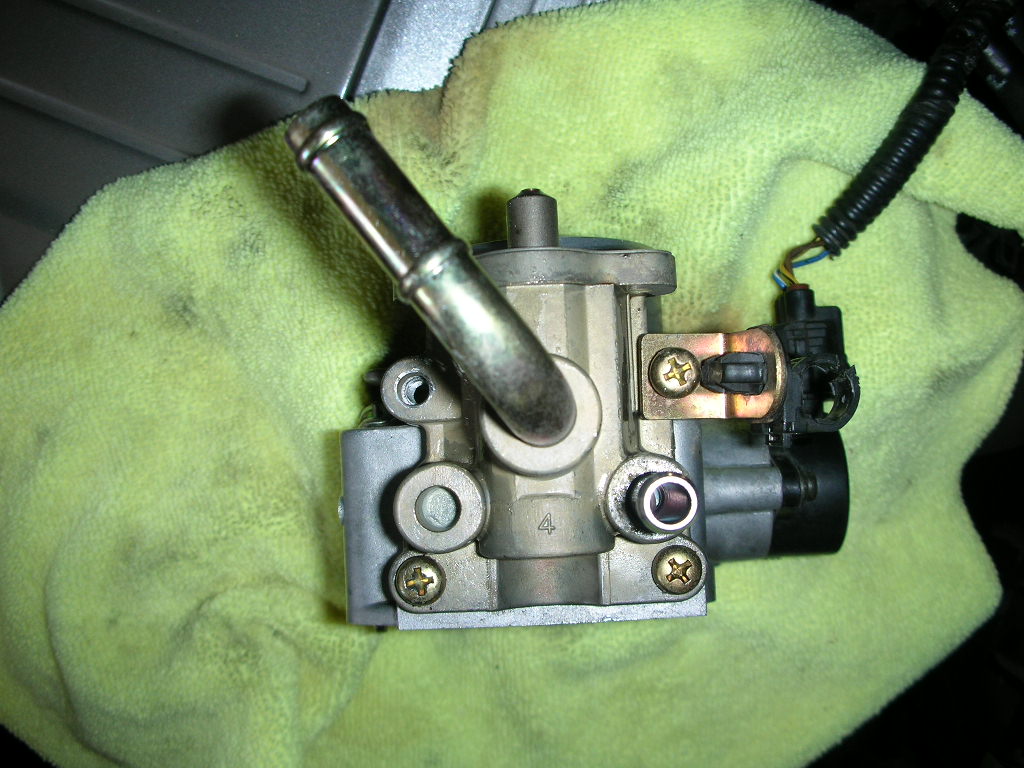
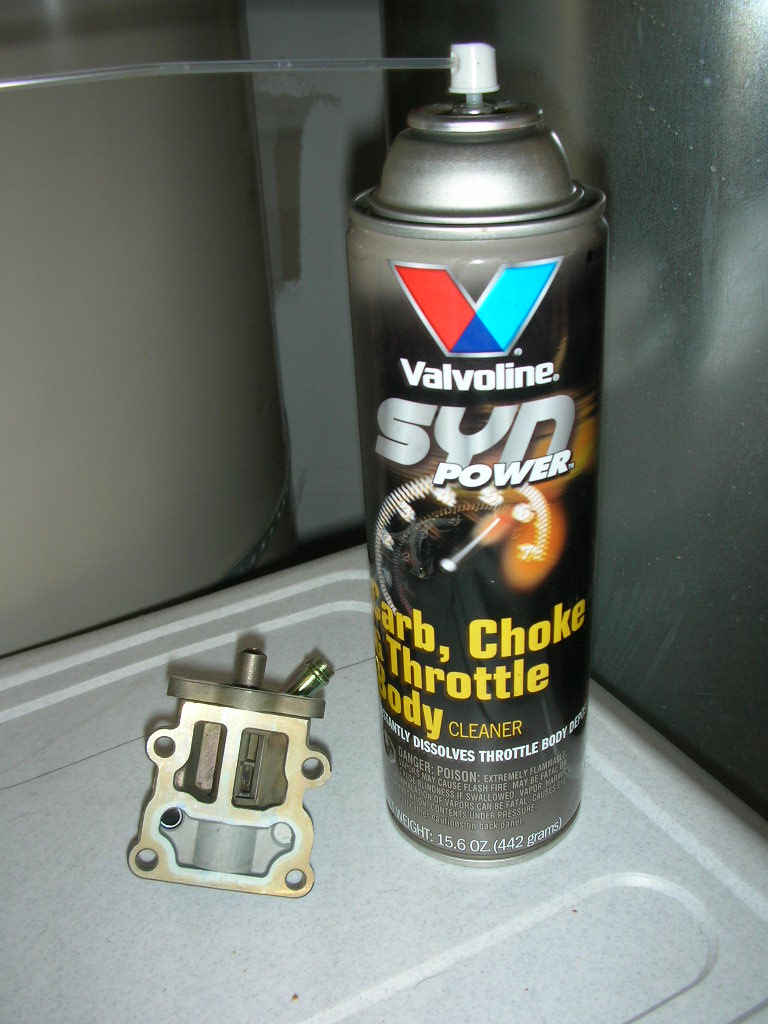
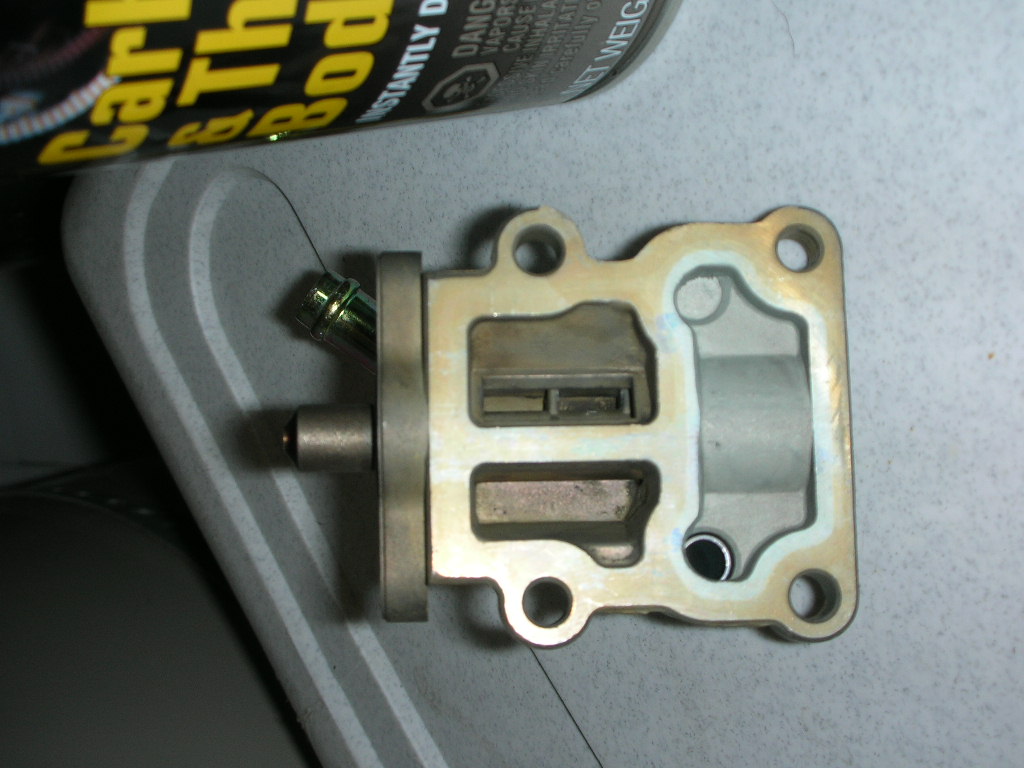
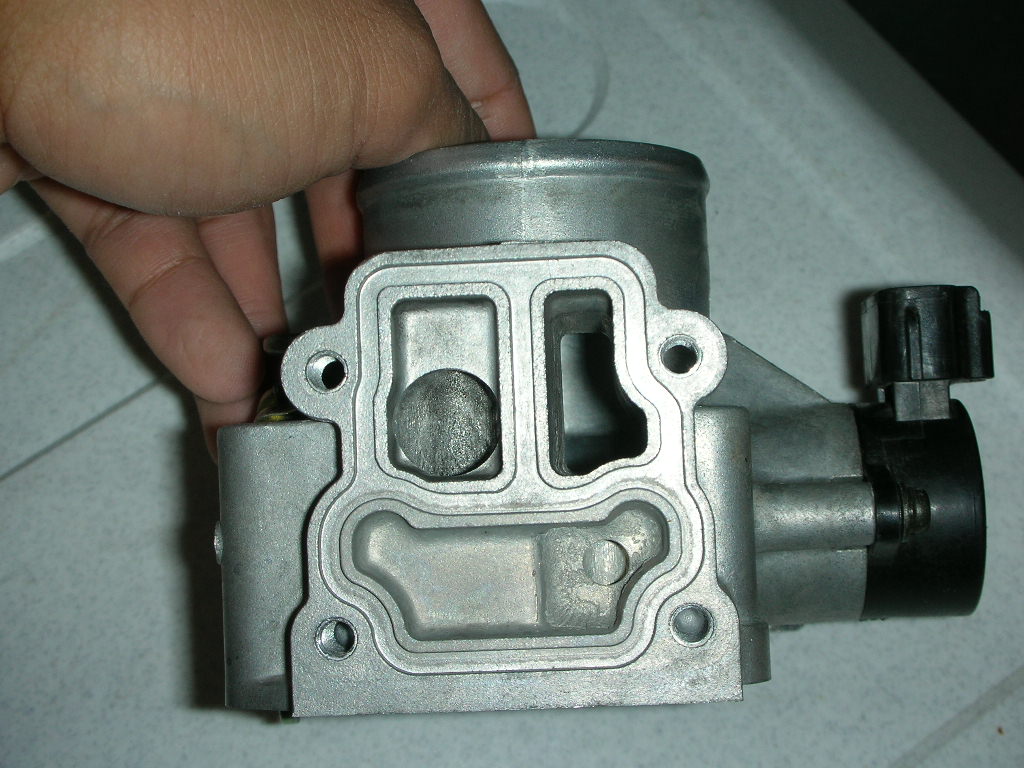
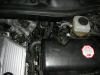
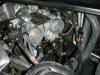
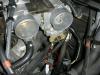
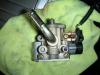
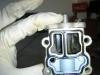
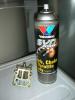
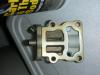
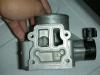
Hello Everyone, I know IACV has been a huge topic on the forum and I have found various pictures in the RX forum and ES forum on the idle air control valve (IACV) or as others call it the idle speed control valve (ISC). However, I have not found a "step by step" posting to date which definitively shows how to clean this thing so that my car stops giving me idling problems. Symptoms I have had included: - low and rough idling that would cause the car engine to start shaking after starting the car - this eventually got worse to the point that when I start my car, it would not idle unless I gave it gas - idling problems for me tended to occur more often after my engine was warm or had been sitting in the sun I hope these series of postings help you fellow LOC members out there. You've certainly helped me in the past so here's my two cents at this common problem. Additionally, the instructions I give are the way in which I have cleaned it myself. As you go about and attempt this, you may find better ways to do so. Please add and refine my instructions/terminology as needed. I am not a professional. I've only changed my oil, air filters, and conducted minor maintenance previously. The bottom line is that if you have the right tools, you should be able to do this. This discovery/ cleaning took me about 2 hours to do cause I ran into problems and there were major steps left out in previous postings that I’ve encountered read. The next time I do this, I believe I can get this done in about an hour or less. Tools Needed: 1) Tightly fitting Philips Screw Driver 2) Carb cleaner that is O2 sensor safe (I've seen CRC. I used Valvoline Carb Cleaner) 3) Locking Grip Pliers (definitely helped me remove the factory tight screws) 4) Small brush for cleaning 5) Towels for cleaning 6) Pliers (help removed brackets holding the hoses) 7) Latex gloves helps with limit the messiness. * I used the same gasket and did not replace it. No problems found. 1) Remove the hose that comes from the engine/motor that connects to the air intake hoses.( Hose is below in red – we’ll refer to this as Hose A) When you pull back the rubber hose covering, you will see that a metal bracket is holding the hose pretty tightly in place. Use the pliers to clasps the two metal pieces together to loosen the bracket and pull the hose loose. You can also do this by hand if it’s easier for you. 2) Upon removing the hose, you will want to remove the two air intake hoses. Loosen the three screws above in green and remove the hose. Below is a picture of the intake hoses removed. 3)After removing the intake hoses, I opened the lid to the air filter and moved this to the side of the car to create more working room. I believe there are two clips on the right holding the lid in place. Just pop the two clips and move the cover to the side. I also took out the air filter and temporarily moved this to the side. 4)After removing the intake hose, the throttle body/IACV/black electric coil is revealed. At this point, I removed the black electric wire from the black coil. Once the electric wire is removed you can remove the black coil from the IACV by removing the two screws. Note, the screws are factory tight so use a tight fitting screw driver to remove the screws. One of my screws was partially stripped from the dealership’s work, so I had to resort to my locking grip pliers which helped out tremendously. After removing the two screws, the black electric piece pops right off. When the black electrical coil is removed from the IACV, it exposes a small pencil sized metal stud. You will also notice a washer that sits on this stud. Don’t lose this washer. Take it and put it aside so it doesn’t fall off when you continue on in the next steps. 5)Additionally, I removed the hose coming out of the IACV. We’ll call this Hose B. This hose can be removed in the same manner by clamping the bracket and pulling the hose out. You will see that the hose is removed below. Below are pictures of before and after. 6)Here is where the fun begins. I initially attempted to remove the four screws attached to the IACV at this point, but found that after an hour, this would be nearly impossible to remove considering the location of the screws were in an extremely tight spot. The only way I would be able to remove the IACV is to remove right throttle body. Not as tough as it sounds. Three screws need to be removed to accomplish this. Again, be careful when removing the screws. Also you will see I removed another electric plug and I also cut a tie wrap. Once you complete these steps, the throttle body/ IACV comes out pretty easily. Note when you remove the throttle body, there will be one LAST hose connected to the IACV. Be careful when you remove this hose as radiator fluid may spill. Some of my fluid spilled out so I just refilled my coolant after I was done. 7)Below is a picture of the bottom view of the IACV. You now can EASILY remove the four screws connecting the IACV to the throttle body . In the picture below, I have already removed one of the screws. Once the four screws are removed the IACV and throttle body separate. Now you can clean both of them with your carb cleaner, brush, towels, cotton swabs etc…. Picture here is before I the cleaning with all the muck inside Pictures after I cleaned the IACV and throttle body This last picture is the post throttle body cleaning 8) Once you are done cleaning, just put back the throttle body/iacv the same way you took it off, and put everything back in reverse order. Ensure the gasket is in place. Also, ensure you put the washer back on the electric coil. Make sure you place hose A & B back and ensure the electric plugs are back in their original position. Once these things are in place, then it's all about putting the air filter/hoses back and you are good to go. If you have lost any coolant, make sure you refill it to a safe level. After completing this cleaning, my car starts up without any problem and idles as if I just purchased the car brand new. Replacing this at a dealership would have costed me $300-400 easily. Let me know if you have any questions. Cheers (Also, I tried to post these as separate replys, but the software combined all my replies into a single reply and did not keep them separated) *Edited the posting to have the pictures follow step by step in sequential order*


-
Be careful not to strip the two screws when removing them. It is challenging to break the factory torque to loosen those screws so find a very tight fitting screwdriver that will do the job. I am in the middle of cleaning my IACV myself..
-
Those four screws are sitting in a VERY VERY tight spot! The head of the screw is facing downward which makes it even harder to get access to. Additionally the two screws holding the IACV in place require much force to loosen and it is very very easy to strip the screws...be very careful
-
I have a similar issue to. Have any of you experienced this issue with the garage door opener on sun visor. Basically, I have to hold down the button for a LONG time before the garage actually opens (if it works). Sometimes I hold the button down for 10 secs and it doesnt open. I try and try again and finally it catched. My car is parked right outside the garage door so distance of the signal should not be an issue. (I used to be able to open my garage when I was one/two houses away from my home), but now seems like the signal is weak or something. I thought it may be a battery issue, however I replaced my battery maybe two months ago. Should I reprogram the signal again? BTW, I can open my second garage just fine without delay. The first garage only has this issue, so that should eliminate any weak battery issue. Hmmm.. Thanks...
-
Do Worn Brake Pads "chirp" ?
GoldenStateSilverSport replied to RX in NC's topic in 99 - 03 Lexus RX300
Pretty incredible stuff..I noticed my car has 69,500 miles on it and I am still running the original brake pads. I had the mechanic check my brake pads when he rotated my tires and he told me that I have about 50% left on both the front and rear brake pads. Have you guys experienced the same life with your brake pads? I would have thought pads last maybe 60k miles, however my car is at almost 70k and the pads are still in pretty good condition. I don't brake hard and most of my miles are indeed highway miles, however I would have never imagined that they would have lasted this long. -
Firestone is currently running a special through June 3rd on the Dueler H/T with a buy 3 get 1 free. Those providing reviews at TireRack have given this tire good ratings and it is available in both the normal 17" and plus-1 18" sizes for the RX330. Personally, while I have liked Michelins on my vehicles over the years I have not be overly impressed by the those that came stock on my RX. Peformance and ride characteristics have fallen off dramatically from new with only 30K on the tires. If I needed new tires at the moment I might be replacing these now with the the Duelers. As for the Exaltos, not sure they are available in the normal sizes for the RX330. I'm soo *BLEEP*ed i missed out on this special at tirerack. I could have saved $75 bucks in buying four tires. :chairshot: I was going to buy the Alenza's too. Now those tires got awesome ratings on tirerack and I have heard nothing but good things about them.
-
Dash Scuff Marks..
GoldenStateSilverSport replied to Cherokee_Outlaw's topic in Lexus Detailing and Car Care Forum
I used the bug/tar remover on the top of my cup holder between the driver/passenger seats. I have some scuff marks there. The bug/tar remover is too strong to apply to the vinyl, it destroys the surface. I regret doing this as now the surface of the cup holder cover does not feel soft as before. I added some conditioner to the surface to help restore it which helped a little, but I can still tell the surface is screwed. -
Congrats - I love white cars and think you made a good choice! White is a great choice! I have a black silversport and I personally think it's the most luxurious color, when it's clean. The keyword being "clean". The problem with black is that it's hard to keep clean, as you previously mentioned. Additionally, the dings and nicks stand out easily.
-
Which Gas Whould You Suggest For Rx300?
GoldenStateSilverSport replied to LexKid630's topic in 99 - 03 Lexus RX300
I've been pumping premium gas ever since I got my car. I've stuck with mostly V-power shell or Chevron with Techron and haven't had any problems, however with the recent spike in gas prices, I am seriously considering downgrading to regular or midgrade. It costs me $65 freakin dollars to fill up last time. That's painful!! -
$1959?... What kind of stuff are they smoking? Are they cutting down an entire rainforest to make that steering wheel/shift knob? That's just absurb.
-
Any ideas where the best place to buy this is? I've found this for $68.95 online plus about $9 S/H. Any recommendations? Thanks!
-
Trouble With Very Low Rpm At Start
GoldenStateSilverSport replied to Xerox's topic in 99 - 03 Lexus RX300
Are "idle speed control" valve and idle air control valve synonymous? -
Trouble With Very Low Rpm At Start
GoldenStateSilverSport replied to Xerox's topic in 99 - 03 Lexus RX300
Thanks! :) I am not a hands-on guy and don't know much about inside the hood of Lexus much. I take it to a independent guy that I trust so will ask him and see what he says. So I am definitely looking at probably IACV or throttle body (cleanup or replacement). how much should each of this cost approx.? I am currently having this problem right now. When I start to my car, I need to gas it for a couple of seconds to keep it from shutting down, otherwise the car will just shut off if I let off the key. I had the throttle body cleaned in November, and they presure cleaned my injectors, however they did not clean the IACV since I am still having this problem. I called two Lexus dealerships and they don't "clean" the IACV, they only replace it for about $700. One lady said they only replace it cause if they clean it, it's only going to get dirty again which didn't make any sense to me. When I called the second Lexus dealership, they said they only replace it. I just called a toyota dealership and they said they would clean the IACV for $99. When I explained to the service advisor why I am getting the IACV cleaned and the starting problems I was experiencing, he said that cleaning the IACV won't do the job. He'd prefer I take the car in and have it diagnosed. So, Im a little confused on what to do. Any suggestions? Does the advisor not know what he's talking about? And is Lexus out of their mind for not wanting to clean the IACV? -
Toyota quoted by about $100 + costs of both belts
-
Sorry to hear that, but glad your family is ok.. So Lexus lied to us when they showed all those RX commercials with the headlights turning 15 degrees so the driver can see the deer in the road while turning a corner...I guess we cant teach the car to drive backwards if the deer is running at the car.
-
Same problem with my 01 RX300..it opens to about 80% normally, but takes forever for the liftgate to go all the way up during the last 20%...it's really annoying, but i don't want to fork out the $$ to replace the liftgate mechanism.
-
2003 Rx 300 Awd Horrible In Snow
GoldenStateSilverSport replied to kenpomasta's topic in 99 - 03 Lexus RX300
I have the RX300 Silversport..2001. it's AWD. I've taken my car to the snow, and I'm not going to lie. It doesn't have the best traction, my car has slid before in the snow etc...I don't feel totally safe driving this vehicle in the snow. Many times when I've stopped, I can feel the Anti-lock breaks kickin in cause the car is somewhat sliding. I've driven other cars such as Denali's and the Tahoe in the snow and I must say I feel much safer in these cars. Foir me personally, I think what it comes down to are the tires. The stock tires which are Duelers aren't exactly made for the snow. I think it's an all around performance tire and more for "performance" and spirited driving. When it comes time to replacing my tires, I think I'm gonna have to go with something a bit more aggressive..something that gives me greater traction. If you plan on taking the car to the snow often, I'd recommend you upgrade the tires to something made more for the snow. Cheers