AndyLowe
-
Posts
28 -
Joined
-
Last visited
Content Type
Profiles
Forums
Events
Gallery
Store
Articles
Videos
News & Articles
Everything posted by AndyLowe
-
Hello Larry, It sounds like your level of charge might be a tad low. Here's how to see without any tools: - With engine off open your hood. - Just Above and at the top, center most corner of your passenger headlight, you will find a Sight Glass. - Wipe it clean with your finger and a little rag. This Sight Glass gives you an inside view of the level of charge in your High Pressure Side, LIQUID LINE You see a clear glass, without any "grayish milkshake" bubbles/vapor and liquid passing by. It should be completely clear, with engine off. Now, start up the engine, turn on the A/C, open both front windows (you're creating work for the A/C) and go look at that Sight Glass again. You should see a few bubbles/vapors (a grayish milkshake) flowing by, and then it should settle down to a completely clear Sight Glass, just like it was when the engine was off. If you see the grayish milkshake going by, you are low on charge and need more freon added. If you see a completely clear Sight Glass, use your hand to touch the larger metal tubing pipe, just under the black plastic cover, in the passenger side Hood Hinge area. It's down along the firewall and it is where the Service Cap is located on the Low Side Service Port. This pipe should be very cold and sweating, due to the humid air condensing on it's 36 degree f internal temp. If it is not sweating, after ten minutes of A/C system on, you are probably NOT at the correct level of charge and need more freon. Toyotas and Lexus give us the Sight Glass to assist in knowing for sure. Many other manufacturers quit installing this excellent tool and there are many people attempting to service an A/C system who truly don't understand them. If your Low Side Lines are sweating fine, along with the Sight Glass being Clear, I would think your system is properly charged. Make sure there is water dripping from the evaporator case, just below the glove box area. It is the result of humid air condensing on the Evaporator Coil and falling to the bottom of the Evaporator Case. It should be dripping. If its not dripping, clear its drain tube. (Rubber tube near passenger side catalytic converter) Make sure your cap is on your Service Port! The cap has a rubber seal within as 90 percent of all schrader valves leak. (That's the valve core, just like your tire) Andy
-
Where To Buy Bushing, Rear, Control Arm, Knuckle Side
AndyLowe replied to AndyLowe's topic in 90 - 00 Lexus LS400
Here's a very helpful link, from an Aussie who replaced his bushing with an ADUS 583 Kit. Thanks! http://www.clublexus.com/forums/ls400/236651-rear-knuckle-bushings-source-pic-attached.html -
Where To Buy Bushing, Rear, Control Arm, Knuckle Side
AndyLowe replied to AndyLowe's topic in 90 - 00 Lexus LS400
Thank You! I had not heard of them, and a search for LS400 Adus on Ebay brought some sources up. Andy -
Where To Buy Bushing, Rear, Control Arm, Knuckle Side
AndyLowe replied to AndyLowe's topic in 90 - 00 Lexus LS400
I found this website and their Bushings look like what I'm trying to find. http://www.redlinemotive.com/store/replacement/wizard.asp?year=1994&make=LX&model=LS-400-001&category=L∂=Trailing+Arm+Bushing The alternative is to perform a great deal of labor and expense, to replace the Knuckle; the cast iron part that contains the two rubber bushings down low. Lexus offers the Knuckle for about $300 with shipping, and that's too much money for a worn bushing if I can avoid it. -
Ls400 How To Fix The %$^# Cigarette Lighter!
AndyLowe replied to 914lps's topic in 90 - 00 Lexus LS400
Good Job~ You're now a royal member of the Lighter Knights~ http://us.lexusownersclub.com/forums/index.php?showtopic=66438 -
I agree with replacing the coils but not with this theory of resistors and pressure in the combustion chamber. The ignition coil doesn't understand what is going on in the combustion chamber. It only knows how often it is being cycled to spark. It can and does heat up with a warmer engine and higher rpms (more sparks). That can cause items to expand and tiny cracks to open up. That becomes a discharge path to ground on the high voltage side. Rather than the spark plug gap reaching flashover (electrical breakdown, the point an arc is passed) it happens earlier in the coil (IE at a lower breakdown voltage). As such the spark never happens in the cylinder and you get a mis fire. Snap On offered advanced diagnostic classes to my employer, about ten years ago. One of the courses I attended was Ignition Principals. The instructor was very knowledgeable and taught theory for several brands and we learned very helpful tips. The fact that compression chamber pressures increase along with cylinder head temperature, (when under load,ie; going up a hill or accelerating to enter a highway,) is the reason for the breakdown of 30,000v to a path of lesser resistance. Normal, non-load combustion temperature and pressure do not require 30,000v, but more close to 18k to 24k volts. It's the added resistance of the spark plugs environment that causes the weak coil to give out. Watch a spark line on an Oscope when under load; it grows into the 30kv range. I won't argue with you, but thought I would pass on to you what the Snap On Instructor taught. I thought this particular fellow was very bright. He shared a few war stories that helped us know more. I like this forum and respectfuly hold my point of view, but also respect those that disagree with me. I want to learn more~ Perhaps I'm wrong? There are some very bright folks in this forum.
-
Where To Buy Bushing, Rear, Control Arm, Knuckle Side
AndyLowe posted a topic in 90 - 00 Lexus LS400
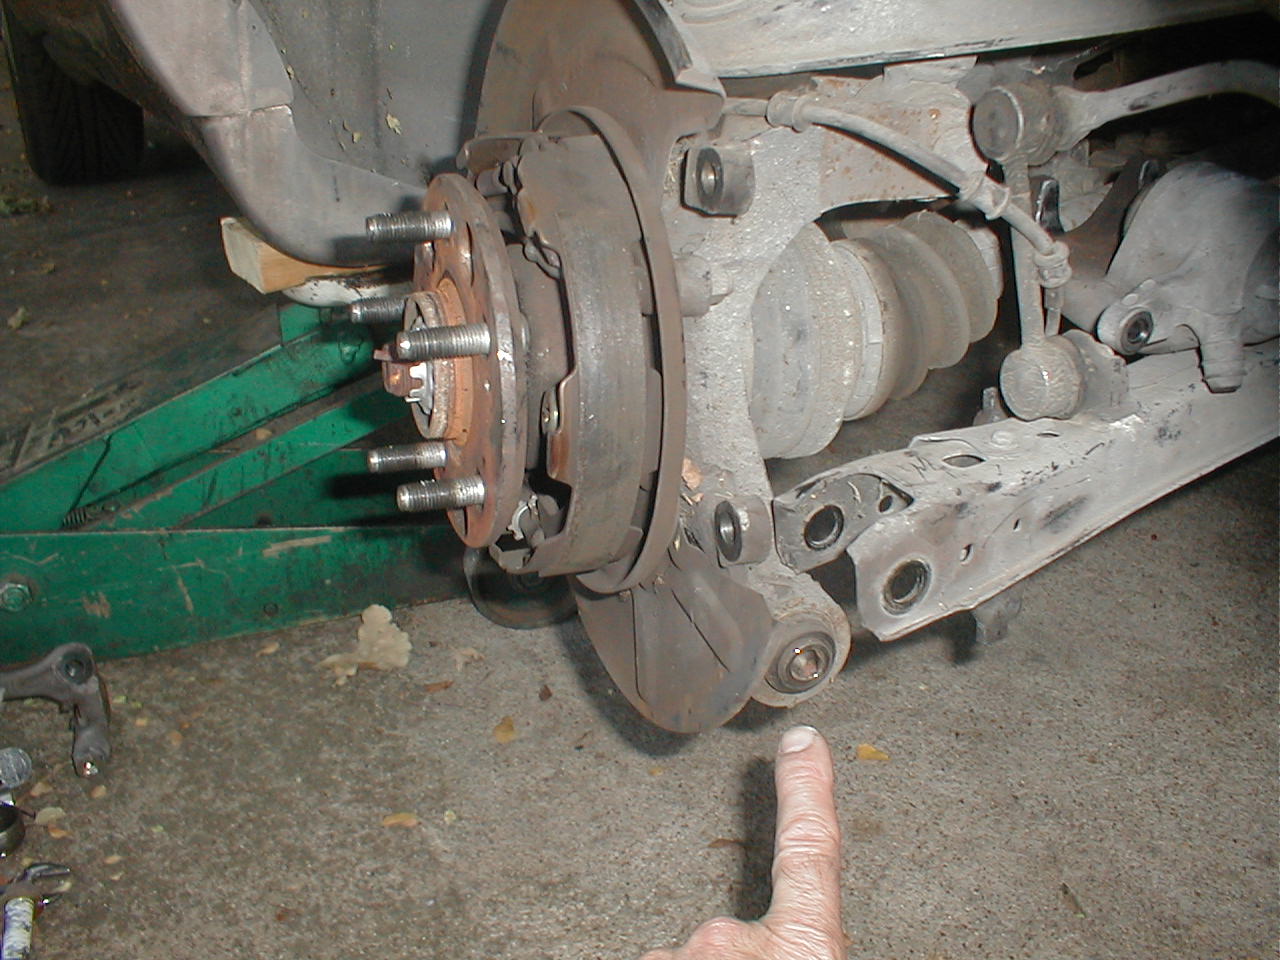
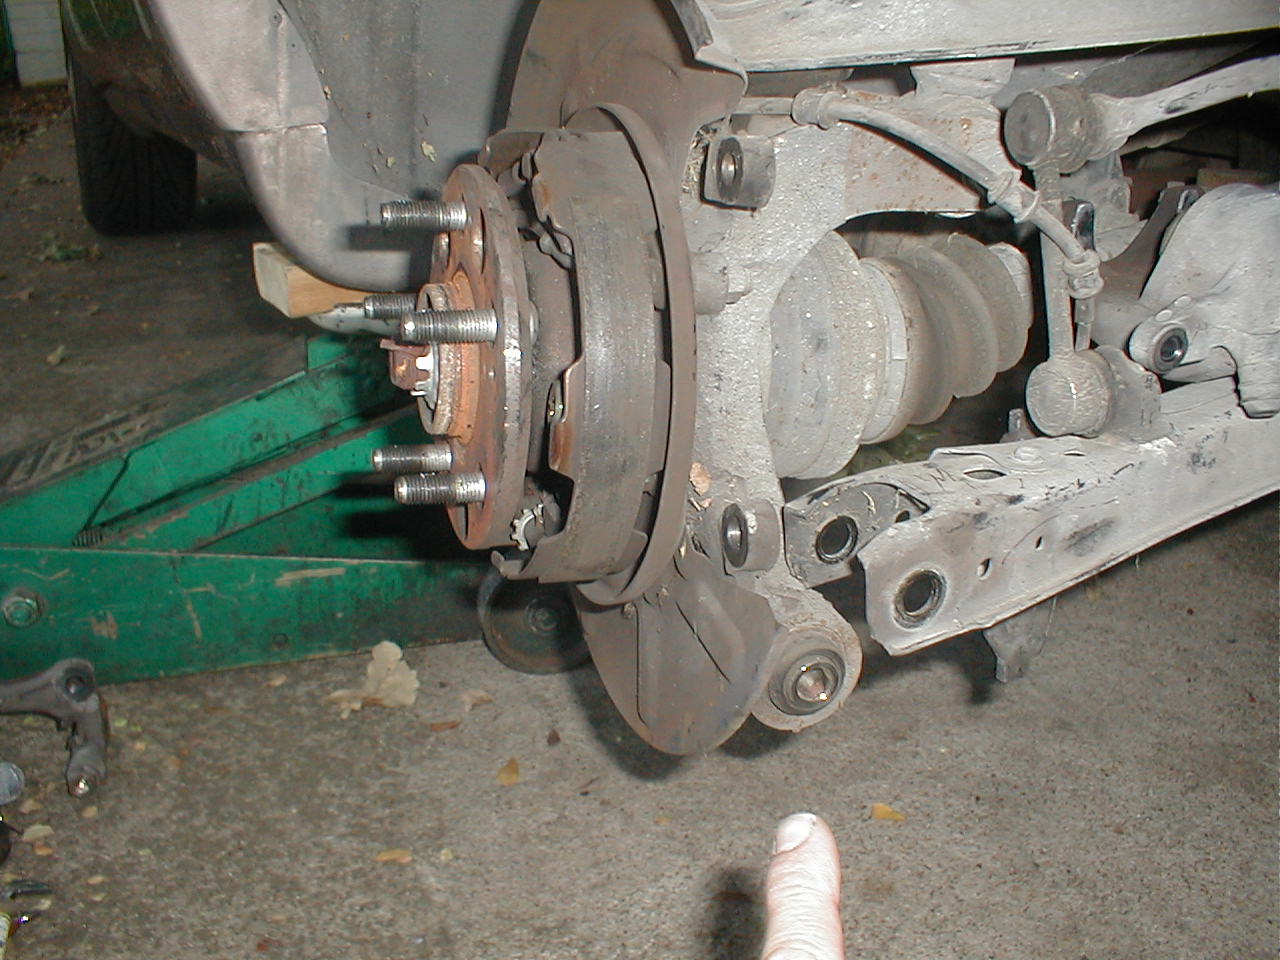
When braking, I have a rythmic noise and have found the driver's rear wheel has play, when off the ground and grabbed from the 9 and 3 oclock position. Closer inspection has shown the rubber bushing that is pressed into the Wheel Hub Bearing Carrier is the cause of the mechanical play. Do you know where I can purchase a bushing for this? Thanks, Andy
-
Battery Runs Down After 1-2 Days Of Non-Use
AndyLowe replied to PilotguyPA28's topic in 90 - 00 Lexus LS400
After you shut the engine off and take out the key, now wait two minutes. Now, connect an Amp Meter that measures milliamps (small) in series with the negative OR positive terminal. Anything over 30 milliamps is too much and needs to be isolated by removing fuses and relays until the draw is below 30 milliamps. If you are drawing less than 30 milliamps and still cannot start the engine, check for 13.5v to 14.3v when the engine IS running. You're confirming your Alternator is working well. If the Alternator is not working well, (or even if it is!) clean the two flat terminals that mount just beneath the 12mm socket head nut, beside the + Positive battery Clamp. Use 80 grit sand paper and really clean the upper and lower surfaces of these two flat terminals. Now reconnect them and see how your Alternator output is at idle. If your alternator is putting out above 13.5v AT THE CENTER OF THE POSITIVE LEAD POST OF THE BATTERY, not the clamp, and you are less than a 30 milliamp draw after two minutes, then replace the battery. Let us know how it goes? Thanks! -
You mentioned that during Inclines, the chugging is present. This is a classic description of a defective Ignition Coil. Some coils are more erratic as they warm up, and then you feel the tremendous surge of power intermittently to the transmission, which makes you think the transmission is "going out". It's not! You need to get on Ebay and buy a coil or two; I've bought them, with shipping, for $22 each. You need two and when they come, replace both. It's $44.00 to get rid of a Coil that is electrically breaking down UNDER LOAD. UNDER LOAD is what you're describing and the 30,000 volts of spark is no longer going off to the Distributor, across the Rotor's air gap, and then onto the Spark Plug's Air Gap. No, your high voltage is jumping internally within the old coil, and it is jumping to the path of least resistance for 30,000 volts; the ground on one of the coils four phillips head screws. Change these two coils out for half the cost of one hour of Service Dept guessing and you will enjoy your wonderful car again. One other item to also address is the two wires that are bolted to your + Positive Battery Clamp. Take a 12mm socket and remove that nut, which holds these two flat terminals to the side of the + Battery Clamp. Now take some 80 grit sandpaper and clean the top and bottom surfaces of both flat terminals. Now re-install this critical junction. I found this out while monitoring both O2 Sensors; my voltages were erratic and the car was having trouble responding to me giving the accelerator pedal a fast, large input. The engine was bogging down! When I cleaned these, the correct response came back. Now keep in mind, my condition was NOT under load, but with gear selector in Park, and car in my driveway. This non-load condition will NOT identify a weak Ignition Coil. The Load of going UP A HILL, adds extreme pressure to the combustion chamber. This is the same thing as adding more resistors to a circuit, and so the high voltage and current simply opt for a more easy path. That's why you're getting this problem when you have warm coils (they've expanded closer to their close by phillips head screw ground) and the under load is the "Road Work Ahead, Next 2 Miles" sign, so your coil says, Let's take another route and still have a nice trip! Good luck and let us know!
-
I tell you all this in hopes you avoid what I learned the hard way, and because it is how we all grow our knowledge. The type of car this occurred on was a ES300 V6, but it still applies to this Forum as it is applicable to both. Back in April, I bought an Autozone Duralast Timing Belt, for my daughter's car. She would get her License in late Sept, but the car was worth buying as it needed repairs and we had time to repair long before she would start driving the car in Oct. I had replaced the forward Head Gasket, Water Pump, Thermostat and Timing Belt. I always purchase genuine Toyota Thermostats, but often go aftermarket on the other items listed. When October came along, it was time to get the Emission Inspection and even though the car ran well, it failed for excessive HydroCarbons and Carbon Monoxide. In our state, we get one free re-test, and so I knew I must truly solve the issue. I came home, popped the hood open and applied my volt meter to the Diagnostic Connector found on EVERY Lexus/Toyota engine, and with DC Volts selected, observed the O21 and O22 (Oxygen Sensor 1, 2) readings. O21 was porpousing quickly between .2v to .8v with engine at idle, at correct normal temperature. This is correct. O22 was always below .5v, and would change slightly from .3v to .4v and very rarely reach .5v. To determine which O2 on the engine was O22, I watched my meter while disconnecting the O2 closest to the front bumper and my meter went to zero volts. Great! It's the easy access O2! Any readings below .5v is Lean. Lean Mixture is Low Voltage Above .5v is rich The O2 Sensor was telling the ECU (Computer) that the exhaust stream was Lean and I then looked for an Air Leak on the Intake Manifold which I had installed new gaskets on, back in April. Finding none, I used some brake clean aerosol and gingerly sprayed around the edges of the Intake manifold mating surfaces, seeking to find if the engine RPM sped up or the volt meter would now rise above the .3v - .4v range it doggedly remained in. No change with adding a rich, flammable vapor near the Intake gaskets and no vacuum lines broken or missing. Next I watched the volt meter and disconnected one electrical connector at a time, from the three related Fuel Injectors for the 3 cylinders reporting to this 02. The engine immediately responded by running rough as I removed one injector at a time and the mixture on the voltmeter would go even more lean; .2v, etc. Reasoning that the O2 may be damaged from back when the Head Gasket failed and steam had its way, I decided to replace the O2 sensor and went to Oreilly Auto Parts. They had a Bosch universal, for $19.99 and when I got home to change it, I found the original O2 was not the type that unscrews from it's little plate steel mount. (I broke mine trying to unscrew it and learned it's welded in!). Back at Oreilly's I returned the universal, and bought the $64.99 Exact Fit Bosch, and that was only due to a price match from Autozone. (Oreilly's price was normally $84.99 and they are close by). With the new Exact Fit Bosch in place I now had, guess what? .3v to .4v All along this troubleshooting, I was remembering what I had seen back in April: When I reassembled the engine back then, I remember fighting to get all three timing belt marks to line up with the factory marks, and was ALWAYS unable to get this forward most cylinder head Cam Gear timing mark to be perfectly in line with it's rear mark! I reasoned that perhaps the Crank Shaft Gear might be one tooth "off" and this would cause the Cam Gear to be "off" a half of a tooth, because of the "two Crank revolutions, to one Cam revolution" ratio. I tried marking them all with White Out, taking the belt off, shifting the belt one tooth on the Crank Gear and reinstalling. This only moved the problem on the upper cam gear to the OTHER side of the mark it was supposed to line up with. Back in April, I went ahead and put it all together, and it ran good, so I waited till October; when my daughter would start driving it. I enlisted my 14 year old son at this point, went to Oreilly's and bought a GATES Timing Belt. I have always loved Gates Products as they are a PERFECT FIT, and their Timing Belts come with the three white lines clearly marked "Left Cam, Right Cam, Crank" and they ALWAYS line up perfectly. We took out the Autozone Duralast Belt, put in the Gates Timing Belt and WALLAH!~! It lined up perfectly. We re-assembled everything, hooked up our volt meter and watched as the O2 sensor came to life. (They are thermocouples and need time to warm up before they produce reliable signal voltage) When it was warm, the new O2 was porpousing rapidly between .2v and .8v and my son and I shook hands in renewed confidence! We drove over and had the Emission Re Tested and it passed very quickly. (It's a 1992 ES300, with 82,500 miles; clean as a pin!) It was mechanical valve timing that was off. That's all it was. I never needed a new $84.99 O2 Sensor, but it doesn't hurt to replace them as this was 18 years old. My lesson to all of you is to make sure your Cam and Crank Timing Marks ALL line up perfectly. Don't re-assemble an engine that is not lined up perfectly. It will run, but it won't run right. I'm truly grateful for the whole problem because of the lesson it taught my 14 year old son; sometimes you have to make absolutely sure you have done something perfect. Accuracy matters and is crucial sometimes in life. Strive for it, demand it and earn it. It was a great moment watching my daughter drive off in her car that she has been waiting 7 months for. She did not know it would be ready, but had seen us working on it for several days. She was beaming and I too was thankful for what my 14 year old son had gained. Andy
-
Please see this link. It's currently on page 8 of this Forum and has been buried with time but is most helpful. Make sure you look at the photos. Andy http://us.lexusownersclub.com/forums/index.php?showtopic=64793
-
Paul, Glad to hear you've made great progress on the fuel and idle problems! I think your current opinion of a particular fuse as being good, has made you think that no other fuse is at fault. If I were at your house, I would help you by buying a subscription to www.alldatadiy.com and we would look at wiring diagrams together. In these diagrams we would find the source of battery voltage and its path to a large fuse first, say 40amp. Next we would find branches off this 40 amp fuse (source) to many components and I'm confident you would see the NEXT fuse in line for Radio, A/C Control Head, and Mirrors. There may be one accessory relay / circuit breaker for these, or another fuse. Have you had a aftermarket Radio, Alarm, GPS or Cell Phone installed recently? (Has someone cut, modified, spliced, jumpered in, any wiring?) If so, gain access to where they last worked and visually inspect like a surgeon. Yes, AllDataDIY is a great investment and gives you the birds eye view of how the +12 is sent to each device. It also shows you wire color and connector locations and pinouts. It's the fastest way to understand and correct these problems and then you're off to problem free driving again! Let us know? Thanks, Andy I don't always check this site so you can have my email: andylowe@sbcglobal.net
-
Andy well you have been just about dead on. Turns out there was alot of gas in the tank. I pulled the rear cap off the tank and it was over half full. There is a float that we tapped a bit an reinstalled and my gauge came back up to about 3/4 after filling the tank. Now the idle problem was the idle air control motor. Just a coincidence it was dying after fueling. I took it apart cleaned it up now its running perfect. Now I have a problem with my radio air and mirrors not working . There is one fuse for this, but it is hot. So now I have no idea where the problem is. What do you think? Thanks, Paul Paul, Glad to hear you've made great progress on the fuel and idle problems! I think your current opinion of a particular fuse as being good, has made you think that no other fuse is at fault. If I were at your house, I would help you by buying a subscription to www.alldatadiy.com and we would look at wiring diagrams together. In these diagrams we would find the source of battery voltage and its path to a large fuse first, say 40amp. Next we would find branches off this 40 amp fuse (source) to many components and I'm confident you would see the NEXT fuse in line for Radio, A/C Control Head, and Mirrors. There may be one accessory relay / circuit breaker for these, or another fuse. Have you had a aftermarket Radio, Alarm, GPS or Cell Phone installed recently? (Has someone cut, modified, spliced, jumpered in, any wiring?) If so, gain access to where they last worked and visually inspect like a surgeon. Yes, AllDataDIY is a great investment and gives you the birds eye view of how the +12 is sent to each device. It also shows you wire color and connector locations and pinouts. It's the fastest way to understand and correct these problems and then you're off to problem free driving again! Let us know? Thanks, Andy I don't always check this site so you can have my email: andylowe@sbcglobal.net
-
I once bought a truck that would indicate it was low on fuel. The gauge made me think it needed to be filled up, when all the while, it was tricking me! I suspect your Fuel Gauge is indicating incorrectly, and you "think" you need to fill up, and when the overflow occurs, you "think" your tank is unable to vent. Because you have a 1991, I highly suspect your Fuel Pump SENDING UNIT, the variable resistor which is attached to a swing arm with a float on the end, is defective. My 1994 LS400 has access to this pump and sending unit, by removing the rear seat cushion first, followed by the rear seat back. Next you will see an access panel, with screws holding it onto the sheet metal where the seat back was. Removing it will allow access to the pump and sending unit. Because I think your tank is VERY full, I would first drive it at least 200 miles, and then gain access. You can purchase a subscription to www.alldatadiy.com, for a 1 year period, and have access to all kinds of good service manual info. My 1994 LS400 has a solenoid valve, that is located on the driver's side, inner fender, down low. A single vacuum hose connects to this valve, and this rubber hose then attaches to the front top edge of the Intake Manifold. Only when the Computer commands this valve, does gasoline vapors from the tank, enter the Intake Manifold. A blocked vent line, under the car on the driver's side would NOT cause the engine to die at idle. You should look for other causes of poor idle. It's likely a coincidence that filling up, and dying at idle occur. Gas Caps are bi-directional and SHOULD allow air to enter the tank, when displacement is necessary; ie,,, you're using gas out of the tank, air needs to enter. Does your tank suck air in when you open the cap? Replace it. It would be nice to know your tank is not the problem, rather your Sending Unit, the item that tells your Fuel Gauge what to indicate. When I worked on Audi's, it WAS the tank.........! I don't have nice things to say about Audis. Best of luck, Andy
-
Who Replaced Or Fixed Your Climate Control Unit
AndyLowe replied to 914lps's topic in 90 - 00 Lexus LS400
On Ebay, I won the auction for one of these panels, which had already been repaired. The Seller does this often and is based in Houston, TX. I think it was $125 total, and when I paid, he shipped immediately. When his unit came, I swapped them out with my son and we placed our old one in the same box. The Seller had included a pre-paid UPS or FedEx Shipping Label for him to get our old unit. His panel was fine and works perfect. It looks fine too. When he received our old unit, I think it took about 10 days before we received our core charge; $50 ??? I would do it again. -
I truly believe you are describing a failing Ignition Coil. I have bought them on Ebay, with shipping for $22. I would buy one if I were you and replace one and then go for a ride. If it continues to fail as you describe, then use the one you removed and install it on the remaining original coil. Voila! I truly think you will be surprised to learn it's fixed. As for the O2 Sensor being replaced and still not being able to clear the light, I would confirm with a volt meter set on 1 volt range, at the Diagnostic Connector on top of the engine, the voltage being produced by your O2 Sensors, while engine is warm at idle. You can buy a subscription to www.alldatadiy.com and look at the electrical wiring diagrams to learn which connector pin to put your meter's red lead, and just ground your meter's black lead. You SHOULD see your O2 producing a signal/voltage that porpoises around .5vdc. (Lean is Low .2v, .3v. .4v..... (Rich is High .6v .7v .8v..... It should always be going above and below .5v if your engine is running correctly. If it's running lean, look for a vacuum leak. If it's running rich, consider a stuck open thermostat......read your temp guage......it should be just slightly below the halfway point on its range when the engine is warm. Hope this helps, Andy
-
Repair To Cigarette Lighter Outlet 98-00 Series
AndyLowe replied to dasha1's topic in 90 - 00 Lexus LS400
If you’re having problems with your 12V outlet beneath the radio and the fuse is okay, you might give this a try. I have fixed these several times, on Toyota cars and now on my LS400 (1994) once. The normal fuse down near the driver's left foot area always checks good, and if you remove the center panel that surrounds the shift lever, and then pull/pry out the ash tray, you can gain access to the wiring connector (four wire on my 1994 LS400). You will have 12v at this 4 wire connector, right at the Ashtray Assembly and now you realize the +12v is being sent TO the Cigarette Lighter Socket, but right AT the Socket is the secret I've learned. If you really look at the socket, you see where they send the +12v and the ground. Now, study the +12v side and you will see that on EVERY TOYOTA/LEXUS SOCKET, is a built in "L" Shaped wire, with a rubber coating. Guess what? It's ANOTHER FUSE! Yes, they put one there in case someone drops a coin down in the socket or some other shorting piece of metal and yet we only think there is the fuse near the driver's left foot. I use a pick and pry the two little crimped terminals OFF this bottom of socket "L" shaped, rubber coated fuse. Next, I cut and bend a common paper clip, into an "L" shape and feed it into position. Now I solder one end and then bend the other a little to get it to fit, where the old burned fusible link/rubber coated wire was previously. It's RIGHT ON THE END OF THE SOCKET. Now, your outlet will work fine, and the fuse at the driver's left foot area will be the protection in the future. Hope this helps, Andy -
First confirm you have spark on BOTH banks of the engine. (I suspect you have spark on one side only). Next, buy a subscription to www.alldatadiy.com and extract the Diagnostic Trouble Codes, via a paper clip and the Diagnostic Connector on the top of the engine. Research what these codes are and how they relate to your symptoms. The wiring diagrams on your alldatadiy.com subscription will prove very valuable to solving the Fuel Pump Relay having no voltage. Your subscription will also provide you which two connectors on the Diagnostic Connector on top of the engine to jumper, so that you BYPASS the Fuel Pump Relay entirely and give the Fuel Pump +12v. When you do this, use your ears to hear the fuel rail. Do you hear fuel flowing through it? If you have fuel, and you have spark on BOTH Banks, you have probably skipped time on your Timing Belt. When any engine jumps its timing belt a few teeth, it will not start, but will have spark and fuel pressure. Let us know!
-
Help Needed! 96 Ls Crunching/creaking When Breaking
AndyLowe replied to Lex4Rdny's topic in 90 - 00 Lexus LS400
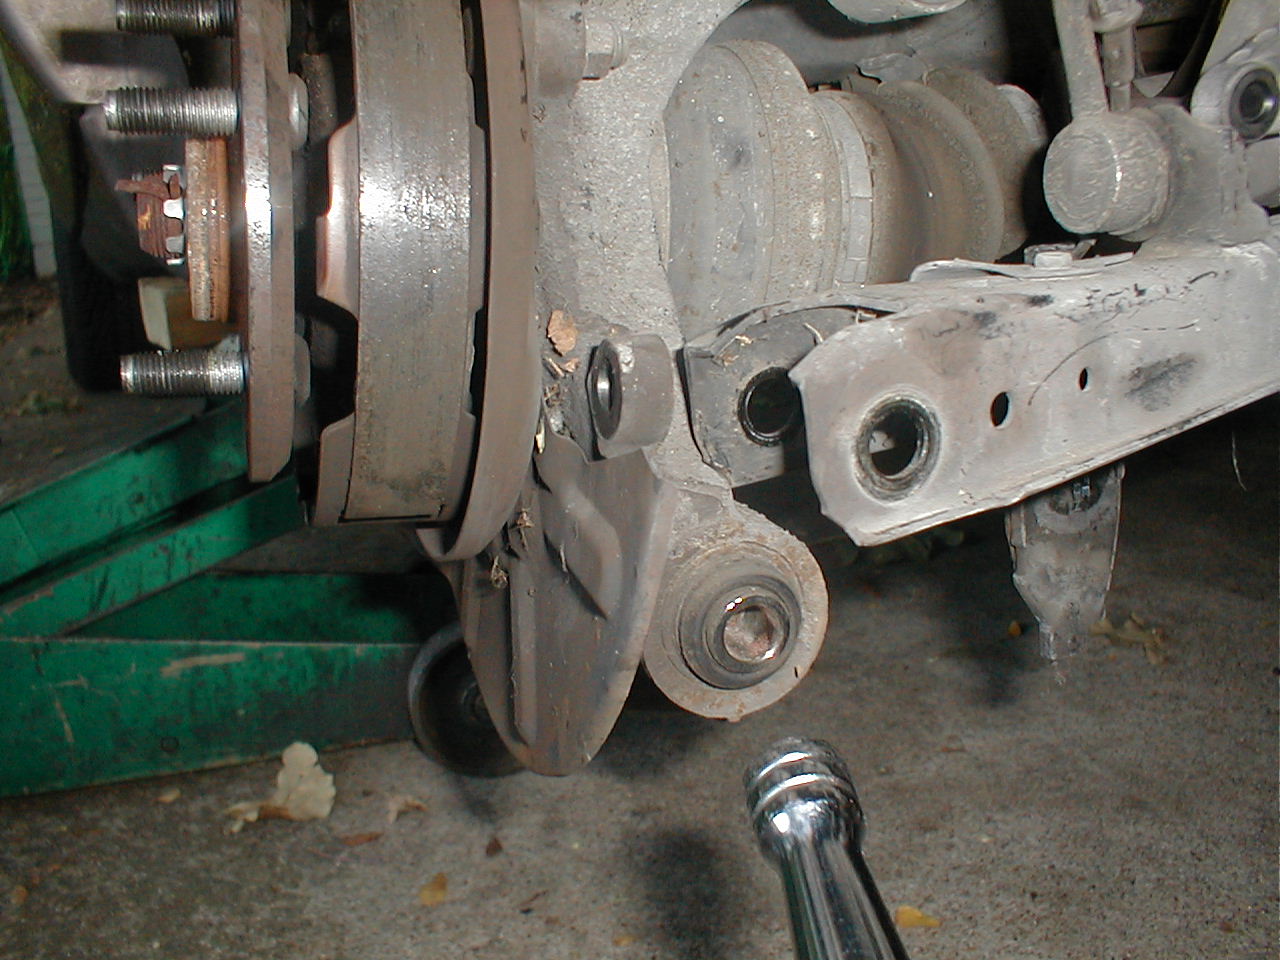
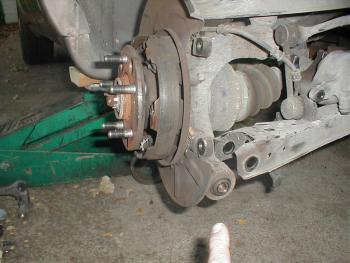
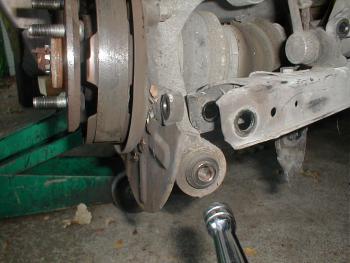
Your calipers are held on by two bolts that a 14mm socket fits onto. When you remove these two bolts, the caliper pulls off and out of the way. The holes that these two bolts threaded into, are the area to look at. These are the pins that should have a rubber bellows at their base. These pins SHOULD smoothly pull and push in and out of their holes of the cast iron frame they reside in. If you can remove these pins, check for a rubber bushing on the deep most end of the pin, checking for a non torn rubber bushing that slides in its cast iron bore/hole. These pins should have nice rubber bushings that are lubricated with high temperature grease, to allow the Caliper to float. (the Caliper bolts to these two pins). If the rubber bushings are missing, or the pins are locked up/frozen in place, it can make a clunking sound when brakes are applied or released. Hope this helps, Andy -
Crankshaft Pullley Removal And Replacement
AndyLowe replied to BlackLex's topic in 90 - 00 Lexus LS400
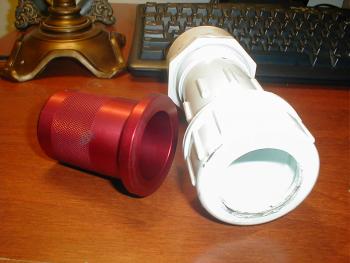
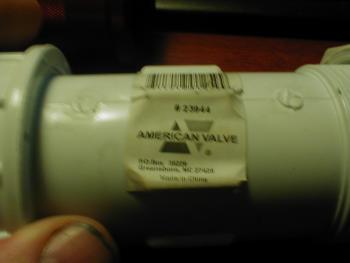
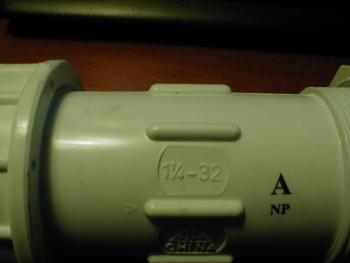
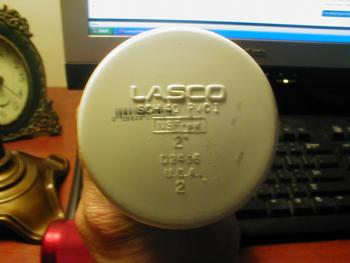
I found a PVC Union assembly and a 2" Cap to screw onto one end of the PVC Union, and spent $10.00, making my own seal installer. -
Crankshaft Pullley Removal And Replacement
AndyLowe replied to BlackLex's topic in 90 - 00 Lexus LS400
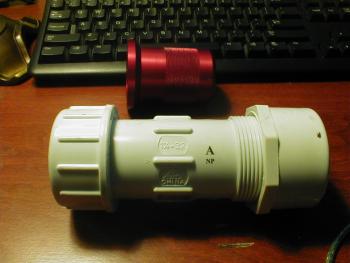
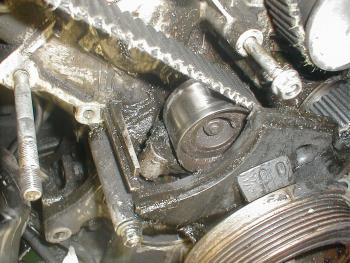
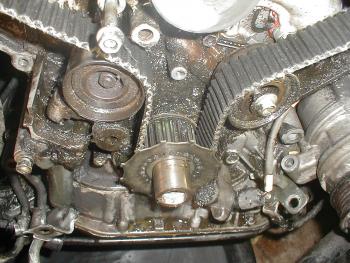
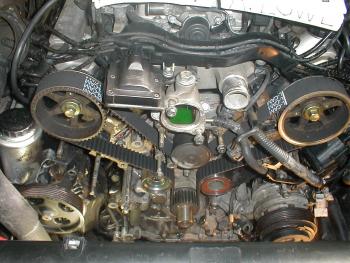
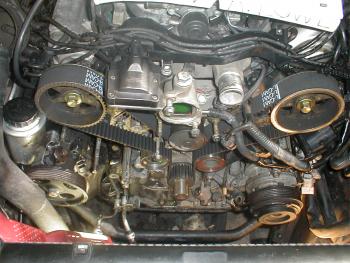
Because I have a SIR Tools Special Crank Shaft Seal Installer, for Toyota 4cyl and 6 cyl, (Lexus too) I thought this tool woould work. Not so. (It's the Red Aluminum Tool in the photos below). I researched and found SIR Tools now sells a Lexus/Toyota V8 Front Crank Seal and they want a lovely $ 168 for this one time use tool. Even though I wanted it badly, I forced myself to the Lowe's Hardware Plumbing aisle with my red aluminum incorrect seal installer, and my New Front Crank Seal. I found a PVC Union assembly and a 2" Cap to screw onto one end of the PVC Union, and spent $10.00, making my own seal installer. It worked 98% of the way, pressing in the new front crank seal perfectly flush, and I used a 1/2" thick by 1" thick by 6" long piece of metal stock, to drive the new seal in the last itty little bit. I think you should change your crank seal as well, as it is not hard to do, and you do NOT have to remove the slot key from the crankshaft. Your hand can easily pull the crankshaft's timing gear off....it slides nicely. Enjoy these photos! Andy Lowe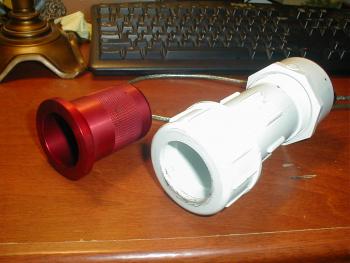
-
Crankshaft Pullley Removal And Replacement
AndyLowe replied to BlackLex's topic in 90 - 00 Lexus LS400
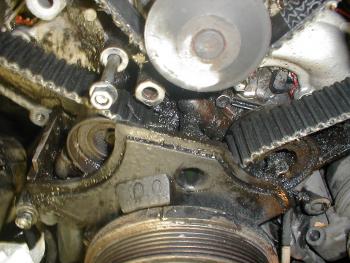
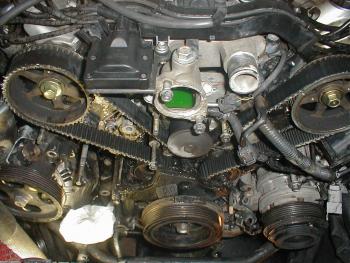
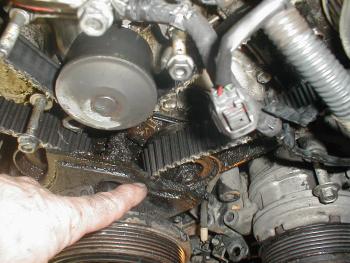
I too use the Schley 64300 and it did not require me to remove the Radiator. I had purchased this 1994 LS400 with a horrendous Oil Leak, and the previous owner thought it was from the crankshaft seal. He was right, but there was additional trouble! I found the roller for the timing belt on the drivers' side of the engine, had seized and had spun its bolt loose (solely because the timing belt glides counterclockwise across this pulley) and when it un-tightened its roller bolt, it then leaked MORE oil, as this bolt mates with the Oil Pump. On top of that, the Tension Roller for the timing belt was also very loose, and the two were causing the belt to ride forward, which shredded the leading edge. It took 20 cans of brake cleaner and lots of paper towels before I had it all clean. When I used the Schley tool, the large crank bolt came off fine, and next I used a simple two jaw gear puller. With everything off and out of the way, and much cleaner, I took a metal pick/scribe, and found the main front crank seal would spin freely! I removed it with very little effort, with the pick and one hand! It HAD been leaking horribly! Because I have a SIR Tools Special Crank Shaft Seal Installer, for Toyota 4cyl and 6 cyl, (Lexus too) I thought this tool woould work. Not so. (It's the Red Aluminum Tool in the photos below). I researched and found SIR Tools now sells a Lexus/Toyota V8 Front Crank Seal and they want a lovely $ 168 for this one time use tool. Even though I wanted it badly, I forced myself to the Lowe's Hardware Plumbing aisle with my red aluminum incorrect seal installer, and my New Front Crank Seal. I found a PVC Union assembly and a 2" Cap to screw onto one end of the PVC Union, and spent $10.00, making my own seal installer. It worked 98% of the way, pressing in the new front crank seal perfectly flush, and I used a 1/2" thick by 1" thick by 6" long piece of metal stock, to drive the new seal in the last itty little bit. I think you should change your crank seal as well, as it is not hard to do, and you do NOT have to remove the slot key from the crankshaft. Your hand can easily pull the crankshaft's timing gear off....it slides nicely. I also replaced my Camshaft Seals, but that requires a special tool to hold the cam pulleys as well. Don't attempt this unless you have the spanner wrench that holds the spokes still, from turning, while un-tightening or tightening the cam bolts. Buy a subscription to www.alldatadiy.com, for torque specs if you need. It's come in handy for many other problems too. Enjoy these photos! Andy Lowe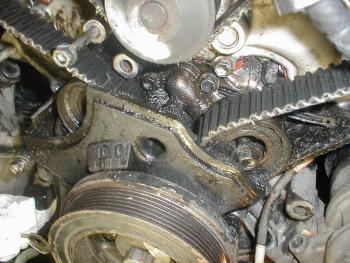

-
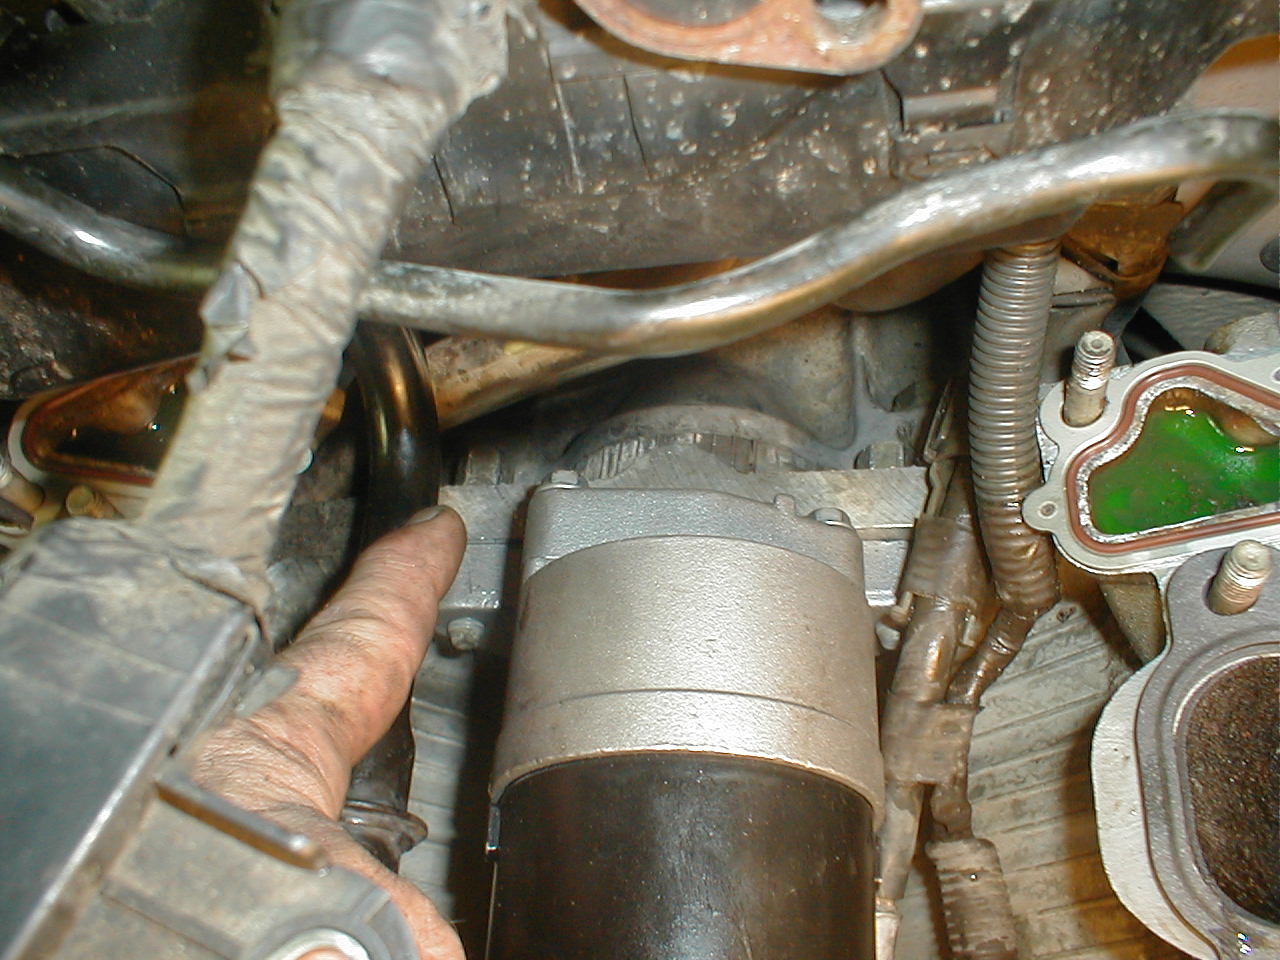
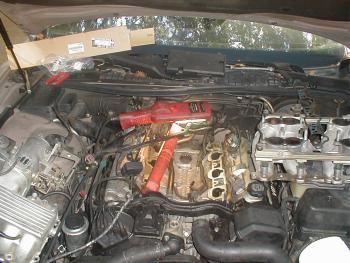
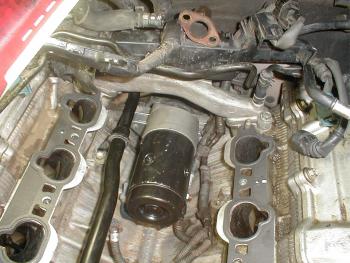
I too just changed my starter and learned a few things that might interest others. My starter also would occasionally refuse to click or rotate. It's a 94 LS400 and I bought the intake manifold upper 4 and lower 2 long gaskets. When I removed the two intakes, I found water/sludge sitting in the engine block valley area where the starter lives. My starter even had a water line on its outer body. Normally, there are two drain holes below the starter where water should drain. Mine were blocked. I had to clean the valley area of the top of the engine block and degrease it, to get these two holes to drain. (see attached). Next, I removed a water crossover pipe that straddles the starter. It required me to go to the Lexus dealer and buy two more little, specialty gaskets that would allow re-assembly. Removing this water crossover pipe was necessary to get to the two 15mm bolts that hold the starter into the engine block. These two bolts are very difficult to remove but with patience and flipping the wrench over and over, one can do it. I bought an Autozone rebuilt Starter for $90 and watched them test the rebuilt one before I left the store. This is not a job for a novice; I don't recommend this for the occasional mechanic. It really was a horrible place to put two bolts; they should have engineered the bolts to tap the opposite direction. The two bolts that hold the starter to the block will last in your memory the rest of your life! hahaha. The picture with my finger pointing to the bolt on the left, shows the water/coolant crossover pipe removed. That bolt put a blister on the end of my middle finger on my right hand! hahaha....that's a first. Next, you see a picture with the new starter installed and water/coolant crossover pipe installed on the new two special gaskets. One thing the Lexus Parts man mentioned to me, warning me, was to be very careful when moving the starter out of its hole. When you pull it out of its hole, it can crush the Knock Sensor on the passenger side bank of the engine block valley. It's close to the starter and I was careful not to bang it. It occured to me I would have to remove both upper intake manifolds again, and that was inspiration enough to not hurt the knock sensors. My Autozone Starter works very well and I am glad it's done. I hope this helps others. AndyLowe

-
The Instrument Cluster Brake Warning Lamp remains off, if it receives a ground signal from one wire, reporting from all four brakes in series. The ground begins its journey and goes to the passenger rear brake sensor. If it makes it through that sensor, it then travels to the driver's rear sensor. If that sensor too is good, it travels to the driver's front sensor, and then onto the passenger front sensor. It leaves this last sensor and then off to the Instrument Cluster. A broken sensor (0pen circuit) on any one of the brakes, will turn the Brake Warning lamp on as they are all in series. Applying a circuit mod of adding a ground at the passenger front brake sensor wiring, would eliminate brake monitoring and turn off the light. You might have to remove the inner fender to gain access to the wiring and add a good ground. I have the same problem on my car and bought a subscription to www.alldatadiy.com and studied the wiring diagram. It's on sheet 5 of the "Combination Meter" a fancy term for the Instrument Cluster. I too need to do this mod as my brake pads are thick and I listen for the opposite. Good luck! Andy
-
I'm certainly no expert, but it appears to be a Fuel Vapor Solenoid, Vacuum Hose relationship. There is a solenoid valve at the lower edge of the driver's inner fender, and it is commanded by the ECM. It's purpose is to route fuel vapors from the gas tank, to the Intake Manifold, to be burned rather than released to the atmosphere. There is a rubber hose that connects the solenoid valve to the Intake Manifold and it often breaks on it's underside, right at the bend, where it connects to the intake manifold on top center forward area of engine. Check this hose for a break or split on each end. If the hose was broken, it would add too much air and be a contributor to a lean condition, when the ECM program is expecting a more rich reaction, having commanded the solenoid to add some gasoline vapor. This could cause the catalyst too lean/inefficient code you are receiving. Hope this helps! Andy