
lexusk8
-
Posts
514 -
Joined
-
Last visited
-
Days Won
1
Content Type
Profiles
Forums
Events
Gallery
Store
Articles
Videos
News & Articles
Everything posted by lexusk8
-
The P0446 code indicates Evaporative Emission Control System Vent Control Malfunction. Here is a list of possible causes: - Vacuum hose cracked, holed blocked, damaged or disconnected - Fuel tank cap incorrectly installed - Fuel tank cap cracked or damaged - Open or short in vapor pressure sensor circuit - Vapor pressure sensor - Open or short in VSV circuit for EVAP - VSV for EVAP - Open or short in VSV circuit for CCV - VSV for CCV - Open or short in VSV circuit for pressure switching valve - VSV for pressure switching valve - Fuel tank cracked, holed or damaged - Charcoal canister cracked, holed or damaged - Fuel tank over fill check valve cracked or damaged - ECM I would definitely get the charcoal canister checked out since I had a similar problem with my '01 ES, but check all of the other parts listed.
-
To access the fog light bulb, you will have to work from under the front bumper. There is a big anti-splash plastic shroud which you'll have to remove a few screws and twist out of the way. Then you should have enough room to peep your head in and see the back of the fog light bulb, which is held on by a metal hinged hook. You will have to reach in and press down on the end of the hook in order to un-hook the bulb and remove. Installation is the reverse of the previous steps. The fog light bulb must be installed in only one way, so remember the orientation of its base when removing the old bulb. For the A/C unit, it sounds like all the backlighting bulbs are burnt out. You will have to remove the stereo and A/C unit cluster from the console, and get into the circuit board of the A/C unit in order to remove the backlighting bulbs. I had to do the same thing when I noticed a bulb burnt out in A/C unit of my '01 ES.
-
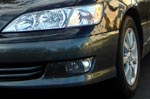
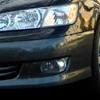
It happened this morning as I was heading to work. I was in the left-thru lane and I needed to make a left turn, which required me to get on the left-turn only lane. The cars were jammed up on that left-turn only lane, and nobody would let me in. I continued on the original lane, and at the intersection I made a bonehead illegal left turn move. At that moment I thought the coast was clear for me to make the turn, and then all of a sudden I see a grey Mustang speeding and coming at me from the opposite direction. It was too late then, and we collided with considerably massive force. I am OK, just some minor bruises on my arms and right foot which didn't require medical attention. The Mustang lady driver complained of chest pains, was put on a neck brace, and had to be hauled off on a stretcher into an ambulance. Both our airbags deployed which was a good thing. The damages assessed from my view: The front bumper of the Mustang was torn off. Both our front ends are completely crumpled and mangled up as you can see in the pics. My windshield cracked as well, and my HIDs are gone. I am pretty sure my car and the Mustang would have to be totaled :( Without doubt I got cited by the officer for making a left turn onto approaching traffic. The fine is only $115.50, believe it or not 4 points will be added to my record if I choose to pay the full fine. The other alternative (which I plan to take) is enroll and complete traffic school online, which means no points will be accounted for, and the fine will be reduced to $104.70. All in all, I am grateful to be alive and walking from the accident, and I sincerely hope the Mustang driver will recover fine from it. A car can be replaced anytime (hoping my insurance will total my car), but a human being cannot. Florida is notorious for dangerous drivers and driving habits on the road, but I will do my best to be more careful and do not do bonehead moves. -Doug


-
98 Es300 Low Beam Lightbulb Replacement
lexusk8 replied to total1's topic in 92 - 06 Lexus ES250/300/330
Here are the steps to do it: 1) Open hood, locate electrical disconnector from the back of the headlight, and disconnect. 2) Find the large black round rubber cover between the connector and the back of the headlight, and pull that off. You may want to clean the dirt off afterwards and before re-installing it. 3) Here is the tricky part: To access the bulb, you must first stick your hand inside the headlight and find a metal hook that encloses the actual bulb into the socket. Push the hook down with your thumb (if it gets painful, wear a glove). Continue to push down until it's in release form. Swing the hook out of the way (it's hinged with the headlamp), and now you can pull the bulb out. 4) Retain the plug adapter from the old bulb by pulling it off, and install it with the new bulb. VERY IMPORTANT: You must remember the orientation of the bulb when it was removed. There is only one way for the bulb to be installed and operated properly. 5) Reverse the previous steps for re-installation of the new bulb. Turn the headlights on, and there you go. 6) Strong suggestion: Replace both the driver and passenger side bulbs at the same time in order to maintain consistent brightness. -
That's exactly what happened to me in my '01 ES. After noticing the aging of the old grommet, I actually went ahead and tried to do the PCV replacement myself by buying $3 worth of parts at Advance Auto Parts. Turns out after a while that these parts do not fit 100% with the engine. I then took the car to Toyota and asked them to replace the PCV. $30 later, it's a guaranteed fit :)
-
My wife has a 5-mile commute to work each way 6 days a week in her '98 Corolla, which rounds out to roughly 60 miles a week driven. As long as oil changes and regular maintenance are done at the recommended basis, the car should last a long time.
-
Depending on how tight the lug nuts are fastened and the condition of the rotors, brake rotors may warp over time on any vehicle, not just the ES. They can also mildly warp if they undergo extreme temperature changes (e.g. cold rain or ice splashed onto the hot rotors in the winter season).
-
2001 Es300 Steering Wheel Conversion
lexusk8 replied to godfather18's topic in 92 - 06 Lexus ES250/300/330
Well done with the conversion, first I've seen in that ES generation. Care to share with us the details of your project? -
Do I Need A Vise For Struts?
lexusk8 replied to backwoods lex's topic in 92 - 06 Lexus ES250/300/330
Yes, whenever one or more struts are replaced, a 4-wheel alignment is usually followed. In your case, it makes sense to get the front and rear struts done at the same time, and do the alignment afterwards so that you save on labor charges. -
My Baby At 3 Months Old - Better Then Ever!
lexusk8 replied to amf1932's topic in 07 - 12 Lexus ES350
Amber Pearl is probably the only color I have yet to see on the road or at a dealership lot. It certainly looks gold (no pun intended) in the pics above. The coolest interior feature IMO would have to be the "redesigned" center armrest; you just push the button and the armrest cover leans back and upward with ease and without interference with the driver's attention. I still can't get over the outside mirrors being relocated to the side doors, something normally seen in an exotic car like a Ferrari. -
^^ Hey, that's exactly the same response I wrote to you when you posted your problem with the fuel system in your ES (original reply here). I see no credit given for my write-up. Are you going to plagarize with somebody else's work and claim that it's your own?
-
Easiet Way To Fix A Loose Panel
lexusk8 replied to godfather18's topic in 92 - 06 Lexus ES250/300/330
Looks like you need to remove the gray cladding piece out, and remove the old adhesive from the cladding piece and the body. Go to any auto parts store and you should be able to locate some 3M double sided adhesive tape, which is needed to put the cladding piece back into place. Not too hard of a job :) -
Sold what? I thought you sold you Es for a outback or something? Maybe I am way off here Ah, that would be Lexusfreak who sold his ES for a Subaru Forester.
-
Sold what?
-
Here are some pics of mine :)
-
When I had my '96 ES, a license plate light burnt out, but the indicator light never turned on. From my experience, the indicator light will go on whenever a tailight bulb or brake bulb is burnt out, or not making a clean connection with the socket. It has nothing to do with the license plate lights.
-
2000 Es300 Problems, Cel, Sludge, Trac Off, Codes
lexusk8 replied to SilviaDET's topic in 92 - 06 Lexus ES250/300/330
According to the 2000-2001 ES300 repair manual, here are the trouble areas for the P0171 error code: - air induction system - fuel injector blockage - MAF meter - engine coolant temp. sensor - fuel pressure - gas leak on exhaust system - open or short in Bank 1, 2 Sensor 1 circuit - ECM For most people who encounter this particular error code, the problem lies in the pre-cat oxygen sensor. There are 2 sensors located before the catalytic converter, and either one or both of them could be delivering a bad circuit. You're going to have to get the resistances tested with a multimeter and see if the resistance meets spec. That's what I would do to determine the bad sensor. Or if you prefer, you can take your car to an independent service shop who is familiar with Lexus/Toyota vehicles and get the sensor(s) diagnosed. Hope this info helps out :) -
Actually, the amount of Lexus touch-up paint is only 14ml. :) You're right Al. I was at work when I posted up. Guestimated the size but I guess I'm way off
-
The touch up paint is in a small 6 fl. oz. bottle w/ a brush top cover. This touch up is ideal for small to medium sized paint chips (you can use a toothpick to touch up even smaller chips). If there are scratches of a certain length, the results from the Lexus touch-up will not be pleasant to look at.
-
The link below tells you how to diagnose problems in your A/C system. Although the link uses the LS400 as an example, the procedure works for the ES (I know this because I tried it out in my '01 ES). http://www.lexls.com/tutorials/air/accodes.html
-
Installing Low Beam Light On 97es300
lexusk8 replied to IlyaIlya's topic in 92 - 06 Lexus ES250/300/330
From my experience, Wal-mart is the best and most convenient place to buy H7 bulbs. They sell the Sylvania brand, which is equivalent to the OEM, and the prices are very reasonable (I mean, c'mon we're talking about Wal-mart here) :) Just look for H7 type, NOT H7 ST/2 or whatever it's called. You do not even have to remove the entire headlamp assembly at all to access the bulbs. It involves just a few steps: Locate and disconnect the electrical connector behind the low beam bulb, remove the black rubber cap, and find the hinge which locks the low beam bulb in its place inside the headlamp assy and push it to release pressure, and pull out the bulb. You may have to duck your head upside down to get to the bulb in the last step. I suggest replacing both bulbs, not just the burnt out one, so that you get equal brightness from your headlights after replacement. Hope that helps out! -
$220 sounds too much for a full tint (minus the front windshield of course). Despite the lifetime warranty add-on and the referral from your friend, the price is too high IMO for tint, and I would shop around at other places. When I got my ES tinted (35% for 4 windows, 20% for the rear), I paid around $150 including tax and the lifetime warranty. Quality is near flawless.
-
Ngk Plugs Compatibility (98 Es300)
lexusk8 replied to Frankie_B's topic in 92 - 06 Lexus ES250/300/330
I never heard of the 8th letter of the VIN number being used to determine the type of spark plug to use. To me it sounds a little fishy, and if I were you, I'd probably play it safe and use the factory ones for replacement, which are the NGKs. Your owner's manual should tell you whether it's the platinum or iridium kind of spark plug. If you're looking for decent prices for plugs, I'd drop by http://www.sparkplugs.com. You can order most kinds from that site directly. -
Check out http://www.oxygensensors.com. If I remember correctly, that site sells both the generic and OEM types.
-
Go to any local tire shop which should have the tools necessary to break open a wheel lock.


