
Leaderboard


Popular Content
Showing content with the highest reputation on 09/23/2022 in all areas
-
Id like to believe im an engineer but thats not the case. From the late 60's to the early 80's I worked for GM as a factory technician (we were called mechanics in those days because we did everything) and, for a few years as an apprentice machinist working for a speed shop blueprinting small block chevy motors (primarily for drag racing). So i do have some experience in the automotive field and im usually very careful in examining wiring schematics and other important data before i start cutting into factory wire looms.2 points
-
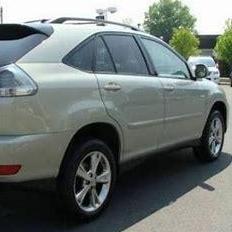
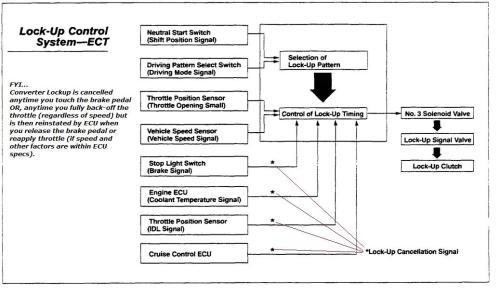
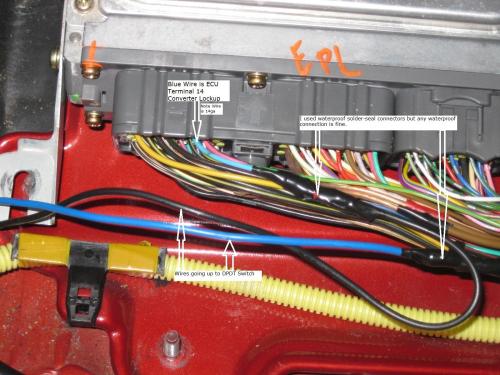
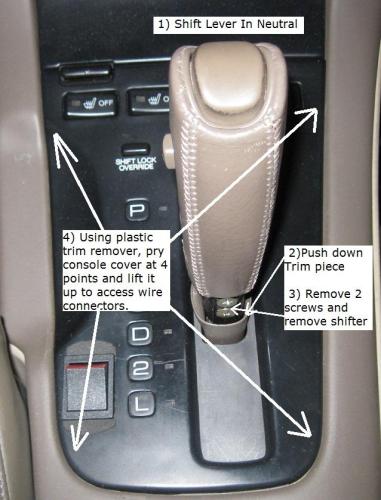
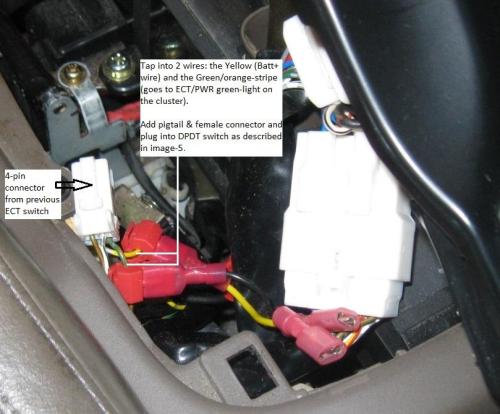
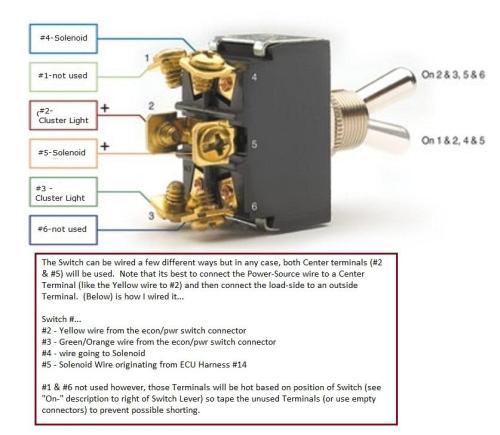
In 30 years of ownership of my 92 SC400, i've had only one nagging driving issue and that is the timing of the Converter Lockup. Under normal OEM conditions, the converter can lock-up (or remain in lockup) at speeds as low as 38mph. This makes for a sluggish driving experience at speeds under 50mph. So i came up with a solution... I intercepted the Lockup signal wire and wired it to a Switch so that i can manually control the lockup procedure. In Addition, I put this switch in place of that useless "ECT pwr-norm" switch and wired it such that when the Lockup is switched off, the Green ECT/PWR light on the Cluster will LIGHT-UP (to remind me that the Lockup is switched-off). That way im not driving highway speeds or distances with the lockup disabled (which would increase trans fluid temperatures). Result... much better all-around performance especially when more torque/rpm is desired in that 40mph to 60mph range and the lockup would otherwise suppress that torque/rpm. HOW I DID IT... There are multiple ways to intercept the lockup signal (see image-1) but after reviewing the wiring schematic i settled on intercepting the Lockup signal wire right at the ECU. That way all the other cancellation signals remain under the control of the ECU (when lockup is enabled). The trick to controling both the Lockup and the ECT/PWR light in one switch, is to use a DPDT Switch. With the switch in one direction, Lockup is suppressed and the Green ECT/PWR Light on Cluster is Switched ON. Flip switch in other direction, ECT/PWR light goes off and Lockup is back to being controlled by ECU. THREE IMPORTANT NOTES... 1) My Lexus Repair manuals (wiring schematics, etc) are for a 92 SC400 model so if you are performing this on a different year (93+) or a different model (SC300) you should check to be sure that your year/model uses the same ECU Terminal (#14 SLU-) for control of Lockup Solenoid No.3. I suspect up to 96 will be the same but i dont know that for certain. Reference: 92 SC400 Repair Manual Volume 2 -> page EWD-10 -> Terminal SLU- #14 (Blue wire). 2) Because you are intercepting an ECU/ECT signal, transmission diagnostic code #64 will be logged (the ECU will interpret your installed switch as a connection issue) however, after 3000 miles of driving, no other codes or issues have surfaced (no point in erasing that code, it will come back). 3) There is a Bracket attached to the "ECT pwr-norm" Switch that wont reattach to the new DPDT switch. That Bracket provides support to one of the console connectors. In its place, I rigged a tie-wrap around the wires to add a little support to that connector. ---------------------------- PARTS NEEDED... 1) DPDT Switch... Ideally, You want 2-position switch (ON-none-ON) like this one from Amazon... NTE Electronics 54-051 Nylon Snap-in Rocker Switch, DPDT Circuit, ON-None-ON Action (close fit, only needs minor modification to mounting hole, somewhat loud click). I used a different switch that required more mounting modification but has a quieter click. 2) Enough 14ga wire for 2-wires to reach from new DPDT switch to ECU Harness (2 different colors if possible so you can tell which one goes to the ECU and which one goes to the Solenoid). 3) Wire Loom (tubing) to insert wires inside of as you route it under the carpet (from Switch to ECU). 3) Waterproof wire connectors, couple small wire t-taps (or can use barrel connectors) or..? --------------------------------------- INSTALLATION... 1) Disconnect Battery Neg cable..? I performed the installation without disconnecting the battery (because I didnt want the ECU and other functions to reset). The Solenoid wire is un-powered while the Key is OFF but to be sure, DONT EVEN PUT THE KEY IN THE IGNITION (because that by itself activates a number of circuits). Use your own judgement...there are other wires, circuits (and the ECU itself) you will work around so if any concerns, disconnect the battery. 2) Drop the kick-panel (under glovebox), Pull back carpet and remove black ECU Cover. 3) See Image-2... Find Blue wire (#14 SLU-) on Harness and cut it a few inches back of the harness. Attach new wires using waterproof connectors to both cuts and, with enough length to reach up to the new console switch. 4) See Image-3... Pop-up shift-cover, disconnect 3 connectors and remove shift cover. Remove the "ECT pwr-norm" switch and Install new DPDT switch - (slightly enlarge hole primarily on the sides - a dremel is great but a small flat file will work). Then run the 2 wires (from ECU and from solenoid) up through center console and over to the new switch (best to put them inside a wire loom). 5) See Image-4... Tap into wires for ECT/PWR green-light on the cluster. Also add female connectors to Solenoid wires from ECU. 6) See Image-5 - How to wire switch I used a toggle-switch image for demonstration (so you can see which terminals are hot based on switch-position). 7) Recheck that all wiring is completed, reconnect the shift-plate connectors and then put shift-plate back in place on console and reinstall shifter knob. Consider test driving before putting the carpet back in place just to be sure all is working correctly. 😎 Test drive... (with Warm Engine) Startup engine and Flip switch so that the Green ECT/PWR cluster light is lit up and Converter-Lockup is (should be) suppressed. Drive up to a speed sufficient to enable 4th gear (O/D) and note that rpm's (and vehicle speed) now more easily move up and down depending on throttle position (because Lockup is suppressed). Flip the switch... the Green ECT/PWR cluster light should turn off and the converter should lockup immediately (except under heavy throttle). Lockup is now back to functioning according to ECU control and rpms dont move up or down as easily. Keep in mind... Lockup disengages anytime (and at any speed) when throttle is fully closed or, when brake pedal is touched (but then quickly re-engages if signals return to normal). If all is working correctly, you are done.
 1 point
 -
In my area, cats that escape to or are allowed outside often get eaten by coyotes, so I never count on them to take care of mice. However, there is a bobcat that enters our yards, occasionally.1 point
-
Wow! You act suspiciously like a manufacturing engineer. 😏 I am one, myself so I can tell a nice procedure when I see one. 👍1 point
-
Good vids. My friend is looking at this ES300 with a similar issue. The truck would not open intermittently. The owner took it to a couple of shops but the issue still returns after a couple of days. We'll just finish installing the suspension and tires from 4Wheelonline on the Wrangler this week before we can take a closer look.1 point
-
look in the glove compartment, right where door would touch the console on the left side - there is a trunk lock button1 point


