


JamesN
-
Posts
59 -
Joined
-
Last visited
Content Type
Profiles
Forums
Events
Gallery
Store
Articles
Videos
News & Articles
Everything posted by JamesN
-
Its a lips kit. Not too hot with people because it just basically "lips". But everyone have their own style and budget. I say go for it if that is what you want
-
Borla is also a very good choice. The reason most people like Magnaflow is because of the sound is alittle deeper. Go here http://www.intellexual.net/faq.html#024 Click on exhaust sound and see what fitt you. Since you are doing exhaust, might as well do BFI or some cold air intake to help better flow.
-
You have great milage for a 93 sc400. You can do BFI and 2.25in x-pipe or straight pipe and get magnaflow exhuast. This is the common things to do for SC4 owners. But any aftermarket exhuast is always louder than our stock keep that in mind. With these mods you have some Hp boost but IMO not much to pack a punch.
-
I think it rep an Ignition signal. You should try to check for loose cables and replug it. Hope this help, good luck.
-
Here you go http://www.l-tunedparts.com/product/?id=1590 You can also try Auto Couture main website. These kit normally run from 2100 to 2400. Good choice this kit is hot.
-
There is not much you can do with the tranny IMO. The tranny is good as it is. You should start on the engine and do some forced induction. Then once your Hp goes up to can mess with the Tranny to go along with your Hp.
-
Lextreme.com or clublexus.com
-
Our old 12 disc changer is invented in the ancient time where there is not enough memory buffer that is why it's skip all the time and crappy. Took mine out cuz I just had it with it. You can put other changer in there, but you have to use radio modulator and the quality is radio <_< . The only changer that fit our plug is 92-96 es300 and Ls400 6 changer. They are pioneer and people say it doesn't have problems like ours since they are a later model. Your last option is my option is to get a kenwood ddx7015. It will play all you want and look great in the deck. But it's heavy on the pocket. Good luck.
-
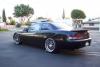
I think 19" stagered set up is perfect for SC. 20" is definitly big but it is your choice and money. There is a link of my car on 19" and 2" drop. Hope this will give you some help. :)
-
You can start with BFI (really cheap). Then go to exhaust, headers, and TC (affordable). And if you still got any money left go with Turbo or Supercharge (expensive). After this she will SOAR all you want.
-
You can try this place also http://www.tmengineering.net/suspension/daizen/make/sc.html Daizen makes pretty good bushing IMO and pricing is not that bad. I don't know how much to have it replace. It depends on where you live and the places you go. I'm planing to do it myself this summer since mine is pretty bad also. Good Luck
-
Yes, there has been a successful twin turbo setup for the SC4 1UZ. Here is a project that my friend also the owner of the site is working on next http://www.lextreme.com/1uzfe.html . As for me I'm going the supercharger route. Lexetreme and I will be building a Twin Screw supercharger set up system and custom our own pulley and internals for higher boost. I'm gathering funds to do start on this project at the end of this year. If successful it should be the first of its kind. If you want to learn more about turbo or force induction for our car you can vist lextreme.com. :)
-
It could be the control arm bushing. Our LCB usually give out at 130K miles. So check for that.
-
Check Engine/trac Control Lights Are On
JamesN replied to 92SC400/89RX7TII's topic in 92 - 00 Lexus SC300 / SC400
Try to clean the TPS and MAFS. I did that for my car when I have the same problem as yours and it work. Becareful cleaning these Sensors, use a really clean and soft cloth. Also use good solvent. Good luck -
Has anyone replace their door actuator? I need some instruction on how to remove it. I tried search but didn't came up. My door actuator is busted on the passenger side. So if anyone can give me a quick tutorial and some picture or diagram if possible would great. Thanks everybody
-
Count me in too. Just let me see some pics first please.
-
Just clean them and reseal them can save you alot of money!! here how you do it. Restoring Cloudy Headlights: To eliminate condensation in the headlights, remove the headlight assembly from the car. It is held in place by three 10mm hexnuts. Examine the headlight housing and find the fracture(s) or crack(s), usually in the black plastic backing piece. Thoroughly seal the fractures with a silicone glass sealant or hot glue. The condensation problem should be eliminated. To remove the cloudy mildew build up on your headlight covers you will need 2000-grit sandpaper, a polishing compound, and water. It is recommended that you wrap the 2000-grit sand paper around a block or something flat and smooth so that your sanding work is clean and even. The mildew is most likely on the outside of the headlight covering so wet down the effected area and gently sand away the grime while flushing liberally with water. Continue sanding as need until the cloudiness is gone. Dry the heeadlight covers, apply a protective coat of polish or wax, and buff out any fine scratches you see. 3M rubbing compound can be used for more severe build-up. To clean mildew or hard water stains from the inside of the headlight cover, you will need to remove the headlight housing from the car and open it up. The headlight cover, headlight shield, and headlight backing pieces are held together with a very strong, resilient adhesive. In order to break this adhesive bond, you will have to heat the adhesive material to the point where it softens up enough to seperate. Three methods exist to accomplish this: 1) the hot oven trick, (2) the hot water trick, and (3) the heat gun trick. The melting point of the backing piece is a few degrees above the melting point of the adhesive so it is critical that you monitor the process throughout. The safest method is the hot water trick due to its inability to melt the headlight backing piece. It can also be the messiest. The oven trick is probably easiest and quickest, and the risk of damage here is low if you know what you're doing. The Hot Oven Trick: Preheat oven to 225 degrees Farenheit (107 Celsius). Take this waiting time to remove all loose pieces, such as metal clips, rubber nozzles, and screws, from the headlight housing. Keep oven on at 225 degrees---this temperature is lower than the melting threshold of anything on the headlight housing. Place headlight housing on a baking sheet in center of the oven (or distanced from the heat filaments). Heat for about 10 minutes. Remove and begin prying away at the seals with a flat, non-sharp straight edge such as a butter knife, ruler, or flat-head screwdriver. Work quick as the adhesive is constantly cooling and hardening. Work around the entire housing prying open a wedge between the seal. Repeat this process as many times as it takes for you to get a good gap between the cover and backing pieces. Once the two pieces seperate even slightly, the whole headlight housing will snap open with ease. The adhesive will get stringy like melted cheese off a slice of pizza. Press the stray strands of adhesive back into the seal groove and do not get this adhesive dirty or contaminated. The Hot Water Trick: Remove all loose pieces, such as metal clips, rubber nozzles, and screws, from the headlight housing. Fill a bucket or tub--large enough to completely submerge the headlight housing--with boiling hot water (212º Farenheit, 100º Celsius). You can wrap the headlight housing in three garbage bags to keep them dry or you can submerge them in the water bare. Hold the headlight housing under water for 15-20 minutes. Remove and begin prying away at the seals with a flat, non-sharp straight edge such as a butter knife, ruler, or flat-head screwdriver. Work quick as the adhesive is constantly cooling and hardening. Work around the entire housing prying open a wedge between the seal. Submerge in a fresh new batch of simmering hot water for another 15-20 minutes. Remove and repeat the prying process. Repeat this process as many times as it takes before you can get a solid finger grip in-between the cover and backing pieces. At this point you want to pry open with as much brute force as you can. Once you find a weak point on the housing, exploit this weak point and continue working a larger wedge in it. Once the two pieces seperate even slightly, the whole headlight housing will snap open with ease. Press the stray strands of adhesive back into the seal groove and do not get this adhesive dirty.
-
Here try this place. http://motorsportwarehouse.com/lexus.shtml I hope it help.
-
Does Anyone Know What The Ect Button Do?
JamesN replied to JamesN's topic in 92 - 00 Lexus SC300 / SC400
cool! I do notice my gas milage is down when i put it on. Thanks guys -
I was just wondering what does the ECT button on the tranmission panel do? All i know is that when its on, I can rev at a higher RPM. Does this help if you want to drag race?? Thanks.
-
I'm the same as MR. O. I use the supra Tokico Illuminas spring set up that get the car is like 2" low in front and like 1.5" rear. The thing about Tokico Illuminas is that you can just the stiffness of your ride. I also put on JIC STB and rolling on 19" wheels and the ride is kick !Removed!. Just watch out for the big pot hole or bumb that might mess up the rims otherwise its handle like a Porshe :D good luck with your set up.
-
I'm no tire expert, but i think you should go with a staggered set up. because our car is rear wheel drive and it look great. The offset should be around +38mm and +42mm and it shouldn't rub. I have 18X8 front and 18x9 rear with +38mm offest all round. My car is also 2" drop and it still doesn't rub. I'm running on tires size 225/40/18 FRONT 245/40/18 REAR. But do check with professional before you buy anything. I hope this help.
-
If you got money go for injen. It would look really nice. But I would do BFI best Bang for the Buck. I used to have Cold air intake and I notice it doesn't perform as well as BFI.
-
Use paint that can stand high temperature. I use the Engine Paint sold at Auto Zone. They were out of Red at that time so I pick this color. Its not that bad :D . Hope this help you guys.

-
Almost Finished W/bfi On 95 Sc400
JamesN replied to knmaynard's topic in 92 - 00 Lexus SC300 / SC400
I say prop open the bottom tray in the center grill. I was wondering this at first like you, but I prop it open knowning it collect air better. Good luck.


