
Leaderboard

Popular Content
Showing content with the highest reputation on 11/16/2023 in all areas
-
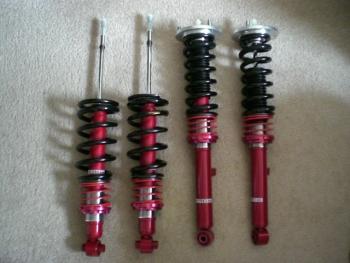
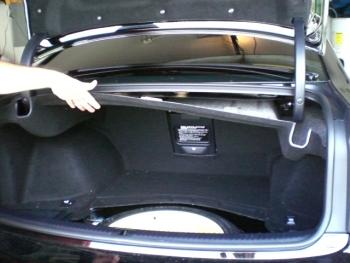
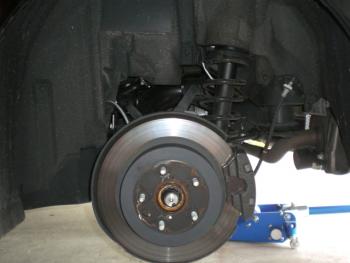
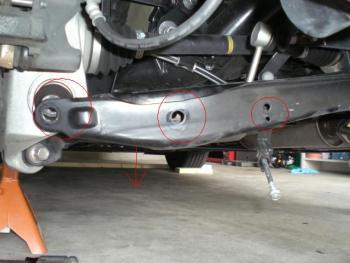
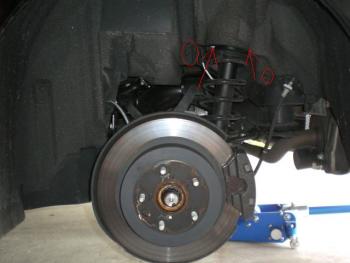
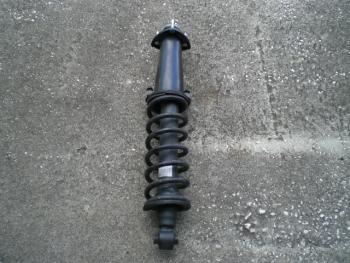
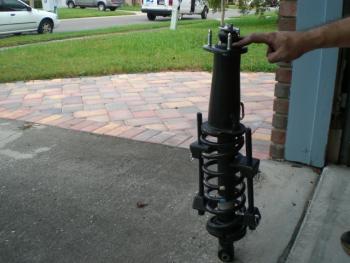
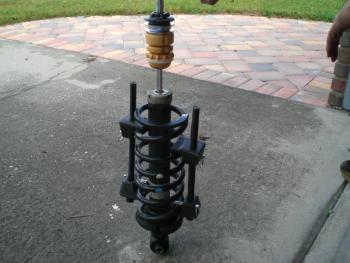
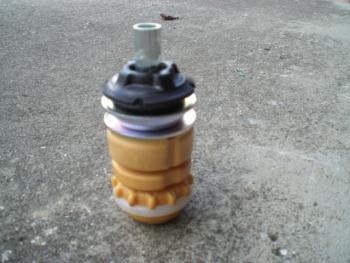
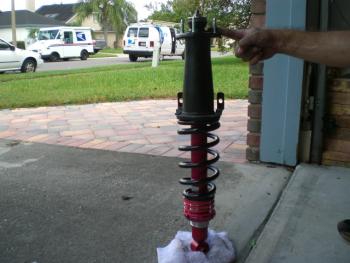
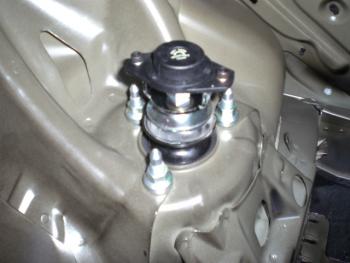
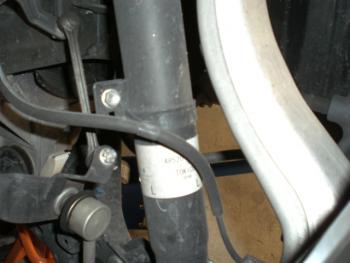
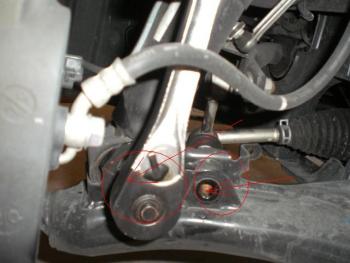
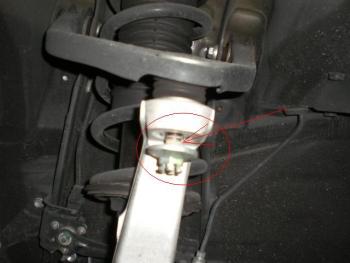
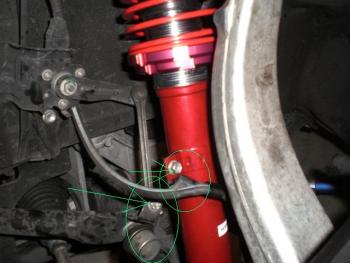
The tools you will need are: Spring Compressor ( You can get this as a free loaner tool from any Advance Auto Parts. I'm sure other auto parts stores offer the same programs.) 10mm, 12mm, 14mm, 17mm, 19mm, sockets and wrenches. 3/8 drive for the 10-17mm should be fine, but I would strongly suggest a 1/2 drive for the 19mm. I also used a 25 inch flex handle breaker bar. Floor jack and jack stands. 1 spare screw type or small hydraulic jack 6mm, 8mm allen wrenches Hammer A small standard screw driver, a medium phillips head screwdriver Torque Wrench 2 coil spring wrenches( These should have come with the coilsprings.) The new springs: Step 1) I started with the rear suspension first. You don't have to, I thought it was just easier to get these out of the way as the rear coils for the Tenabe Pro Sustec's reuse the stock hats and upper mounts. So start by removing the trunk liner. There are 3 slide latches under the trunk deck you just pull toward you and remove. Next I used a small screwdriver to slide into the retainer slips and popped them out. I also noticed latches on the floor of the trunk ( the silver ones for bungy cords and so on) have a reverse black cover that pulls out revealing a phillips screw that will need to be removed. Also be careful of the wire for the trunk light. Just pop it off at the light and now you can remove trunk liner. 2) Jack up the car and place the jack stands for safety. I used the center brace right behind the differential for the floor jack, and I just located 2 points for the jack stands. 3) remove the rear wheels. 4) Loosen the top mounts with a 14 mm wrench inside the trunk. Remove the 12mm nut holding the sway bar endlink to the control arm. Then remove the 17mm nut and bolt connecting the coilover to the control arm, and the 17mm nut/bolt that holds the control arm to the hub assembly. Now using a 10 mm socket and extension, you'll need to remove the tire well lining around where the coilover is to get access to the two 12mm bolts that anchor the coilovers to the chassis. I circled the 10 mm bolts to remove the liner, and pointed the arrows at the 12 mm bolts to be removed underneath. 5) Now finish removing the 14mm bolts that hold the upper mounts on, and carefully push the control arm down to allow enouph room for the stock coilover to come out. BE CAREFUL!! The rubber hose on your right is a brake line. Stock coilover: With the Tanabe coilover, and with Tein and others as well, you have to reuse the stock strut hat and bumpstops. So at this point your going to need to use the spring compressor on the stock coilover and compress the spring in order to take the tension off the hat. Do not attempt to disassemble the coilover before or without the spring compressor. Don't over compress the spring as well. In the picture above, I circled the center coil seat. There is a rubber seat there. You can see when the coil is compressed enouph by looking at that seal. You don't want to create a gap there, you just want to uncompress that rubber seat. Once you have done that, you can remove the 17mm nut that holds the strut hat on. I would still unthread this slowly as the rubber mounts will expand and make a slight "pop" also now. Now slide the hat up and off: And now slide the oem bump stop washer, bushing and collar off. Keeping the assembly the same slide it on the new coilover: And now put the OEM hat on the new coilover and tighten the strut bolt.*Tip: try to make sure the thrust washer/joint seal is seated correctly. and if your new coilover has helper springs, make sure the end of the helper spring isn't directly over the end of the coilspring itself. I allways turn them 90 degrees from each other. It's a common mistake that gets made and can lead to a coil squeak noise later. 6) Your now ready to slide the coilover back into positon. At this point it would be good to have a friend guide the top of the coilover back into the upper mount while you work on positioning the lower mounts and moving the control arm back into place. If you don't have a friend, then you may need to put on some safety glasses so you can look straight up into the upper mount from underneath the car and work it into position. 7)Replace all the bolts and nuts. A note here: tighten the lower control arm bolts first, then the two 12mm support bolts on the well, then do the upper mounts last. You have to make sure the coilover in aligned and correctly seated. If you tighten the upper mounts first, you won't be able to tell if it is aligned right or not. 8) It's going to be up to you to determine the correct ride height. So, I would just put the lower seat collars in the middle of the threading for now. Make sure you lock the seat tight with the locking collar so they don't move. Keep in mind that over the next 2 weeks, the coilover springs are going to settle a bit. I would wait atleast that long to determine the exact height setting you want then. For now we just want to put everything on correctly. And come back later to get the ride height dialed in. You'll see how I did that process later in this tutorial. 9) Torque everything down, and double check all your bolts and lines. Do the same for the other side. Replace the trunk liner and your now ready to move to the front suspension.

 1 point
 -
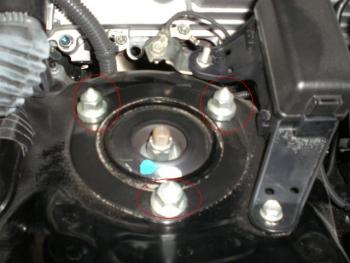
1)Jack up the front end of the car and place your jack stands for safety. Remove the plastic side panels in the engine bay. 2) remove the front wheels. 3) Use a 14mm socket to loosen the upper mounts. 4) Now use a 10mm socket to remove the receiver wire from the shock housing. And the 10 mm nut that holds the headlight leveling sensor. 5) Now remove the 17mm nut that holds the lower shock in place. (It was easier if you turn the wheels all the way to the opposite side your working on with the steering wheel.) In the pic above, this nut was a BUSTER to get off! I ended up having to use a breaker bar to get this loose. It may not be that hard for all. But just be prepared in case it is. 6) I have found it much easier to remove the cotter pin and the 17mm bolt at the top of the A-arm to make room for the coilover to slide out. Like this: 7)Tip: Don't completely remove this nut yet. Just loosen it all the way to bottom of the threading like this: Then tap on the A-arm with a hammer until it comes free. This will make sure the arm and roter don't just flop out at you when it comes free. Now just hold the A-arm and remove the nut. Then move the arm to allow acces to the coilover. 8) Remove the stock coilover. 9) Slide into the place the new coilover. Again, making sure you hand tighten the lower bolts first. 10) reattach the 10 mm bolt holding the reciever wire and all the other bolts. 11) Make sure you torque down the upper mounts last again, and then double check all your bolts and lines. Make sure you torque all your lugnuts on your wheels down properly. The finish results: * pics courtesy of the wife. :)


 1 point


