Lexlogic
-
Posts
153 -
Joined
-
Last visited
Content Type
Profiles
Forums
Events
Gallery
Store
Articles
Videos
News & Articles
Everything posted by Lexlogic
-
My Es300 Runs Bad After Sludge Clean
Lexlogic replied to GS300Sport's topic in 92 - 06 Lexus ES250/300/330
GS300 Sport msg was posted in March 2011 and his profile Location is not Identify therefore this Hot Soapy water cleaning must be a old JOKE! Right? Yes, it is funny! Recommendation replace the engine. Sorry but I am holding back :P -
KC is right its time to clean or replace here is the link IACV
-
1999 Es200 With P1133 Code And Rough Idle
Lexlogic replied to fpt2001's topic in 92 - 06 Lexus ES250/300/330
I suggest to isolate the problem by looking into P0303 and P0302 by swapping Ignition Coil #3 move to #6 meaning switching Ignition Coil between them. Reset or ease the codes. Start the engine on idle and wait for the Engine Check light to appear. Then shut the engine, read the codes and if #3 (P0303) transfer to #6 (P0306) then you should know that the ignition coil is inoperation. Ignition Coil #6 should be replaced. If P0303 appears rather P0306 then it could be the spark plug or the wirings. Tell us the results of your troubleshoot method. -
Another write up I used here is the Link
-
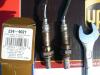
Here is what happened and how I fixed it. I thought I would post for others to learn from. The P1135 was from a failed heater element in the upstream o2 sensor on the rear of the engine. It is a 2001 ES300 with 65,000 miles. I bought a Denso 234-9021 sensor from Amazon ... the best deal I could find and was $98 delivered. I let the car cool over night and in the morning started it and backed it out of the garage to make room to work around it. I didn't know if I was going to jack the car up and work underneath. I sprayed some liquid wrench on the sensor and let it set while I rounded up a 22mm open end wrench. The elecrtical plug was not too difficult to separate. You can only get one hand to it from the top so you have to press the release tab in real hard with your thumb and wiggle the connector appart by pullung down on the connector and wires for leverqage with the rest of your hand. I got it in a few seconds. I put the 22 mm open end wrench on the sensor from the top and it was too hard to break loose. I positioned the wrench to the left side of the vehicle and got a short pipe and mallot and put the pipe on the other open end of the wrench (slipping one side into the hole) and gave it a couple raps with the mallot and the sensor broke free. After that it was simple to change out and plug the connector back in. The sensor came with some anti-seise compound for the threads. I was done in 15 minutes. I had to use a reader to re-set the engine light. I don't know if it would clear on its own. I hope this helps someone. I find tips here help me. Beach-Gt I did the same except after positioning the wrench 22mm , I went under and pull down to loosen the O2 sensor. And I was on top of the engine just to reach the plug connector. Great job! Here is a photo o2sensor 1997 bank1.pdf

-
Take note to your headlight switch. Turn your headlight switch "ON", until the knob hits the end. Now you are positioned on Auto setting, which means that when you shut the engine "OFF" and pull the keys, those headlights will turn "OFF". And when you start the engine, those headlights will resumed "ON". When my wife return from work, I will try to see while engine is shut off,when headlights are left "ON" position (not on AUTO), if there are any warning light or sound indication.
-
I had the same code 2 years ago becoz I was using the wrong fuel. Here is information on Knock sensor
-
My fuel consumption increase even having a known good MAF sensor. We found a small hole on one of two rubber hose after the MAF sensor before the throttle body. There was more air mixture going into the intake. When there is more air draw in at a faster rate, surely the indication is to signal the ECU to increase fuel flow. Or is my logic off?
-
I own the same model and color. I have 135,500 miles, 5 month ago replaced timing belt (package deal), 4 new shocks, knock sensor (6-7 hours replacement), Alternator, battery, 4 new goodyear eagle tires, transmission fuild change, 1 coil pack # 2 Cylinder and both O2 sensors. Wife does most of the driving, has a lot of power but 19-21 MPG for a V6 engine. Rear light lens, AC and the sound of music is what I love with car. I do all the work on this car except Timing belt. I have seen senior citizen love driving these car and my 20 year son would like to own it. We bought the car as the second owner 5 years ago price $11,500 out the door. 5 months ago I spend for repair $1,680 as I stated above. We are ready to see another 5 more good years with this car.
-
2000 Lexus Es300 - "play In Parking Position"
Lexlogic replied to ml30306's topic in 92 - 06 Lexus ES250/300/330
When on a up-hill incline, this is what I do, First placed the shifter on Netural with one foot on the brake paddle, Second press the parking brake until engaged. Third removed both feet from the brakes. At this time car should be still and no backing moment whatsoever. Then lastly move the shifter to Park position. Turn off the ignition. There should be no moment of the car when positioning shifter to Park. When ready to drive, turn the ignition and start the car, Press the brake paddle and disengage the Parking brake. Then move the shifter to drive. When shifting from Park to Drive you should not feel any movement or jump or hang up to the transmission. Forcing the shifter movement from any direction, specially partial braking applied is asking for problem. -
Car Idle At Low Rpm When Start R It Cut Off
Lexlogic replied to ice's topic in 92 - 06 Lexus ES250/300/330
Time to clean or replace IACV For RX300, 92 ES300 or 2000/01 ES300 -
Rattling Noise On Front Wheels Or Struts 2000 Lexus Es300
Lexlogic replied to ml30306's topic in 92 - 06 Lexus ES250/300/330
Yes, that was the Part 48603 SUPPORT SUB-ASSY, FRONT SUSPENSION, RH and 48331B BUMPER, FRONT SPRING, RH. I got those parts from Sun Rising Auto part (local store) Rockauto.com is a great place to shop, I got two Shock sensors from them for this Lexus ES300 (this job took me 6-9 hours). -
Rattling Noise On Front Wheels Or Struts 2000 Lexus Es300
Lexlogic replied to ml30306's topic in 92 - 06 Lexus ES250/300/330
When I replaced my Strut Shocks last year. I did not replace the top mount strut. And it did sound like empty coke can when I went over a pot hole or humps on the right side. Replaced right side top strut mount and stut mate (rubber). Fix completed check good. -
Vibrating Steering Wheel At 60 Miles And More!
Lexlogic replied to ml30306's topic in 92 - 06 Lexus ES250/300/330
I had a slight Vibration on my steering wheel a week ago. My front Shock absorber and front engine mount lower were replaced a year ago. Inspected front suspension for worn out bushings and rodend bearing on rack pinion assy. Last week replaced worn out tire size 205/60R-16 92V (V Rated) Goodyear Eagle GT at Discount Tire $585.00 included balance and alignment. Sweet drive on the highway and wife is happy again! -
2000 Lexus Es300 Engine & Trac Off Lights On
Lexlogic replied to Stephen8229's topic in 92 - 06 Lexus ES250/300/330
I replaced my Knock Sensor it took 6-9 Hours. Here is the link -
Denso AF oxygen sensor cost $72.99 ea Click here I manage to replace both sensor. the one to the firewall is a little difficult. I was directly on top of the engine to disconnect the wire harness and went underneath for the sensor. Alot of back pain but save alot of money.
-
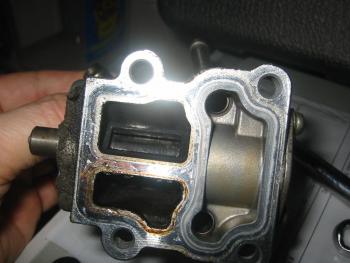
I agree with scott1966, Had the exact problem in the morning, solution was to clean the IAC valve first. Problem solved.
-
Geat Job!
-
B) Oops!
-
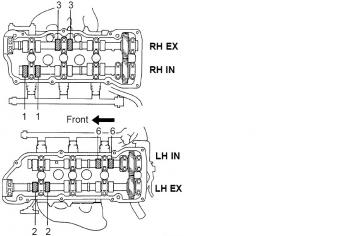
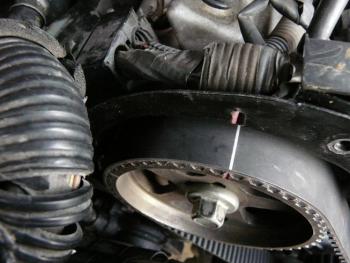
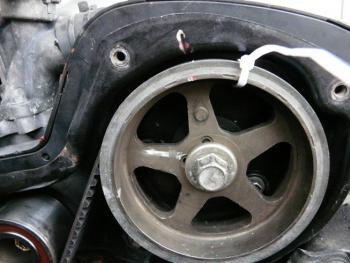
If you notice on one of the picture, when you slap the timing belt "ON" a white spot tie is placed to prevent from slipping. And another tip: It is important to torque the cylinder head bolts in squence with a new head gasket everytime. I failed this task and had to re-do the head cylinder after a month. A lot of our members can learn from this post. Keep us updated!
-
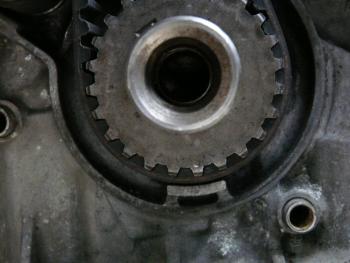
SET NO.1 CYLINDER TO TDC/COMPRESSION (a) Turn the crankshaft pulley, and align its groove with the timing mark ”0” of the No.1 timing belt cover. (B) Check that the valve lifters on the No.1 (IN and EX) are loose. If not, turn the crankshaft 1 revolution (360°) and align the mark.
-
Will this help?
-
Lets try to stay on topic folks. When I get this code P0440, I would gas up and not over fill the tank. Then tight down gas cap and reset code. I do have the same problem like every 4 months P0440 comes back. Until I am sure that it is a big problem then I will buy a Canister at Sewell Lexus online and all stuff including the VSV valve. Price is $229.00 plus $10.00 shipping, but wait I was told by CarQuest will be authorized to carry this item and cheaper by this December 2010. In other post topic vacuum hoses are found to be crack or leaking.
-
Knock Sensor If you get a code P0330 Knock Sensors ES2000-2001 I just got done replacing two Knock Sensors. it took me 9 hours. I have replaced Parts you are going to need: 1. Knock sensor 2. Knock sensor wiring harness 3. Intake gaskets 4. By-pass hose 5. Antifreeze Lexus quoted me a price of $224.00 per sensor. (The car has 2 sensors, if you’re going to go through the trouble of changing them, change them both!) RockAuto.com STANDARD MOTOR PRODUCTS Part # KS81 $134 ea After several hours of bothering the hell out of the parts guy at Lexus he told me that the part number for the knock sensor I needed was 896145-12040. I ordered the intake gasket kit from rockauto.com for $56.79 this was a FEL-PRO part number MS92766 it came with all 3 gaskets. Also replace PCV STANDARD MOTOR PRODUCTS Part # V313T $3.16 and rubber grommet STANDARD MOTOR PRODUCTS Part # GV21 $2.72 Replaced wiring harness and by-pass hose from Lexus because I didn't have the energy to go through the whole mess again. They charged me $42.00 for the harness and $18.00 for the hose. The Toyota part number for the wiring harness is 82219-07010 and the Toyota part number for the by-pass hose is 16261-20010. It took me 9 hours to change the knock sensors. It is not an easy job. Drain the coolant first. Then I removed the hood off the car. Then you have to remove the whole top half of the engine. My best advice for anyone that’s going to tackle this project is to get a small 1/4" ratchet with a swivel head. I used this to get to the intake bracket mount bolts (2), as well as the ground bolt and fuel line bracket bolt that are located behind the intake, there’s not much room back there but this saved me tons of time. You might as well change the spark plugs cause they are breeze to change with half the engine missing. Fuel injector rail stays with the intake manifold not to be separated.
-
2001 Es300 Trac Off Light & Ck. Engine Light
Lexlogic replied to Deane's topic in 92 - 06 Lexus ES250/300/330
If you get a code P0330 Knock Sensors ES2000-2001 I just got done replacing two Knock Sensors. it took me 9 hours. I have replaced Parts you are going to need: 1. Knock sensor 2. Knock sensor wiring harness 3. Intake gaskets 4. By-pass hose 5. Antifreeze Lexus quoted me a price of $224.00 per sensor. (The car has 2 sensors, if youre going to go through the trouble of changing them, change them both!) RockAuto.com STANDARD MOTOR PRODUCTS Part # KS81 $134 ea After several hours of bothering the hell out of the parts guy at Lexus he told me that the part number for the knock sensor I needed was 896145-12040. I ordered the intake gasket kit from rockauto.com for $56.79 this was a FEL-PRO part number MS92766 it came with all 3 gaskets. Also replace PCV STANDARD MOTOR PRODUCTS Part # V313T $3.16 and rubber grommet STANDARD MOTOR PRODUCTS Part # GV21 $2.72 Replaced wiring harness and by-pass hose from Lexus because I didn't have the energy to go through the whole mess again. They charged me $42.00 for the harness and $18.00 for the hose. The Toyota part number for the wiring harness is 82219-07010 and the Toyota part number for the by-pass hose is 16261-20010. It took me 9 hours to change the knock sensors. It is not an easy job. Drain the coolant first. Then I removed the hood off the car. Then you have to remove the whole top half of the engine. My best advice for anyone thats going to tackle this project is to get a small 1/4" ratchet with a swivel head. I used this to get to the intake bracket mount bolts (2), as well as the ground bolt and fuel line bracket bolt that are located behind the intake, theres not much room back there but this saved me tons of time. You might as well change the spark plugs cause they are breeze to change with half the engine missing. Fuel injector rail stays with the intake manifold not to be separated.