


mejojo
-
Posts
163 -
Joined
-
Last visited
Content Type
Profiles
Forums
Events
Gallery
Store
Articles
Videos
News & Articles
Everything posted by mejojo
-
If you have a little spare time and are adventurous, you could try something like this... Joe
-
I just realized that the antenna goes up more on FM2 more so than FM1, thats pretty cool. Makes alot of sense, but it would be real cool if it went up and down according to what freq you were on... It is supposed to go up a varying amount based on the signal strength. If you end up having to replace it, I got a part on eBay for about $25. It's just the antenna and the long plastic gear thing as the most common failure is that the plastic gear thing breaks. You have to get the old broken piece out and then feed this in. There are threads about doing this. Joe
-
Check the fuel filter. See if you're getting pressure at the filter. See if the filter is clogged. In case you haven't messed with the fuel filter before, it can get very gassy. I recommend having a big bowl and something you can use to plug, or clamp, the hose with in case you have trouble getting the hose back on the filter. (Ask me why I recommend it. Better yet, don't.) If no pressure, check that the pump is getting power...which also involves checking the relay, as recommended. Joe
-
The insulator parts were solid and in good order...no problems there. I think the next chance I get I'm going to attach some sort of drape around the exposed rod area if I can figure a way to do it leaving the struts installed. Perhaps chopsticks would come in handy . :D I am NOT taking those back ones out again..... Joe
-
After replacing all 4 struts, and finding each dust boot pretty much in pieces, and not having replacements, I put the new ones in without the benefit of dust boots. The dust boots would, of course, keep most road dirt off the strut rods, theoretically extending their life. (Of course, the original struts were "going naked" for quite some time, based on seeing the decomposed pieces of the original boots laying at the bottom of the springs). Has anyone added dust boots to an installed strut? I'm imagining wrapping a drape of some sort of rubber material attached at the top with a tie-wrap, or something like that. Also, I need to get some bump stops for the fronts. The originals were completely destroyed and I had no replacement to install. I thought I might be able to get away without them as the Tokico install instructions only mentioned them in the case of lowering the car, but I hit metal when I hit a little dip yesterday, so I need to take care of that asap. Has anyone picked these up somewhere? Can generic ones from AutoZone work? Or do I need the special ones that were installed? I, personally, can make sure I don't do that again, but I don't want to have to explain that and worry about it when anyone else drives the car. Joe
-
Jim, I have looked around and do agree that distilled or de-ionized water is recommended. In my 37 years of car ownership, I've never used distilled water, and never even considered it. I'm guessing it's probably about as important to use distilled water as it is to use only the red coolant in the Lexus. Joe
-
You know, I did the same on my 1991 LS400. I don't think it will do any harm. The reservoir, from what I was told from a mechanic, is for the radiator overflow - meaning if there is too much water in the radiator, it dumps into the reservoir. Next time, let the car cool down, open the radiator cap and add your antifreeze and water in. -Tony Lanz, Austin, TX Better yet, if you need to bring it up a bit, just add a pint or two of water. Joe Distilled Water You're thinking of a battery. No need for distilled water in a radiator. Unless you have REALLY hard water, I guess. Joe
-
You know, I did the same on my 1991 LS400. I don't think it will do any harm. The reservoir, from what I was told from a mechanic, is for the radiator overflow - meaning if there is too much water in the radiator, it dumps into the reservoir. Next time, let the car cool down, open the radiator cap and add your antifreeze and water in. -Tony Lanz, Austin, TX Better yet, if you need to bring it up a bit, just add a pint or two of water. Joe
-
Thanks for the input, guys. It turns out the way to get it to fall out was to not only turn the strut 90 degrees, but also, once the bottom is out of the bracker, to raise the axle very high, which is counterintuitive at that point. It turns out I had to re-do the one I did yesterday...when I compress in-place, it turns out I did not get a good seat on the top mount, and it made all kinds of spring-y racket. So, doing the left one over again took me 2 hours, including replacing the brake pads and figuring out how to make it fall out like glenmore said. Doing the right one, now that I know more tricks, took less than an hour, including the brake pads. Well, all done and I'm glad! Joe
-
Such a feature wasn't in a 1990...at least not standard. The key without the button is fine for opening the doors and starting the car...it won't open the trunk is all...it's a valet key. Joe
-
Did you hook up both connectors on the alternator? Did you verify the alternator is charging now? If you put a voltmeter across the battery terminals, it should read around 14.5 Volts if it's charging. If it checks out, make sure you also check when it's warm. Joe
-
Dan, thanks very much...sadly, that's pretty much exactly what I did. I had problems getting the strut up past the axle when installing. So much so that I kept thinking that I must be doing it wrong. Well, hopefully I learned enough so that it will be easier. Joe
-
Okay...I couldn't find many references to a rear strut replace procedure. This one from lextreme Lextreme Rear Strut is about the most detailed (which is not very), and addresses replacing air suspension with conventional struts, but I did not have much success following this one. I ran into a number of issues once I began on the left side. Any comments on this procedure? Links to others? Advice? I don't want to spend another 3 hours on the right side, especially not as frustrating a 3 hours as the left side was. As an example, I had issues lining up the 3 bolts on the top mount with the holes in the deck, leading to recompressing the spring in-place and reaching my hand up and twisting the top mount until the bolts lined up with the holes. I just didn't really know to pay attention to that before I shoved the strut back in place. I'm tired....lol. (Yes, I could have a shop do it, but that's just not very convenient for me, plus I enjoy doing this stuff when I have enough information.) I had no problem getting the rear seat out (except it would have been even easier if I knew to PUSH the tab, not PULL the tab.) Here are the words from the procedure I referenced from lextreme. ========= Rear Strut Installation: The rear is slightly complex due to the rear seat. However, its not impossible. Here are the procedure of changing the rear struts: 1) Raise and support vehicle. Remove rear seat cushion and rear seat back. Please see Upgrade Fuel Pump for rear seat removal instruction. Remove right and left scuff plates. Remove right and left roof side inner garnishes. Remove package trim. 2) Disconnect right and left stabilizer bar links from stabilizer bar. Remove 2 brake caliper bolts from rear axle carrier. Hang caliper with wire. Remove nut on lower side of shock absorber. Support rear axle carrier with jack. Remove dust cap on top of strut. 3) Loosen strut rod center nut (do not remove nut). Remove 3 suspension support retaining nuts. Lower rear axle carrier and remove lower shock absorber. 4) For Air Suspension Equipped LS400. You need to remove the in air inlet line. Its almost impossible to loosen the 14 mm bolt from the bottom. The easiest way to remove this bolt is from the trunk. Open the trunk and on both left and right side of trunk is where you can access. 1) Install strut assembly on vehicle. Tighten 3 mounting nuts to specification. Install shock absorber cap. Tighten lower strut-to-axle carrier bolt to specification. Tighten upper strut center nut to specification. 2) Install brake caliper, tighten mounting bolt to specification. Connect right and left stabilizer bar links. To complete installation, reverse removal procedure. Check wheel alignment. ===== Sounds very EASY! I didn't find it so easy..... Joe
-
Also, most of those guys will give you $30 back if you send in your old alternator. Even if it's not specified in the specific auction you bought, see if the same shop advertises the $30 core refund in other auctions. I think they just forgot to put that in on one of their auctions. I got mine from Eagle and it seems to be doing just fine so far. Joe
-
"Oddy" may be the 'correct' British pronunciation, but it's not the correct German pronunciation. Would you pronounce Frau as Frah? (Or was it just a joke to associate Audi with shoddy, as in workmanship?) Joe
-

Check Engine Light Code 25 And 26, Related To Code 71?
mejojo replied to hondaspeed85's topic in 90 - 00 Lexus LS400
I just did the caps/rotors/plugs/wires for the first time (202K) What did you do to facilitate getting the caps/rotors out/in as regards the lower shield? I undid the bolts on the lower shields and bent them out of the way, but there has to be a better way?!? Also, with the caps I used (Beck/Arnley) the rubber buttons (2 per cap) had come off at some point in working the cap into place. I found all but 1. Worst case is that it fell down into the timing belt area. If so, hopefully it will settle to the bottom to be found some time later when I have to do the timing belt. Joe -
Why leery of eBay? They are just rebuild shops that are marketing there to hit a larger audience than your local shop. It happens that I live close to several of them (Los Angeles area) and their feedback ratings are excellent. If they were putting out bum product, it would be apparent. Rebuilding an alternator isn't rocket science...you could probably do it yourself given the parts, tools, test eqpt. and a page of instructions. Joe
-
Did you have one particular tutorial in mind? The change spark plugs one doesn't address cap/rotor. The Timing Belt one takes off a lot more stuff than I wanted to which makes it very easy. I just want to know if the lowers are supposed to be able to come off without taking off radiator hoses, wires, etc. If not, then I'll be happy that the way I did it was a "time saver" rather than "stupid because I didn't know the right way". Joe
-
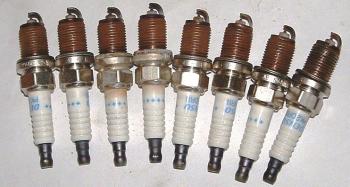
Ok....I've just changed my spark plugs for the first time ever on this car. See attached pic. 202,000 miles. They don't look so bad, do they? The car always ran great, good mileage (23mpg) so I just never got into it...taking off all the intake stuff was just a bit much. So this weekend I decided to go all out since I had to pull the alternator anyway and I had some time. - Front Tokico struts (backs will be done another day) - Pulled the alternator awaiting rebuilt unit - Changed Plugs - Pulled dist caps and rotors, ordered replacements - Have new wireset to be installed when it goes back together - Got a can of throttle body cleaner and will do that before I put it back together I had a bit of trouble with the lower cap shield on both sides...is it supposed to come out easily? After undoing the bolts, I couldn't work the shield much out of the way, so I ended up distorting it enough to be able to get the dist cap and rotor out. Was there an easier way? The old shocks/struts had 202K on them, and the fronts were completely dead...I could compress it just by pushing on the rod, and it stayed compressed. I expect the backs are the same and I've been riding on springs for quite a while. Also, the rubber bump stops at the top of the struts were destroyed. The Tokico's did not come with bump stops, and the instructions only mention that they are necessary if you are lowering the car. I put them in without. Was this a wise idea? Should they ever be used so long as the struts have gas and I don't go 4-wheelin'? Joe
-
Well that sure makes the alternator diagnosis pretty solid. Yeah a brand like Denso would be good, avoid like the plague those "lifetime warranty" pieces of junk sold by autoparts stores like Autozone or Kragens. OR, have it repaired by an alternator specialty shop which is what I'd try to do. That way you'll retain your OE alternator and just have whatever is bad, like a rectifier, replaced. They'll rebuild it to where it's like new too. You should be able to find an alternator specialty repair shop in your Yellow Pages without too much effort. I think I'm going to go with an eBay rebuild...$90 + shipping ($15-$30 depending whose shop) and some will give you a core refund if you send your old one in. Joe
-
I had 75k on my original '90 when I totalled it in 94. Got a 92 with 30k on it to replace it. The 92 now has 202K. So been driving an LS400 for 247K. Joe
-
This is exactly what's going on with my 92 LS400 with 200k+ miles. Shop says alternator will put out when cold, but not when it warms up. Other reading on this forum has led me to believe the alternator is worn out. My plan is to take it out and put it on the tester at AutoZone and see what the machine says, taking care to run it for a while. Anxiously awaiting any news from your end. Joe
-
How To Replace The Egr Pipe Without Dropping The Tranny!
mejojo replied to DAZZX's topic in 90 - 00 Lexus LS400
Please post a picture of THAT arrangement! Joe -
UPDATE - Shop reports alternator charges when cold, but not when it warms up. They say they load-tested to battery and verified it's okay. Good thing the weekend is coming up...will also be doing the shocks, so it'll be an all-Lexus weekend for me. Joe
-
Very elementary compared to the other fixes you tried, but assume you've checked fuel pressure? Fuel pump putting out low pressure could cause this symptom. It happened to me in my Volvo where the delivery hose worked off the pump and was only supplying 1/2 the required pressure. Ran great until I tried to hard accelerate. Joe


