

Dean2
-
Posts
84 -
Joined
-
Last visited
-
Days Won
7
Content Type
Profiles
Forums
Events
Gallery
Store
Articles
Videos
News & Articles
Everything posted by Dean2
-
Disconnect dinging seat belt sound
Dean2 replied to Norty Giffis's topic in 2013 - 2018 ES350 / ES350h
The simplest way to get around the ding and the light are simple seat belt extensions. Put them in and leave them there. No more lights or dings. 15 bucks a pair on Amazon -
It is normal. It speeds up when you engage ac due to the extra load, almost all cars do that. There is a typo in my first post, it should have said just above 650 with ac on, 500 with it off. Sorry about that.
-
If you have a multi meter check for power at the bulb sockets. Otherwise, try putting in a new fuse anyhow. Then try new bulbs. Do the easy cheap stuff first
-
Is your ac on at that idle? If it is and the car is idling smooth, no lumpiness, no hesitation when you step on the gas to leave, then your are fine. My GS 430 idled just above 550 in drive, with ac on. Same motor. My ls460 idles at about 850 to 900 under those same conditions and I would prefer if it idled a little lower, actually.
-
Book time to change the belt, tensioner and water pump on a 430 engine is 7 hours. Even if you have done a few, it will take you pretty close to that to change the parts and do a good job, by the time you burp the coolant, button everything up. Rock Auto sells the Aisin all in Kits for about the best price I could find, far cheaper than the dealer. My independent mechanic charges 135 an hour so basically 1000 for labour. I supplied the OEM coolant and Aisin kit. Had him flush the brake fluid at the same time. I was at the recommended mileage as well as just past the 12 year mark on age on my GS430. The belt was starting to show some cracking so it was definitely time. The vehicle was garage stored and only summer driven, so pretty much ideal conditions for extended life. Next one will get done at ten years, if it isn't at the mileage or at the mileage, whichever happens first.
-
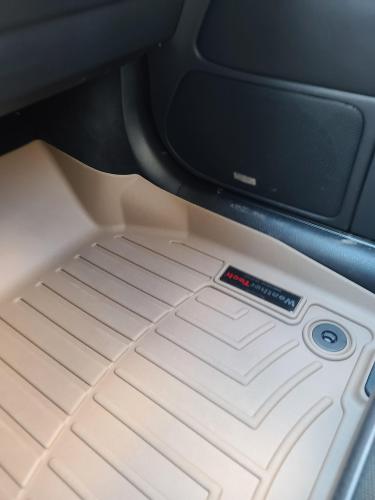
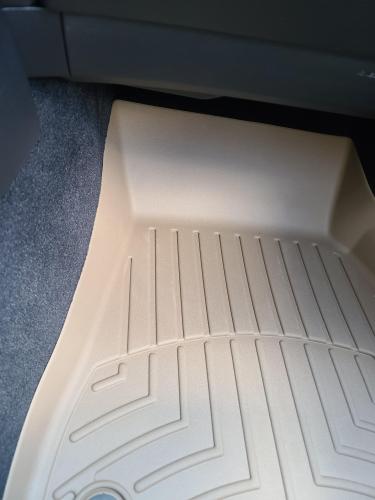
I put tan in mine to lighten the floor area. I think they look good.
-
A bit of an update. Have had the LS460 on a battery tender all winter. Car hasn't been driven for about 35 days, prior to unplugging the tender. Took it off two weeks ago as I was going away and didn't want to plugged in while I was gone. Got back, measured the battery voltage, still at 12.67 after 14 days just sitting. So the good news is, for longer term sits the car must go into a deeper sleep than what I was first measuring. Once it has sat un-driven for a month or so, the draw must drop to nearly nothing as 12.67 is virtually a fully charged battery. If the draw had remained at even 40 Milliamps, it would have drawn it down more than that. So a battery in good condition, and a car stored in heated indoor storage, no alarm armed, appears to be able to sit for very l;ong periods of time without flattening the battery.
-
So, did you get it sorted? What was the cause of it running so rich?
-
You help your way, I will help my way. If you check my posts on here you will find all of them are technical and helping answer other people's questions. The vast majority, like this question, are questions posted by first post members, who ask one question, get the answer they need, never come back to even bother to say thanks, let alone add any value to the group later on. If you don't think my answers add value, feel free to put me on ignore but don't tell me how I need to help.
-
Use the individual window controller and roll the window all the way down, then up, hold the button at full up for about 5 seconds, you should hear a beep. Once you have done this for each window the drivers door switch as well as the one touch should be working for all windows.
-
Typical, new member, one post, never comes back, no thank you for the info. Pretty common pattern on this and other car forums. They wonder why newbies have a hard time getting an answer.
-
Step 1 .... get up from computer and go out to your car Step 2 .... open glovebox, remove manual Step 3 .... read your manual !!!!! It's all in there.
-
Go back to the dealer and make them show you how it works. Every dealer up here has a demonstration and setup expert. They go through a 1 to 2 hour process with each buyer. They will show you how your car works and preset all of the driver selectable options for you and walk you through how to do it. Well worth the hour or so it takes to see this hands on. https://www.autouserguide.com/lexus/es350/lexus-es350-2023-cruise-control-user-manual/ Selecting Constant Speed Control Mode When constant speed control mode is selected, your vehicle will maintain a set speed without controlling the vehicle- to-vehicle distance. Select this mode only when vehicle-to-vehicle distance control mode does not function correctly due to a dirty radar, etc. With the cruise control off, press and hold the cruise control main switch for 1.5 seconds or more. Immediately after the switch is pressed, the dynamic radar cruise control indicator will come on. Afterwards, it switches to the cruise control indicator. Switching to constant speed control mode is only possible when operating the switch with the cruise control off. Accelerate or decelerate, with accelerator pedal operation, to the desired vehicle speed (at or above approximately 20 mph [30 km/h]) and press the “-SET” switch to set the speed. Cruise control “SET” indicator will come on. The vehicle speed at the moment the switch is released becomes the set speed. Adjusting the speed setting: Canceling and resuming the speed setting: Dynamic radar cruise control with full-speed range can be set when The shift lever is in D. The desired set speed can be set when the vehicle speed is approximately 20 mph (30 km/h) or more. (However, when the vehicle speed is set while driving at below approximately 20 mph [30 km/h], the set speed will be set to approximately 20 mph [30 km/h].) Accelerating After Setting the Vehicle Speed The vehicle can accelerate by operating the accelerator pedal. After accelerating, the set speed resumes. However, during vehicle to-vehicle distance control mode, the vehicle speed may decrease below the set speed in order to maintain the distance to the preceding vehicle. When the Vehicle Stops while Follow up Cruising Pressing the “+RES” switch while the vehicle ahead stops will resume follow-up cruising if the vehicle ahead starts off within approximately 3 seconds after the switch is pressed. If the vehicle ahead starts off within 3 seconds after your vehicle stops, follow-up cruising will be resumed. Automatic Cancelation of Vehicle-to-Vehicle Distance Control Mode Vehicle-to-vehicle distance control mode is automatically canceled in the following situations. VSC is activated. TRAC is activated for a period of time. When the VSC or TRAC system is turned off. The sensor cannot detect correctly because it is covered in some way. When the brake control or output restriction control of a driving support system operates. (For example: Pre Collision System, Drive-Start Control) The parking brake is operated. The vehicle is stopped by system control on a steep incline. The following are detected when the vehicle has been stopped by system control: The driver is not wearing a seat belt. The driver’s door is opened. The vehicle has been stopped for about 3 minutes If vehicle-to-vehicle distance control mode is automatically canceled for any reasons other than the above, there may be a mal-function in the system. Contact your Lexus dealer. Automatic Cancelation of Constant Speed Control Mode Constant speed control mode is automatically canceled in the following situations: Actual vehicle speed is more than approximately 10 mph (16 km/h) below the set vehicle speed. Actual vehicle speed falls below approximately 20 mph (30 km/h). VSC is activated. TRAC is activated for a period of time. When the VSC or TRAC system is turned off. When the brake control or output restriction control of a driving support system operates. (For example: Pre Collision System, Drive-Start Control) The parking brake is operated. If constant speed control mode is automatically canceled for any reasons other than the above, there may be a malfunction in the system. Contact your Lexus dealer. Situations in which the Curve Speed Reduction Function may not Operate In situations such as the following, the curve speed reduction function may not operate: When the vehicle is being driven around a gentle curve. When the accelerator pedal is being depressed. When the vehicle is being driven around an extremely short curve. https://www.lexus.com/My-Lexus/resources/video-detail-page/vehicle-features/dynamic-radar-cruise-control--gen-10-
-
It won't hurt and if it is old or plugged up it could be part of your problem. Have you done a compression test to see if it is, rings, valves etc.
-
Well, outside bad O2 sensors, plugs, coils, plugged pcv and you already changed those I am left with you are getting extra air from somewhere, or your ecu needs to be reset and the ecu being off, unless you did something to change its programing, doesn't seem real likely. Does the car idle at normal rpm, and does it drive normally, just sucking a lot of gas?
-
If you just replaced the intake gasket recently then I would for sure be checking for a leak there. Once you have checked let me know the results. Are there any error codes stored. Have you done an obd code read?
-
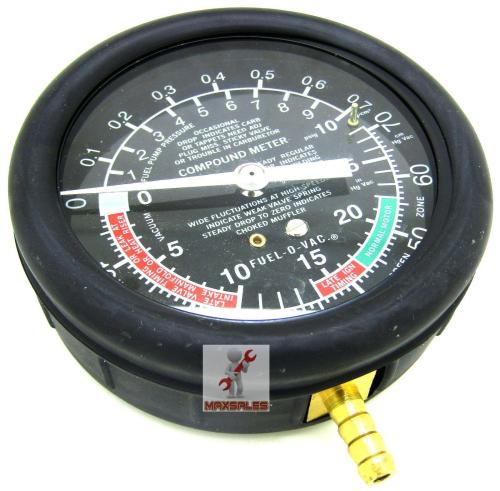
With car warm and idling spray flammable throttle body cleaner around the intake manifold gasket. If it is sucking air you should be able to hear a difference in the idle rpm. Also, if you have a live OBD reader you should be able to read the vacum level. Also, you can use an old style vacum gauge, it should read 18 or more, if you have a vacum leak it will read a lot lower.
-
Check for an intake manifold leak. If you have a leak, additional air is being pulled into the engine and the ECU will add fuel to balance it out. Causes really poor gas mileage and what appears to be a run rich scenario.
-
They have been made by Aisin for decades and Japanese producers do not switch suppliers easily at all. Long term relationships are how they run their businesses. I would assume they made them for those too.
- 1 reply
-
- 1
-

-
If you look up GS430 the fluids and capacities are the same. Also the owners manual has all that information in it. If you don't have one download it from the Lexus site. The 2008 sc and yours are very similar. https://www.lexus.ca/lexus/en/know-your-lexus/manuals
-
32 years old, your mechanic is spot on. New belt, water pump and tensioner. You can buy the complete kit, OEM Aisin parts, from Rock Auto for a good price. Your mechanic will charge you about 8 hours for the job. Plugs should be fine, but i would do coolant, oil, filter and brake flush just becuase of the age, unless you know when they were last done. A few treatments with in tank injector cleaners and a then new fuel filter would also be a good idea.
-
Put a 5 gallon jerry in the trunck. Run it till it stops. Add the 5 gallons go to station and fill up. You will pretty soon know if you are getting a short fill or there is way more than 2.2 gallon in the tank when the light comes on.
-
You guys do realise that with the fuel pumps in the tank they need to have fluid on them to prevent overheating, and you have to have enough fuel that if you are on a steep uphill, it can still pump fuel. If you run them low enough you will potentially stop, even though there is gas in the tank. Old cars had mechanical or later, electric outside fuel pumps. You could run the tanks nearly empty on flat ground becuase the fuel line came out the bottom of the tank, but even those were uphill sensitive. Modern cars with in tank fuel pumps aren't like that.
-
You can get the rim cleaned up and re powder coated. Quite a bit cheaper than new oem. Or buy aftermarket rims, slightly more than powder coat.
-
Simple jib to fix. Most lexus the freeze plug is held on by two small bolts. Remove them, take the cover off and clean it up. Put is back on with a silicone bead on it. You will need to drain coolant amd put it back in, or replace it if it is due. Only use the proper Toyota long life antifreeze.


