


Gumart1
-
Posts
294 -
Joined
-
Last visited
Content Type
Profiles
Forums
Events
Gallery
Store
Articles
Videos
News & Articles
Everything posted by Gumart1
-
Monarch - I did find that my solenoids appeared clean, but Blake had a tiny deposit on one of his solenoids that, when cleaned, made a big difference for him in the shifting. You are correct in that the entire tranny looked very clean overall. I have to add about 4 ounces of fluid to get my level perfect, so I can't comment on the improvements just yet, but I have a feeling that I am not seeing the improvement that I hoped for and that my tranny may be showing it's age. It shifts smoothly except for a hard downshift from 2 to 1. I also feel it engage harder than most LS's when I put it in gear. I've already replaced my tranny mount. I'm not against flushing, but I know this will support your point of view when I say that this LS has seen regular tranny fluid changes and no flushing and is still original at 253k miles and is still going strong. :)
-
Chuby - Call another Dealer. Or better yet call a Toyota Dealer. It's part#00279-000T4. I paid $3.40 per quart for a case at a local Toyota Dealer (Trying to upload a photo but getting an error message). I took a short drive but didn't feel anything unusual. Will remove the hose and start the car to confirm fluid direction. I'm guessing my '91 will be the same as Lexls's '91. Thanks for the ideas. Interesting note: Because it took me so long to work on the car, I managed to drain over 6 quarts just from dropping the pan! My fluid was excellent before the change, and nothing was under pressure, so I feel like I came pretty close to a 100% flush.
-
Well I'm finally finishing my transmission fluid and filter change, including a good cleaning of the tranny solenoids thanks to Blake's help and recommendation. I am also adding a tranny filter, the same one that I added to my power steering after a flush. It is directional, and I'd like to know which way is correct. I have removed the tranny hose at the radiator (driver's side). On Lexls's site, for a tranny fluid flush, it looks like the fluid flows not from the disconnected hose, but from the hard pipe inlet at the radiator. If that is correct then wouldn't I want the flow to go from the inlet towards the hose that connects to the tranny? I'm just confused that it is called an "inlet". Wouldn't it be an "outlet"? OK I can probable answer my own question. When Lexls starts the car, fluid comes out of the inlet and not the disconnected hose, so the inlet has to be where the fluid flow is originating from, so the correct direction for the filter is from the inlet towards the hose. Maybe someone can confirm before I start the car...
-
Sweet - It will be difficult for me the judge the effects of the new sensors because I just completed a major tune-up at the same time. So I expect an all around improvement in mileage. I haven't driven the car yet. This was a fairly easy procedure for a do-it-yourselfer. Ross's suggestion to solder instead of crimping is right on. When I spoke to Denso Tech Support they agreed that the biggest problem they are seeing are people to don't crimp perfectly and having to redo the wiring later. Thanks Ross! One correction, it's a 22mm wrench for my '91, and after unplugging the connectors first, the box end fit right through the OEM harness. Same thing on the installation of the new; box end fits right over. I changed them because it didn't know the age of them on my car and assumed they were original. They were slightly rusted too. I also just had a crappy experience with stripped threads when changing the O2's on my '97 Ford Explorer. I got mine from Rockauto for about $50 each plus shipping. I prefer the Denso's to Lexls' Walker universals, Denso being OEM. But the tutorial helped a lot. One final note. The guys at Denso tried to talk me into replacing the 2 rear sensors. They claimed that the new fronts will change the chemistry of the airflow and that could throw the rears off. But I'm trusting the members here who say the rears almost never need replacing. Good luck!
-
It's off! Thanks for the suggestions. Blake, I was afraid to use the big guns, but the 3 solid hits to the chisel and it came right off. It also came off easier by hitting at the corners as Ko90ls suggested too. Pan looks pretty good by the way. Very few minute silver particles but 1 larger piece (maybe 1/4"). Fluid was still mostly cherry red and smelled fine. Screen looks slightly dirty and since I have a replacement kit I will be changing it vs. cleaning it. I hope that this plus cleaning the solenoids will help with a slightly hard downshift from 3 to 2 or 2 to 1 when the engine is cold (not sure exactly on the gear). Thanks Blake for the photo of the solenoids. My location is slightly different and I'll attach a photo later. :)
-
Well, I've tried everything I can think of. Rubber mallet, scraper, utility knife, hammer with block of wood, sharp kitchen knife at various angles. Bolts are all removed. Pan will not budge. Since I've been trying for a couple of days when I have a few minutes, I've managed to drain over 4 quarts! I know many people have reported problems getting it off. Some have nearly damaged their pans and given up. Is there any trick or tips for removal? The angle is really tough to get to with the car on ramps. I hate working under jack stands so that is not an option for me. Thanks!
-
Thank you both . Curt, I did take a reading from the new sensor before I connected it to the harness. Same reading. I thought for sure it would change with the added length and the plug connectors, but it did not. I guess I was most surprised that the old sensors were just within spec while the new were not. One further question, the new universal plug has the same 4 colors as the OEM harness, Blue, White, and 2 Black. On the new sensor, blue is the signal wire, white is ground, and black are heater wires. I am assuming I'll be matching colors and lexls did it that way, but I want to be sure. Can anyone verify this?
-
Hey guys. I am replacing my main O2 sensors with Denso Universal replacements. The correct heater resistance is between 5.1 and 6.3 at 68 degrees. I am getting readings of 6.5 on the new ones which is less resistance than specified. My old sensors, original to the car to my knowledge, still give a reading of 6.3. I called a local Dealer and they verified that 5.1 and 6.3 range is correct, and it is also written in my Lexus Service Manual. I called Denso and was told by a tech that the reading I am getting is acceptable and that it is more important to check for proper voltage when installed. That doesn't sound right to me. Should I demand new replacements?
-
Just wanted to add to this thread and say how great my experience with Darrel at Sewell has been. I got quotes from the other big competitors like Irontoad and Park Place. I can't knock them, very friendly guys, but Sewell hands down gave me the lowest prices on a large order, $800 worth of parts. My total shipping for everything was less than $9. I've determined that if you order more than a few nuts and bolts, Sewell is the best deal vs. Park Place's free shipping. They're all good though and a heck of a lot less than the local Dealer. They had my order shipped within 24 hours and I received it in 2 days. These days some Dealers are sneaking in aftermarket parts but Sewell uses only OEM. All my e-mails were returned. And, although I didn't have any problems, you can return anything unused within 14 days for a FULL refund. That is worth a lot in my book versus those ridiculous places that charge a 20% restocking. Geez, I sound like I work for them! I don't, just sharing my experience. :D
-
I would definitely fix your machanical problems first. No sense in recovering the seats if the car is going to die next week. What exactly is the "dieseling" noise you are hearing? Can you describe it in more detail? Also, have you changed your transmission fluid lately or pulled and inspected the pan? When does the shifting problem occur, upshift or downshift? Warm engine or cold? Once you fix those two issues, I would get some good tires. Of course with your climate you will get plenty of dry traction with your worn tires but that would be next on the list. Good choice to put the $ into the LS, I have a pearl white '91 as well with 253k miles and it has a long life ahead. Good luck!
-
I just finished everything up over the weekend, and I can report that the suspension work made a huge difference, as expected, because I bit the bullet and replaced the majority of the front end along with the air ride conversion. No more creaks or rattles and the front end is like new with 253k miles! Along with the Arnott conversion kit, I changed the lower control arm bushings (OEM), upper control arm bushings (Daizen), stabilizer links (OEM from Drivewire, about $55 for both shipped!), stabilizer bar bushings (OEM), and stabiler bar cushions (OEM, not cheap). My advice is, if you plan to keep the car for any length of time, if you like to do the work yourself to save $, have higher mileage and know that these parts haven't been changed before, to do them all at once. Some of these parts like stabilizer bar bushings may look OK, but people have reported that changing them fixed their problems regardless. They may be cracked and brittle but difficult to spot. I highly recommend the Lexus Repair Manuals which were very helpful here. Lexls.com also has great tutorials on most of the front end. One thing I would not do if I were to change the rubber bushings is to burn them out. I had a great time making a fire, but in the end I still couldn't get the outermost metal sleeves out of the arms, so I ended up finding an engine rebuilding shop to press them out and press the new lowers in. My total cost was $54 for the labor and it was worth it compared to the price of one new upper control arm ($300+). I lubed every inch of the upper bushings, and I do not have any squeeks, for awhile at least. Most of the conversion to the Arnott struts was very easy. I took my time while I worked on the bushings so I did it over the course of a week. If you are just converting the struts it can be done in a day easily. The rear was a PITA because you have to remove the seats and some of the rear trim. The new struts come already assembled and the springs are already on, so the whole job is really just just getting to the old ones. You will also remove the old actuators and air tubes. The one disappointment with the Arnott kit is that there are no instructions, but again if you have the repair manuals you will be fine. Arnott claims that their conversion kit has a damping force that will mimic the soft air ride. Unfortunately I am not able to confirm this for sure because at the same time I replaced my upper control arm bushings with polyurethane, and my ride is definitely stiffer than before I converted. But my true feeling is that I lost some of the smoothness of the air shocks. It's still an excellent ride overall, and I'm happy I converted. Now I have all new parts including springs and strut mount cushions. I think Arnott has them on E-Bay for $599 now, that's a steal for all 4. I was pretty scared to take that test drive, but I was so relieved when I drove off and didn't hear a peep. :D
-
jragosta, I usually don't get involved with this stuff, but I wanted to share a few thoughts. First of all, I respect your opinions and contributions you've made to this forum, as I see the number of posts you have made and how long you have been a member. I am a highly educated person, but not when it comes to cars. However, I look at this forum as exactly what it is: a DISCUSSION forum, which is a two-way system. I am not here solely to be educated by you, no matter if you are always right or not. I read the last contest between you and mnickburnas and I was actually learning something until you both made it personal. You are wrong to blame management. They are acting exactly as they should under the rules. The bickering should have been taken offline. I enjoy reading the forum daily, but I have to weed through these personal wars, and that is not pleasant. Sometimes I may learn something from you, sometimes from Mike; however it is my decision who to listen to or believe, just as someone will ignore Monarch while another listens. Be proud of your knowledge, and share it, but don't push it, let the reader make his own choices, right or wrong. I'm not going to beg you to stay here on the LOC. I don't support that you loudly created a thread titled "Goodbye to Lexus Forums" here instead of in a general discussion, or anywhere for that matter. But I'd hate to see you go because your opinion does have value, and if you have the confidence in yourself and your opinions, you do not need to worry about what the others say or challenge you on here, right?
-
csorbo01, the alternator for your 93 is different than for the 90-92. Not sure of the exact differences, however. Could be an upgrade from 80amp to 100amp. But the most important thing is for you to fix the power steering leak completely first, or you'll be changing alternators every week! Plenty of repeat threads about the leaks, so start there before you deal with the alternator. I like what some other members have recommended with the alternator, which is rebuilding it instead of replacing. For the '92 I was repairing at the time, I found a rebuilt alternator online for about $125 with a $25 refundable core. Best price I could find at the time. Replacing the alternator takes about an hour at the most, and this is coming from someone who couldn't even find the alternator when I joined this forum. :D
-
Arkansawyer - Thanks for the reply. I know you've been busy too. You're right, it's all very straightforward. The toughest part for me without an air gun was not to remove one part that might have been needed to provide some torque for removing another. With 250k miles on my '91, I'm still amazed at how well these components have held up. Even with new struts with springs and cushions (converted from air ride) and lower ball joints, I still had some noises and wandering. Because of their age and visible wear and cracking to the rubber, I'm replacing the upper and lower control arm bushings, stabilizer links, stabilizer bar bushings, and strut bar cushions. I expect a smooooth ride! My outer and inner tie rods seem fine, as does my steering rack. I understand there is a steering rack cushion but haven't checked mine out yet. Tranny and engine mounts (can't wait...) coming soon. I have a friend who's shop will be pressing out my bushings today - hopefully there won't be any problem. Have you replaced yours, and were you able to press the new ones in yourself with a c-clamp? The only component I am hanging onto are the $300 a piece upper control arms. With everyone's tip I decided that my upper ball joints are still good although with ripped rubber boots I'm sure their life will be limited.
-
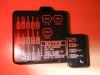
When I removed this cover I found that the 10A fuse for "RR A.C." is missing. I assume it has something to do with the air conditioning but I'm wondering why it was pulled? I do know that my air conditioning did not work when I purchased the car but have not done any troubleshooting yet. Thanks!
-
Replacing my lower control arm bushings with OEM. Daizens for the UCA bushings will be lubed with Sil-Glyde. Any reason to lube the rubber ones? It won't harm the rubber, but will it offer any protective or preventative benefits?
-
Also known as the torque plate.
-
Thanks for the help. VMF posted this awhile back - it's also straight out of the repair manual: "Remove upper suspension arm. Move ball joint stud back and forth five times, then install nut. Using torque wrench, turn nut continuously one turn per 2-4 seconds and take torque reading on fifth turn. If torque reading is not 9-30 in. lb. , replace upper suspension arm and ball joint." The movement of the ball is definitely rough when I turn it by hand, like it hits a stopping point instead of a smooth circle. Is this the degredation of the ball itself or another internal part? If I did have a torque gauge with inch pound readings, I still don't understand this test. It says to install the nut - do I hand tighten it? Or torque as if I'm installing the ball joint to the upper arm? Why would the torque reading on the nut tell me the condition of the ball joint? I'm totally confused with this test.
-
I am currently changing out much of my front suspension. I had some visible play in the upper control arm bushings, so I know these need replacement. I also found that one of my rubber boots for the upper ball joint was torn, and most of the grease had leaked out. I've read that some people ignore this on the upper ball joints because the lower take the most wear. But I also noticed that if I move the threaded stud around in a circle it feels choppy, not smooth. I do not own a torque gauge with inch pounds, which is required to measure the free play according to the shop manual. Is the rough movement enough to determine that they are bad? Or is there anything else I can test while the control arm is hanging free with the ball joint? I'd do anything to save $650 - I already have the replacement bushings and the arms themselves are fine.
-
Arkansawyer - I know you are in the process of rebuilding your front suspension. Did you actually experience a clunking during hard braking prompting you to change the cushions? What kinds of wear did your originals have, and have you noticed an improvement in your ride since? I just removed my originals with 250k miles, and was surprised to see that they look pretty good. I had purchased new ones from Sewell but I have 14 days to return them and I'm not sure what to do. They were about $100 each which is not cheap! I did not have a the typical strut rod noise, but with 250k miles I feel like I can't go wrong replacing all of my rubber bushings. But I was surprised that besides some minor cracking, it wasn't compressed or compromised in any way. By the way thanks for the pics and the tips - very easy job.
-
Steve - I'm almost ashamed to admit I did sell my '98 :( . I'm probably the first LOC member to actually sell his! As you know in the past year I've bought and sold a few (including the 93 ES 5-speed) and loved them all. My '92 is nothing at all like the '98 in performance, and I plan to own one again in the future. For me it was personal, I put on all of 3,000 miles in just under a year with the '98 - not enough time with my foreclosure rehabbing work. I'm enjoying the hobby, and I'd rather learn on the '92 for which I paid next to nothing. I suppose it is like a "foreclosure Lexus". Plus the tutorials are there. I'm in a different situation that you Sapper, so I can understand your dilemna. I still think the 98-00 are the best years to own, and the best body style of all. I would have loved to have bought your dad's.
-
"i love my lex and it's in great shape" You said it yourself - so I say keep it. As LexiRx said, you know what is wrong with it, you can buy another and inherit someone else's problems. You are handy and you have this forum and already have most parts so you're halfway there! The mileage means little (ask Blake). I have over 250k on my '91 and it is much better mechanically than the '92 I owned briefly with 100k less miles! If you absolutely don't have the time, and you said you have up to 15k to spend, then I like Blake's advice on a newer Toyota with an extended warranty. You're actually right at the price point of a '98LS - but that wouldn't leave you with any room to work. Hope it works out - Good luck.
-
Anyone Ever Installed "monroe Sensatrac" Struts?
Gumart1 replied to 90LS400Lexus's topic in 90 - 00 Lexus LS400
Yes, KYB did make the OEM struts for Lexus, but was specifically designed for the LS400 and is a different damping force than the GR-2's that have a firmer ride. Personally I would go with the OEM part on this and it's only about $55 a piece from Irontoad, newlexusparts, or lexus-parts.com. 90LS400Lexus - Just wondering - how many miles on your LS, and have you looked at any other suspension components that can compromise your ride quality in addition to your struts? -
Hey Steve! Thanks for the e-mail on the recommendation of using Meguiars NXT Cleaner/Wax - I asked the question on another thread topic but wanted to put it where it belongs. I realized that I still have some other Meguiar's products that I believe were recommended me at one time or another. They are: #9 Swirl Remover, #7 Glaze, and #26 Hi-Tech Yellow Wax. This is for a Pearl White LS with light swirls and a few very light scratches. Do you feel these will be adequate for the job or will the NXT bring better results? Or is the primary difference the length in which the wax will last? Also, will the #9 swirl remover do anything if apply it by hand? I have microfiber towels, buffing pads, and terry cloths. I suppose microfiber would be the best choice, or is one a better applicator than it is a remover?
-
Blake - Truly amazing - Just "dreamy" - love the clouds photo. Hard to believe you have 272k miles and that the car was previously neglected before you owned it. A real testament to Lexus but even more so to your efforts And you did the wheel wells which many people forget about. How many hours did the entire process take you? I'm sure I can find my answers in the detail forum but I definitely want to find the best cleaner, polish, and wax for pearl white that can be applied by hand.


