


tckcumming
-
Posts
165 -
Joined
-
Last visited
Content Type
Profiles
Forums
Events
Gallery
Store
Articles
Videos
News & Articles
Everything posted by tckcumming
-

Es300 Model Year 1993 Transmission Issue
tckcumming replied to dchauhan's topic in 92 - 06 Lexus ES250/300/330
Two words.... SECOND OPINION!! Two more... THIRD OPINION (if necessary)! (oops - that was four). I would definitely spend some $$$ to have this checked out at another shop - and another. From your description, it could be a multitude of things. Sounds to me like your shop is taking a stab in the dark in diagnosing the cause. I'm not saying they're trying to scam you. But I'd want to know for sure before I shelled out that kind of cash. I would kick myself hard if I spent $1300 on repairs only to find out the problem was still not corrected. IMHO tck... -
LMFAO!! Great movie, SKPERF!! Should be required viewing for everyone on every forum I've ever read (NOT just this one!!). tck...
-
... don't know about that - I'm much better with "old-school" engines. Give me a big old Detroit iron V-8... or a little old multi-carb Brit 4 cyl - those things I understand. Really though, the basic idea is the same - air goes in, mix with fuel, add spark... bang!! make power. Balancing the air and fuel, and timing the spark are the only tricks. The same principals apply whether you are working with a '60's MG, a Chrysler 440 six-pack, an ES300 or a new Porsche. All the computer controls and electronics just confuse the issue for me... but hey, I'm learning! So far only good from my "corrected" adjustment. Better throttle response when engine is cold. Feels better when warmed up, too - no lag or "bogging" so far. I'll leave it this way & update again after a while - see if there's any downside. Gotta go back to my deserted stretch of road & try some good old power launches again. Spinning tires & burning rubber - Now THAT I understand! tck...
-
Glad someone brought this up again... I've been meaning to post an update for a few days, never got around to it. Had a driveability problem under some circumstances after I leaned out the mixture. Seemed great for a couple of weeks, no ill effects at all. Then my son complained of the car "bogging down" (his words) on acceleration when the engine was cold sometimes. I told him to take it easy on the gas pedal when the engine was cold - I figured he was just trying to accelerate too fast before the engine had warmed up enough (I was 17 once, too!). Everything OK after that. But I was out of town for a few days - a great road trip, by the way, around 900 miles in a couple of travel days. I got into the car one morning (warm weather about 80 degrees F, quite humid), started the car & drove off as normal. The engine bogged, the car almost stopped! Let off the gas, it was better. On the gas, bogging very badly. No sputtering or backfiring, no warning lights, nothing to indicate a problem except the car wouldn't go anywhere. I turned around & went back to where I'd started. Popped the hood & took the cover off the airflow meter (glad I left my fancy electrical tape in place & didn't seal it back up yet). Used my little keychain-size multi-tool to move the cog back to the red line I had put on it. (thanks for the tip Toysrme). Started up the car - way better, smooth & back to normal. Since I was far from home I thought I'd better leave it like that & mess with it some more later. It's still back in it's original "factory" state now, I haven't had time to fool with it any more. I never did mess with the timing, maybe that would have helped. The fact that it behaves this way intermittently and not all the time makes me wonder if something is starting to fail or go "out of spec" under some conditions. I've replaced just about everything (plugs, cap rotor, etc.) except the O2 sensors, they are original never changed ('93, around 120,000 miles). Could it be a failing sensor? No CEL or any warnings. Fuel mileage should be better, IMO. As I mentioned before, it's running well now. Any ideas?? tck... ← I had one of those "HOLY S**T!!" moments this morning. Changed both O2 sensors last week. Decided to try the "lean fuel mixture" thing again, as discussed above. Popped open the airflow cover, then realized... I had turned the little cog the wrong way the last time I did this! That would explain the crappy "bogging" acceleration, as I had actually made the engine run RICHER than stock, instead of leaner. I turned it in the "Pink" direction, NOT the "Blue", as I should have. You can see my red mark just under the little coiled spring - the wrong direction... It's "fixed" now... I put it back where it started... then turned it 5 "clicks" the other way (the "Blue" way). Went for a drive to check it out. So far... so good! Much more responsive throttle. I'll leave it for a while & update later. Hey, nobody's perfect!! tck...

-
posted this by mistake..... see below
-
Oil Spots On Driveway.... Mgb Not Guilty!
tckcumming replied to tckcumming's topic in 92 - 06 Lexus ES250/300/330
Thanks, skperformance, that makes me feel better. The cooler is still hooked up - I just bypassed the steel line. Like this... rad_diag.bmp Do you like my sophisticated CAD drawing?? BTW - I do need a new rad - I've just been putting it off - more important things to spend my $$ on... tck... ps. - found a small hydraulic leak from clutch slave on MGB - great relief - it's very disconcerting when the MG has no leaks... the universe is in balance again... -
Oil Spots On Driveway.... Mgb Not Guilty!
tckcumming replied to tckcumming's topic in 92 - 06 Lexus ES250/300/330
You are right, a kink or bend in the hose would create problems. The hard line is connected with rubber hoses on both ends - one end to the line coming from the trans, the other end to the trans cooler. So I figure that all I've really done is lengthen the rubber hoses that were already there. Instead of 2 rubber hoses with a steel line in the middle, I now have only 1 (longer) rubber hose. The overall length from trans to cooler is the same as before, it's just that now there is no steel line in between. I was really careful not to let the hose kink or twist - that's why I ziptied it to the steel line, so it couldn't flex or kink. I figured that the trans cooler can't be anywhere near line pressure - 200 psi would surely blow something out. The coolant in the rad is at about 17 psi. Even if the trans cooler is double that I should be OK with a 50 psi hose. I guess I'll find out. I use those solid metal clamps - the ones with a little captive square nut and a bolt. I don't like the usual slotted-gear type as they do seem to cut into the hose & cause problems occasionally. To be honest, this concerns me even more... When the MGB isn't leaking, it means that either all the fluids have already leaked out or something is about to go BANG. Think I'll go have another look... tck... -
Oil spots on my driveway... checked my '69 MGB (the usual suspect)... nothing leaking . Looked under the ES300 - :o red tranny fluid leaking. Not much, just enough to notice. I removed the rubber hoses that go from the trans to the cooler in the bottom of the radiator. The longer hose is connected to a hard line about 18" long mounted to the frame below the rad, then another shorter hose goes from the hard line to the rad. This hard line is very corroded and "cheesy" looking, wet with fluid. I went to a local autoparts store, they didn't have any proper trans oil hoses, but I did find some rubber fuel line hose with an identical I.D. (3/8" or so?). Here's what is printed on the hose: 9.5mm 50psi Fuel/Emission SAE 30R7 Made in USA Goodyear . I bought 5 feet of it because I had already taken the old hoses off & needed something to replace them with (possible big mistake on a Saturday afternoon!!). When I installed it, I bypassed the old rotten hard line (just zip tied the new rubber hose alongside the old metal one), replaced the second shorter hose and started the car up. No leaks. Shifted through the gears, put it in "D" and revved the engine - AOK. Went for a drive around the block - still OK. I was intending to make this a temporary repair, just until I could get some proper rubber hose for a transmission. But now that the job is done and everything is all neatly cleaned up and zip tied in place, I want to leave it as is. Anyone have an opinion about this? Can the fuel line hose handle the pressure in the trans line over time? I have no idea how much pressure is generated in the oil cooler lines, but I think a 50 psi-rated hose should be able to handle it - do you think?? I'm also considering adding an external transmission filter, plumbing it into the hoses I just replaced should be a snap. Where can I get an external filter? tck...
-
Do I Need To Do The Rust Protection Every Year?
tckcumming replied to aaron.q.wang's topic in 92 - 06 Lexus ES250/300/330
I agree, SK - ice racing is a hoot! There are often ice races on the St. Lawrence River just near my home. What a riot. Skinny tires with big spikes sticking out, cars "drifting" sideways lap after lap around an oval course at a blistering 30 - 40 mph. When one of the cars goes off course and plows into the snow "guard rail", the spectators push him out so he can continue. The motorcycles are even better - they look positively lethal and seem to go very fast, throwing up rooster tails of snow and ice chips as they slide around. It's amazing how some people will find a way to race whatever they have on any surface they can find - even if it's a frozen lake or river. tck... -
Do I Need To Do The Rust Protection Every Year?
tckcumming replied to aaron.q.wang's topic in 92 - 06 Lexus ES250/300/330
Yup, it's not just the undercarriage one has to worry about. The seems of the hood (and underneith as mentioned since the engine warms up) , trunk, doors etc. I use the black 'undercoating' sym-tech for the underbody & the yellow paste sym-tech for all other body panels. ;) Krown is a decent product, but it's not permanent & is quite messy, especially if you have a garage. The product will drip all over the place for 2 - 3 weeks. Use a permanent product like Sym-tech or Vital, much more durable & lasts 5 - 7 years. Only a 'touch up' is required to maintain the body. B) ← A couple of problems I have noticed with most permanent - type rustproofing products: ** once you get a stone chip or other "scar" in the coating it leaves a small vulnerable area for the salt & moisture to attack; ** moisture can get under the coating (through small nicks and stone chips or at seams in the metal), this can lead to a perfect recipe for corrosion to start because the coating holds the moisture in contact with the metal for a long period of time. It's also out of sight so you can't see there's a problem until it's too late. The thin oily type stuff doesn't get nicks or marks - if some of it is rubbed off, the rest of the stuff around the area just "creeps" back in to the bare spot. It loves seams and cracks and seeps right in to these areas. It gets into all the little nooks and crannies that you can't see and it stays there. Moisture can't get underneath it. Is it perfect? Far from it. It doesn't last very long on exposed areas like the bottom of the car or the wheel wells. You really do have to re-do it, Krown and others recommend every year for it to work best. It (Krown) costs around $75 - $100 CDN each time, so it does get expensive after a few years. And - it IS messy! If oil spots on your driveway make you crazy, you might want to think about parking somewhere else for a few days. Many people lay down a layer of newspapers on their garage floor to catch the drips. My car has never dripped for more than a few days, not weeks. But it is still a bit of a pain. I put up with the cost and the mess because it seems to work over the long run. Your experience may vary, as they say. tck... -
Do I Need To Do The Rust Protection Every Year?
tckcumming replied to aaron.q.wang's topic in 92 - 06 Lexus ES250/300/330
My 2 cents... Ever wonder why Canada is called the "Great White North"? It perfectly describes the colour of our salt-caked roads here in Eastern Ontario from about November to March. Like driving on a surface of corrosive sludge for half the year. Road crews here use WAY too much salt on roads in the winter, IMHO. The body panels and paint on my 93 ES300 have survived this abuse remarkably well. It's by far the best "rust-resistant" car I have ever owned. BUT... The body panels are not the only things subjected to this abuse. Brake lines, fuel lines, radiators, fuel tanks, electrical connections, brakes, etc. - all these things wear out much faster in our climate. I've had to replace my fuel tank and two brake lines, and my emergency brake doesn't work due to rust and crud siezing up the parts inside the brake drum. Rustproofing protects all these components, too. Bottom line? If you live in the "sunny south" where snow and salt on roads are infrequent, don't worry about rustproofing. You don't need it. If you plan on keeping your car for 5 - 6 years or less, no problem either, no matter where you live. If, like me, you plan on keeping your Lexus until it qualifies for "antique" status, AND you live in a snowy salty region like I do, rust protection of some kind will pay off in the long term. I like the "Krown" type of rustproofing, a thin oily stuff that gets all over everything and creeps into cracks and seams. tck....
-
Glad someone brought this up again... I've been meaning to post an update for a few days, never got around to it. Had a driveability problem under some circumstances after I leaned out the mixture. Seemed great for a couple of weeks, no ill effects at all. Then my son complained of the car "bogging down" (his words) on acceleration when the engine was cold sometimes. I told him to take it easy on the gas pedal when the engine was cold - I figured he was just trying to accelerate too fast before the engine had warmed up enough (I was 17 once, too!). Everything OK after that. But I was out of town for a few days - a great road trip, by the way, around 900 miles in a couple of travel days. I got into the car one morning (warm weather about 80 degrees F, quite humid), started the car & drove off as normal. The engine bogged, the car almost stopped! Let off the gas, it was better. On the gas, bogging very badly. No sputtering or backfiring, no warning lights, nothing to indicate a problem except the car wouldn't go anywhere. I turned around & went back to where I'd started. Popped the hood & took the cover off the airflow meter (glad I left my fancy electrical tape in place & didn't seal it back up yet). Used my little keychain-size multi-tool to move the cog back to the red line I had put on it. (thanks for the tip Toysrme). Started up the car - way better, smooth & back to normal. Since I was far from home I thought I'd better leave it like that & mess with it some more later. It's still back in it's original "factory" state now, I haven't had time to fool with it any more. I never did mess with the timing, maybe that would have helped. The fact that it behaves this way intermittently and not all the time makes me wonder if something is starting to fail or go "out of spec" under some conditions. I've replaced just about everything (plugs, cap rotor, etc.) except the O2 sensors, they are original never changed ('93, around 120,000 miles). Could it be a failing sensor? No CEL or any warnings. Fuel mileage should be better, IMO. As I mentioned before, it's running well now. Any ideas?? tck...
-
Great post, honkland! :D I need to check this out on my '93 as well. ABS light first came on about 4 or 5 months ago, it was intermittent for a while. ABS worked fine when light was off, didn't work when it came on. This went on for about a month or two, then the light stayed on steadily as soon as the car was started. No ABS since then. Local dealers want $75 - $100 just to read the codes, and they tell me that they might not be able to say for certain what the problem is anyway. No thanks! <_< I could take it to a shop & just tell them to fix it... but most shops would rather just replace everything whether it's broken or not. Much simpler and quicker for them. But I like to know what's wrong first, fix it myself if I can and let someone else do it if I don't have the time, the tools, or the skill. I don't mind paying someone else for their experience or expertise. I just like to be sure that what's being repaired is actually going to fix the problem! Could you post the procedure mentioned above, as well as the codes, from your manual? Do you have a factory manual or an "aftermarket" one? I need to get one, which do you recommend? Thanks in advance! tck...
-
Like you said, I think that will be my last resort. I saw a similar thread during my search. It looked like SKperformance referred to some tutorials he/she published. Don't know how to get to it. I'm a new member. ← This happens to British cars all the time. Here's what I do to fix my MGB... ** Take the wheel off. Spray penetrating oil around the hub and wheel studs/lugs. This WILL destroy your brake pads - but hey, your replacing them anyway, right?? ** Put the wheel back on, but DO NOT tighten the lug nuts. Leave them loose enough that you can feel some movement when you "wiggle" the wheel ** now... here's the tricky part... you have to drive the car VERY SLOWLY in a circle. Apply the brakes a few times as you go. Now drive (remember the VERY SLOWLY part???) in a circle in the other direction, on and off the brakes. You can go in reverse, too. ** Jack up the car - off with the wheel - check to see if the brake has come "unstuck". If not, repeat a few times until it comes loose. Haven't tried this on my Lexus, but it has worked like a charm on other vehicles I have owned. It works REALLY well if a wheel ever becomes stuck on the hub, but it has worked for brake rotors too. The combination of the penetrating oil, wobbly motion of the loose wheel, and application of the brakes on & off apply a lot of different forces to the wheel studs and hub, enough to break the rotor and hub free. tck...
-
I recently converted mine and I do not regret it. It blows fast, cold, and doesn't make a peep! DO IT! Snes ← ... Converted mine in early June. Heat - humidity has been wicked here since then. No problems. Takes a little longer to initially cool cabin (compared to before w/ R-12) on very hot days - a very minor issue, not a problem. Works perfectly otherwise. Why spend your $$$ repairing your system & recharging w/ R-12 when you can convert to R-134a, new o-rings, oil, receiver/dryer, etc. for around the same cost? A real no-brainer as far as I'm concerned. Go for it. tck...
-
Awesome. I'll bet it runs a lot better, too. It's rewarding to see a positive result after a little sweat & effort, isn't it? You'll find even more improvement by changing plugs & cap - rotor - PCV - etc. as discussed earlier. Not every fix will result in such a big "bump", though. Each change you make gets you closer (hopefully!) to the factory spec "perfect" state of tune for your engine, so the increments get smaller and smaller as you go. Best way to check your gas mileage: 1. ** Completely fill your tank. Doesn't matter how much goes in - you don't care at this point. Set your trip meter to zero. 2. ** Drive around for a few days. Normal every day type of driving is best, you'll get an idea of your "day-to-day" mileage this way. DON'T drive until the tank is completely empty - you don't have to. 3. ** Fill up your tank completely with gas. Write down the # of gallons you put in the tank AND the mileage shown on your trip meter. Divide # of miles by # of gallons - this is your mpg for that tankfull of gas. Write it down - you WILL forget it! 4. ** Set your trip meter to zero again immediately, at the gas station, before you put any more miles on the car you have just filled up. Go back to step #2 and repeat as many times as you want. The more different tankfulls of fuel you check, the more accurate your overall mpg number will be. It's amazing how so many people screw this up. :whistles: BTW - I got just shy of 25mpg with my ES300 with my last fill-up, lots of short trips & regular driving (and a couple of practice "burnouts" on a deserted country road). Going on a long-haul hiway run tomorrow. Around 800 - 900 miles in the next couple of days, all at around 70 - 80mph (depending on traffic and the mood of the OPP officers cruising the 401). Good chance to chk my gas mileage at a good steady state cruise; we'll see if my recent work helped any under those conditions. I'll post my result when I get back. tck...
-
I have been this route with a '92 and my '93 ES300. Don't know what yr yours is, but... 2 different muffler shops told me they would repair the broken flex joint for me if I asked them to - but with no warranty at all. Once I leave the shop, good-bye! Both places said they had done this repair on Camrys before - same basic part - with nothing but grief. Customers always came back because the repair didn't last. I just replaced the whole pipe both times. Sorry for the bad news! OEM heat shield should fit on aftermarket pipe. It will take some fiddling - fabricating mounts, welding, etc. But shouldn't be too difficult. tck...
-
"a Lexus Is Just A Camry With A Different Emblem"
tckcumming replied to H8R Proof's topic in 92 - 06 Lexus ES250/300/330
... a Lexus Is Just A Camry With A Different Emblem .... Classic case of "emblem envy". I always just say.. "It's true - but what a kick-!Removed! emblem. Worth every penny!" tck... -
So far so good! Use your 2 pennies of profit towards your parts purchase... I once found a dead bird in the airbox of a Honda I owned. Cleaning out the built up crud from the throttle makes a bigger difference than you think it should. Airflow through the throttle body and intake plenum is critical to an engine running smoothly and making power efficiently. An old "hot rodder's" trick is to polish the inside of the air intake and cylinder head ports like a mirror to create better flow and more power. You're doing the same thing by making sure the airflow isn't restricted by dirt and carbon. If you ever get really ambitious, you can remove the throttle body and intake plenum and really clean them out until they're spotless and shiny inside. It's really quite easy to do - like 8 or 10 bolts and a couple of gaskets. Takes a couple of hours and a beer or two on a Saturday afternoon. Something for another day... PCV on your engine is probably tucked further up under the intake plenum than on mine. You know the throttle body that you cleaned all the gunk out of? The thing that it is bolted to is the plenum. Look under that part on the left side of the engine. PCV will be plugged into the top of the valve cover just like in my earlier pictures. Just further under the plenum & harder to see (and reach). If you ever do decide to take off your intake plenum to clean it, the PCV will be right there in the open, exposed for all to see. Onward and upward... tck...
-
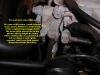
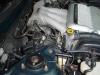
Ain't photography wonderful? Your basic layout is a lot like mine, just a little more "cramped", less room to move things around. Components are in basically the same place. I have one question for you - why are you removing the air filter box? I've never had mine out. All the maintenance items I've mentioned can be done with this airbox left in place. If you must remove it, I think there are a couple of bolts inside on the bottom of the box holding it to the car body. You have to take the air filter out, look in the bottom of the box. I could be wrong... :whistles: maybe someone else here knows nore about this than I do. Have a look at my "captions" to your photos below. Loosen the clamps, spray a bit of WD-40 and wiggle the intake hose off. You might have to pull off a couple of the smaller hoses attached to it, same deal - WD-40 to the rescue! Just make sure you plug it all back in the way it was when you're done. Distributor cap is much more accessible when the hose is off. Maybe someone else with an engine exactly like yours can help out locating the PCV - a photo would be good. Let us know how it's going. tck...
-
I haven't noticed any difference at all. Can't hear the engine running inside the car at idle. Very quiet on the road - just like the factory OEM. A custom made one would definitely be noisier. If serene quiet is what you're after - stick with the stock (OEM or aftermarket). Some people like a little "growl" from the exhaust. I could put up with a little increase in noise, but wouldn't be happy if it was at all intrusive. Just doesn't suit the Lexus "character". I get all the exhaust noise I need from my '69 MGB. Straight stainless steel pipe right from the header to a shorty "full flow" muffler at the back. The muffler is a real joke. It's a round stainless steel can about 6" in diameter and a foot and a half long. You can look in one end and see right through it out the other end. Only there to make it legal. It sounds awesome, tho! tck...
-
I agree... misaligned pulleys maybe? Belts shouldn't break like that. The last one (OEM) I replaced still looked perfect after about 100000KM (60000miles) of driving. Admittedly, very little (none) of it at 143 mph. That belt must have made quite an interesting sound when it let go at that speed... tck...
-
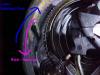
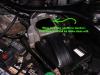
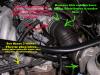
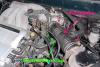
My 2 cents?? DON'T go to Autozone for your parts. I know others will disagree with me. But the PCV valves they (and all others) sell are crap. They do not seal properly. Waste of time and money. Likewise the cap & rotor. I've never been happy with these parts bought as aftermarket replacements. And spark plugs? MANY previous posts about this, it's a real issue with some people. Go to your nearest Toyota dealer for the PCV, cap, rotor, and plugs. You WILL pay more. You also WILL be confident that these things are going to work they way they were designed to. Air filters? Oil filters? Bulbs, oil, tires, carb cleaner, etc and etc can be purchased easily anywhere. Half the parts on my Lexus are from Canadian Tire. But you won't save any money buying cheap tuneup parts because you'll be doing the job again much sooner than you need to. OK - Preaching is over! Now go and do whatever you want. More pictures!! See the air intake? How could you miss it?? :D That's the part you have to take off to clean the throttle out with carb cleaner. Just loosen the 2 clamps (the small arrows) and wiggle the large rubber hose free. Don't be too crazy - you can crack it. If it does crack or split, seal up the cracks with some RTV silicone, don't just ignore them because the air leaks will affect the airflow sensor. Just be careful & you shouldn't have a problem. A little WD-40 sprayed around makes it come off easier. Spray the carb cleaner around the throttle body & scrub it with a toothbrush and wipe it out with some clean rags. Get it as clean as you can. While the rubber hose thingy is off, you can easily get to the distributor. That's it in the photo with the green arrow. It's right below the intake. Much easier to see with the intake hose off (I didn't feel like taking it off just for this photo, but you get the idea). The small arrow is pointing at one of the screws you need to loosen to remove the cap. There are only 2 (I think). Loosen them off and wiggle the cap until it comes off. The rotor is right underneath the cap. Two more screws, off with the old rotor and on with the new! Make sure the new one is pointing the same as the one you took off - I think it only goes on one way anyhow. You need to transfer the plug wires from the old cap to the new one. Don't mix them up or your engine won't run. OEM caps and plug wires have the cylinder #'s right on them - just match up plug wire number whatever to cap terminal number whatever and plug it in. Aftermarket parts don't usually have the numbers on them, so just be sure to take the wires off one at a time and plug them into the correct terminal. Sounds harder than it is - nothing too it, really. Just don't rush ahead & unplug all the plug wires before you remove the old cap, you could be in for a long session of "trial and error" to get them back on right. Don't even ask how I know this... Piece of cake!! tck...
-
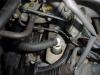
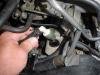
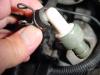
True! But if you don't supply the parts, the shop will just put in whatever they use on every other car. I have found that these Toyota engines run better & last longer if you use the OEM parts in them. Besides, the parts I suggested you purchase are probably much higher quality than anything the shop would supply, you shouldn't need any guarantee on them from the shop. My opinion... yours may vary! As far as the PCV.... Open your hood. Look on the left side of the engine, near the back. See that white thing with the little curved hose attached?? That's the PCV. Here's a closer look. Yours will DEFINITELY look more greasy and grimy than this one. I just did a bunch of work on my engine, that's why it looks sooooo good!! Just pull the plastic PCV thing out of the hole - no tools required. You can see the rubber grommet that the PCV came out of. These ALWAYS get brittle and hard, they allow air to leak if they aren't changed regularly. Most people skip this step - you can too, but I don't recommend it. Stuff a rag down in the hole to stop any pieces of this grommet from falling in there if it cracks and breaks up when you try to remove it. Now grab it with a pair of pliers and rip it out of there. No need to be gentle - you have a new one to put in, right?? Pull out the rag and any pieces - don't let them fall in the engine! Now smear a little grease on the grommet and pop it into the hole. (the grease makes it MUCH easier to get out next time!!) Compress the little clip on the hose and pull the old PCV off. I usually replace the little hose, too. It just pulls off, transfer the clips to the new one, plug it back where it came from. Again, many people skip replacing the hose - but it's so easy, why not do it now?? Stick your new PCV on the hose, a little grease on the metal end and pop it back in the grommet where it came from. All done! Didn't even get my hands dirty. Why pay a mechanic $80 per hour (or more) to do something so simple?? Go ahead and give it a shot. tck...
-
Just wrote a long detailed reply to your post - clicked "Add Reply" - got an error msg., my reply is gone! Anyway... I've done this job twice, on a '92 (aftermarket) and my current '93 (dealer installed OEM). Bottom line: ** OEM or aftermarket parts - makes no difference. Both do the job. ** WHERE it's done is the more important thing. ** Find a GOOD muffler shop - they can do this work just fine. Get recommendations from friends, family, etc. ** Last time I had this job done - cost $565 total at Lexus dealer. ** YES - the vibration at idle can be caused by the bad exhaust pipe. My '93 did this too; new pipe = no vibration. Mention it at whatever shop you take the car to - they'll check exhaust & motor mounts while it's on the rack. But replacing only the pipe will probably cure it. If not - next step is to get a new "dog bone". My advice? - go aftermarket, as long as you trust the shop that will do the work. Speedy Muffler did mine on my '92. Good work, no complaints. Lexus dealer did my '93, also good. Speedy was around $200 cheaper. Good luck! tck... ps. Toysrme is correct - the y-pipe in the Lexus is a horrible design as far as flow and restriction is concerned. Whoever designed that piece must have been having a bad day. I would have considered getting a new one made last time, but my original one blew out just as I was leaving town for a business trip - I needed it changed NOW, so I went to Lexus dealer since they had it in stock. BTW - lucky that you have an "early" ES300. If I remember correctly, later ones (don't remember the changeover date - '94??) have the cat converter(s) in unit with this pipe. Cost to replace is horrendous!


