


jsmith20
-
Posts
40 -
Joined
-
Last visited
Content Type
Profiles
Forums
Events
Gallery
Store
Articles
Videos
News & Articles
Everything posted by jsmith20
-
I did that...but like I mentioned, there was no adjustment left as the belt was so short it was holding the tensioner all the way open. I think I streched/stripped the threads when I tried to open the tensioner. It moved very easily with the belt off, but in order to get the belt back on, I had to hold the tensioner open while scootching the belt onto the idler...I'm pretty sure my belt is ~ 1" short.
-
It was such a nice day in West Michigan I had to open the sunroof, man was that nice...:-) Well after about 3 blocks, I had to give in and acknowledge the steady screech was coming from under my hood...turns out the idler belt puller was gone. $18 and 10m later problem fixed, well it should have taken 10m (or less) but I spent about 10m since I couldn't get the pulley to extend and further and release the belt. I was able to slide it off the pulley and had to do the same to get it back on. OK - so after a bunch of rambling this is my question... How much should I be able to move my idler to get a belt on and off? My belt is in great shape, but I'm thinking the previous owner threw on the closest belt they had around and missed the correct length be 1" or so. In the process of trying to move the idler, I may have (pretty sure I did) stretched and potentially stripped the threads in the aluminum arm. Since the bolt is a LH thread, I just put it touching then backed it off 1/8 turn (and added a small drop of blue Loctite), figured the worst that will happen is the washer will turn the screw back on, lock up the pulley and I will hear the belt squealing on the pulley again. If you have another 30s... Sunday I was backing out of my garage and accidentally hit the remote opener. I looked in my rear view mirror just in time to see the garage door opening, out of view...crazy thing is it was open before I put it in reverse...Pretty sure I hit the opener, started backing up and tripped the safety sensor before I had a chance to run into the garage door, but not before the garage door had come down and snagged my antenna. So today I was driving through town with the antenna limply hanging to the side and the engine squealing like a stuck pig...pretty humbling :-)
-
Get the metric screw (M8 or M10)...I ruined my rotor before I saw these holes and then it was nearly effortless. Amazing how just the right force in the right spot can make such a big difference. (They don't mention it in the tutorial, but you can see the screw holes, near the pilot hole 9 and 3 o'clock).
-
1996 in Grand Rapids...not exactly what you are asking for though.
-
Great to hear...I am planning to add these to my '96 LS in a few weeks.
-
Thanks John...unfortunately the only item you mentioned I didn't have and try was the acetylene (although I tried MAAP gas...a little). I soaked in penetrating oil for over 24hrs, before twisting the bushing in half. The nuts were the easy part. I also thing that the bushing took a lot of the shock when I tried both the breaker bar and an impact wrench. Oh well, they have been replaced and drive MUCH smoother.
-
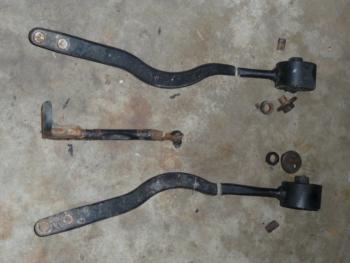
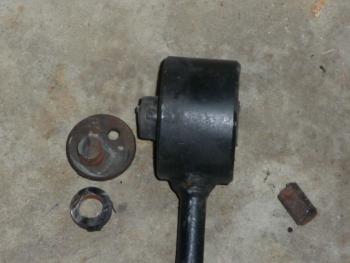
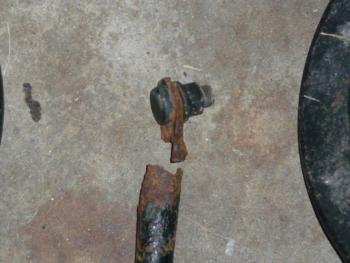
Eureka! Nothing a 6" cut-off wheel can't take care of! Check out the pictures of what remains of my strut bars :-) Another good side note is I found that the RH support bar had rusted through...so I'll be fixing that this weekend. Thanks for the help - amcdonal86...not sure why my bolts were so stuck, but it was bound to be something and that wasn't so bad overall.
-
Then I'm screwed....I have spent my couple hours trying to get these crazy things out. Actually ripped the driver side bushing so that the bushing tube is separated from the strut arm! Then I tried to torch the bushing which only started the bushing on fire but did nothing to free the bolt (although I don't thing I tried hard enough on this one. My next approach is to try an angle grinder to cut through the bushing and bolt. For sure on the driver side this seems like my only option as the bushing and bolt now just turn in the strut bar housing.ugh...I thought getting the nuts off was going to be the hard thing and that proved to be relatively easy. Thanks again for the feedback. BTW - do you know what the groaning noise coming from the driver side front bumper would be? I hear it when I turn off my car, I thought it was some sort of pressure system and it actually made a few grunts this afternoon, after it had been off for 48h...any idea?
-
Great Thanks...I have been using a 1/2" breaker bar with no luck. I am going to try the cheater bar AND a torch this morning. This may be where the lift becomes handy, I'm going to have a tough time finding the space for a cheater bar with only 30deg of travel. Also, the bushings are so shot that they allow quite a bit of rotation because they are torn/cracked. Thanks again for the advice, I will let you know how it turns out.
-
Tire Selection Needed For An '03 Ls430
jsmith20 replied to PilotguyPA28's topic in 01 - 06 Lexus LS430
Costco has them for $148 +$15 (install and disposal) per tire PLUS there is a $70 Mich rebate as of 17Sep09...as soon as I can get my strut bars replaced I plan to get a set of these. Thanks for all the advice. -
I have made the leap and bought RH&LH Strut bars and have gotten as far as getting everything loose and ready for removal BUT CANNOT free the front Camber Bolts. I have tried an impact wrench, breaker bar, C-Clamp, hammer, Sawzall through the bolt,...I don't have a torch, so I haven't tried that...yet. Thoughts? The bushings deff. are shot, I can see the tears. My LS has 120k on it and I want these changed before I get new tires. Thanks in advance for your insight. Joel
-
Just did mine, it is a pleasure to drive again. No noise from the front suspension going over small bumps and undulations in the road. I was getting a "something is loose up there" noise whenever I went over a n oticeable bump. I took mine off, checked them out and didnt really see anything wrong, but the ball joint was as loose as a joystick on a Pacman game. I couldnt feel any play in it but I couldnt put as much force on it as the car does. about 90 minutes total, the first side being 60 of those. I am very happy the shock didnt need to be compressed to be pulled, that would have been a bummer. I would like to advise that if you are doing one side at a time, you need to unbolt the swaybar link so the lower control arm can be lowered enough to unstress the shock and get the bolt out. Otherwise you are working on a still compressed shock, dangerous. Another hint. REuse the original castle nut as the one supplied is thinner and ends up above the cotter pin hole, rendering the cotter pin useless at retaining the nut torque, Or use a washer as stated before. I am going to try and replace the ball joint with a shelf item just to see if I can as the bushings are still tight. I notice this site is just for cars with air suspension...are the control arms the same with or without air? The pics look the same, just want to be sure. If so, they are able to sell these REALLY inexpensively :-)
-
Looking for some insight...I drove my car today for 30m, everything was as usual until... I let it sit and idle for 20m and it started creaking and moaning horribly. Normally it runs at about 40% on the temp gage, after leaving idle for 10-20m it climbs to 70% (and stays there), but never overheats. When I drove it while at this temp, the front end started moaning and groaning every time the weight shifted, hit a bump,... After letting it cool down I have driven it a couple times and its back to its old normal self. Any thoughts on what this could be? Thanks in advance :)
-
great job! feels great huh? :) It does...I also flushed the PS fluid, changed plugs and wires, and gave it an oil change! Not sure on the overall improvement, but your right, it feels great. I just got this car ('96 LS 400, 118k) and it is fun to see how its built. Has anyone had their switch bulbs burn out? I think the three in my heated seat and TRAC buttons are burned out as they don't light when my lights come on. The dealer quoted $12 ea, I was hoping something closer to $1.20 :-)
-
I thought the 2-3mm of crud was an exaggeration on earlier posts...but right on. I am 1/2 done on with cleaning my TB and intake manifold ('96 LS400). I could bare to try and clean out the intake mounted, so I'm taking it off and cleaning it, but a little more involved that I planned. The other component that was FILTHY was the EGRV valve assy. It took a little while to get it all of as it was pretty crusty, but now its nice and clean again...she is going to be breathing so much easier when its all back together :-)


