


motoroil
-
Posts
117 -
Joined
-
Last visited
Content Type
Profiles
Forums
Events
Gallery
Store
Articles
Videos
News & Articles
Everything posted by motoroil
-
Lexucan, or anyone who may know: The link that hosted your DIY for the burnt out needles is not functioning. ClubLexus is up and running, but for some reason the posts will not show up. :o Does anyone has this saved anywhere else? Can anyone re-post it here, or somehow make it available again? I've been driving with burnt out needles for some time now, and its finally driving me nuts--so I plan to fix it. Thanks! Ooops... they are showing up now. Probably just a problem with my computer. Sorry bout that.
-
Thanks!! :D I would've never guessed...
-
I found an unexpected feature on my ES300. Behind the armrest in the back seat--you know--if you pull the armrest down--there is a little compartment that velcros shut. I opened it, and some kind of really long black cloth bag pulls out. What the heck is it? And what is it for? It must be some kind of option?????
-
Unfortunately I don't have any pictures. I took me about 2 hours--but I work slow and carefully. I don't know the technical name for the little plastic tabs--some people call them window links, or door links. I actually found some at Checker Auto that are the same size, but waaaayy cheaper than dealer--a multi-pack for $4 instead of $5 each. They were in the "help" section. Theres a company called "help" that makes hard to find parts. Lemme know how it goes!
-
Its not so bad. I just removed my passenger door handle. It takes patience though. You have to remove your door panel. Then there are two bolts that hold the outer handle in place. There is an access hole for one, not for the other. For the one without an access hole, use a box end wrench and you can easily reach the bolt via the large inner opening/cavity that is exposed once you remove the door panel. Then, you've got a hard part. There are two rods connected to the handle. One to the handle itself, one to the lock cylinder. You have to remove both of those as well. You can do this either by pulling the rods out--they are attached via little plastic tabs. However, the tabs may break if you try to remove the rods. They tabs tend to get brittle. Other option is to unbolt the lock cylinder from the handle, then you don't have to remove that tab--as the lock cylinder will separate from the handle and the tab is in the lock cylinder. There's an access hole for unbolting the lock cylinder. That still leaves the rod with tab that connects directly to the outer handle. With that one I'd just break the tab (what I did). Then you can just pull the handle straight out, pick up a new tab from the dealer for $2, and put the new tab on before reinstall. The tabs tend to get brittle and break over time anyways, so no harm in just breaking them off and using new ones. Thats what I did. Good luck!
-
Quixtar--all that shows up as your post is, "1993 Lexus Es 300 Is Okay To Put 10 W 30 Oil Or Do I Have To Buy The E" :P What is it you want to know? What is the "E"?
-
Oh nooo!!!! The tail lights do not fit. :o They're '96 tail lights (or at least the seller said they are), and they definitely will not fit my '93 es300. They use the same four bolts, but the bolts are spaced differently--don't line up with the bolt holes. Saaaad day. Maybe I can sell them on ebay?
-
Try ebay. You can do alright there for odds n ends, otherwise dealer it is.
-
I'm about to replace the tail lights on my '93 ES300. Based on the new tail lights, I can tell that the housing is held in place by 4 bolts. These four bolts extend directly into the trunk. My question is--how do I access those bolts? I don't want to break anything. The plastic/fabric liner/molding at the back end of the trunk must need to come out first, I think. Any advice? Anyone done it before? Thanks! Okay so I just figured out how to pull back the liner. It just pulls back. I thought something would tear, but nothing did. Now it just looks like a couple of bolts and I'm done!
-
Control Arm Bushing / A-arm Bushings
motoroil replied to motoroil's topic in 92 - 06 Lexus ES250/300/330
Thanks George--good to know. They have started using salt here in the Springs in certain places. I have a mechanic friend--he's a lead mechanic for the USPS office here--maintains their vehicles. He's gonna help me do the ps pump, ps rack, and ps pressure hose. I'll ask him to help me do the bushings while we're doing the rest then. Sounds like it might be difficult on my own. -
THANKS!!
-
My front lower control arm bushings are toast. Are they difficult to replace? Thanks!!
-
93 Es300, How To Remove Front Door Passenger Door Panel
motoroil replied to mounder's topic in 92 - 06 Lexus ES250/300/330
Hey how did you take the door panel off? Anyone have any tips? I'm about to take off my door panels all around--don't have a manual for it--jus the camry manual. Thanks! -
That looks pretty sweet. It actually looks plug and play. Is it?
-
Thanks! So you recommend just gluing the new mirror glass right over the old stuff. Its in shards--pretty bad--its okay to glue the new right over it? It won't be a flat mounting surface due to the shards and missing chunks--should I remove/chip out the old glass before gluing in the new glass--or just glue the new glass right over the old?
-
My driver side mirror is totally cracked. I'd like to replace it. Anyone know how to do that? Maybe some tabs, or screws that hold it in place? I'd rather just replace the mirror itself than the whole unit. Thanks!
-
Great! Thanks! :D Off to bleed my coolant... and soon the ES300 will be back on the road!!
-
How do you bleed the cooling system on a '93 ES300? It doesn't have a bleed valve like some cars do. Just top off the radiator, then top off the other rad cap near the intake plenum? Then run the engine with the rad cap off until the temp raises-thermostat opens--and then let it cool off and top it off again? Thats what I used to do on my toyota truck, but does it work for an es300? Thanks!!!
-
Thanks for the reply--it helped. Turns out its a ground wire--and its a good ground on the valve cover. So its good to go--had a mechanic check it out while it was in the shop for other maintenance.
-
Where Is The Main Relay, What Does It Look Like?
motoroil replied to motoroil's topic in 92 - 06 Lexus ES250/300/330
Answer--there is no main relay. My mechanic was bs'ing me. I checked with the dealer. -
Thanks for the replies--they really help. Its done! He did lie about the main relay. I checked with the dealer and the dealer told me that relay spot is supposed to be empty. Checked my EFI relay--its good. Did more diagnotics--turned out my MAF had gone bad. I didn't know MAFs could impact starting--I thought they could only impact how it ran--you know, it would start, but run rough. Put a used MAF in there--now it runs great. Thanks!!!!
-
'93 ES300 My mechanic is telling me I need a main relay--and there is an empty spot for it in a fusebox. But in the owners manual it shows no main relay in that spot. The owners manual shows that spot stays unused. Its the fusebox in the engine bay, drivers side edge of the engine bay. There are two fuse boxes there, its the fusebox closer to the headlight--the bigger of the two fuseboxes. Does anyone else have a relay in the "main relay" spot? You'll see the words "main relay" by the spot in raised letters on the plastic.
-
'93 ES300 Where is the main relay located? Does anyone know what it looks like--how many prongs it has, how big it is, etc.... Does anyone know where exactly its located? Is it in a fusebox, or bolted to something in the engine bay? Your help is GREATLY appreciated!!!
-
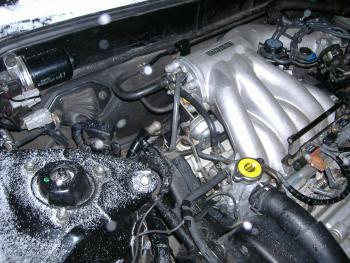
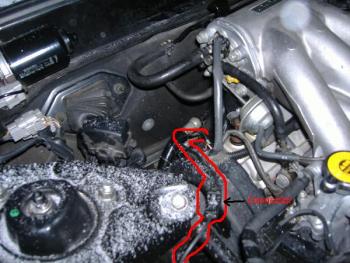
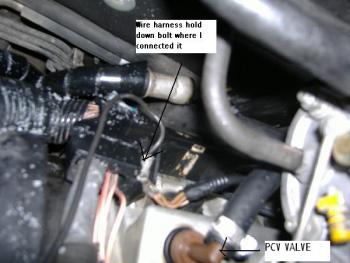
1993 ES300 I just did my valve cover gaskets, and i had one wire left over. I think i put it in the right place. The wire is located on the passenger side--it looks kinda like a ground wire--I bolted it down with the nut that holds the wire harness in place onto the rear bank. There are two of those bolts on the rear bank--this is the one on the passenger side. Can any of you pop your hood and tell me if yours is in the same place? Did I put it back right? And yes, that is snow. I'm working on it in 20 degree weather and its snowing. And I'm in a parking lot. No carport no nothin. First pic is just so you see what part of the engine bay I'm talking about. Second pic shows the wire--I drew red on either side of it (the wire has a connector in the middle). Third pic shows where I bolted down the wire. I also labed the PCV valve so you'd know where the camera was pointed. I attached the pics to the post b/c I couldn't figure out how to put them directly in the post. THANKS!! c'mon ya'll, I got over 70+ views but no one has told me what their underhood looks like? I gotta get this car moving, and its coooooollld!
-
2000 300es Headlight Bulb... How To Replace
motoroil replied to Frales's topic in 92 - 06 Lexus ES250/300/330
Ordinarily when you see headlights with 'disc with fins' the fins are for you to grip and then twist. Ordinarily they don't truly "screw" out, as they only need to turn 2/3 a turn or so. They not actually threaded, more like opening a medicine bottle or something. It will have tabs underneath that must line up with open areas on the housing and then it can pull out. Sometimes they get pretty stuck if the bulbs haven't been replaced in a long time.


