


DaveMcKenz
-
Posts
70 -
Joined
-
Last visited
Content Type
Profiles
Forums
Events
Gallery
Store
Articles
Videos
News & Articles
Everything posted by DaveMcKenz
-
Power Steering High Pressure Hose
DaveMcKenz replied to Cognative Resonance's topic in 92 - 00 Lexus SC300 / SC400
I looked around and I think I found the part for about $300. It's a Lexus part with built in sensors or something special if I remember. Sorry. -
I couldn't get my OBD I to work on the first try either. I used a fine paper clip and finally got it inserted well into each socket Te1 and E1, and I got the CEL to blink out a code. You have to stick your wire in pretty deep, about 1/4" or so to make contact in the socket. Hope it works.
-
A/c Not Cold After Ten Minutes
DaveMcKenz replied to Rod the Sound Guy's topic in 92 - 00 Lexus SC300 / SC400
Good idea. It should take longer to freeze up at higher fan speeds, so you could try to test that theory. Thanks! Here's a new thing I discovered last night: if I leave the A/C off while I'm driving for a long period of time then suddenly turn on the A/C, it is cold. So it has nothing to do with the car being warm. Any other possibilities? Given the symptoms I've mentioned could it still be the heater valve as the original replier suggested? Sounds less like heater valve from that. Could well be a bad freeze switch or low on freon. Try keeping the fan speed to max and see if it blows cold any longer. -
A/c Not Cold After Ten Minutes
DaveMcKenz replied to Rod the Sound Guy's topic in 92 - 00 Lexus SC300 / SC400
Good idea. It should take longer to freeze up at higher fan speeds, so you could try to test that theory. -
A/c Not Cold After Ten Minutes
DaveMcKenz replied to Rod the Sound Guy's topic in 92 - 00 Lexus SC300 / SC400
There is a diagnostic code system for your AC system. I don't remember how to access it but use the search function. It's fairly simple like press and hold two buttons and look at the display of the temp. I'll see if I can find it and post it for you. -
A/c Not Cold After Ten Minutes
DaveMcKenz replied to Rod the Sound Guy's topic in 92 - 00 Lexus SC300 / SC400
Sounds like a bad heater valve. It controls flow of engine heated coolant to the the HVAC fan box. If it does not shut off the hot water flow, your AC will not be able to cool the car. You may also be low on freon, and have reduced AC efficiency as a result.I saw an article about how to replace heater valve on the net, maybe planet soarer. Good luck. -
92 Sc400 - Air Conditioning Not Very Cold
DaveMcKenz replied to AppleJack's topic in 92 - 00 Lexus SC300 / SC400
Apple J, Did you add r12 or was your car converted to r134? What were your low side service port pressures? Some of the consumer (r134) products contain oil and leak sealants that may be helpful to you. Good luck -
Two things: I had Freeze 12 on my 928 and it worked fine. I could not find any local A/C shop who used it, so I was afraid I would be stuck if I ever had a problem. I converted that car and my 92 sc400 to r134. They both work fantastic and I can get service anywhere. An evaporator leak can be a pretty big problem. It usually involve removal or dash and HVAC system. It's a long DIY project and an expensive dealer job. In some cars it's a fatal condition, costing more to fix than car's value. I hope you don't have that situation. I have also heard that some of the various stop-leak additive can help on evap leaks. Beware that some A/C shops are pretty picky about working on cars that have stop-leak, since it can clog up their automatic recharge machines. Good luck.
-
I was having troubles with my car gradually loosing its charge. Every week or so I was hooking it up to a battery charger and I would be fine for a while and then I'd need to do it again. I cleaned all my terminals but no change. I decided i had 100K on my original alternator so I'd take a chance on replacing it. I bought a rebuilt nippondenso on ebay for $105 shipped. I was very pleasantly surprised by the simplicity of replacement: Disconnect battery ground Raise front of car and remove belly pan 14mm wrench to loosen tensioner and remove serpentine belt 14mm wrench to loosen one nut and one bolt on front of alternator, from above 12mm wrench to remove B+ cable from alternator (from below) Unplug other cable from alternator top rear (from below) You can now push alternator forward off mounting stud and wiggle it out (from below) You may need to release a soft line fixation point to make room to get alternator out Replacement is the reverse and actually easier. Time will tell on improvemt in charging system. Thought someone would like to now how easy this is. It took me 1 1/2 hours and I'was never in that area before.
-
Replacement Of The Instrument Cluster
DaveMcKenz replied to shar94603's topic in 92 - 00 Lexus SC300 / SC400
Disconnect the battery before you begin the cluster removal. If you don't you will have to reset the airbag fault light which is a PITA. -
New Leatherseats.com Interior For My '92 Pictures
DaveMcKenz replied to DaveMcKenz's topic in 92 - 00 Lexus SC300 / SC400
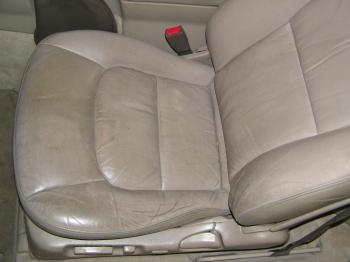
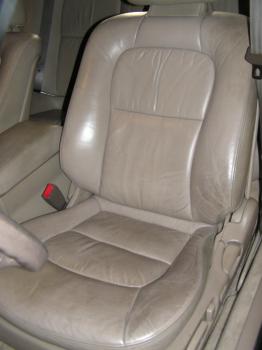
You can have it free. In fact I'll send both seat bottoms since they might interchange and the passenger is probably better shape. They were refinished with a brush-on dye and looked fine for about a year. The before pictures are their present condition. I'm guessing UPS ground would be $10-15, just pay shipping. -
Airbag Light In Instrument Panel
DaveMcKenz replied to Lexuscovergirl's topic in 92 - 00 Lexus SC300 / SC400
Lexuscovergirl, You might want to try and disconnect your battery to see if it resets your airbag light. If not, you may want to get it checked out because it could be a real problem. Lexus philosophy tends to believe in "switchology" versus "maintenance" to ensure a low failure rate after repairs and the money the service generates...there's NO need to replace your cluster though. There are a few options. First, you can send your cluster to LexTech and get whatever color you want, but the needles only have one LED that lights up the needle from the base, slowly fading as it gets to the tip; it looks fine, but I prefer the needle lit all the way across, uniformly. Second, I made contact with a LOC member (dnaspeedo) who owns a shop in Florida that can do the work. The price is good and I visited their site, so it all looks like quality work and legit. Below is his last correspondence with me. Here's their site... http://www.dnaspeedometers.com/pointers.htm. The site seems to be down now, so feel free to call their number below. Hope this helps. Steve //////////////////////////// Hey Steve, We use red LEDs because we found the LEDs in the lense red already. I don't have pictures at night in the vehicle though. The pictures we have are on the bench with hardly any background lighting. Also in the picture we have simulated the dimming function in the car to the fullest. I'll be happy to get you some at night if you'd like once we get another vehicle in our shop. I do have another picture to send you. Should you want to speak to me, my Toll-free phone number is 1-888-495-2777. Our shop hours are M-F 9-5PM EST. We charge $189 for needles and backlighting bulbs. We also include return shipping UPS Ground with tracking info. We do not take payment in advance only when we have everything working and ready to ship back. Please make sure you include our repair form on our website if you decide to send it. Thanks, Andrew Gavosto DNA SPEEDOMETERS INC. There is an airbag warning light reset procedure. When you pull your instrument cluster without first disconnecting the battery it causes this airbag fault. The procedure is described somewhere on this forum (search) and I think it's also on the lextech sight. BTW I agree that the needles are more visible if they have a row of led's along their entire length (like factory did), maybe DNA might be a better choice. The prices are comparable if I remember. -
You need to remove about a dozen small phillips head screws around the inside perimeter. The top comes off and you can re-cover it.
-
Auto Dim Interior Mirror W/homelink
DaveMcKenz replied to DaveMcKenz's topic in 92 - 00 Lexus SC300 / SC400
It may be rationalization, but I think the car looks more current with the black mirror. -
Auto Dim Interior Mirror W/homelink
DaveMcKenz replied to DaveMcKenz's topic in 92 - 00 Lexus SC300 / SC400
I am looking for the same thing; either the sun visor or rear view mirror. Was there just a two wire connection? Did your old mirror have wires; mine does. Did you use the harness that came with the mirror? bruce Hi Bruce, I wanted to use the original mirror's wire, but you need a switched 12V and I couldn't find one there. -
Whenever I post, I notice a line below my bio which says "warn: (0 %)" or something like that. I haven't noticed it anywhere else. What does it mean? Yeah. really?
-
New Leatherseats.com Interior For My '92 Pictures
DaveMcKenz replied to DaveMcKenz's topic in 92 - 00 Lexus SC300 / SC400
I decided that I wanted to tighten up my covers because of shrunken foam. I glued on some 1/2" foam after pulling the seats and peeling back the perimeter of the covers. I restretched the covers and got a tighter, cleaner look. I would figure on this as a required part of a good install for anyone interested. BTW I used my old seat covers as a pattern to cut out the foam. Doing it a second time only involved about 2 hours per front seat. The back seat was OK as is.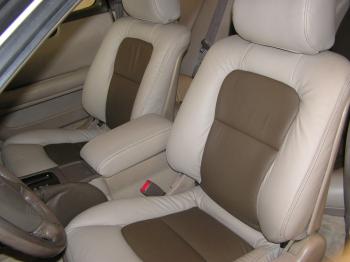

-
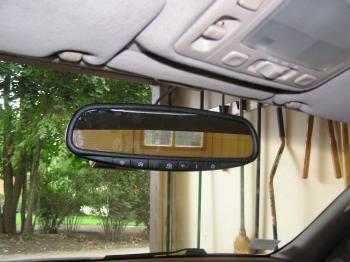
I don't know why but I decided to look at Homelink stuff on ebay. I noticed some universal and Toyota mirrors w/auto dim feature. They cost around $100 and usually came off a 3-4 year old car. I had to remove the original mirror and its adhesive attached base to make room for the wedge base that these mirrors require. I did this by making an aluminum foil shield with a 1" hole and applying 15 seconds of heat gun on high; then turn the old base w/ a vise-grip like you are wrenching a bolt, and the base comes off. They included a Permatex rear view mirror adhesive kit w/ good instructions. I ran a wire down the drives a-pillar to the fuse panel andI was pretty well done. The mirror is the same width but about 1/2" bigger from top to bottom. The dimming function is nice but the Homelink buttons work my garage doors really well. I took a picture and the install looks factory.
-
New Leatherseats.com Interior For My '92 Pictures
DaveMcKenz replied to DaveMcKenz's topic in 92 - 00 Lexus SC300 / SC400
Center console only. They do sell material by the yard or quarter hide. -
New Leatherseats.com Interior For My '92 Pictures
DaveMcKenz replied to DaveMcKenz's topic in 92 - 00 Lexus SC300 / SC400
Did it myself. It took about 12-15 hours. My first time doing upholstery. I think you could take it to a pro as well. The seat kit was about $780 shipped, front and back seats with custom inserts and contrasting stitching. It was actually fun. I'm near Chicago in Park Ridge, if you need help or info, let me know. -
New Leatherseats.com Interior For My '92
DaveMcKenz replied to DaveMcKenz's topic in 92 - 00 Lexus SC300 / SC400
Done. I started new post since I didn't know how to edit the title. -
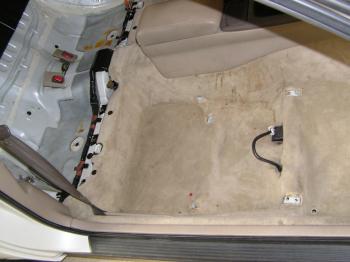
Some before and after: It took me about 16 hours to install. I am a novice. A pro might have built up the cushions a little since they get compressed by 15 years or old shrinking leather. They said that most wrinkles will come out when car is parked in summers sun. BTW this is the best chance you will get to really clean your carpets well. Overall I am very satisfied and found the install a positive experience and one which most DIY'ers could easily perform.

-
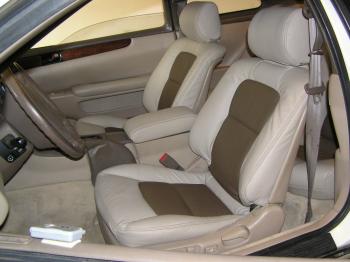
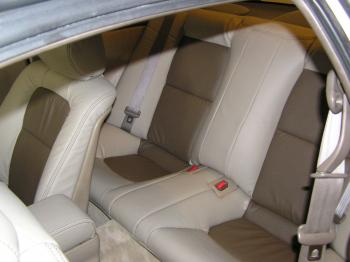
Hi, Consider this the teaser post on this topic since I don't have pics yet. My tan (Lexus Ivory) interior was showing cracks and wear on the drivers seat and back and some on the passenger side too. I patched and colored them and that bought me another 2 years but then they were back to ratty looking. I had been lusting after the leatherseats.com interior for that time period and last month I finally took the plunge. I went with a two-tone (inserts dark mocha, which is not on the website but matches the darker trim color already in the car, and sandstone main color, which is very close to the original ivory or tan color. The kit came in 2 weeks and it is wonderful! I chose their standard full leather front and vinyl w/leather inserts for rear seat configuration. I added dark mocha stitching. I think the total was $780 shipped including their hog-rings w/pliers. The process of installation involves removing the seat from the car, disassembly of the seat, stripping of the upholstery, transfer or listing wires, heat pads, etc to new upholstery, then installation. They suggest doing the back seat first first since it's easier and it's good practice. Anyway I spent about 12 hours yesterday and have the rear and passenger seat installed. To me they look fantastic. The quality and fit of the kit is excellent and the leather is much more luxurious than the original. I've taken some before pics and I'll put together some finsihed pics this week. This was also a great time to really clean the carpets and get old french fries out from under the seats.
-
Just purchased a '92 SC300 as a daily driver for my son. It will need the gauge lighting (including needles) repaired. You mentioned 10 minutes to remove the gauge cluster. Any step by step instructions for a new owner? I was about to walk you through it when I found (again) Luxury Mods' tutorial... http://vipmods.com/tutorial7.htm I would just add to their tutorial... 1) Set your steering wheel full down and out. 2) Put a terry cloth hand towel on the steering column to protect the plastic screen. 3) Take your time removing screws because if you drop them back there you could add plenty of time to the job. 4) My wires wren't NEAR long enough to come out like the one in the pics, so I had to struggle with reachign back there to disengage the harness clips. You may have to actually type the address in your URL to get it to work, I did, but its a detailed (pics included) walkthrough. If you have any problems while going through it, feel free to ask me or one of the "grand elders" around here to help ya out. Its pretty straight forward, but I know it can be a bit nerve racking when dealing with a pricey part. Nice link. I've seen that before but couldn't find it. There are 4 key points and you've covered them well 1. Once you lower the steering wheel as far as possible, turn off the automatic steering wheel position and put the car key in another room. This way you won't have to reset the airbag light which can be frustrating. 2. Pull the dimmer panel firmly toward you. It will take a good grip and some force. 3. Definitely don't drop the 4 screws which hold the instrument panel. A magnetic probe nearby might help. 4. There are 3 electrical connectors to release the panel. You need to press a release tab on each one and wiggle to get them free. Good luck,
-
How Do I Replace My Cornering Light Bulbs?
DaveMcKenz replied to DaveMcKenz's topic in 92 - 00 Lexus SC300 / SC400
Done. The bottom, front part of the wheelwell liner wraps forward and attaches to spoiler lip and belly pan. Remove this by pulling about 8 screws. (First turn the wheels to full lock toward side you are working on. No need to jack car or remove wheel.) Reach inside and turn socket counterclockwise to release. Then insert new #1156 bulb. Assembly is reverse, but it's a little hard to get it all lined up. Thanks for the help. Dave


