Eric Cheung
-
Posts
119 -
Joined
-
Last visited
Content Type
Profiles
Forums
Events
Gallery
Store
Articles
Videos
News & Articles
Everything posted by Eric Cheung
-
Momentary Film On Windshield After Wiper Swing
Eric Cheung replied to Eric Cheung's topic in 92 - 06 Lexus ES250/300/330
Hi Guys, I've just returned to the forum after a few days of busy work. Thanks for all your suggestions and directions. The number of responses is out of my expectation. Thank you all. I'll try what you have suggested. -
I don't know whether it is because the wiper is pressing too hard on the windshield or somthing else. When the wiper swings past, there is somthing like a white film that remains on the windshield momentarily. The film affects visibility, but it goes away in 1-2 seconds after the wiper passes. Do you have the same problem? Appreciate if you could give me some suggestions to sort out the problem. Thanks
-
Thanks for the information. However, there is no matching color code for exterior cladding for body color code 199 which is metallic silver.
-
Hi, I have been looking for a long time but still have not been able to find the color code of the exterior cladding of my 1997 ES300 whose body color code 199 (Silver). Any guidance in finding the cladding color code is highly appreciated. Thanks in advance.
-
Intermittent No Idle On Re-start
Eric Cheung replied to gld98682's topic in 92 - 06 Lexus ES250/300/330
Hi, just as a reference to you, I fixed the exactly same problem of my 97 ES300 by spraying throttle plate cleaner to clean the IACV. It has been like 3 months and the problem has not come back yet. ← Getting ready to do the same thing. Did you take it all apart first? Lazy man (me) here would like to just spray clean without taking anything apart! ← You need to detach the hose of the air filter from the throttle body in order to reach the throttle plate and the little cavity in front of the throttle plate where the IACV is. -
Intermittent No Idle On Re-start
Eric Cheung replied to gld98682's topic in 92 - 06 Lexus ES250/300/330
Hi, just as a reference to you, I fixed the exactly same problem of my 97 ES300 by spraying throttle plate cleaner to clean the IACV. It has been like 3 months and the problem has not come back yet. -
I think the switch is broken. Either the switch itself or the button that activates the switch is broken. The woodtrim panel can be pryed to remove it. Previously my 97 ES300 had similar problem. The driver side window could auto go down but could not auto go down. It turned out to be that the pushbutton was broken at its hinge and so it could not activate the auto-up switch. To remove the woodtrim panel, please see the links below: http://us.lexusownersclub.com/forums/index...+++door+++panel http://us.lexusownersclub.com/forums/index...+++door+++panel Hope the info. helps
-
Removing Window Switches/door Panel
Eric Cheung replied to Eric Cheung's topic in 92 - 06 Lexus ES250/300/330
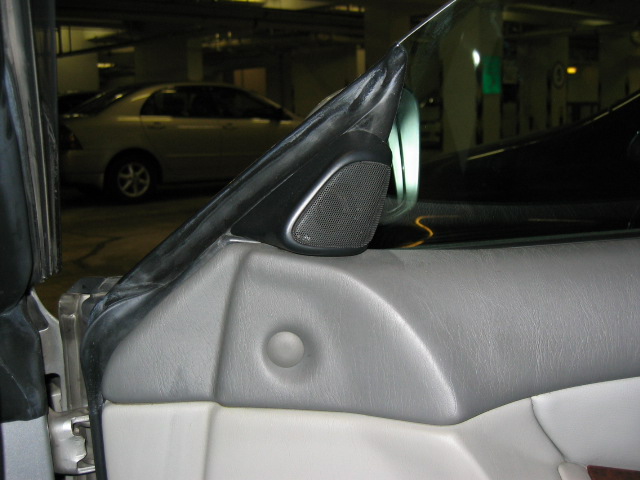
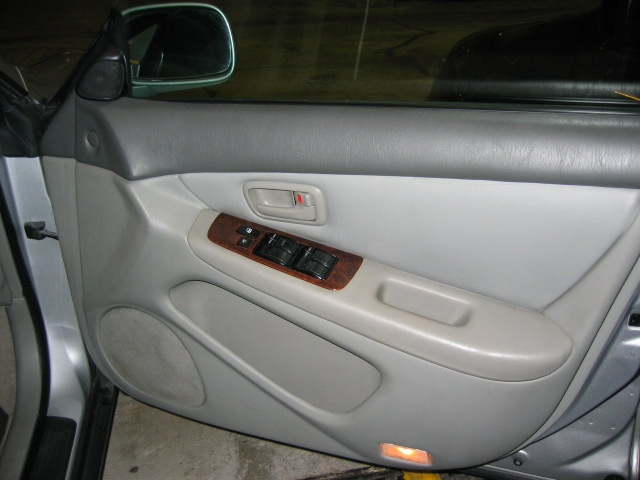
I did it! Thanks very much for all your directions. I'd like to share with you what I did. 1. Prying out the woodtrim panel of the switch assembly There is a little trick in prying out the woodtrim panel of the switch assembly. It is better to pry from the long side first, then from the short side closer to the door hinge. The spring clip is at this short side. Never pry from the other short side (closer to the door latch) because there is a plastic tab there. Prying from this side will break the plastic tab. (I broke it, but managed to glue it back with instant glue.) BTW, I managed to fix the broken switch for the driver's window. Actually it was the button that was broken and not the switch. The button broken at the hinge. I glued it back and how it is working great. 2. Removing the housing of the tweeter It was a lot easier to lift up the door panel after the tweeter housing has been removed. I even detached the tweeter to make it even easier to re-install the panel. I just removed the nut holding the tweeter, disconnected the connector and it came out easily. (BTW, I found the tweeter has a broken wire and so it has been mute for a long time. I've soldered the wire back and now it is singing sweetly.) 3. Prying out the door handle trim There is a little trick in prying out the door handle trim after removing the screw. It has to be pried at the hinge of the door handle from inside the door handle trim, becuase the door handle trim has 2 rings that click into hinge of the door handle. I pried from outside the compartment and broken the 2 rings. It could still be securely installed back, though. 4. Removing the snap plugs of the door panel The 7 snap plugs form a U-shape. There are no snap plugs at the top. The bottom ones (2 of them) need to be pried out carefully. Do not pull the panel to pop out these 2 plugs, because excessive force will break the bond between the door pocket and the door panel. 5. Removing the door panel After removing all screws and popping out all the snap plugs, I lifted the door panel straight up and pulled towards myself to take it off. That was how I did it. Hope this can serve as another reference to others. -
Removing Window Switches/door Panel
Eric Cheung replied to Eric Cheung's topic in 92 - 06 Lexus ES250/300/330
Thanks very much guys. I think that is all the information I need to get the work done. Now I am more confident in applying force to pry the woodtrim panel. Will let you know how I get on. -
Removing Window Switches/door Panel
Eric Cheung replied to Eric Cheung's topic in 92 - 06 Lexus ES250/300/330
Thanks for the advice and information. I've made progress and almost succeed. I managed to do the following: 1. removed the door handle compartment 2. pulled off the housing of the tweeter 3. popped out the snap plugs However, I was unable to lift the door panel up. I could lift the a little bit from the end where the tweeter is, but could not lift from the other end. I read from another post (which quotes 97 ES300 worksop manual) that there is another screw to be removed before the panel can be lifted. The link of the post is copy below for your reference: http://us.lexusownersclub.com/forums/index...ving+door+panel However, this internal screw can be seen and removed only if the power switch assembly is removed. However, the problem is I also don't know how to remove the power switch assembly. I try prying as directed but was unsuccessful. Thanks again. -
Removing Window Switches/door Panel
Eric Cheung replied to Eric Cheung's topic in 92 - 06 Lexus ES250/300/330
Please enlighten me again. The little tweeter is sitting on the upper left corner of the door panel, preventing the panel from being lifted straight up (please see attached photo). Shall I lift from the other end? Also, if the door panel is lifted up with the door handle and its little comparment, will it be easy to re-dock with the door open/lock mechanism when re-installing the door panel? Thanks again.
-
Removing Window Switches/door Panel
Eric Cheung replied to Eric Cheung's topic in 92 - 06 Lexus ES250/300/330
Thanks for replying. I did the following already: 1. removed the main screw in the little compartment where the door pull handle is. 2. pulled the door panel towards myself and was able to pop out 6 or 7 snap plugs along the vertical sides and the bottom of the panel. 3. However, the top side of the panel where the glass ascends/descends was still very tight. I pulled quite hard but could pop out any snap plugs. I'm not sure whether there are any snap plugs along that side. As I mainly want to remove the switch assembly to fix a switch, I also tried prying the woodtrim panel as directed in other posts, but was also unsuccessful. I managed to insert a taped flathead screwdriver in between the woodtrim panel and the door panel and pried, but could not pop it out. -
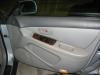
My car is a 97 Windom. I has been thinking it is exactly the same as 97 ES300. However, when I try to follow the directions of the posts on removing door panel or window switches, I was unsuccessful. So I wonder if the door of my97 Windom is the same as 97 ES300. I have attached a picture of the driver's side door of my car here. Appreciate if you could tell me whether the driver's side door of your 97 ES300 look like that. What I want to do is to remove the window switches assembly to fix a faulty switch. Thank you in advance.
-
My 97 ES300 has similar problem. Auto up of drivers window has ceased working. Have to hold the switch in order to close the drivers window. I tried prying the the woodtrim panel in the door, but was unable to take it out. I used quite a bit of force and was afraid that I was going to break it. Shall I use more force? Or is there a technique in doing that, like prying from the long side or short side first? Any advice is appreciated. Thanks in advance.
-
Gary, thanks a lot for responding :) . It's interesting to know such a security feature. I'm eager to try it. However, I'm out of town and will not see my car until the coming Friday. Can't wait to try it. Cheers, Eric :D
-
Leroy, thanks a lot for the very useful advice. I'll bear that in mind. BTW, is the RC related to the AH number? My current under-sized battery is rated 45AH.
-
Jack, I think I'm pretty much at the mercy of what the local stores have. Most tire shops in HK also sell batteries, though the variety is not great. As long as the battery is with the spec and of reasonable price, I'll be happy with it. Yesterday I saw one in a tire shop with 500 CCA at -18F. It is maintenance free type and was made in Malaysia. Glad to hear you lived in HK for several years. I live in an area to the north of Kowloon called the New Territories. If you had taken the KCR train (not the subway), the area where I live in is near the terminus in the north end.
-
Thanks for all the responses. Appreciate it. In where I live, there are no red tops, yellows or diehards. Most of the brands I'm not familiar with. That's why I'm looking for the required specifications of the battery to make better match. Probably a more well known brand in where I live is the Varta. From Varta's website I did a search by vehicle model and year, the suggested battery has a CCA of 390 (EN). I think the EN refers to the EN standard as opposed to the DIN standard. Lexusfreak, in where I live, the coldest temperature is about 50F in the winter. In that case, should I care about the CCA? Or just most of the batteries will do? Thanks.
-
Optima Yellow Top is the best battery. A lexus OEM batter is $100 I believe. ← Just wondering why use a yellow top? Unless you have a HUGE "kicker" and need the voltage, the red top is the way to go. I think the stock battery is around 500 to 600 CCA and the red top is 850 CCA. ← Thanks mburnickas for the CCA info. Is the 500 to 600 CCA the EN or DIN scale? Thanks again.
-
The battery of my 97 ES300 is not original. I think it is under sized as it looks small and I see "45AH" marked on the battery. I'm considering replacing the battery, but am not sure what the original specifications of the battery are. I searched the forum but could not find the required information. Should I look for a battery with the required Cold Cranking Amperage (CCA)? If so, what is the CCA of the 97 ES300 battery? Does anybody has the information? Thanks in advance.
-
I bought a 97 ES300 recently. The previous owner replaced the stock alarm system. I can operate all the four doors with alarm remote unit. However, if I operate the doors with the key, I can only lock/unlock the drivers door. The other doors will not follow. Is this how it should be or is this related to the stock alarm system being removed? Any information is highly appreciated. Thanks in advance.
-
Brake Pads Always Touches Brake Disc
Eric Cheung replied to Eric Cheung's topic in 92 - 06 Lexus ES250/300/330
I'll give the Toyota/Lexus OEM pads a shot. I'm gathering information to make myself confident in change the pads myself. Cheers :D -
Brake Pads Always Touches Brake Disc
Eric Cheung replied to Eric Cheung's topic in 92 - 06 Lexus ES250/300/330
There will be some dust after some constant city driving where you use your brakes a lot. Stevie probably doesn't notice it because he takes better care of his car than I do. heehee :) ← amf, most of the time I drive on highways (50-60mph) and so don't use the brake very often. A mechanic I spoke with today said something about the brake dust like "it blows outwards for the front wheels and inwards for the rear wheels". I was thinking he talked about the way the brake discs are cooled down (just guess), and thus the brake dust is blown out from the front wheels and so is visible. He also mentioned that fiber brake pads produce less dust but the braking is not as effective as what I'm using now. What do you guys think? -
Brake Pads Always Touches Brake Disc
Eric Cheung replied to Eric Cheung's topic in 92 - 06 Lexus ES250/300/330
Cheers Stevie. :) -
Brake Pads Always Touches Brake Disc
Eric Cheung replied to Eric Cheung's topic in 92 - 06 Lexus ES250/300/330
1. -Don't forget that the rear wheels are just wheels on spindles. They will move freely than the front wheels. -The front wheels are attached to half shafts that rotate in the tranny. When the front are spinning you have wheels shafts and gears moving. This will cause increased drag so the overall rotation duration will be shorter. 2. It is normal for brake pads to slightly touch the discs. There is only about a half of a thousandths of an inch space. (not much wiggle room there). The caliper retration is cause by the reshaping of a "square O-ring" after the pressure is released on the caliper plunger. Not alot of return force here, so the plunger doesn't come back very far. 3. It sounds as if your brakes are normal so far. Remove each wheel and see if you can't measure the thickness of each pad and compare to each other to see if you have abnormal wear. 4. A possible problem could be that if the pads where ever replaced, the shop may have clamped off the brake lines with a pair of vise grips. This can crush the rubber is such a way that that fluid flow to the caliper was uneffected but return flow of the fluid was impeeded. This impeeded flow would result in poor caliper return travel, thus leaving a pad in hard contact with the rotor. (This was common practice in many shops in the 90's, especially Goodyear shops. This practice has since been abandoned.) 5. Excessive brake dust can be from inferior pads, especially metalic pads. Metallic pads will also create a more noticable noise. steviej ← Stevie, Thanks a lot for the detailed analysis and explanation. I really appreciate that . The brake dust really bothers me, as it make the sidewalls of the front tires and wheels look brown. I'm thinking of changing the brake pads to some non-metallic ones, hopefully to avoid future brown stains.