
NeoN
-
Posts
228 -
Joined
-
Last visited
Content Type
Profiles
Forums
Events
Gallery
Store
Articles
Videos
News & Articles
Posts posted by NeoN
-
-
Before I started, here is the picture of the front of my car,

Here is the picture of my heater keeping me warm working in the garage during the install! two of these things are much better than typical stationary space heaters.

Yes, its a Hybrid

Teaser pics of the Supra and the other cars in the garage


Starting to disassemble the front bumper...

Bolts under the front fender, ONLY disconnect this silver one you can barely see, and the bolt closest to the front of the bumper on the fender well edge,


-
Holy cow! That's impressive!
 I wish I could expand my measely 3-car garage to accomodate as many vehicles as you have. Unfortunately, big lot property below $3 mil is a rare thing here in San Diego.
Heh, not my house, those are my parents' cars, and my sis' rx330 sits outside. I wouldn't trade the San Diego weather for a 6 car garage lol. I love the setup thus so far, the bass control knob is great and works for any song, I can crank it up if im playing the beatles or something with NO BASS or turn it down when something with alot of bass comes on. Couldn't be happier. We'll just have to see if this kills my alternator.
-
Wow, I'm exhausted just looking at all of that work! Great job...now go and have a rest! BTW...How many cars do you have?! Sheesh! Take care, Rey
lol no comment, those aren't mine (my parents cars') but we've got my sisters car outside as well lol (she has a Rx330)
-
Here are the lower support mounts

Here is another problem, along the lower passenger side of the grill guard, the lower support mounts, run into the A/C Condenser lines, you must bend these lines in order to make the Grill guard fit, as you can see mine almost rubs up against it, dangerous I know, but i'll be ok


The Finished Product


-
Here are the upper support mounts, I bought about (20 washers per screw) and purchased 2" long screws to bolt up the upper support mounts to the grill guard, since the RX400h bumper is taller than the RX330 bumper,


-
Metal Front bumper disassembled

With the grill guard mounts ready to be bolted down


Everything bolted back together, sorry I forgot to take pics (my friend never came over to help me) in between, but all you have to do is bolt the bumper back onto the front and mount the grill guard itself and tighten the bottom bolts,

-
Just took off the front bumper, next comes the styrofoam

***Note, watch out when you remove the headlamp washer line, it drains all the washer fluid!! have at least two gallon jugs ready to catch the excess fluid as you can see a bunch dripped on my towels ugh


Everything off except the front metal bumper itself, air gun, compressor, allen keys, screwdrivers, etc


Close up of the front bumper, you must unbolt these three bolts, mount the grill guard support ontop of the front bumper mounts, then replace the metal front bumper back where it was.

-
Before I started, here is the picture of the front of my car,
Here is the picture of my heater keeping me warm working in the garage during the install! two of these things are much better than typical stationary space heaters.
Yes, its a Hybrid
Teaser pics of the Supra and the other cars in the garage
Starting to disassemble the front bumper...
Bolts under the front fender, ONLY disconnect this silver one you can barely see, and the bolt closest to the front of the bumper on the fender well edge,
-
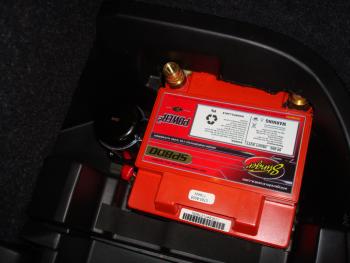
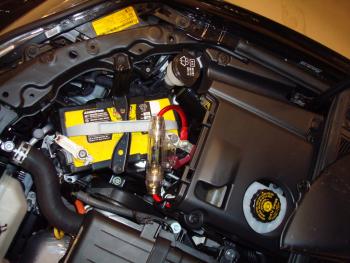
The Optima Yellow Top I now run under my hood to handle the increased load

Neat little subwoofer control volume installed next to my mirror switch, looks factory!!

After the install of my auxiliary battery (Stinger SP800), along with the Stinger SR200 battery isolator relay,


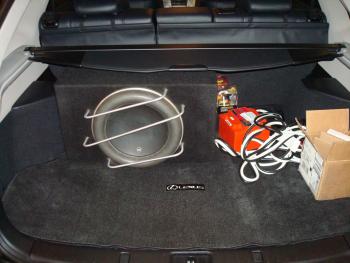
All my goodies (0 gauge jumper cables, flashlight, can of fix-o-flat, all ready to go in my cargo area)

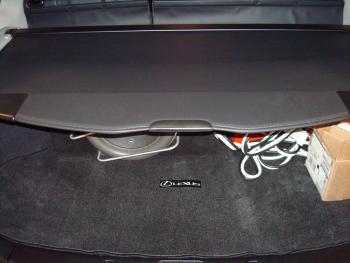
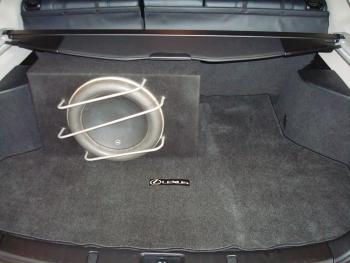
Now you see it, now you don't!!

Again, big shoutout to Mauro over at Monmouth Stereo (732-842-6565)
-
Here are the pics of my setup!
By the way, all of this work was done by Mauro over at Monmouth Stereo (732-842-6565)
Setup:
Sub: JL 13w7, 1000 Watts RMS, 2000 Watts Max @ 1.5 ohm, actually 13.5".
Amp: Phoenix Gold 1200.1 Amp, Rated 1250 watts RMS @ 1-4 ohm (I used to run this amp at 4 ohm, now I run it at 1.5 ohm)
Wires: 0-Gauge power wire, w/ 120 amp fuse,
Converter: Tsunami Hi-Lo converter
My amp Hidden under the extra cargo area, along with a flashlight and the wires going to my speakers.

My XM Radio, Valentine One and an air freshner for my health :-p


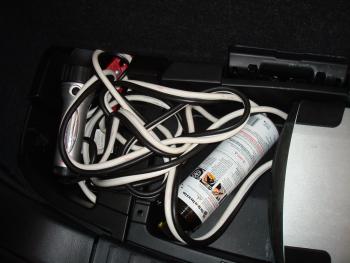
My JL 13w7, along with jumper cables, and the Stinger SP800 Auxiliary battery/Stinger SR200 Battery isolator relay waiting to go in


Close up view of part of the wires, I ran the rest through the cargo area, as you really can't see them unless you look by the controls on the amp them run into the cargo area and under back around to the front of the car.


Teaser pics of the supra and other cars at my house
-
The Optima Yellow Top I now run under my hood to handle the increased load
Neat little subwoofer control volume installed next to my mirror switch, looks factory!!
After the install of my auxiliary battery (Stinger SP800), along with the Stinger SR200 battery isolator relay,
All my goodies (0 gauge jumper cables, flashlight, can of fix-o-flat, all ready to go in my cargo area)
Now you see it, now you don't!!
-
Here are the pics of my setup!
By the way, all of this work was done by Mauro over at Monmouth Stereo (732-842-6565)
Setup:
Sub: JL 13w7, 1000 Watts RMS, 2000 Watts Max @ 1.5 ohm, actually 13.5".
Amp: Phoenix Gold 1200.1 Amp, Rated 1250 watts RMS @ 1-4 ohm (I used to run this amp at 4 ohm, now I run it at 1.5 ohm)
Wires: 0-Gauge power wire, w/ 120 amp fuse,
Converter: Tsunami Hi-Lo converter
My amp Hidden under the extra cargo area, along with a flashlight and the wires going to my speakers.
My XM Radio, Valentine One and an air freshner for my health :-p
My JL 13w7, along with jumper cables, and the Stinger SP800 Auxiliary battery/Stinger SR200 Battery isolator relay waiting to go in
Close up view of part of the wires, I ran the rest through the cargo area, as you really can't see them unless you look by the controls on the amp them run into the cargo area and under back around to the front of the car.
Teaser pics of the supra and other cars at my house
-
Picture of my new secondary battery setup waiting to go in!
Picture of my Yellow Top Optima, W/ subwoofer cable installed
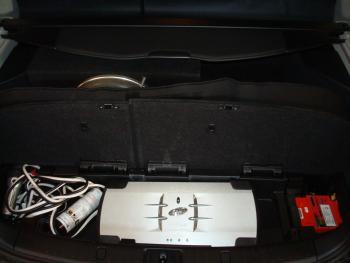
Picture of my new Stinger SP800 dry cell battery (secondary) installed in the back along with the Stinger SR200 Relay battery isolator
Everything fits away nicely, giant jumper cables, fix a flat, my amp, a flashlight, etc.
Now you see it, now you don't!
-
Picture of my new secondary battery setup waiting to go in!
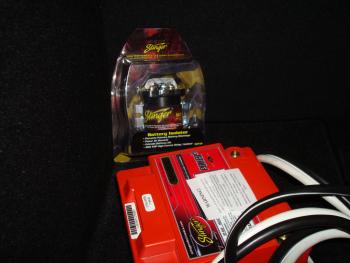
Picture of my new Stinger SP800 dry cell battery (secondary) installed in the back along with the Stinger SR200 Relay battery isolator
Everything fits away nicely, giant jumper cables, fix a flat, my amp, a flashlight, etc.
Now you see it, now you don't!
-
stock wheels are 18x7 with a +35mm offset for anyone wondering
-
Hey I was looking to see what the stock RX 400h 18" wheels offset is?
I'm actually looking to buy a new set of rims that could make my RX handle better, anyone know what size of offsets is possible for my car?
You are going to want to go 1/2 wider and with at least a 1/4" lesser "postive offset which puts the tire farther out from the car so it won't rub (zero offset would probably be taking things too far).
thanks for the help dude!
-
any updates since aug? I'm interested in purcahasing a set of the Yokohama Prada Spec X tires for $150 a piece,
-
Its finally done!!!!!!!!!!
I will post up a step by step writeup on how to install the bumper guard, but the biggest pain in the !Removed! was reinstalling the front bumper, as I proceeded to take apart all of the undercarriage from the wheel wells, which was NOT necessary, only the two screws that lock it into the fender on the edge of the bumper, which I will highlight in my writeup. As for the problem that I ran into with the upper support mounts (Rey's problem), my "mass washers and longer bolts solution" worked like a charm, I puchased 2" long 3/8" thick screws, loaded them up with approx 20 washers each and bolted them down to create a now-solid 1.75" mounting gap (the washers almost act like spacers) to compensate for the taller RX400h bumper. This worked out perfectly, and the bumper doesn't shake at all from what I can tell. I did cheat and use an air compressor gun to tighten the lower support bolts, but we'll see once I hit the highway as this has been known to vibrate over 70mph.
<_< Its nice knowing I have this big barrier in front of me, I don't have to worry anymore about my precious baby accidentally making contact with a parking pole or a stationary object of some sort. Just a piece of mind, but it helps.
I'm still deciding on the rear bumper guard, although its ugly as hell i'm not sure what i'm going to do about it.
-
Why did you take apart your bumper on the 400h? The grill guard for the 330/350/400h is the same and fits all of them without modification. The guard i have on my 350 now used to be on my 330, then on my 400h when i had it. The dealer put it on for me each time but didn't inform me of any mod problems.
the upper mounting support bars don't fit... the rx400h has a different front bumper than the rx330. WAAG makes a separate kit for the rx400h
-
Update... I'm almost done installing the gill guard, I worked on assembling the guard itself, which took almost an hour to get tightened and aligned correctly. I then mounted the grill on the lower mounts with the bumper off and everything looked ok, centered it and took it back off. I then reinstalled all the fog lamp connections, headlamp washer fluid connections, and the styrofoam bumper protector. I then screwed in the two mounts on either end of the bumper near the wheel wells and connected the three mounts near the radiator with the push-on clips. After re-assembling the bumper I then mounted the grill guard back onto the front with only the four lower support bolts connected. I went to install the upper support assembly and ran into the problem rey mentioned... the front grill is different and it doesn't allow for the room to properly mount the supports, however, I plan on heading to home depot tonight, purcahsing a 2" long bolt 3/8" thick, and a ton of washers, so theoretically it will be clamped down tight but just mount an inch and a half higher (the clearance that it really needs)
 arg im going to get this right even if it requires a simple solution like that, no cutting or welding involved!!! I'll display pics of the problem/situation and how I plan to address this with all the necessary parts for anyone else attempting to complete this install. After these upper support mounts are installed all that I must worry about is closing the hood and making sure it has enough clearance, which I don't forsee being a problem. Hopefully by tonight this will all be completed and i'll be on my way happily running over stuff and ramming cones/highway barricades :-p
 more updates to come tomorrow hopefully with pics if I have time to upload them, thanks for all the support thus so far
-
can anyone add a pic of where the oil filter is attatched under the RX400h?
-
Guys,
Started working on the grill guard install last night, wasn't too tough to uninstall the factory bumper, however ran into a slight problem when the second radiator, which I believe is a A/C Condenser or something, I had to bend the pipe back to fit the mounting bracket, I took detailed pictures of my findings and was able to mount the brackets ok. I'm still in the process of putting together the ramming guard itself, but I will try and get it mounted up tonight and put everything back together. Note, have two empty gallon jugs ready because when you try and disassemble the factory bumper the headlamp washer fluid will drain out automatically!! ugh. Other than that the hardest part was getting the mounts to bolt up correctly and align them. I kind of cheated and used a air compressor gun to tighten them, but everything is secure and i'm now ready to mount the upper support mounts that extend from the radiator up to the top of the ramming guard and bolt it securely into place. Then just replace the bumper and I'll be back on the road! Not too bad but I will summarize this when finished upon steps that you should plan on taking to avoid the problems I ran into
-
Hey tonight I will start taking apart the bumper and mounting everything together, pics to come!
-
Great info and now I'm curious to see all that you are going to do! I am looking into getting lowering springs from Eibach. Are you possibly considering lowering yours? The Eibach lowering kit seems to be the best around and isn't supposed to affect the ride but I need to get an objective opinion. Anyway, have fun and keep me/all of us posted. Rey
I would love to, however I would most likely lose my warranty which is something that i can't afford! :( check back to me in a couple of years and i'll be up for lowering my car. I'm probably going to head the bigger wheel/smaller sidewall/high perf tire route to fix the "boat like" handling with the RX400h
 I wish I could expand my measely 3-car garage to accomodate as many vehicles as you have. Unfortunately, big lot property below $3 mil is a rare thing here in San Diego.


 arg im going to get this right even if it requires a simple solution like that, no cutting or welding involved!!! I'll display pics of the problem/situation and how I plan to address this with all the necessary parts for anyone else attempting to complete this install. After these upper support mounts are installed all that I must worry about is closing the hood and making sure it has enough clearance, which I don't forsee being a problem. Hopefully by tonight this will all be completed and i'll be on my way happily running over stuff and ramming cones/highway barricades :-p
Writeup: My Install Of The Waag Grill Guard (pics Included)
in 04 - 09 Lexus RX330 / RX350 / RX400h
Posted
Just took off the front bumper, next comes the styrofoam
***Note, watch out when you remove the headlamp washer line, it drains all the washer fluid!! have at least two gallon jugs ready to catch the excess fluid as you can see a bunch dripped on my towels ugh

Everything off except the front metal bumper itself, air gun, compressor, allen keys, screwdrivers, etc

Close up of the front bumper, you must unbolt these three bolts, mount the grill guard support ontop of the front bumper mounts, then replace the metal front bumper back where it was.