zeppo
-
Posts
31 -
Joined
-
Last visited
Content Type
Profiles
Forums
Events
Gallery
Store
Articles
Videos
News & Articles
Everything posted by zeppo
-
I just got a used 2008 Lexus RX400h and want to protect the black dash. I bought ordered some floormats at Weathertech and then noticed they offer a custom fit shade for $50 plus shipping. Has anyone tried them?
-
What Is This Green Tube Running Under Glovebox?
zeppo replied to zeppo's topic in 04 - 09 Lexus RX330 / RX350 / RX400h
It was speculated in another forum that the green tube handles the washer fluid to the rear window. Sounds good to me. -
After learning where the AC condensation hose is as well as the moonroof drain hose, I happened to notice this little green tubing running behind the wiring just below the glove box. What is it? Thanks

-
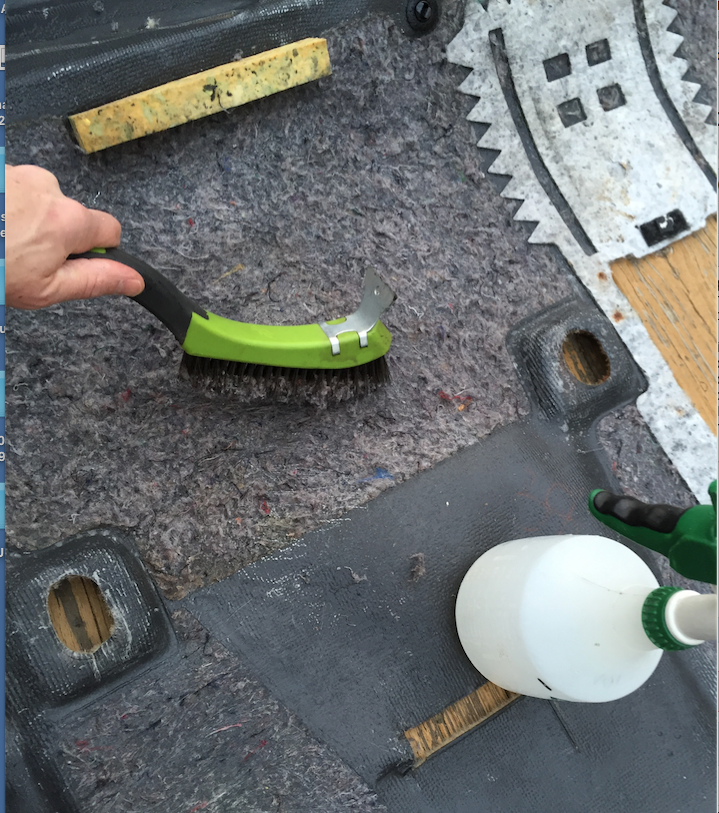
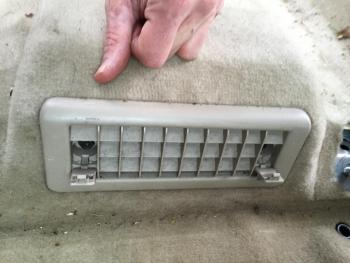
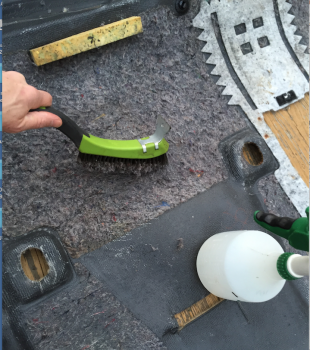
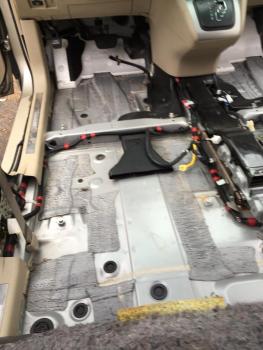
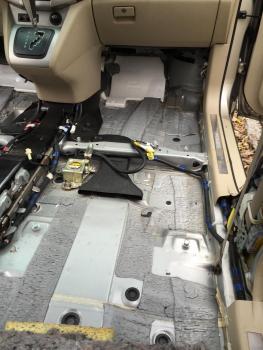
I went ahead and took the carpet all the way up. For anyone doing this, the vent covers under the rear seats come up by flipping open little latches and unscrewing (I came close to trying to pry them off since so many other things just pry off, but fortunately I took a closer look). I tryed to scrape off what I could of the remaining padding with a putty knife. Then I sprayed it with about a 70/30 hydrogen peroxide/water solution, and took a metal brush and scrubbed off even more. Then i spray the rest of the backing with the solution and wiped it down. Now I'll just drop the carpet off at a detailer to get it cleaned with a steam cleaner to remove any potential mold in the carpet (I never saw any, but it smelled musty). After it drys, I found an car restoration shop that says he has some of the same type of padding he will sell me and I'll glue it back on myself. By the way, for anyone that is curious, here also are some photos of what it looks like after removing the seats, console, and carpet.

-
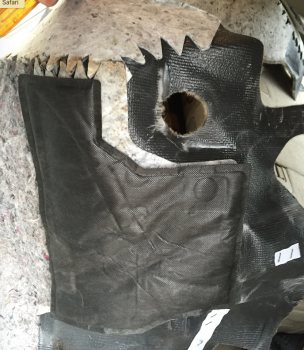
After removing the back seat and pulling the carpet all the way back to the hatch, I'm surprised the carpet is as permeable as it is since it has a kind of rubberized coating backing it. There are three types of backing on it. Down the center and running under the central console is a stiff, white reinforcement about an 1/8 of an inch thick. It doesn't seem to be very absorbant, and I'm guessing I can get away with just spraying it with peroxide and letting it dry. In the front wall of the front seat foot wells (behind where the pedals are on the drivers side) there is some kind of light weight padding material, black on the back, but white on the side that glues to the carpet. It does not touch the padding, acting as a transition from top of carpet that tucks behind paneling beneath the dashboard and the floor of the carpet. I attach a picture of it. The bottom edge of this did manage to get wet and still holds a bit of moisture. Does anyone know where I can find this stuff? Carpet padding is padding is not so expensive that a couple of more square feet need be substituted the this stuff, so I assume it has some properties that are preferred to the padding. Heat resistance? Better at evaporating moisture that it comes in contact with ? The padding itself is apparently made from the thread refuse of a fabric manufacturer. Just a bunch of pieces of threads like you would find in a sewing kit

-
Thanks. How thick does the felt come?
-
Thanks. It seems to me there is a dilemma here. The factory padding had no moisture barrier. With water-aborbing padding with a moisture barrier on top, water dripping onto the carpet from above might evaporate back out more readily through the carpet than if it were absorbed into a pad with no barrier. But water soaking into the pad from the side (unless you tape the sides) or from below might go unnoticed for a long time. The same for fully water resistance material. With regular rains, I might just think the moisture by the door wells was just incidental, needing time to dry. In fact, just a little incidental rain might create a nice damp and warm environment under the pad to create mold and rust. For this reason I'm inclined to stick with a material that water can get into, but in moderate normal conditions can also hopefully wick out of through the carpet. Once water logged due to some disaster such as the overflowing moonroof drain water down the sidewall, it might at least be caught soon enough before serious mold issues occur. The other thing I have to consider is it looks like this factory padding was probably at least a half inch thick. Removed pieces even look to be an inch thick, but perhaps due to expansion from the combination of age and drying out. In some places a second layer was glued on. What type of adhesive do I use?
-
I need to replace the padding under my carpet. Can I just go buy some at Home Depot used for home carpets, or does this have to have some special heat or fire resistance properties?
-
Removing Back Seat Of A Rx400H
zeppo replied to zeppo's topic in 04 - 09 Lexus RX330 / RX350 / RX400h
Went to Lexus Dealer Service Shop who didn't know the answer and could only point me to a body shop down the street. The guy there understood (or had an educated guess) that you just yank up on it, as there are just typical plastic anchors holding it down as shown in the picture: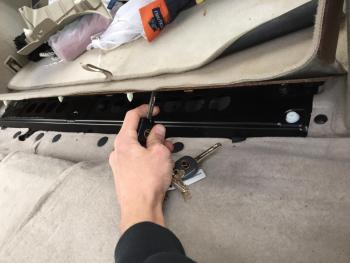
-
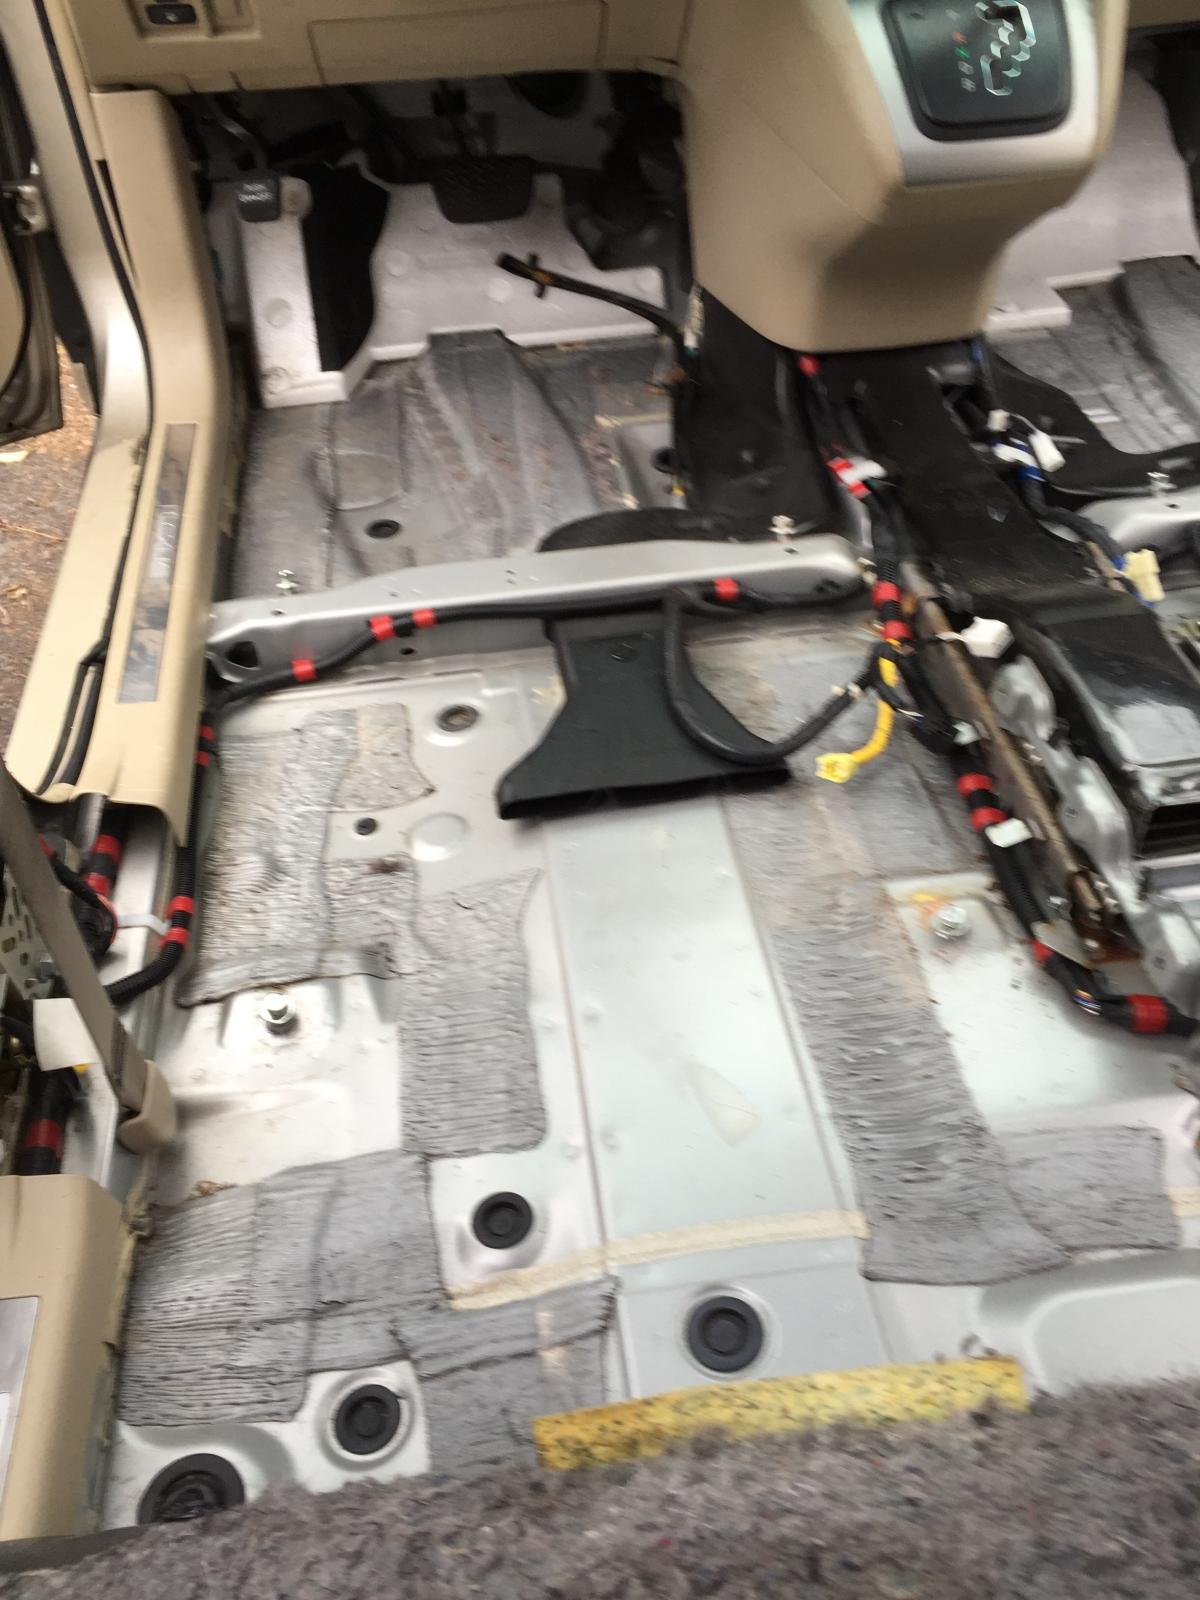
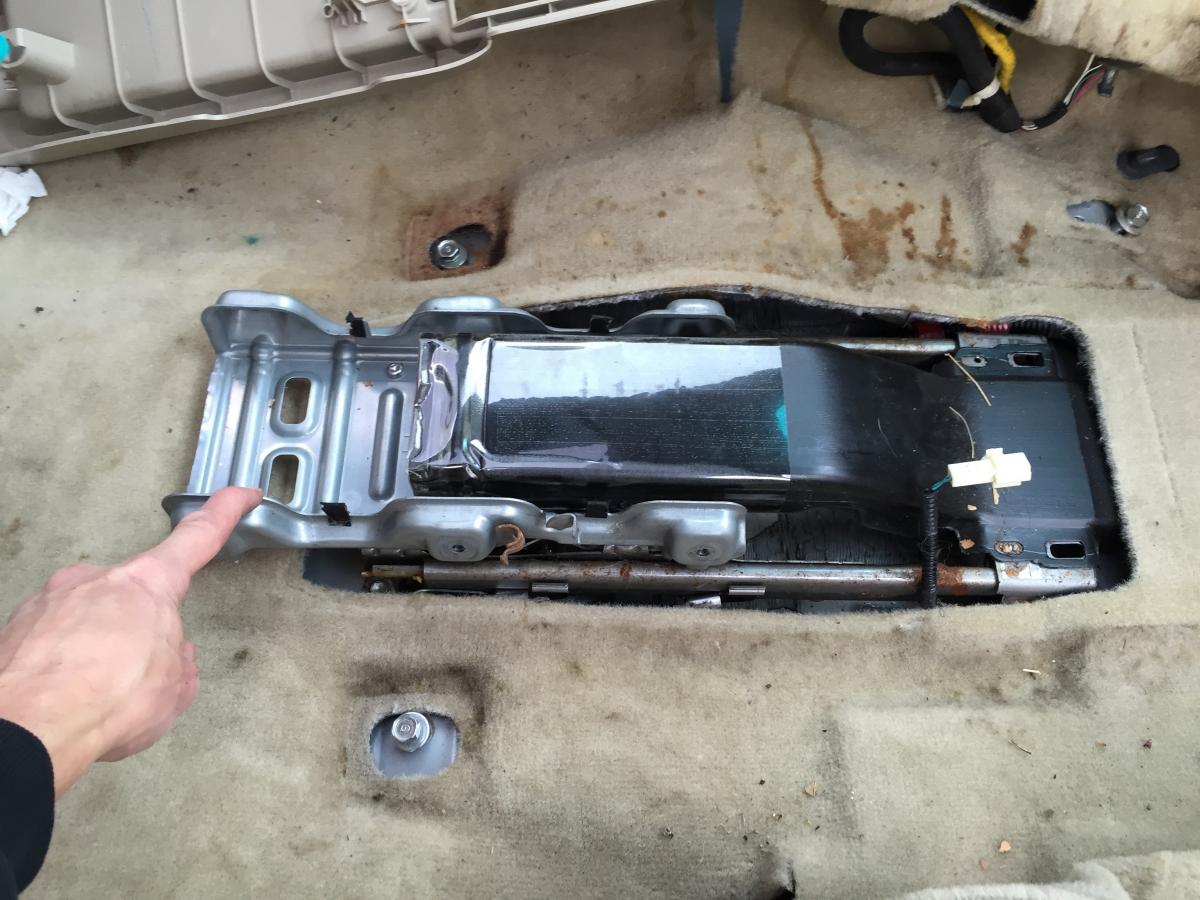
Oh, and for anyone else that might pull up this thread in the future, here is a photo of what it looks like with that central cupholder compartment removed, and the plastic tray below it To remove that tray, you unscrew to phillips screws and then unsnap it by prying underneath it. Then you have to unhook the connector to the electrical outlet ("cigarette lighter"). The metal piece I point to will block me from just lifting the carpet up, but it looks to be a major task to remove that, so the carpet will just have to be slide back to get out from underneath that and then lifted up. That is, if I can figure out how to take off that front panel and remove the back seat.

-
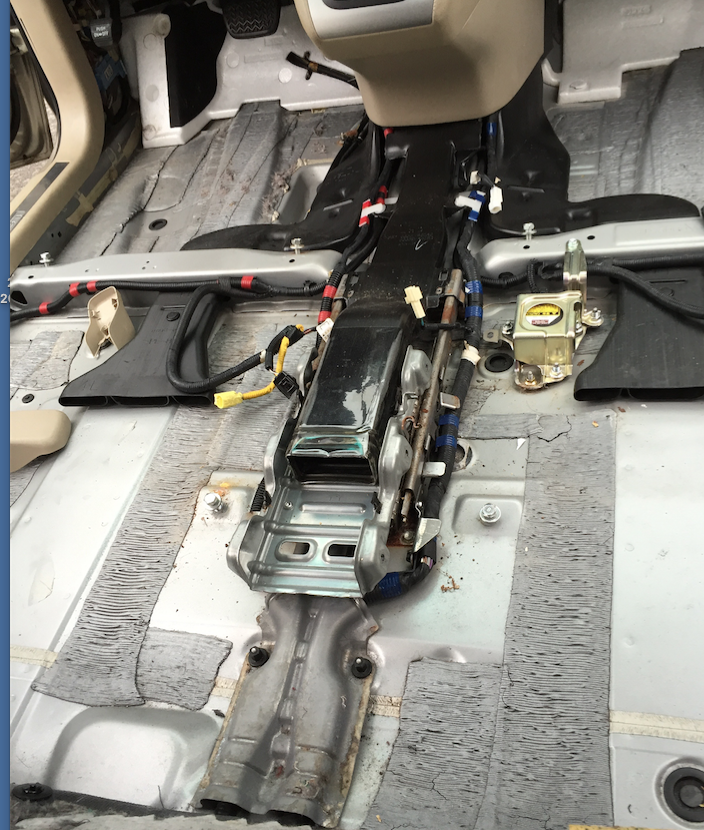
By the way, does anyone know how to remove this lower panel below the gear shift compartment (pointed to in this photo)? it tucks under the upper panel and I'm hoping it can be removed without taking the upper off. But I'm afraid I'll just break something if I start trying to pry away at that lower panel.

-
Removing Back Seat Of A Rx400H
zeppo replied to zeppo's topic in 04 - 09 Lexus RX330 / RX350 / RX400h
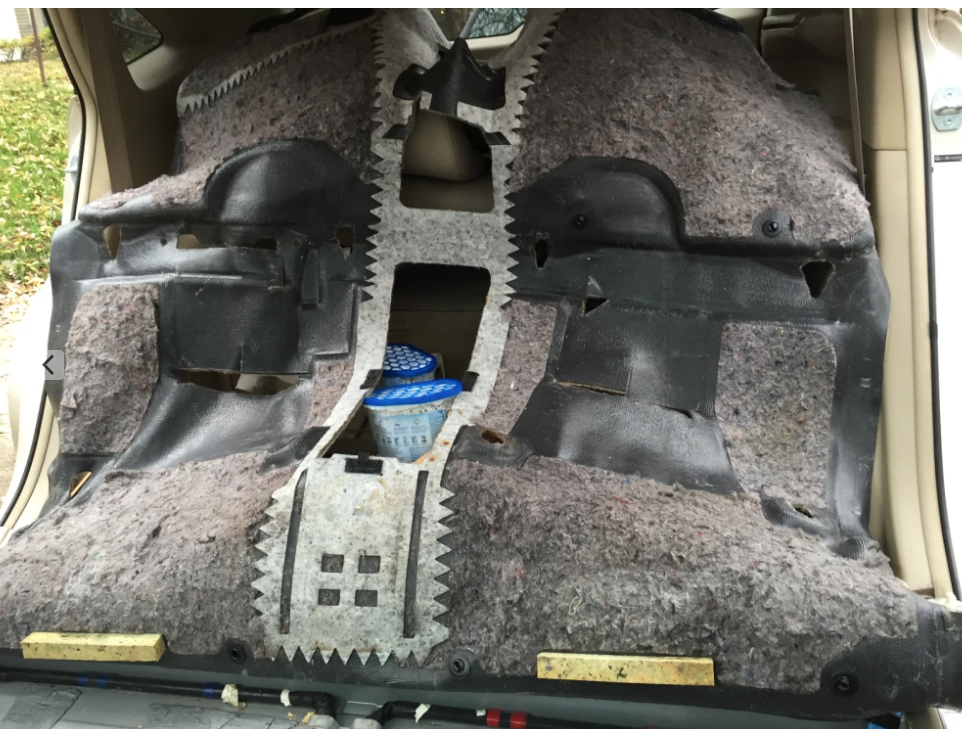
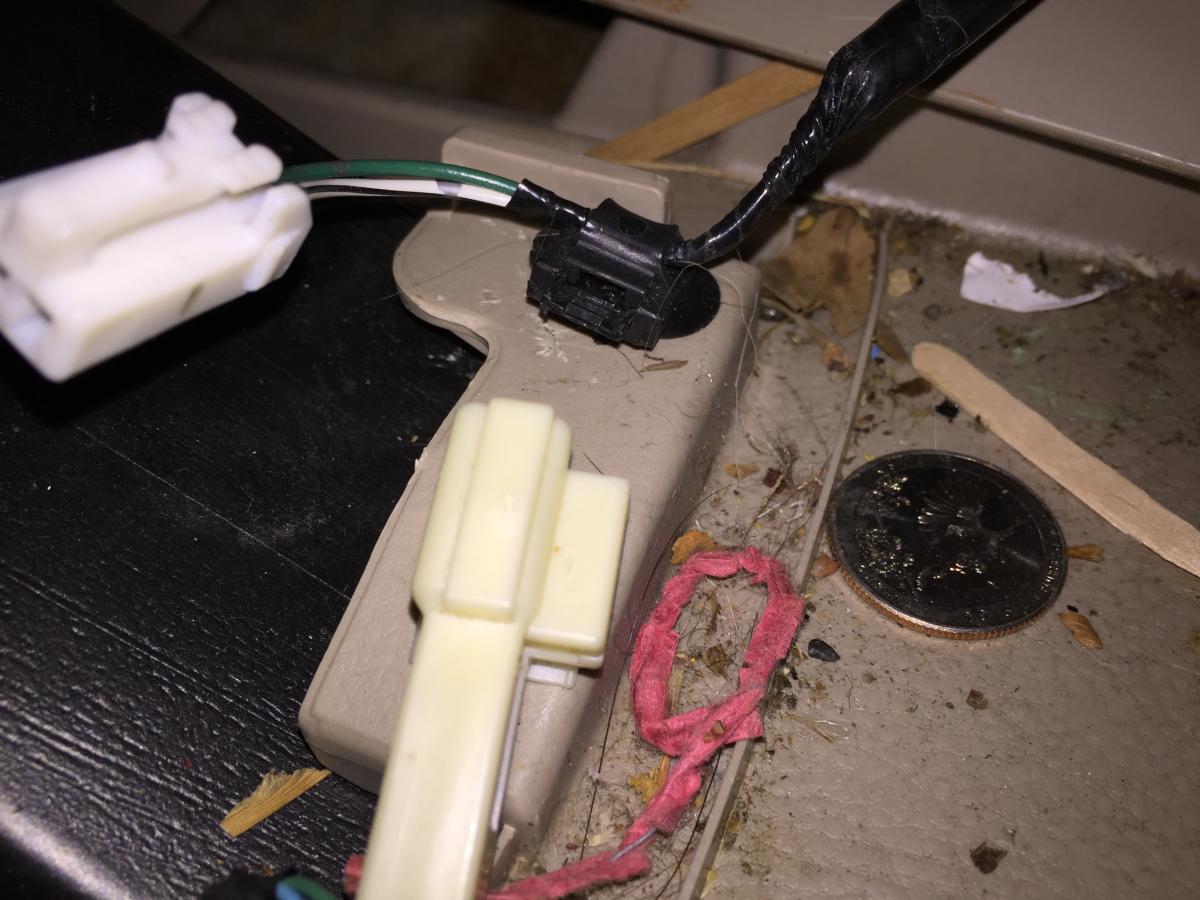
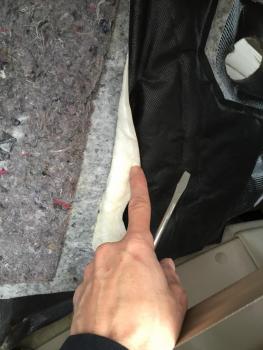
I figured out that you can move the seats forward by tugging on those black handles in front of the seats and reveal the back bolts. But I still don't understand how to free the upholstery from the hatch compartment. The ends have flaps which will allow me to free each side, but I can't see how to free the middle. The photo shows a seam along the white piece of paper that marks where the hinge is to lift up the floor of the hatch to get into the hatch compartment. But on the other side of that hinge is a tightly anchored piece of particle board that in turn has the backseat fabric anchored beneath it. It would seem I would need to be able to lift this strip of particle board to free the backseat fabric, enabling me to pull out the back seat. But how do I go about doing this? I can't figure it out.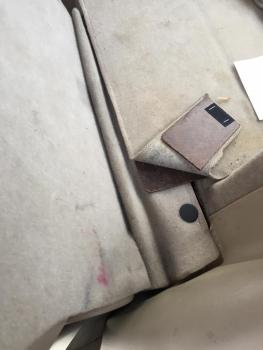
-
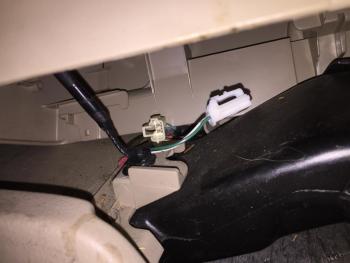
I didn't notice until this morning that the photo revealed details I could not see in the evening light, even with my iphone flashlight. I stuck a screwdriver into the hole and was able to push the wire out of the anchor. I still have a problem with the backseat removal though, which I am trying to make clearer in my other post with a photo.
-
The bolts allowed me to slide back and up the outer casing, which was promising, until I came across this wire. There is a connector which I undid and thought would have me on my way until I noticed the other end of the wire is clamped down with what looks to me is intended to be a permanent connection. The wiring goes up inside the case, but as to its use I have no idea. I can see anything that runs on electricity in it, unless perhaps it is running a hidden air temperature gauge of sometime to assist with the climate control? I stuck. How do I undo the black plastic clamp without breaking it. The wires going up into the box have electrical tape. Perhaps there use to be another coupler there originally?

-
Water Leak Into Passenger Side Floor
zeppo replied to zeppo's topic in 04 - 09 Lexus RX330 / RX350 / RX400h
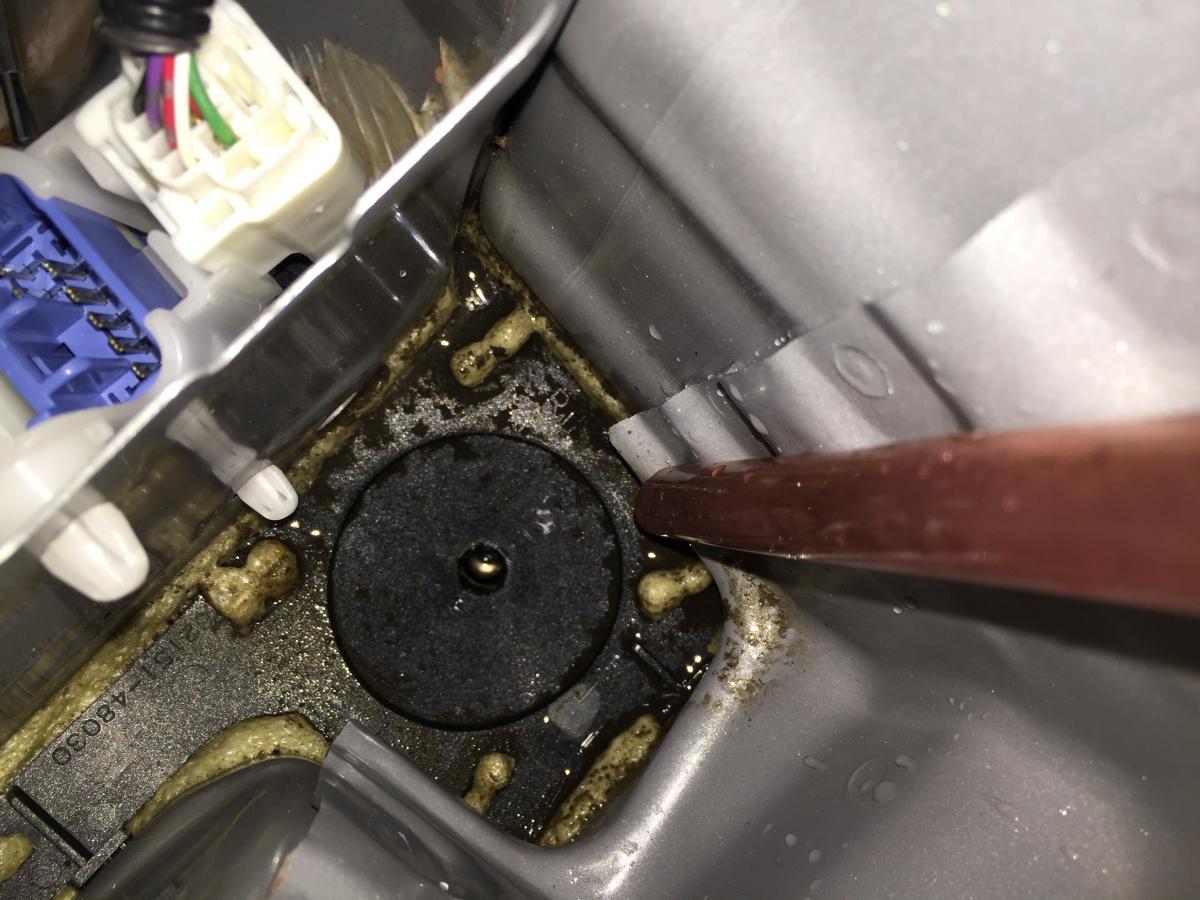
The hole is set into a conical piece that acts as a drain to catch water coming out of the hose. I've seen speculation that in a case like this the hose has shrunk a few inches over time from where it was once inserted into that hole, but I don't think that is the case at all. I think the design is just as you see, with the hose stopping a couple of inches above the drain. The compartment is water tight at the bottom, but when the hole gets clogged it fills with water until finally pouring out a small hole in the sidewall of the compartment and into the interior. Blowing out the drain hose with compressed air could solve a hose blockage, but you would probably have to get lucky for the air to dislodge the debris blocking the drain hole at the bottom of the compartment and not have it fall right back into the drain and clog it again fairly soon after. The hose I rigged to my shop vac with duct tape is 3/8" in diameter, and can actually just fit down into the drain hole if you feel your way around. I vacuumed the sludgy stuff out of the bottom of the compartment and drain hole as best I could by blindly feeling my way around it with my hand down in the compartment. The 3/8" hose will also just fit snuggly inside the moonroof drain hose that you see in the pic. That hose hangs freely, so you can pull it out of the compartment if you want to fish a line through it from the bottom, or as I did, vaccum it with the smaller 3/8" hose (it didn't yield anything from it in my case). After cleaning it the best I could I poured a little water into the compartment and watched it finally come out of the bottom of the car. It can take a bit of time for it to appear and not yield everything you poured into it, because it drains into the plastic compartment that runs below the doors on the exterior . But as you pour more down it, it eventually pools inside there enough to where it starts pouring out more readily. Some of what I poured in actually made its way down that exterior compartment and exited near the rear door in addition to what came out in the front end of it behind the front tire. I also ran some weed-eater line down into the drain hole, but you can't see where it exits because it just takes a turn and goes into that exterior compartment (which someone referred to as the "rocker panel". -
Water Leak Into Passenger Side Floor
zeppo replied to zeppo's topic in 04 - 09 Lexus RX330 / RX350 / RX400h
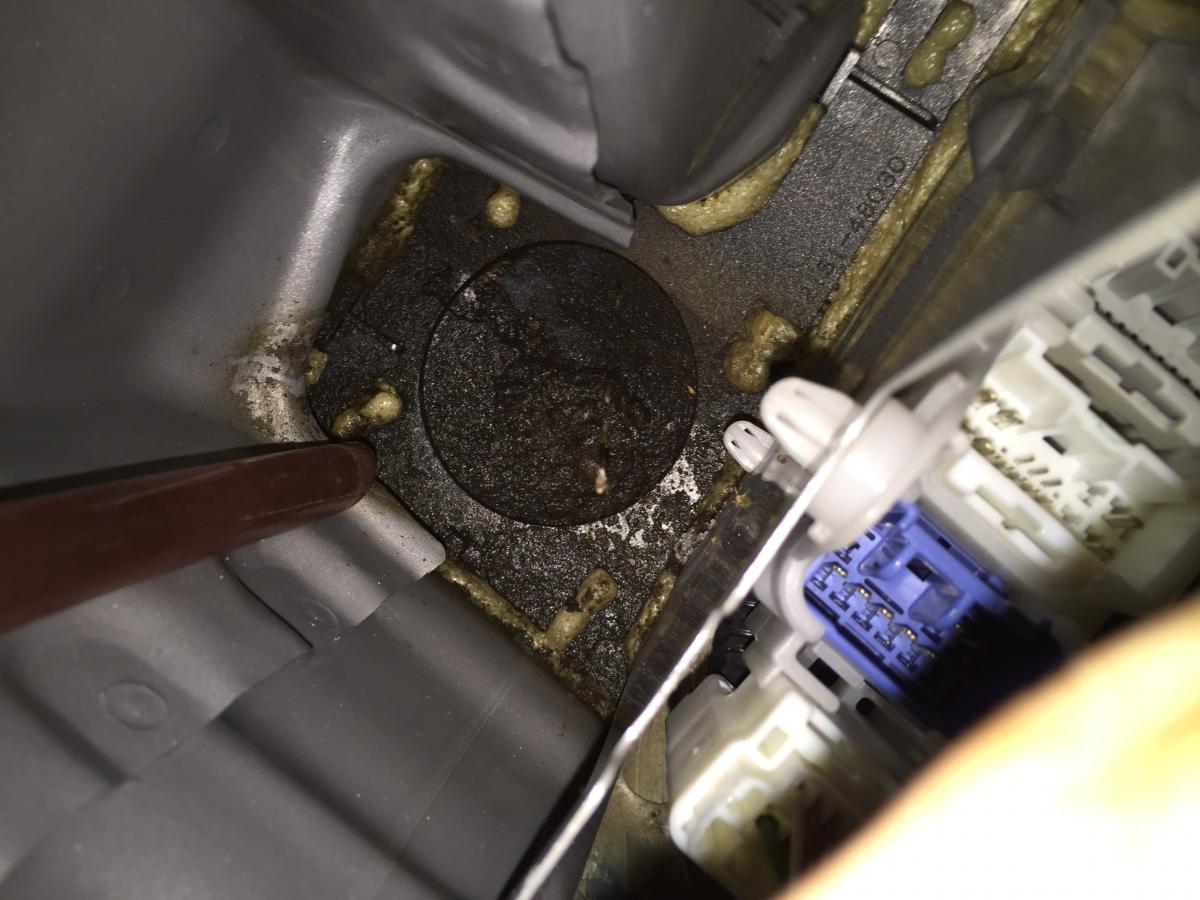
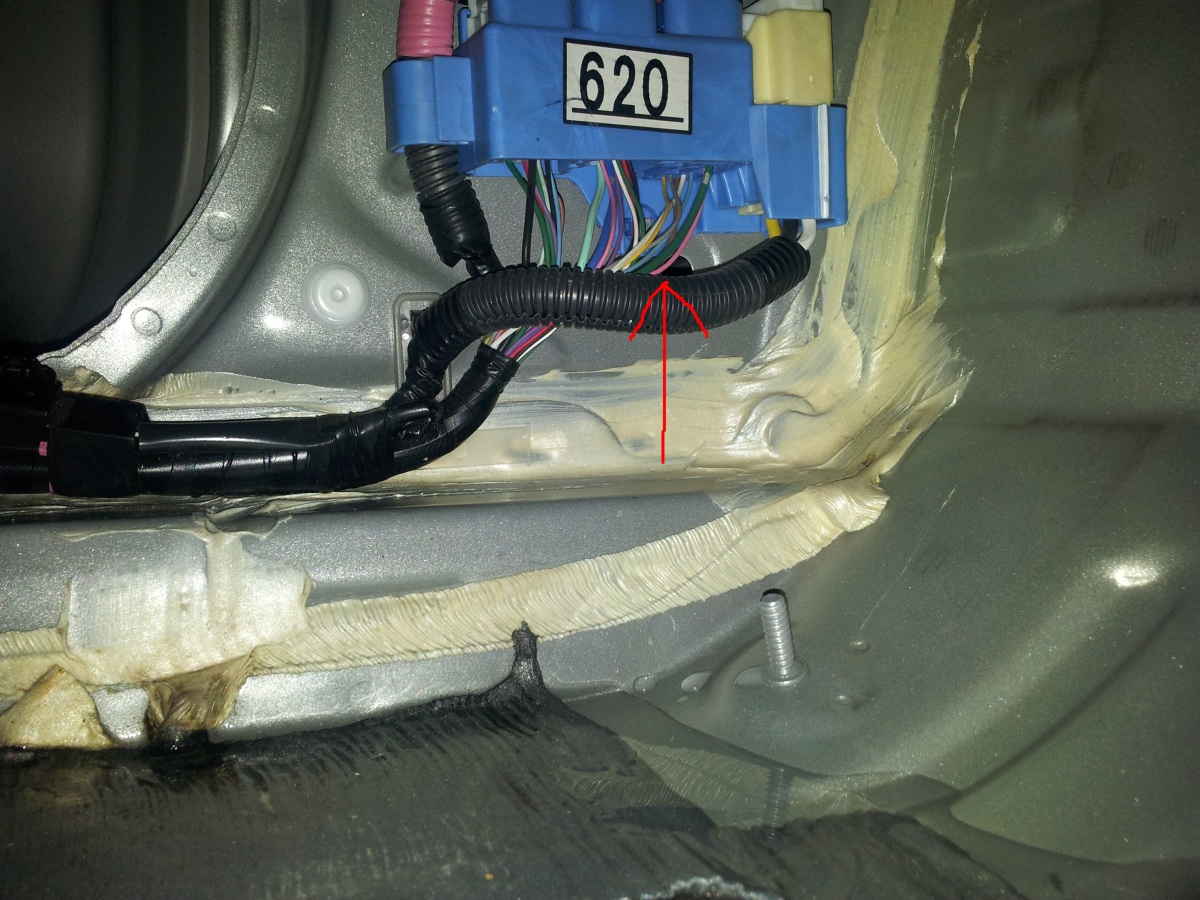
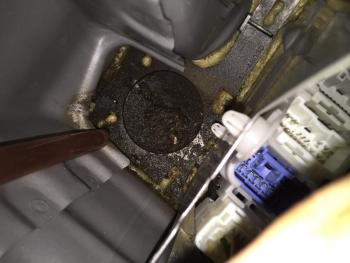
Now it is impossible to see down inside the compartment, but you can carefully insert a camera in there with the flash on and view it that way. I used a regular sized iPhone 6, but you just have to be careful not to scratch it or drop it in the hole if you don't have screen protection. Oh, by the way, before I did this, I rigged small hose to my shop vac and cleaned out any standing water. Here is the view of what the drain hole should look like (after I cleaned it out) and what mine looked like clogged up.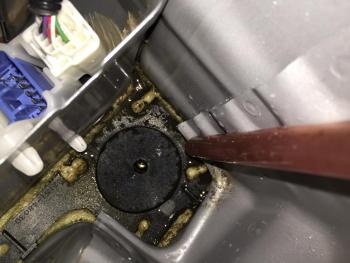
-
Water Leak Into Passenger Side Floor
zeppo replied to zeppo's topic in 04 - 09 Lexus RX330 / RX350 / RX400h
Was going to take it to the dealer today, but decided to take a closer look at it first. I was able to solve the issue myself. First off, for a passenger side (U.S.) problem, it is possible to remove the box that all the wires are plugged into on the side panel and have a big enough opening to fit your hand in if its not to big. I can just about palm a basketball but still managed to fit my hand in. Here is a pic of the wires unplugged and white plastic box (on left) pulled out of its compartment in the side wall. You can see the rectangular hole of that compartment just behind it in the top left of the picture.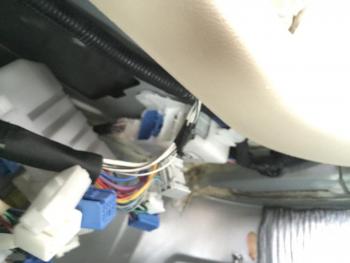
-
Thanks. As long as I can remove bolts and lift the parts off without fear of something being any more complicated or difficult to reverse the process, I'll give it a whirl.
-
Thanks. I can't say I'm reassured by what I see. :) I am basically afraid that I'll encounter something spring loaded that is hard to put back if I undo those bolts-- something I'm not prepared for. I'll look at over more closely again tomorrow.
-
The two bolts in the front of the seat are easy enough. But if there are two more bolts in the back, I sure can't figure out how to access them. ARE there two more bolts in the back? Or is this just a matter of taking off the front two bolts and then somehow slide the seat forward out of some kind of tray that it fits into and secures it? If its just as easy as taking off the front two bolts and pulling it out, I'll give it a whirl.
-
Water Leak Into Passenger Side Floor
zeppo replied to zeppo's topic in 04 - 09 Lexus RX330 / RX350 / RX400h
I'm in the US, so in my car, the set up is the same as in the photo, but on the opposite side as what is shown. Water must have to accumulate and stand inside that cavity before it finally fills enough to exit that hole. I guess I'll have to duct tape a small tube to the end of a shop vac to get out the standing water and then hope the compressed air trick works. But given Draco ended up having to take his to a dealer to solve it, I'm guessing I'll have to do the same. I'll probably have to file and insurance claim for the carpet. Taking it out looks to be a pain, and even if I can manage to fold it back and dry it by running a floor heater for days, it smells like mold has already taken hold of it. -
Water Leak Into Passenger Side Floor
zeppo replied to zeppo's topic in 04 - 09 Lexus RX330 / RX350 / RX400h
After peeling back the carpet in all corners front and back, I was able to determine the leak is from the front passenger side moonroof drain tube. It is either backed up or dislodged. Fishing a weed-eater line down it hasn't helped, but it was a pretty thin guage. I will try compressed air when I get the chance. This picture from an old post by Draco shows the hole where water backs up and enters the cabin. The red arrow he drew points to the hole.
-
Has anyone ever removed the carpet from this vehicle? If so, how hard is it to deal with the center storage compartment between the front seats? After removing the front seats, I took off some snap on trim from the sides of the compartment to reveal some bolts that would need to be removed. However, I also notice the spring involved in compartment and started wondering what I might be getting myself into. Also, the padding was soaked all over and I would think needs to be replaced since the water in it smells. I'm guessing the cost of getting a factory fit carpet would be ridiculous. My carpet is really dirty anyway, but I don't care that much and if it were cleaned, any stains wouldn't bother me. So I'm thinking if I could strip off the the padding beneath and glue some new padding there, that might be an option. I guess I'll price it when I find this leak and fix it.
-
Water Leak Into Passenger Side Floor
zeppo replied to zeppo's topic in 04 - 09 Lexus RX330 / RX350 / RX400h
Oh well I found info that help me brave pulling up some of the interior panels to allow me to peel back the carpet. Of course, I did screw up in that instead of being able to pull out the plastic clip that the carpet is stapled to, instead the carpet came unstapled from the clip. Not sure what the trick is to getting the plastic things out other than luck. At any rate the padding underneath was soaked all over, extending to the drivers side as well. So I really have no clue as to the source. If it were somehow coming from the hatch area (which is bone dry are far as what can be seen, would it be channeling down the sides by the doors, or is there somewhere in the center where it would channel? If it would have to come from the side, I can test those channels without removing the backseats by peeling back the carpet a little.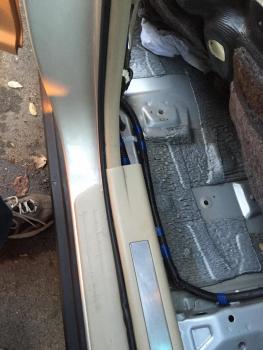
-
Replacing Door Weatherstripping - Do It Yourself Job?
zeppo replied to zeppo's topic in 04 - 09 Lexus RX330 / RX350 / RX400h
Okay, I finally found a post that described how to remove the trim at the bottom door wells, so I pried the rear one up. That allows me to see that the tears weatherstripping that I posted are clearly not the problem, since the metal bends curves up a half inch to prevent this. After taking a closer look, I also see that removing interior paneling in the hatch area would be a royal pain in the tuckuss, so I won't go there for now. Since the specifics of weatherstripping now seems irrelevant, I will take up my problem again in my Water Leak Into Passenger Side Floor thread.