


richardkwon
-
Posts
69 -
Joined
-
Last visited
Content Type
Profiles
Forums
Events
Gallery
Store
Articles
Videos
News & Articles
Everything posted by richardkwon
-
1998-2000 Valve Cover Gasket Replacement
richardkwon replied to richardkwon's topic in 90 - 00 Lexus LS400
I took another careful look at the driver side and it looks like the dipsticks would be in the way because one has to lift the cover off of the spark plug tubes and to do so would require that finicky transmission bolt to become undone. How did you get that bolt back on? And as for a tutorial that's not a bad idea. -
98 1uz-fe Timing Belt And Water Pump Replacement How_to
richardkwon replied to landar's topic in 90 - 00 Lexus LS400
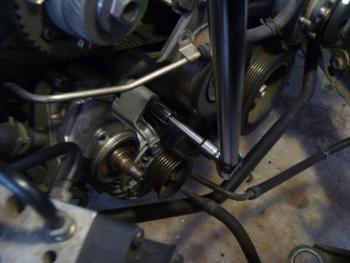
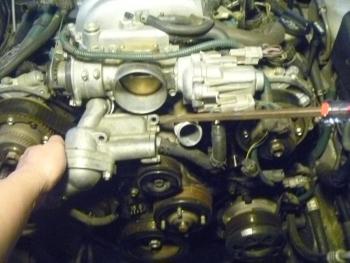
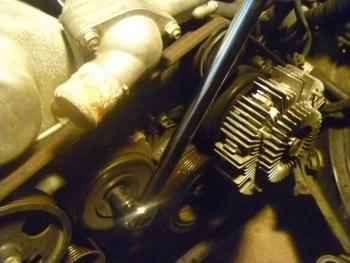
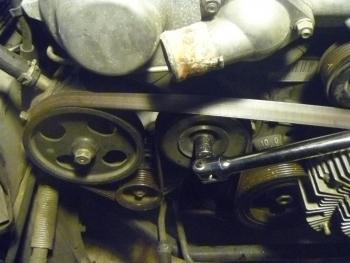
17. Took off the power steering pulley and nut. The nut is turned counterclockwise using a 17mm socket. To keep the pulley from spinning, insert a long screwdriver (or 2 like I did) into any pulley opening (there are 4) and wedge it in the area on top of the alternator and below the pump. See pic. Make sure you never wedge it in to something that can come into contact such as a loose hose. Give a couple of soft trial pulls to make sure you won't bend or damage something and then undo the bolt. Or you can use an impact wrench. My electric wrench was too big to fit so I did it the old fashioned way. It will take some muscle, but use it and the nut will come free. As for pulling the pulley off, I first smacked it lightly with a rubber mallet a couple of times and used both hands and pulled it free. Try to smack it directly from behind towards the front and not at an angle as this could possibly damage/strip the gears. Did not have to use a puller although some may have to depending on your fate. 18. Remove the top alternator nut (12MM using an extended socket) and the long bolt at the bottom. Be careful of the AC hose at the bottom bolt. Then slide the alternator towards the front and you are done. The reason both of these items need to be removed is because the belt tensioner housing is located behind. 19. Using a 12mm socket, removed the 2 bolts and removed the flywheel housing. I'm still trying to figure out how and where to wedge the screwdriver or allen wrench into the flywheel. Does the short part of the allen key have to face the passenger side to remove the CS bolt?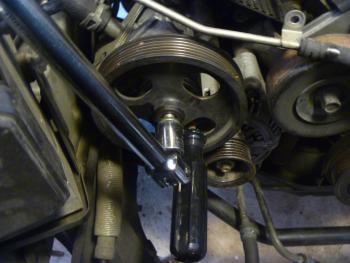
-
98 1uz-fe Timing Belt And Water Pump Replacement How_to
richardkwon replied to landar's topic in 90 - 00 Lexus LS400
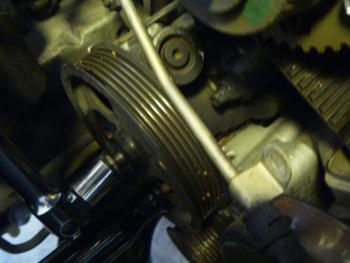
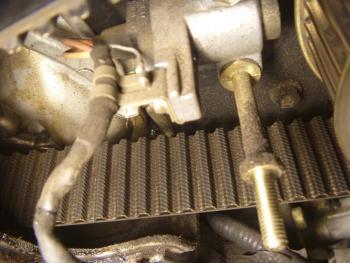
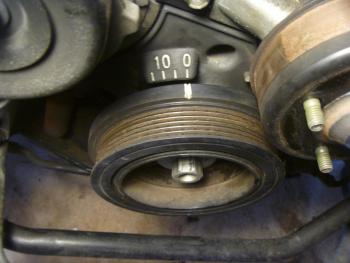
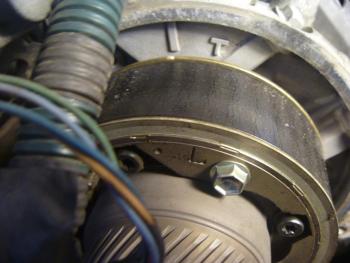
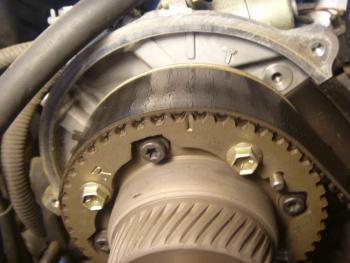
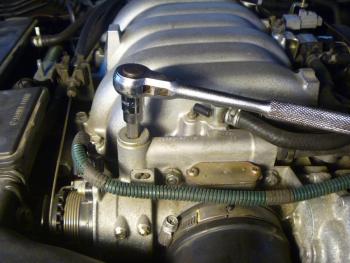
16. Using a 24" breaker bar and a 22mm socket, turned the crankshaft clockwise to 0 Top Dead Center. Both left and right camshaft pulleys aligned also. I was expecting to have to use tremendous force to turn the crankshaft but it was really easy to turn. Not too difficult force wise at all to turn the crankshaft. Piece of cake. Tomorrow I'm going to buy a puller to remove the power steering pulley, loosen up the alternator and then prepare for the big showdown with the all powerful god: the famous crankshaft bolt! Attached are some pics of the timing belt, the crankshaft at TDC and the camshaft pulleys aligned. The outer part of the belt has numerous cracks in it but the inner side looks good. This is where all the reinforcement and inner webbing is so I think this belt could have lasted a while longer. The passenger side camshaft lined up perfectly but the drivers side is off just by the tiniest bit. I rotated the crankshaft again twice just to make sure and it aligns the same way. The timing on the car has always been spot on so I'm not going to worry about it.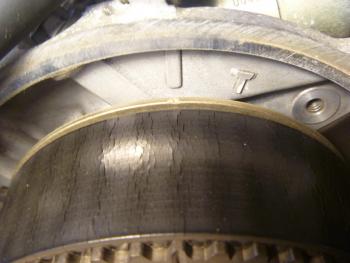
-
Guys, I'm in the middle of my timing belt replacement and with everything removed, I can really see that my driver side valve cover gasket has been leaking for a long time. I've got oily soot and dirt running down everything. It's never been a heavy leak, but more like a seepage and explains why the oil level would never stay full. I've got the engine compartment practically all torn down so now it's one of those if you're there you might as well do it type of deals for me. So my question is there any tutorial (besides the one on lexls.com) on the 1998-2000? Looks to me like all that has to be done on the driver side valve cover is remove the ignition coils, some wires and hoses and pull off the cover? The manual indicates that the oil and automatic transmission dipsticks must first be removed? It looks like there is some space to wriggle off the valve covers without having to first remove the 2 dipstick housings, which I understand is a nightmare to remove do to the tight space and the fact that the bolt is hidden. The passenger side looks a little easier. Also, the half moons in the back toward the firewall, should they be replaced also? Does not look too hard to do from what the manual describes. Does the throttle body and intake manifold have to come off also? I've read about all the difficulty in this job so I'm starting to wonder if I'm missing something. Any help or tips would be appreciated.
-
98 1uz-fe Timing Belt And Water Pump Replacement How_to
richardkwon replied to landar's topic in 90 - 00 Lexus LS400
Attached is a pic of the old serpentine belt and a new Gates one. The old belt has got cracks at every valley/indentation but the back of the belt (although shiny and glossy from wear) is still held on together very well. Not bad for a 118K mile belt.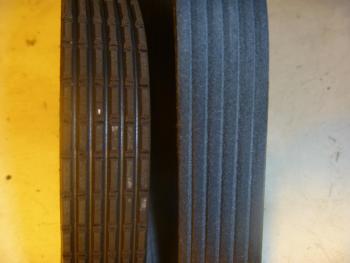
-
98 1uz-fe Timing Belt And Water Pump Replacement How_to
richardkwon replied to landar's topic in 90 - 00 Lexus LS400
I've gone to the dark side. Absolutely no turning back. It's fun though. I'm enjoying this more than I thought I would. -
98 1uz-fe Timing Belt And Water Pump Replacement How_to
richardkwon replied to landar's topic in 90 - 00 Lexus LS400
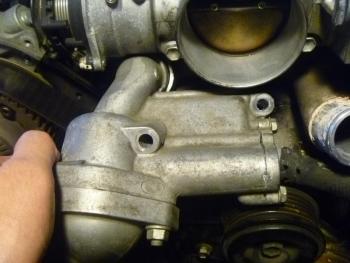
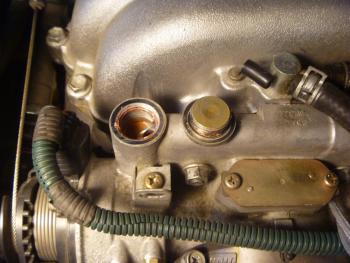
14. I took off the timing belt covers (or as the service manual calls "RH No. 3 Timing Belt Cover" and "LH No. 3 Timing Belt Cover). The left hand (driver) side cover is easy to remove. Using a 10mm extended socket, remove the 4 bolts and the nut in the center. For more space, undo the small coolant hose that goes from the water inlet to the engine on the top right side. Otherwise, the cover hits the hose and there's not much space to wriggle it out. The sensor connections are attached to the cover via 2 small black plastic clips. Mine had become so brittle with age and heat that they were not usable. Will have to get some replacements from the dealer. I don't want my camshaft sensor wiring to be flopping in the wind. Using a flat tipped screwdriver undo the round black rubber grommet and bag it with your bolts. I thought I had cracked mine but there is already a split in the grommet through which the wiring can go through. Remove the timing belt cover. For the right hand (passenger) side cover, remove the 3 bolts and the nut. There are a couple of hoses that are held onto the cover on the left side of the cover. Just pop the two hoses off the holder. There is a small metal tubing that runs across the cover and to the right is a small rubber hose. Undo the hose on the right side, let it hang and then remove the cover. Both my covers had belt dust and dirt on the inside. The rubber gaskets are still in ok condition. I was thinking of replacing them but I don't think it is necessary. There is no oil or coolant for it to come in contact with so I am reusing it. The driver side gasket had some oil and gunk from the leaking valve cover. I will clean it up and it should be good to go. 15. Now remove the 2 bolts to the water inlet housing using a short extension and a 12mm socket. The bolt on the left is quite a bit longer than the right bolt. Now comes the fun part, getting the damn housing off. First, you've already taken off the coolant hose that is connected to the engine on the top right side. I plan on replacing this hose with a new one so I left it connected to the water inlet so that I know how to perfectly position it at installation. Now comes the fun part of removing the water inlet housing. I fought and fought with it and even banged it with a rubber mallet a couple of times, which I do not recommend as it could possibly damage the aluminum. The first thing to do is to first wriggle it up and down. Then I took a long thick screwdriver and gently pried where the bolt thread is while at the same time wriggling it up and down and back and forth. Be patient and soon enough it will come undone. The reason why it is so difficult to remove is because of the rubber O-ring at the inlet and the FIPG (black gasket material) that is stuck onto the housing. And as usual, have some towels underneath. Again, some frickin' coolant spilled out and now I'm at 1 win and 3 losses for the year.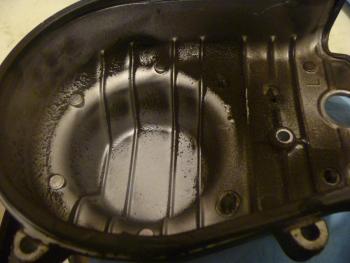

-
98 1uz-fe Timing Belt And Water Pump Replacement How_to
richardkwon replied to landar's topic in 90 - 00 Lexus LS400
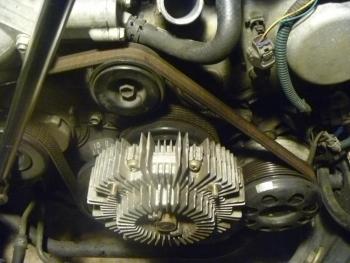
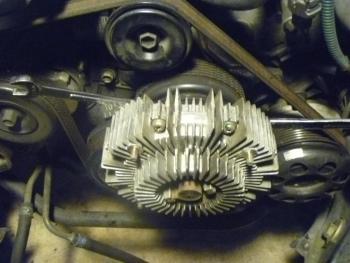
13. I took off the 4 fan clutch nuts using two 12mm wrenches. When you are at the last nut and the rubber mallet smack trick does not work, then just retighten an already removed nut to obtain leverage to remove the last nut. Then both will come off very easily. I also removed the serpentine belt by using a 14mm socket on the pulley located right of the PS pulley. To remove the fan clutch off the fan bracket pulley just smack it off with a rubber mallet evenly around the clutch. I tried pulling it off by hand at first but it's on there pretty tight.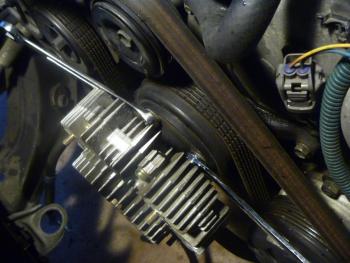

-
98 1uz-fe Timing Belt And Water Pump Replacement How_to
richardkwon replied to landar's topic in 90 - 00 Lexus LS400
12. Today I removed the fan housing, fan and radiator. Undo the 4 bolts that hold the fan housing to loosen it up. My top right clip that holds the fan housing to the radiator broke into 2 pieces so I will either gorilla glue it back and hope it stays in place or get a new housing. I think with 3 bolts it's on there fairly securely but without the top right bolt it can shake and make noises. Getting the fan blades off of the fan clutch is a tight squeeze. I found it easiest by standing with my left side facing the passenger seat and using my right arm to wriggle a 10mm socket wrench (no extensions necessary) onto the nut, hold the fan clutch with your left hand so it doesn't move and then undoing all 4 nuts. The fan comes out first and then wriggle the fan housing out or you can take them all out together. Then undo the bottom radiator hose but first place a pan underneath the hose as there will be some coolant that spills out. Undo the 2 automatic transmission cooler hoses (again place a pan underneath to catch the fluid). Disconnect the white fan switch connector. The electrical socket/connector piece that has to be undone was facing the outside and hard to get a grasp of to push in to unhook so I took a wrench and turned it around and then popped it off. Then remove the two top radiator stay bolts (12mm) and pop them off. The left (passenger) side is shorter than the right (driver) side. They should pop off with a little force as the rubber will have stuck to the metal after all these years. If the rubber has deteriorated and or collapsed, you may want to get new ones or use the radiator hose cut out trick and use that as the cushion. It's really important since excessive vibration could cause leaks later on. There was also a bunch of cakey coolant residue on the thermostat housing. I think the prior coolant change must not have used distilled water? It took me another hour to do this today. I spilled coolant and transmission fluid onto the driveway so my winning streak is gone. But it wasn't too bad. I found out the location of the ECT sensor. It is underneath the accelerator cable and has a black connector. I've now got a clean view and access to everything now. It feels good and I can honestly say I would not have been able to make it this far without Landar and others help on this site. -
98 1uz-fe Timing Belt And Water Pump Replacement How_to
richardkwon replied to landar's topic in 90 - 00 Lexus LS400
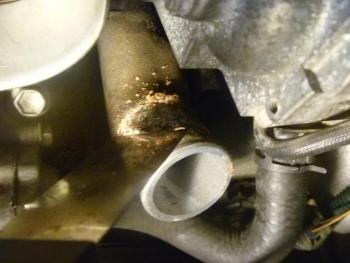
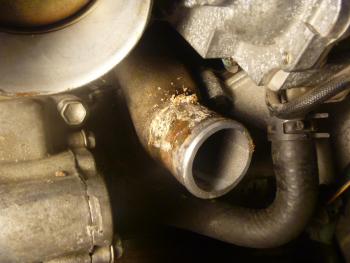
I figured out the electrical connector to the air inlet assembly. Just push the 2 clips and it slides right out. 9. So today I took off the air inlet housing which is held on by 4 10mm bolts. Undo the 2 small EVAP hoses towards the rear and the front and undo the larger air hose which is on the inner side of the assembly right where spark plug 2 is located. I can't figure out what this hose is but when I took it off, it cracked at the opening. I think it may be the PS air hose or PVC hose? Picture is attached. Looking at some of the hoses, I think I'm going to replace a few of them. That heat in the engine bay really cooks those things. Loosen the hose clamp that attaches the hose to the throttle body and wiggle it out. I had a difficult time taking this end off and I had to use a large screw driver to wedge/push it out. The throttle body has some black gunk so I pretty much cleaned out the whole area with some throttle body cleaner. 10. After the air inlet housing is removed it is much easier to remove the upper radiator hose. After I took off the hose, I noticed a bunch of crusty residue on the water outlet pipe so I took a scraper and took all the gunk off and lightly sanded it for a smooth finish. After time, the residue builds up causing an uneven seal and ever so slowly the coolant escapes. 11. I also drained the remaining engine coolant. Placing the plastic tubing onto the drain is really easy on the passenger side. The driver side was not too bad but if you have overly large hands, you can use a long 90 degree plier to get the hose on. Then using a socket wrench with a long extension and a 10mm socket, it was a cinch. Don't forget to tighten the drain !Removed! when all the coolant is drained. I only spilled a couple of drops. Amazing. The coolant condition was excellent as it has been changed a couple of times already. I'm sure if one wants to save money you could reuse it but I like things fresh. The total coolant that I drained came out to about 2.5 gallons. I heard a lot about the ECT sensor and so I'm going to replace it. I can' locate it. The manual it says it's on the passenger side of the engine near the throttle body? All in all, it took about 1.5 hours for me to do this. This includes putting the used coolant into jugs, cleaning up the radiator outlet pipe and the throttle body cleaning. Now that all the messy fluid stuff is done and out of the way, the fun part of dismantling begins!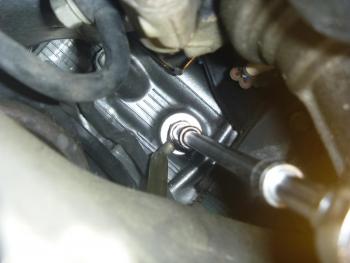

-
98 1uz-fe Timing Belt And Water Pump Replacement How_to
richardkwon replied to landar's topic in 90 - 00 Lexus LS400
When removing the air intake assembly from the throttle body, did you undo the electrical connector to completely remove it from the engine or did you just move the air intake assembly to the side? -
98 1uz-fe Timing Belt And Water Pump Replacement How_to
richardkwon replied to landar's topic in 90 - 00 Lexus LS400
Yes I'm thinking it's an 8mm bolt. Also regarding step 3: 3. Remove the engine undercover (multiple bolts). Once the main plastic undercover is undone, there is a semi circle type of plastic piece that is held underneath the bumper and is held on with a couple of screws. Undo these and the plastic little hose on the driver's side and remove it, otherwise it will hang down by the 2 screws and flap around and get in your way. You don't have to remove it but I like a clean and spacious area to work with. The "semi circle" plastic piece is actually the length of the bumper and is held on by 4 10mm bolts. The hose that attaches to it is the charcoal canister vent hose. It's pretty easy to remove and I would recommend it as I kept hitting it when I would get underneath the car. Again not mandatory but makes working underneath (which I detest the most in automotive repair) easier. -
98 1uz-fe Timing Belt And Water Pump Replacement How_to
richardkwon replied to landar's topic in 90 - 00 Lexus LS400
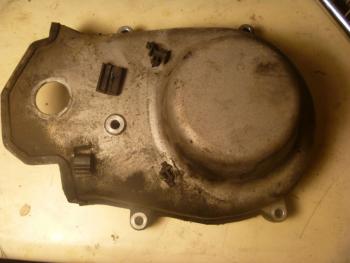
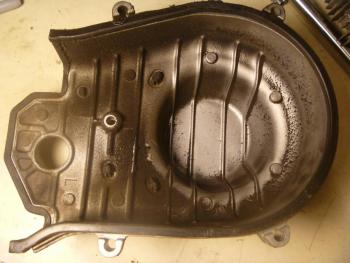
Worked on the car today for about an hour. Basically did not do too much as I spent most of the time cleaning the undercarriage of grease and dirt. I would have worked on it more but a 10mm fuel pressure regulator bolt on my 1991 Camry had caused me many hours of frustration in the morning and most of the afternoon. 8. Remove the oil pan protector which is located behind the engine undercover. There are 7 bolts/screws and 4 nuts that hold it in place. I took a picture of it so that I know exactly what bolts go where. The 4 nuts are obvious but the remaining 7 bolts/screws are actually a combination of 3 different types. Once you remove it you will have clear access to the flywheel housing, which is the holy grail as regards to assisting in removal of the crankshaft bolt. I noticed some oil on the flywheel housing cover and I'm pretty sure that this is coming from my leaky valve cover gaskets. I also took a look at the engine drain !Removed! and had a difficult time placing a 3/8" clear plastic tubing over the drain !Removed! but a long set of 90 degree pliers will assist to get it on. The steering rack and wires make it very difficult to get your hands to where the drain !Removed! is. A long extension will get the drain bolt loosened. Not sure of the socket size but I'm thinking 8mm to undo the bolt. I will find out for sure tomorrow. Attached is a pic of the oil pan protector and the air duct inlet from step 2
-
98 1uz-fe Timing Belt And Water Pump Replacement How_to
richardkwon replied to landar's topic in 90 - 00 Lexus LS400
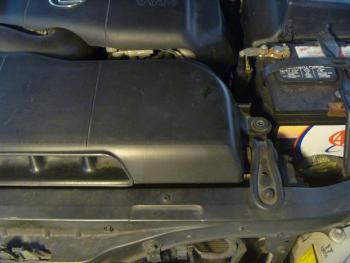
OK, I got started this afternoon. My car is a 1998 LS 400 with 118,000 miles. The water pump, timing belt, hoses and radiator have never been changed. I'm going to try to document everything here and try to provide as much detail as possible. I will attach as many pictures as possible without making it too redundant as Landar's Flickr site has more than enough. Left and right orientation here is the person standing in front of the car so left is passenger side and right is driver side. 1. I jacked up the front of the car with jack stands 2. Remove the intake manifold cover (4 bolts total) and the air duct inlet located above the radiator (1 long screw on the right (driver) side of the radiator holds it into place) 3. Remove the engine undercover (multiple bolts). Once the main plastic undercover is undone, there is a semi circle type of plastic piece that is held underneath the bumper and is held on with a couple of screws. Undo these and the plastic little hose on the driver's side and remove it, otherwise it will hang down by the 2 screws and flap around and get in your way. You don't have to remove it but I like a clean and spacious area to work with. One of my goals in this procedure is to not have any coolant or oil touch the driveway! 4. Undo the radiator drain !Removed! located at the bottom of the passenger side of the radiator and undo the radiator cap and let the coolant drain. 5. Undo the coolant bleeder screw (located in front of the intake manifold) with a 10mm hex allen key socket/bit. I bought one from Pep Boys for about $5 and it is used with a socket and works so much better than a regular allen key. I used a breaker bar to undo it because I'm such a wuss and it makes it so much easier. The bleeder screw has an aluminum washer on it. The washer looks ok but I'm going to replace it anyway. I noticed that there was quite a bit of dried caked on pink coolant on the threads so I used a small ice pick type of tool to carefully scrape the residue off. It is aluminum so be gentle. 6. Approximately 1 gallon of coolant will come out of the radiator. No need to completely undo the drain !Removed!. I noticed my radiator cap has some small cracks on the inside of the cap and so will be getting a new OEM cap. 7. Remove the upper radiator hose and undo the small coolant hose that is located on the left (passenger) side of the radiator (aka radiator reservoir outlet pipe). The upper radiator hose will come off easily at the radiator but to remove it from the water inlet, it will be much easier with the air intake assembly removed. The leak from the radiator was coming from the left (passenger side) side where there is a screw on type of coolant inlet pipe with a pliable gasket and it was a little loose and the gasket/washer was not in good condition. I guess I could have just replaced this part as this is where the leaking is coming from in regards to the radiator. I've already purchased a replacement radiator so I'm not going to worry about it. One thing about the OEM radiator vs. the replacement radiator is the replacement coolant inlet section is not a screw on type. Rather it is a whole assembly made out of plastic which I think is a good thing. Less moving parts means less things to go wrong. Of course, the downside is how long will the plastic last? My guess is 10-15 years. 8. I located the 2 engine coolant drain plugs which are located right above the steering rack boots. I'm guessing another gallon or so of coolant will come out here. I will do this tomorrow. I've bagged all the screws and labeled everything. Like Landar said, it is mandatory to label everything and even right down the steps and take pictures. Use your voice memo to record if you don't want to write stuff down. It's hard to keep up with everything and believe me if you don't get organized, you will forget something. This process including the write up and taking pictures has taken me 2 frickin' hours! I'm tired already. There's no way I could do this thing in a day let alone 2 days. And good thing I have a third car, otherwise I'd be walking to work for weeks. But it feels good to have finally started. For the past few months the thought of having to do this has been nagging me.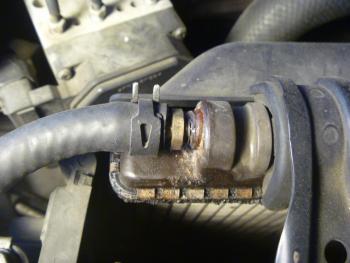
-
98 1uz-fe Timing Belt And Water Pump Replacement How_to
richardkwon replied to landar's topic in 90 - 00 Lexus LS400
Thanks guys. Today I will be draining the coolant and removing the radiator. -
98 1uz-fe Timing Belt And Water Pump Replacement How_to
richardkwon replied to landar's topic in 90 - 00 Lexus LS400
I finally have some time this weekend for the timing belt change and just a couple of questions before I take the plunge: 1. When I remove the coolant from the engine block do I have to jack up the car? 2. In order to access the flywheel area does the car need to be jacked up? 3. If so when working on the timing belt do I jack the car back down so that it is on level ground? Maybe I'm over thinking this but I'm trying to decide whether to use jack stands or drive the car up onto ramps (much easier) To drain the coolant and access the flywheel but then without coolant in the car how would I drive it down off the ramps? 4. The service manual mentions removing the camshaft pulleys? I don't see why this would be necessary? 5. I noticed in a picture that when the crankshaft bolt is being removed there are two lung bolts threaded into the pulley. Where did you get the bolts and what size. If the bolts are used to hold the pulley then why would we need to lock the flywheel. Probably a stupid question but I'm a little confused on this one. I have planned a good week to complete this job so that I can go nice and slow and not get physically too tired by trying to cram it all in in 2 days. -
98 1uz-fe Timing Belt And Water Pump Replacement How_to
richardkwon replied to landar's topic in 90 - 00 Lexus LS400
Landar, thanks for the response. Regarding the above, if I were to purchase an air impact wrench, I guess there would be no need for a holding tool or to wedge the allen key into the flywheel? I'm assuming the air impact wrench would have enough power to just zap the bolt off? But then as for properly torquing the bolt back on dilema, I would have to use the allen key in the flywheel approach as mentioned in your writeup? And what happens if the air impact wrench does not have enough power to undo the bolt initially and turns the crank CCW. Then I assume the engine is no longer at TDC? I guess you would have to realign to TDC? I told you I was a dummy with this timing TDC crap. As fo the special holding tool, the ones that I have seen look like a round key and there is no handle and is only held to the crankshaft pulley with a couple of bolts? And where could I buy this tool? Again, thanks for your help! -
98 1uz-fe Timing Belt And Water Pump Replacement How_to
richardkwon replied to landar's topic in 90 - 00 Lexus LS400
Well, my wife's 1998 LS400 with 118,000 miles is starting to give me the tell tale signs that at a minimum, the water pump is about to go out. If the car is running at slow speeds and I press the accelerator half way or so, sometimes I hear the marbles in a can sound. This happens very sporadically. I've also noticed that there is some dry coolant residue around the timing belt cover. Plus, the radiator is leaking at the top left (passenger) side where the small hose feeds into the radiator from the coolant expansion tank. I was hoping it was just the hose but it's definitely leaking from the radiator. At first, I thought the leaking coolant (which was running along the top left of the radiator and down to the drivers side) was getting blown by the wind and the cooling fan and splattering onto the timing cover area. But I don't think this is the case. I was hoping that I could just replace the radiator and be done with it but knowing that the timing belt has never been replaced, I've decided to just change out everything. So hell, let's get this thing done! I've bought all the parts including a new fan clutch and fan bracket and fan temperature sensor. I've noticed that the fan when running is a little wobbly looking and does'nt rotate "straight". So might as well replace it. I've done a lot of reading on the internet and various other sites and have decided to do the timing belt and water pump myself. I'm no expert mechanic nor do I try to be one but I love working on cars. I can do the simple stuff and have changed shocks, brakes, valve cover gaskets, mufflers, etc. But I've never done a timing belt replacement. I've always been afraid to tackle this job. It's a mental hurdle for me and I can never get over the TDC and timing stuff. It's so confusing for me. I have literally gone over Landar's wonderful Flickr tutorial 25 times and each time I read it, it seems to make more sense to the point that now I feel like I can really do this. There are a few things that I am worrying about: FIrst, do you need to remove the spark plugs before starting this procedure? I've read manuals where they say the first thing to do is spark plug removal. I don't understand why this would be necessary. Second, is getting the crank bolt off. Landar mentioned the allen key method and that is what I have decided to use. I think he also mentioned in a separate topic that the special crankshaft bolt removal tool would be recommended to be used? I'm concerned that due to the torque involved, the allen key might break? I know an 8mm was used but there are different lengths. Does it matter? In a previous post, a poster mentioned that the allen key fell into the flywheel housing. Maybe tie something to the end to fish it back out in case? And with the special tool, how does it work? Does'nt someone have to hold the special tool while I crank the bolt off? I don't see how I could hold the special tool with one hand and crank the bolt off with my other hand, especially if it's at 181ft/lbs. The picture in all the Toyota and Lexus factory manuals shows a really strong looking guy holding the SST with one hand and magically untorquing the crankshaft bolt with the other. Is it really that easy? Third, I'm confused about the part where you have to turn the camshaft pulley's 50 degrees. When I slip the belt back on, I'm sure there will be movement. I guess as long as the pulley's do not turn more than 50 degrees, I will be ok? So it does not matter if they turn 4 degrees or 10 or 49 or anything between 0 and 50? And if they do turn after I get the belt slipped back on, do I need to turn back the pulley's to be back at 50 degrees? And can I use a socket to place on the camshaft bolt to turn the camshaft to slip on the belt instead of a camshaft tool? Fourth, after I get the belt back on, it mentions to turn the engine over 2 revolutions. How much force is necessary to do this? If I feel any thing hitting like the valves, I assume I should stop immediately? If this happenes, how would I get it "unstuck" or back to normal? Would I reverse the direction ie. counterclockwise (CCW)? This may never happen but I'm trying to think of the worst case scenario. Finally, does the car need to be jacked up? I'm thinking it's not. I plan on starting this wonderful project this weekend and have been planning this for the past couple of months if you can believe it. Any help and comments would be appreciated.


