


IVAces
-
Posts
5 -
Joined
-
Last visited
Content Type
Profiles
Forums
Events
Gallery
Store
Articles
Videos
News & Articles
Everything posted by IVAces
-
Garage Door Opener Weak Signal
IVAces replied to percy's topic in 07 - 16 Lexus LS460 / LS460L / LS600h
Outstanding Dave - so glad it worked for you as well!! -
Garage Door Opener Weak Signal
IVAces replied to percy's topic in 07 - 16 Lexus LS460 / LS460L / LS600h
Fingers crossed Dave - looking forward to your update! Further testing on mine indicates that my range is around 500'. Don -
Garage Door Opener Weak Signal
IVAces replied to percy's topic in 07 - 16 Lexus LS460 / LS460L / LS600h
No Dave, I used a 12" piece of stranded harness wire of the same gauge leftover from a radio install, carefully stripped off 1/2" of insulation from one end of both pieces and twisted them together. Now the opener responds immediately to a button press. Prior to the mod, I had to press and hold to get it to work - if it did at all. It sounds as if you're having EXACTLY the same problem that I was experiencing. We have a home office adjacent to our garage with a desktop, modem, router, etc. in it which wasn't interfering with the old opener's operation. I had been having issues with my car since the install, and suspected it was an issue with it's electronics (couldn't get it unlocked with my remote the other day 🙂), but then my wife couldn't get the door closed from outside the garage yesterday morning from her 2020 Mazda CX5 after opening it on her return from her yoga class. That was when I started looking at the new rolling-code opener as the culprit. We have a very narrow garage with doors at both ends, so a vehicle is never parked under a door as there's barely enough room to get a car in. ☹️ Good Luck!!!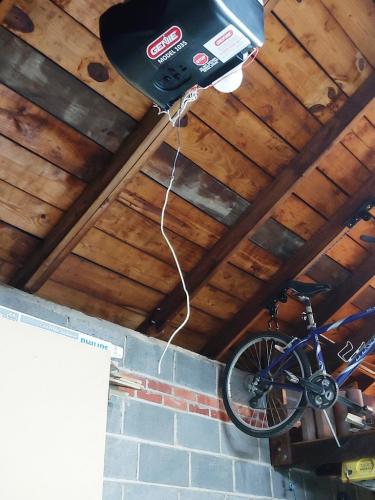
-
Garage Door Opener Weak Signal
IVAces replied to percy's topic in 07 - 16 Lexus LS460 / LS460L / LS600h
I was experiencing the same issue with my 2006 GX470 after replacing one of my two openers last week. After reading through the responses that you've all kindly contributed, I decided that adding a foot of wire to my opener's antenna might resolve my issue, and sure enough, it did. After struggling to get the door closed this morning sitting in the driveway, I was able to open it from 180' away (with no line of sight) after the mod. -
How Do I Remove The Center Storage Console In 06 Gx470
IVAces replied to daubin's topic in 03 - 09 Lexus GX470
You have to remove the entire rear console, which is held in place by 4 bolts, and flip it over to get your goodies out. :cries: Had it happen to me a couple of years ago, and it'll take you an hour or more, depending on your skill level. So, grab a coffee and..... You'll need a putty-knife, clean rag, and a 10mm socket. 1. Begin by removing the two trim pieces flanking the upper panel of the forward console [where your gear-shift lever is] with a putty knife wrapped with a rag so you don't scratch your trim. These 2 pieces are simply clipped into the console. 2. Unscrew both shift knobs and unzip the hand brake boot. The forward console is in two pieces-an upper and lower. [The boot for the gear shift knob clips to the knob via the plastic ring at the top of the boot, so pulling down on that boot before unscrewing the knob (or separating the two gently with a flat screwdriver) may be easier. You don't want to break that clip, as it's an integral part of the boot, which is an integral part of the main piece, which is probably expensive to replace.] 3. Remove the upper portion of the forward console with the putty knife by gently prying upward at it from just behind the hand brake, where it meets the forward portion of the rear console, then working around it's perimeter. It's clipped to the bottom piece with no screws. [The upper portion of the forward console was the hardest piece to come off because it has about 11 clips on it, and I was a bit reluctant to put enough upward pressure on the piece to pry it loose. Once it started coming up, it went pretty easy though. It slides up under the piece in front of it just a bit, so you have to go at it starting from behind the hand brake. You don't have to attempt to separate the wooden trim piece from this part (seems to be glued on), nor do you need to remove the gear-selection plate-they both come off with the major piece that they're attached to. Actually, you may not even have to disconnect the harness or pull the piece completely off if you can reposition the piece to get at those two forward bolts. (I took mine off and cleaned everything before reinstalling.)] 4. Disconnect the wiring harness attached to it and pull it off. Once it's off, you'll see the two forward bolts holding the rear console in place, but don't remove them yet. 5. There is a rubber mat on the bottom of the trap-door storage area of the rear console [where your goodies are hiding]-remove it with your hand, and you'll see the two bolts holding down the rear of the console, but don't remove them yet. 6. The rear console is in two pieces, forward and rear. Remove the rear end sub-assembly from the forward portion by carefully prying it from the console with the putty knife, and disconnect it's wiring harness. 7. Now remove the aforementioned 4 bolts, and remove the portion of the rear console that contains the trap-door storage bin. Hopefully, your cards will come unlodged by turning this piece upside down and gently shaking it. 8. Reinstall in the reverse order, and don't forget to hook up your harnesses at each step. Note: I don't have the DVD option in mine, but it's probably just another harness to disconnect prior to removing the rear-most console half, if you do. GOOD LUCK!!! :)

