landar
-
Posts
2,162 -
Joined
-
Last visited
-
Days Won
25
Content Type
Profiles
Forums
Events
Gallery
Store
Articles
Videos
News & Articles
Everything posted by landar
-

1998-2000 Valve Cover Gasket Replacement
landar replied to richardkwon's topic in 90 - 00 Lexus LS400
Excellent write-up and pics, Richard. Thank you! You have earned your beers! -
The odds of having a seized motor on an LS are slim to none but I gotta ask. The starter, if properly working and supplied with power as you seem to suggest, should at least be cranking over the engine. I would not put too much stock into the previous owner saying it ran fine. He/she ditched it for some reason. You have to assume nothing and suspect everything. Let us know what you find.
-
91 Ls400 Throwing Check Engine Light Left And Right
landar replied to ls400bckdov's topic in 90 - 00 Lexus LS400
Sounds like it might be the MAF/TPS sensors or connector(s). -
With the starter engaging into flywheel teeth...are you sure the engine is not seized?
-
98 1uz-fe Timing Belt And Water Pump Replacement How_to
landar replied to landar's topic in 90 - 00 Lexus LS400
Almost looks like someone, along the line of ownership, put in some stop leak and clogged the passage. Either that or the coolant has never been changed. That is a good 'find' and good to finally get it fixed. -
98 1uz-fe Timing Belt And Water Pump Replacement How_to
landar replied to landar's topic in 90 - 00 Lexus LS400
You want to make sure the crank is approx at 50 degrees ATDC before pulling the belt. The reason being is if the cam "snap-rolls" (due to valve spring pressure) the pistons will be sufficiently clear. So, you have to temporarily throw your plastic timing mark cover back on and slip the crank pulley back on the crankshaft to move things around. To remove the belt, I simply pulled the belt tensioner out and put a 19mm on one of the cams to create some additional slop in the belt. Its a little bit like pushing on a rope. So, I think I put the socket on the LH (drivers) cam and with CCW pressure (which makes slack on the RH(passenger) cam, I removed the belt off of the RH cam. Even with the tensioner removed there is going to be a fairly good amount of tension on the belt. It just fits very tight and you have to wriggle the belt from behind the cam, maybe use a large screwdriver or other tool to help. Once off the cam, removing the rest of the belt is trivial. And do not freak out if the cam(s) should snap roll a few degrees on you. Its fairly normal and happened to me. Putting the new belt on is a reverse of the removal but plan on some time to get it right. I had to make multiple attempts AND found the markings on the new belt showing where CR and RH/LH go to be very helpful. Getting the new belt on correctly is your job #1. It has to be exactly tooth-on or there will be problems later. Not all that hard to do but will require lots of patience. -
98 1uz-fe Timing Belt And Water Pump Replacement How_to
landar replied to landar's topic in 90 - 00 Lexus LS400
Thats a good suggestion about changing out the fan bracket. I left mine in on the first 90k belt change but thought I would change it at the 180k point. But it might be smart to just go ahead and change it at every belt change just like the water pump. The cost is fairly small compared to the labor involved. -
98 1uz-fe Timing Belt And Water Pump Replacement How_to
landar replied to landar's topic in 90 - 00 Lexus LS400
Richard, forget about the 50 degrees After Top Dead Center for now. That comes later when you get ready to remove the timing belt. That is when movement of the crank and cams becomes more critical. Just rotate the crank to a point where you can get the tool wedged in the flexplate. Do not worry about timing marks in the least at this point in the game. You have done no damage at all so far. I was wondering however, if it might be worth your while to order a crank holding tool and wait for that to arrive. They are about $70. Might take some of the stress off this project? -
98 1uz-fe Timing Belt And Water Pump Replacement How_to
landar replied to landar's topic in 90 - 00 Lexus LS400
Again, do not be concerned about the exact timing position of the crank at this time. The timing belt is still on so everything is good. Move the crank where you need to to get the flexplate hole, tool and housing to 'wedge'. And there is no magic about the Allen key. I used it only because an earlier poster did and would agree that it may not be ideal(I do believe the 'L' on mine was a bit longer). Actually, a hardwood (not soft pine) dowel as big as possible (1" or more) would probably be ideal. That would slip thru the flexplate hole and allow resistance while not potentially damaging anything. The wood would give before any metal. So, feel free to look around and find something else in the garage. Something rather large that could be hooked around that flexplate hole. I have a small crowbar that I could hook around the flexplate hole and that would probably work very well. Is the hardware store open today? ;-) -
Thinking About Tracking Out My 02 Es300
landar replied to firl21's topic in 92 - 06 Lexus ES250/300/330
Thoughts? Yeah, why not take the $12k ($5k for the ES + $7k on mods) you were going to flush and invest in something else? -
98 1uz-fe Timing Belt And Water Pump Replacement How_to
landar replied to landar's topic in 90 - 00 Lexus LS400
Yes on all of that. The short leg of the allen is facing toward the passenger side. Your timing belt is still on so your cams will turn in concert with the pistons and a little CCW motion will not hurt anything, timing-wise. Once the bolt is broken free, you are going to readjust the crank back to 50 degrees ATDC. If fact, even when you get the timing belt off, the crank may get moved a few degrees (+/-10) when you are making adjustments and it wont hurt a thing. Just bring it back to roughly the same area. -
98 1uz-fe Timing Belt And Water Pump Replacement How_to
landar replied to landar's topic in 90 - 00 Lexus LS400
I put a large allen key in the hole of the flywheel (flexplate) with the key 'L' facing left. Then slowly rotate the crankbolt CCW until you feel the resistance of the key. Get back underneath and verify that the key seems to be securely wedged and is not about to slip out. The key at this point should be all the way against the drivers side of the bellhousing. Once you are convinced that the key is secure, get a long breaker bar on that crank bolt and give several strong but steady 'jerks' (to mimic an impact). I heard a heck of a screech and the crank bolt broke free. Heres a pic of the allen key in position just before pulling.
-
1998-2000 Valve Cover Gasket Replacement
landar replied to richardkwon's topic in 90 - 00 Lexus LS400
How do you get the tranny bolt back in? Just by feel. You can use a mirror to get your bearings but it is mostly by trial and error feel. If you do not actually move the tranny tube too much, it should not be a huge issue but plan on a few cuss words getting that bolt back in. -
1998-2000 Valve Cover Gasket Replacement
landar replied to richardkwon's topic in 90 - 00 Lexus LS400
Oddly enough, I have never seen a tutorial on the 98-00 models. And you are right in thinking that while you have things torn down this far, why not? The leak could be as simple as loose valve cover bolts but it would be nice to have new gaskets in there when the job is complete. I would put new plugs in while at it as well. I do not believe that you will have to remove the throttle body(it faces outward from the front of the motor) nor the 'intake manifold' (although I really think you meant to say 'intake plenum'). It looks like you will need to remove the Coil on plug modules x8 and various vacuum and control hoses/lines (mark with masking tape and indicator to reconnect). The drivers side may be the hardest one with the oil and tranny dipstick brackets in the way. I have taken the tranny dipstick out before and it is a royal pain(sorry to her 'Highness', Steve). You have to feel for the bolt (8mm, IIRC). I really think you can just loosen the bolts slightly and gently bend the tubes slightly out of the way, putting them back after the valve cover is wriggled back in. The good news is that you have the perfect opportunity to author a new tutorial on how its done on a 98-00! Lucky you. ;) -
98 1uz-fe Timing Belt And Water Pump Replacement How_to
landar replied to landar's topic in 90 - 00 Lexus LS400
Good job so far. You will cherish the memories (and vow never to do it again! jk ^_^ ) -
Well, to be perfectly honest, I do not know exactly what it should be but I believe it should be lower than 50ma. How much lower, I don't know(it could vary as different circuits shut down). And be careful how you measure it. The ECU might take hours to go into quiescent mode so you cannot just shut down the engine, pull the cable and measure. I would let it setup with ammeter overnight and monitor in the morning. But yes, 280ma is too high. Check for an interior light being left on and perhaps not an obvious one (trunk, vanity mirror, etc).
-
Check Engine Light, Trac Off, Code 51....what Does It Mean?
landar replied to leftfooter's topic in 90 - 00 Lexus LS400
Putting in the 'cheapest' gas you could find was not a stupid thing, very logical actually. $10 does not get you much gas so it would be easy to dilute if bad. BTW, how much seafoam did you pour in the tank? That stuff is not the magic elixir that many believe. It can actually cause some problems. You have not yet expounded upon what exactly happened to the performance, if anything. The light coming on is perhaps meaningful and perhaps not. If the engine still starts and runs ok, then fill up with premium fuel, reset the code(you have it captured already) and watch to see if further issues crop up. If the engine now runs poorly, let us know how it is acting up. Who knows, it could be as simple as a loose gas cap. Oh BTW, seeing that you have a '92, have you ever had the trunk wiring harness checked or repaired? -
Any Austin Area Members? Need Handy Ls Mechanic...
landar replied to leftfooter's topic in 90 - 00 Lexus LS400
Here is how to read the code leftfooter -> http://www.lexls.com/tutorials/intro/codereading.html Why not consider doing a good portion of the work yourself? It really is not that hard and brings lots of satisfaction (at least to me, anyway). There are many tutorials available, such as on the site above. -
Timing Belt Replacement Question For 04 Es330
landar replied to richanb's topic in 92 - 06 Lexus ES250/300/330
That is interesting about the 100k replacement interval for coolant. They also do not necessarily recommend replacing the water pump(unless it is leaking) with timing belt but I would not even dream of doing the timing belt without changing the pump. My personal experience is to change coolant every 3 to 5 years regardless of mileage. It just goes bad after some time. -
98 1uz-fe Timing Belt And Water Pump Replacement How_to
landar replied to landar's topic in 90 - 00 Lexus LS400
Good job. I guess there is no turning back now!? :D -
It sounds like you have done about all you can to confirm that the one key fob is kaput, VB. If it were my unit, I would make absolutely sure that the switch contact is making and I probably would use a spectrum analyzer to look for RF energy (thats not an option for many). Probably time to buy another key fob while you still have one working unit.
-
You have the right thinking on this Brandon. In general, I would say 'yes, the battery is good' if the battery will start the car. The reason I mention the battery is that sometimes, I only get part of the story from posters. And you have so many electrical issues that the battery is the first to come to mind. It really sounds like you have a parasitic drain that is draining the battery overnight. The 14.5VDC and 12.3VDC (with loads) sounds about right. If you disconnect the battery cable overnight and then reinstall in the morning, does it start? If so, you will need to find what is drawing current when sitting. Now, you mentioned checking fuses but you have to do a thorough job with this. Do not rely solely on sight. I have had bad fuses which look good. An ohmmeter tells a different story. And I would check for voltage right at the fuse box itself. I have a suspicion that the fuse box circuits may not be fed due to a broken wire or fusible link. Bad connector even. So get a voltmeter and start checking for voltage on each fuse. It might be missing which will get you tracing the line.
-
Lots of issues. If the car starts, drives and runs well, an OBDII is not going to find the inoperative circuits. You will need to get a schematic and volt/ohmmeter to start sniffing out the supply to each fuse and circuit. I would place the battery at the top of the suspect list as we really do not know its condition and often, when left to go dead several times, they will never again operate correctly. Do you have a battery in another vehicle that you could swap out to verify its not the battery?
-
A laptop with good scan software installed would show a lot of info...more than typical handhelds. But will probably cost you close to $200. A 99 LS400 is supported with this kit -> http://www.autotap.com/ I am not endorsing this package, just using as an example.
-
98 1uz-fe Timing Belt And Water Pump Replacement How_to
landar replied to landar's topic in 90 - 00 Lexus LS400
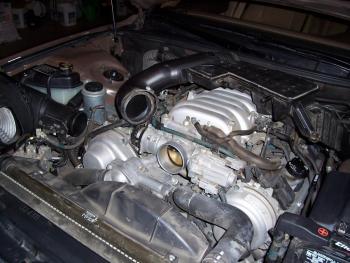
I believe I completely removed the air intake unit but that might have been overkill. As long as you can get to the cam covers it would be ok to leave it but I think that is why I completely removed. I left half of the air filter housing in place as you can see in one of the pics. BTW, I have more pics than are posted on Flickr so if you run into any questions, I might be able to pull up more detail. This pic shows the intake box removed and sitting on the plenum (but I moved it off the engine later).