jaed2
-
Posts
30 -
Joined
-
Last visited
jaed2's Achievements
")


-
2004 Rx330 Power Liftgate Gas Strut (lift Cylinder) Replacement Needed
jaed2 replied to jaed2's topic in 99 - 03 Lexus RX300
I would doubt this is under warranty. My car is out of warranty by almost 2 years (I'm guessing yours is out by 1 unless you have an extended plan). There probably isn't much incentive for the dealer to replace these under warranty. When you say Lexus "Poo-poo-ed" your claim, do you mean that they refused to replace it under warranty a few years ago? I wasn't able to find too much information about this online, so I'm not sure how known the problem is. Guessing that there were other Rx330 or Rx350 owners who were purchasing these from Mr. Lou's on eBay, there must be some others who are having this problem. I'll let you know my experience when I install the after market ones. -
2004 Rx330 Power Liftgate Gas Strut (lift Cylinder) Replacement Needed
jaed2 replied to jaed2's topic in 99 - 03 Lexus RX300
Thanks so much, Filehorse. I had actually seen Mr. Lou's on eBay before posting, but was unsure if the condition of my lift struts was normal or not. I'm guessing it isn't now, so I just bought a pair 2 minutes ago from him and we'll see how these work when I get them. $59.00 with free shipping seemed like a bargain after seeing dealer prices and reading through his feedback comments I saw that there were several satisfied 330 owners. I appreciate the help and I'll try and post on the differences after I install them. Thanks again. I'm still curious about the experiences of other Rx330 or 350 owners with power gates, so if you've notice this please do let me know. -
I have a 2004 RX330 with a power lift gate, but when opening the gate manually I noticed that the lift gate needs to be fairly high before it opens all the way up on its own. The power door still seems to work well going up or down when using the automated feature. I'm not sure if these gas struts, or (lift cylinders as they seem to be called) should be replaced, or if this type of opening is normal with a power trunk. I noticed a small amount of corrosion around the liftgate cylinders, and they are 6 years old. The dealer cost in parts alone seems to be over $300 for the pair. Mostly what I'm concerned about is that if the struts are weak or running down, that it will put strain on the power lift motor. Has anyone else noticed this or experienced this? Should the trunk just "pop-up" as soon as the electronic trunk button is pressed or should it delay until it's about 1/2-3/4 the way up? The trunk doesn't drop on your head, it just doesn't go up on its own upon first opening. It is in the mid 30s here in Philadelphia! Maybe it's the cold? Has anyone replaced these? Any experience? Any thoughts would be appreciated! Thank you! :)
-
1995 Ls400 Fuel Filter Location And Replacement
jaed2 replied to jaed2's topic in 90 - 00 Lexus LS400
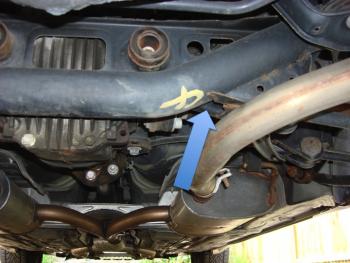
FUEL FILTER LOCATION FOR 1995-1997 LS400 IS DIFFERENT FROM 90-94. After removing the heat shield in front of the drivers side rear wheel well I thought I was crazy because I couldn't find the fuel filter. After looking around for a little while under the car I finally found it. It turns out the location changed for the 1995 model year from where it had been previously. In 1994 and earlier LS models, the fuel filter was located in front of the driver's side rear wheel well under a heat shield. This can be seen at the tutorial on LexLS.com. IT IS NOT LOCATED HERE AFTER THE 1994 MODEL YEAR. It is actually located under the car just above the passenger side inner CV joint and exhaust. There is also no heat shield covering it. (see pictures). If you have a 95 or newer (at least until 97 and probably to 2000) and you're looking at a tutorial on a 94 or newer car, the operation to perform this procedure is the same, but the location has changed. Just wanted to give others a heads up and to save them some time! :)
-
1995 Ls400 Fuel Filter Location And Replacement
jaed2 replied to jaed2's topic in 90 - 00 Lexus LS400
Thanks for the info Bicol-ini! but I didn't see anywhere in this thread where the filter was located. If you have a 96, ours will be in the same place. Can you tell me where yours was? Your pics of the filter make me want to change mine ASAP (although I only have 63K on my '95 :D ). After you replaced it, did you notice any difference in the drive? I've noticed that sometimes if I accelerate hard the cars acceleration is not totally "linear" and I feel some mild hesitation. I'm hoping this might help that as I've never replaced the filter since getting the car with 45k. Thanks again for the help! -
I'm hoping someone can tell me where the fuel filter is located in the 1995-1997 LS400. I have a 95. There is a nice tutorial for the 90-94 LS on lexls.com, but I think the filter location changed for the 1995 model year. I can't be certain, but when I looked under the car in front of the driver's side rear wheel well (where it is for the 1994 and earlier years) I didn't immediately see it. Does anybody know anything about this? If someone can just tell me the location I'll post a picture tutorial when I replace it in the next couple of weeks. Just so people know, I'm not looking to replace the fuel pump filter (behind the rear seats) but the one that is usually in series with the fuel line. I'm REALLY hoping that this is not the same thing, and that I don't have to pull the rear seats to get to the fuel pump. :( . However, if I'm misinformed please let me know. Thanks!
-
I have a 1995 also that i got last year with 45,000 miles and the heated seats also didn't work. It wasn't a big deal, but when it gets cold i sort of wish i had them now. Both buttons light up, but i get nothing. I do know that coffee was spilled in the car at some point, but a local shop told me the elements were burned out so i didn't think that was the problem. However, i'm not 100% convinced seeing as how the mileage is so low. I haven't done anything yet because the elements are INCREDIBLY expensive. Have you checked to see if there is power going to the coils ? Dirty switches ? Did someone spill a coke or ?? on the switches ? ya im sure the doc spilled coffee on it when he had it but how do i take apart the consol my volvo was simple n i dont wna break or scratch anything im going to try n clean it out if not i have to take it to a shop or somthing
-
Front Strur Bar Bushings Cracked? Suspension Questions
jaed2 replied to jaed2's topic in 90 - 00 Lexus LS400
Hey Landar, Thanks again for all the great help and guidance. Just wanted people to know that I did the rear carrier arm bushings, front strut rods and lower ball joints over the past 2 weekends and it was really not very difficult in my opinion. It definitely takes some time and a bit of muscle (I was totally sore the whole weekend but I'm out of shape) but it is worth it. 2 weekends ago i changed the carrier arm bushings and this past weekend I changed the strut rods as well as the lower ball joints. LBJs were very easy and although the strut rods weren't particularly difficult, the operation did require some finessing. One thing that I found difficult on the first side was securing the strut rod's 2 bolts into the carrier arm. This was tricky because normally the strut rod is twisted so that the two bolts align with the holes in the carrier arm. However, when it is bolted through only the bushing into the frame and not into the carrier arm, it is not twisted and is thus relaxed. When it is relaxed the bolts don't line up with the holes. If you take a wrench (21mm, 22mm, 20mm, doesn't really matter too much) and place the box end on the arm, you can actually twist it so that the bolts line up with the holes and you simulate the "unrelaxed" position that the strut rod normally is in. This allows the bolts to line up with the carrier arm holes. On the first side where i didn't use this trick I banged the bolts in, but when i tried this with the wrench on the second side the bolts basically just slide into the carrier arm with a light tap. The other word of advice that I have is to make sure everything is tight! On my first test drive after doing the front end i started to hear a clanging and couldn't figure out what it was. I figured it was the new strut rod, but i couldn't figure out why this was happening as I thought I torqued everything correctly with the torque wrench. When i bounced on the fender, you could hear it and when i drove the car you heard it all the time on the tiniest bumps. I finally realized that i had not properly tightened the bolt for the little snubber rod enough. It's tricky having to use the allen key and the wrench at the same time (you'll see what i mean if you haven't done this yet.) Anyway, after I realized that this was the problem, i tightened it up and the car drove GREAT! I've heard a lot of people in this forum complain about some shaking in the fronts of their car at about 60-70mph. I had that problem ever since I bought the car. Sometimes it would be there and sometimes it wouldn't. Wheel balancing seemed to help a little, but it always came back. It wasn't terrible, but moderately annoying. It was also random. Although I'm not sure if it was related to the rear carrier arm bushings, front strut rods or front ball joints (most likely candidate) I will say that it is now gone and the car is TOTALLY smooth. No bone shattering clunks over potholes...Like driving 2 different cars. Overall this cost me $400 in parts and maybe 7 hours in time. Out the door of the Lexus dealer (w/tax etc.) these jobs were quoted as costing over $1800. That staggering figure is what led me to decide to do this myself and i truly appreciated all the help from everyone on this forum (especially Landar and Jzz30). I am somewhat (ok, very) embarrassed to say that this is the first work I've done on my car. EVER. I have always taken my cars to the dealership and have had the notion that the only people who can do this work is the dealership that knows the car. I will say that I do have a "mechanical mind" and a good tool selection, but I would encourage others who doubt themselves (like me) to try doing these jobs themselves. Saving $1400 over dealer cost for 7 hours of work = $200/hr. I don't make that much or even close to it, so it's worth it for me to do this, and you might find that it is for you too. I hope that my admission of embarrassment will give others the courage to give it a shot and be pleasantly surprised! Remember also that some of these tools you can borrow from your local auto store for FREE (pepboys, autozone, advance AP, etc). I have still never changed my own oil, but now I have changed my strut rods, ball joints and rear carrier arm bushings. I saved over $1400 by switching to DIY! Thanks again to all who helped and if others have questions that i can field about these jobs, send me a message, I'm happy to help! -jaed2 -
Ls400 Rear Carrier Arm Bushing Replacement...do You Need Pics?
jaed2 replied to jaed2's topic in 90 - 00 Lexus LS400
I noticed that too and I think it's a good observation. You lose that "play" in the new bushing since the clamp is now clamped to the rubber and thus the carrier arm. This sort of makes them almost "connected". The rotation that was there before is probably lost to some degree, but the bushings i think are pliable enough to allow some play. I think the rubber in the OEM bushings was stiffer, so there may not have been as much play as it seems. More flexibility in the OEMs is probably a result of their deterioration. When i was removing the bolt that holds the strut rod to the carrier arm, it was flopping around like crazy as i wrenched. If all the rubber deteriorates i would imagine that strut bar goes clanging around back there as it moves back and forth in the carrier arm housing. The reason i think the new ones are designed this way and the other problem i suppose with putting in new OEM style bushings (if they were even made) is securing a new bushing in there without it sliding out. If it weren't in tight the way the original was, it could come loose and could cause a problem of it once again was clanging around loose. The sides that now stick out of the housing on the new non-OEMs keep them put around the clamp and in the housing. Pishta, if you're OEMs still feel really stiff then maybe you should wait. Mine were undoubtedly wobbly and I could tell when i went to take out the bolt just how bad they were. I will say that i drove the car a good amount this weekend to test the new front ball joints and strut rods and the back end feels completely smooth and solid. I also had a shake in the steering wheel that i got at about 60-70mph that is now totally gone. Can't say if that's from the new front end parts or the rear bushings though. should have driven it on the highway before doing the front end stuff. -jaed2 Another observation: Look at the angle in pic 1 and then the angle in pic 12. See how the OEM bar is not perpendicular to the through bolt? Can the new bushings allow that angle? It looks pretty big compared to the crushing replacement bushing. Im looking for a reason to change these but I think mine are still good, can turn the trailing rod about 10 degrees with lots of resistance, I dont think you can turn yours at all with those retro bushings, can you? -
Ls400 Rear Carrier Arm Bushing Replacement...do You Need Pics?
jaed2 replied to jaed2's topic in 90 - 00 Lexus LS400
I suppose it's true that you can do it all with a jigsaw or sawzall, I probably didn't even need the 2 arm, but rented it from pepboys envisioning that I would get a punch. It was still useful for pushing out the center. Your idea was probably better. Hope this fixes your rear end! -
Ls400 Rear Carrier Arm Bushing Replacement...do You Need Pics?
jaed2 replied to jaed2's topic in 90 - 00 Lexus LS400
Hi fisher972002, I didn't replace those bushings but did seriously consider it before starting the job (I bought replacements and may do it at some point). However, I didn't really get a good look at them as I never removed the whole strut rod. I was fairly confident that they were still in good shape for a couple of reasons. a) When i pinned them under the carrier arm the way you see in the pics, they were "fighting" to get back to their normal position. If these bushing were ripped, torn, or hanging on by a thread the way the carrier arm bushings were they would have just sagged and not bounced back. B) I'm sure the dealer would have loved to have told me that those were rotted too but they didn't! That also led me to believe that they were most likely OK. However if you do remove the entire strut rod (do some call this a trailing arm?) and find that yours are rotted, I'm 99% sure the replacement part for this is ADUS 5056TA. Maybe it's a good idea to replace them anyway if you have it off. hope this helps! -
Ls400 Rear Carrier Arm Bushing Replacement...do You Need Pics?
jaed2 replied to jaed2's topic in 90 - 00 Lexus LS400
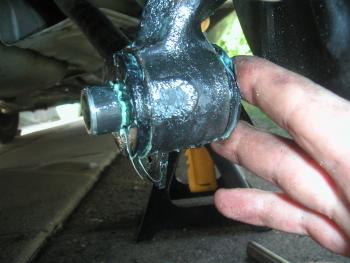
Hi Pishta, In regards to the strut rod cuff clamping down on the inner metal sleeve, that's what i thought would happen but it didn't! I know this for 2 reasons. The first is that i could actually see the cuff pressing into the rubber and the second was that the more i tightened the bolt, the more green grease that squeezed out from the bushings (see picture 12). Let me know if you still think otherwise, but it seems to me like it's crushing the rubber and not squeezing against the inner metal...maybe they're supposed to squeeze the rubber tight?? It's not the way it was originally... To press this out you would have to used something metal, it would have to be thick and very close to exactly 33mm. that metal sleeve is in there tight. Look at the punch that Jzz30 made that can be seen in his tutorial. That is what you need. I tried a bunch of things that were close to 33mm including a stack of 33mm washers and they just crumpled in the 2 jaw puller. To press out the metal outer sleeve that attaches to the housing PLUS the rubber and metal center you would need a punch like this. (see my pic with the screwdriver? instead of prying this out part out, the 33mm punch would just shove that outer metal housing out. If your asking if the new bushing is 33mm, then the answer is yes. Without that old metal sleeve out of the housing the new one would never get in there. Hope I'm answering that question correctly. I would say the new bushings are somewhat softer than a skateboard wheel. They feel a little pliable, but in no way feel like hard plastic. There is substantially more rubber on the new bushing than the old one which should in theory make a it a little more comfortable. I would be pretty hesitant to use skate board wheels here :) hope this helps! Fear not, the metal sleeve you pushed into the center of the rubber bushing is where the arm is clamping down on, torque away! So a 33 mm arbor would push/pull the old bushing sleeve out, or more precisely, a 33mm poly bushing is what they are using as the insert? I have turned down skateboard wheels (!) and made bushings for other projects, how hard are the replacement bushings, like plastic hard or like skate wheel hard? Just curious....Great write up! -
Ls400 Rear Carrier Arm Bushing Replacement...do You Need Pics?
jaed2 replied to jaed2's topic in 90 - 00 Lexus LS400
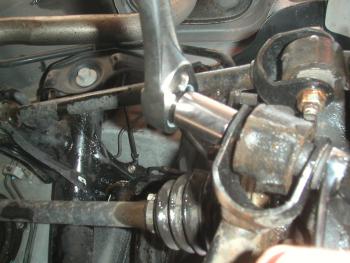
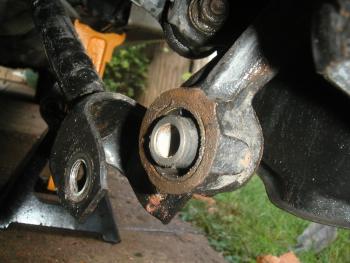
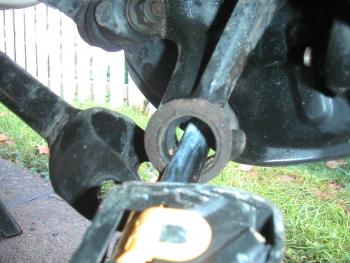
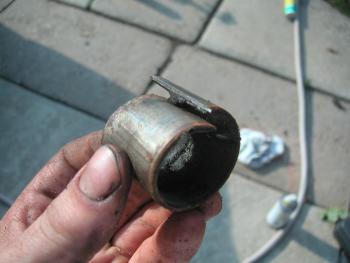
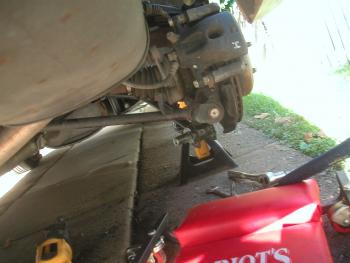
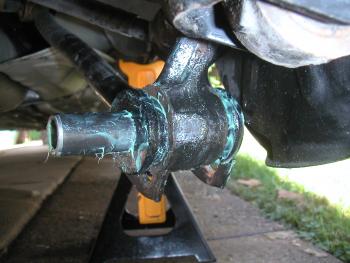
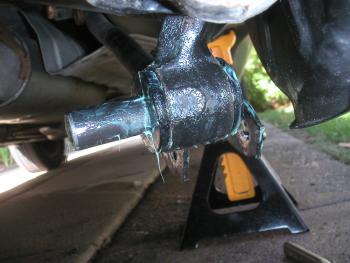
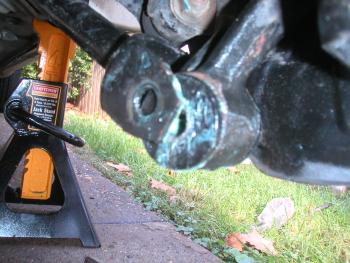
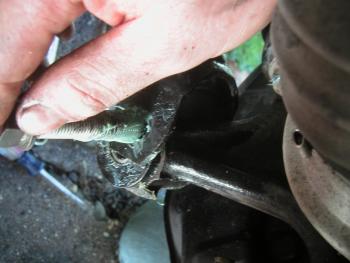
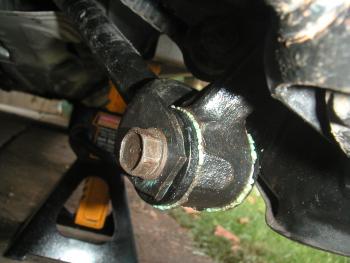
Ok...Here are the instructions from left to right, top row to bottom row. pictures are 1-12. 1) this picture is taken from beneath the car and shows me with a wrench on the nut and a socket wrench on the bolt. bolt will screw out. This was AFTER i loosened the nut with a breaker bar. these things are on at 136 ft/lbs. THEY ARE HARD TO GET OFF! step on the breaker bar or hit it or something to get it moving. 2) This is a picture of the old bushing before i pressed it out using the tools borrowed from Pep boys (see Jzz30s protocol if its unclear how to do this with the 2 jaw puller). This part is easy and when you pop that metal center out, it is a good feeling and you can see how rotted it was. **Also notice how these metal-sleeved bushings are different from the ones that you will put in. First of all they have a metal sleeve that you see me about to sawzall in the next pic. (The new ones don't have this). Also notice that on the old bushing there is no rubber on the outside of the housing which will be there with the new bushing (see pic 12). This made me nervous when the manual and others said it needed to be torqued to 136 ft/lbs because the strut rod "clamp" or "cuff" was pushing against metal in the old bushing and now it is squeezing the rubber. I'm curious what others think, but however you do the new one torque it on tight!** 3) Getting ready to sawzall. BE CAREFUL AND TAKE YOUR TIME!!! If you have a 33mm circular piece of metal like the punch that jzz30 made, use this. I had nothing that was 33mm and would work. sawzalling will work fine. 4) Here i've made the cut and am placing a screwdriver between the old metal sleeve and the carrier arm housing. i first used a smaller screwdriver and hammered it between them. Then i took the bigger screwdriver (pictured) and pryed it out. Very easy once it is freed. 5) here is the old metal housing. See how it's been pryed? wish i'd taken a picture of the inner metal tube with cracked rubber all around it, but you get the idea. 6) time to get the new rubber bushing in! Grease them first (rubber and metal in and out) as well as the carrier arm housing where they will go in. I used Green Grease. It was expensive but is supposed to be waterproof and good stuff. I want to keep these bushing for a while. here is a far away picture so you can get a perspective of what i'm looking at. now to zoom in... 7) push the rubber in on one side and then on the other 8) same pretty much as 7 9) holding one end of the rubber (see my fingers), slide the metal center from the left to the right (in picture) until it's centered. easy. 10) now things get slightly trickier. see how the strut and carrier arm don't exactly line up? yeah, I had to really push to get these back together. if you can, wedge yourself in the wheel well between the back on the wheel well and the carrier arm/brakes. It seem counterintuitive, but you're going to kind of push down and forward on the carrier arm assembly while simultaneously holding that bolt in the proper place (see pic 11) so that when they line up, the bolt goes right in and secures them together. This my friends, takes a little muscle and effort, but luckily for me was the hardest part. 11) this is me positioning myself in the wheel well and aiming the bolt to slide in while i pushed. See step above on grunt work. 12) You did it! Now get your torque wrench and put it all together. See how the rubber is now on the outside of the carrier arm housing and the strut rod cuff unlike the factory bushing (picture 2)? This made me a little nervous torquing it so tight. I didn't get quite to 136 ft/lbs, but it was on there REALLY tight and the rubber seems to have survived. (Knock on wood it holds...) Really didn't want to tear it but maybe my concern is not valid. Factory specs say 136 ft/lbs. so do what you think. Hope this helps people! take those $525 dollars of profit and buy yourself something nice. Need i suggest you MUST have your car on jack stands NOT JUST A JACK FROM THE TRUNK? Do this job only if you feel comfortable. Most importantly don't hurt yourself and be safe when working under your car! -
Ls400 Rear Carrier Arm Bushing Replacement...do You Need Pics?
jaed2 replied to jaed2's topic in 90 - 00 Lexus LS400
Got them from LPD auto parts (member name lpdautoparts) on ebay. Here's a set...$75.00/pair shipped. http://cgi.ebay.com/ebaymotors/90-99-Lexus...sspagenameZWD1V -
Ls400 Rear Carrier Arm Bushing Replacement...do You Need Pics?
jaed2 replied to jaed2's topic in 90 - 00 Lexus LS400
Ok...Here are some pictures in sequential order. I will post more detailed instructions in a bit or if someone requests. one thing that i didn't do that was in the previous tutorial was remove the entire rear strut bar. I only removed the end that was attached to the bushing i was replacing. I then just let the carrier arm pin it down a little...BUT DON'T RIP THE BUSHINGS IN THE TOP OF THE STRUT ROD! I don't think this is bad, but i may be misinformed, so you may want to remove the whole bar. Something to keep in mind that if you use a sawzall on the old bushings (to cut the metal sleeve after pressing out the old metal center from the rubber... see the jzz30 tutorial), BE VERY CAREFUL!! I cut farther than i wanted to and even though it wasn't enough to cause any problem, i still wish i hadn't done it. It is hard to maneuver in there! make 2 cuts and then get your screwdriver in there to detach it. don;t go crazy with the SZ and cut through your carrier arm. Another thing to keep in mind but is easy...put both ends of the new rubber bushing into the carrier arm hole before sliding in the metal center. Remember to use grease in there....I used Green Grease. you'll see how i do it in the pics but this is the easiest way because the metal insert expands the rubber slightly. pics should be fairly self explanatory, but please feel free to email me with questions.