


CELSI0R
-
Posts
52 -
Joined
-
Last visited
-
Days Won
6
Content Type
Profiles
Forums
Events
Gallery
Store
Articles
Videos
News & Articles
Posts posted by CELSI0R
-
-
On 7/4/2018 at 8:28 PM, Gary Georges said:
I just purchased a white and beige interior 1996 Lexus LS 400 that belonged to an old lady that never drove it practically.
The car was purchased with 9,547 original miles.
It is still under 10,000 miles
The car looks like it just came out from dealership
and still smells new
Incredible!... Any photos?
I can only say one thing:

-
The ECU will not recognize a change in wheel size, and relies on the car having the same size wheels (in total diameter, including rims and tires) as it did stock when determining speed.
If the speed was reading fine when the stock rims and tires were on the car, then changing the cluster may not necessarily fix the problem. As sha4000 suggested, I would try putting the stock rims back on the car, to see if the speed is reading properly again. However, your new tires should not have resulted in such a dramatic change in speed. I calculated what you should expect using a calculator on TireSize.com:
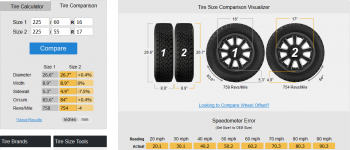
On the other hand, you mentioned that the speedometer needle doesn't start moving until about 15 mph. Try hooking up a scan tool, and have a passenger check if the speed is correct coming from the ECU's diagnostic port as you drive. If it is, then the problem could be the cluster.
-
MAF sensor cleaner will destroy the Karman Vortex MAFs on these cars, so it's a good thing you found out before it was too late. I got really worried when I read the title of this thread. 😅
The MAF sensors in these first generation (1990-1994) LS 400s don't need to be cleaned or serviced at all -
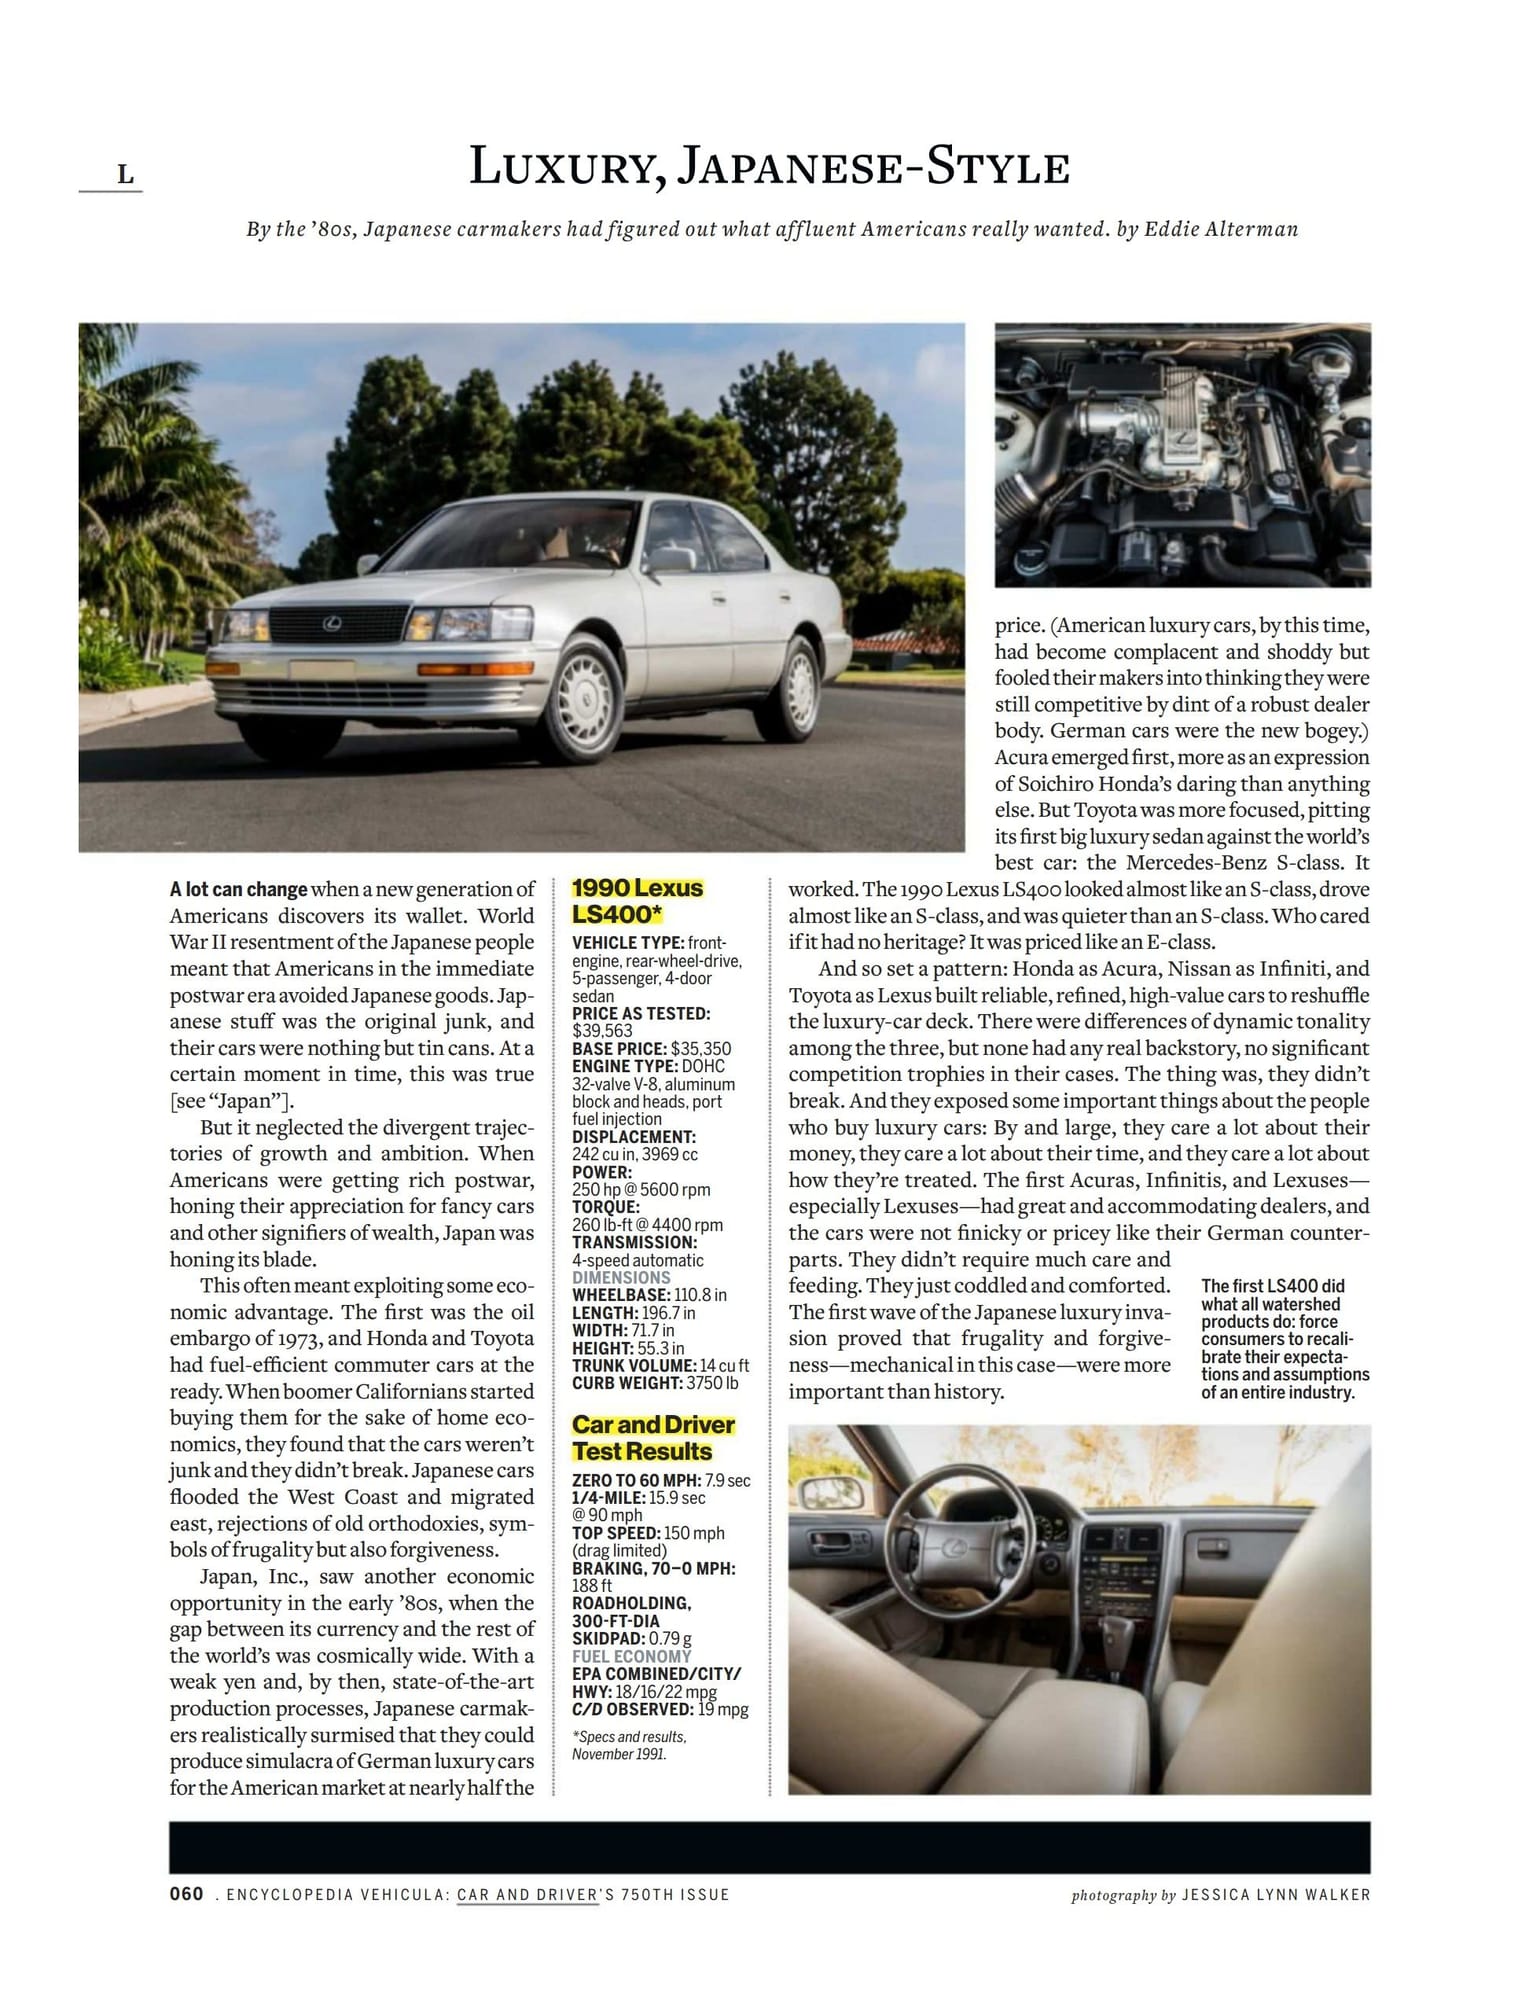
The car is one of 450 prototype cars built in 1985, according to the museum's old website:
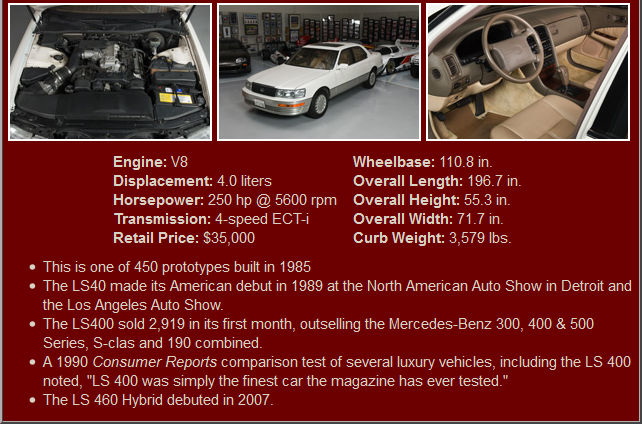
https://web.archive.org/web/20160623223329/http://www.toyotausamuseum.com/collection/1990_LS400.htm -
Car and Driver has released this article on their website with more photos!
https://www.caranddriver.com/features/luxury-japanese-style-revisiting-the-original-lexus-ls400-feature
I hope that everyone has a happy New Year! -
Glad you liked it, Paul!
For anyone who is also interested, I speculate that the car featured here is the same LS 400 currently being held at the Toyota USA Auto Museum in California: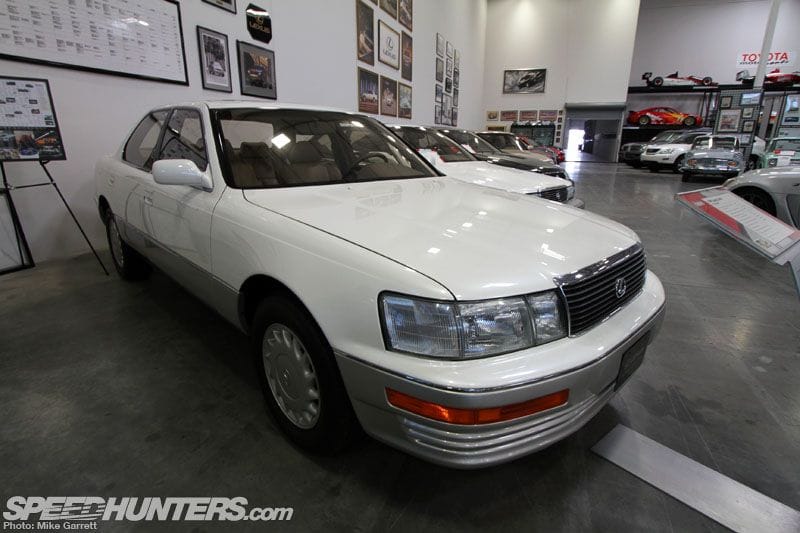
Even though this car has a plate on it, it has been in photos before with the plate removed, such as this one: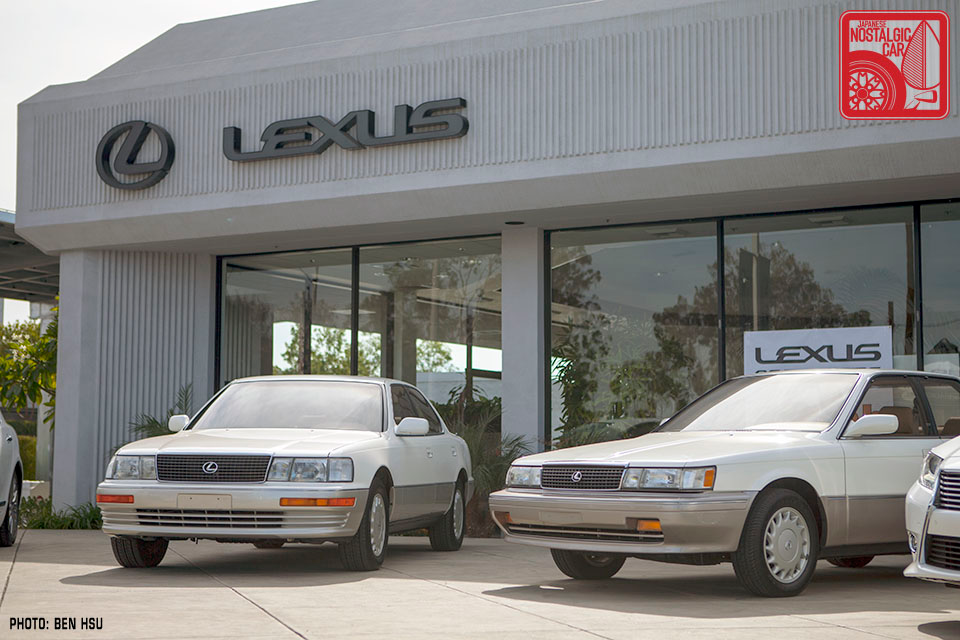
The mounting holes are so small, that at the right angle with the right lighting, or with the use of photo editing, it could appear as if they aren't even there (like the photo in the C&D article). Notice how hard it is to see the holes on the ES 250 beside the LS (above).
The museum car is also a non-Trac equipped model, just like the one in the article: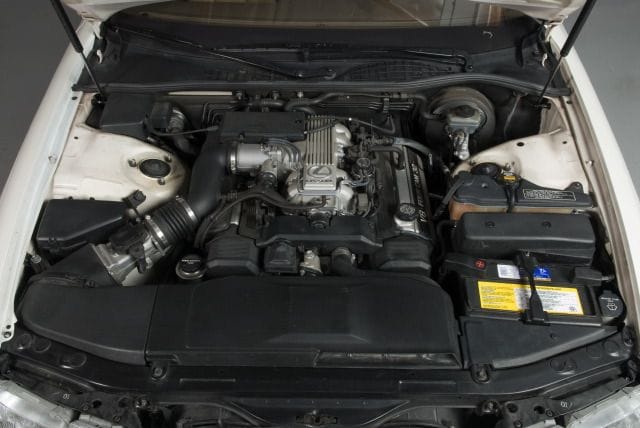
Sources for photos:
http://www.speedhunters.com/2012/05/the-toyota-usa-museumfrom-lexus-to-nascar-more/
http://japanesenostalgiccar.com/the-lexus-ls-400-is-officially-a-japanese-nostalgic-car/
http://www.toyotausamuseum.com/collection/1990_LS400.htm-
 1
1
-
-
I discovered this article today, thanks to a member at ClubLexus. I went and made a scan of my copy, thanks to his discovery. I don't suppose it would hurt to post it here:
-
2
-
-
Here is a copy of the tutorial from an archived version on ClubLexus. As a precaution, make sure you read through everything before attempting.
------
REVISED *For people with some technical knowledge only* Do this at your own risk!*
Hi, My name is Rice. I wasn't going to pay $1200 to get my 93 LS 400 Lexus cluster to stop flickering and my gas gauge working again, so here is my permanent fix. It cost me 3 or 4 bucks!
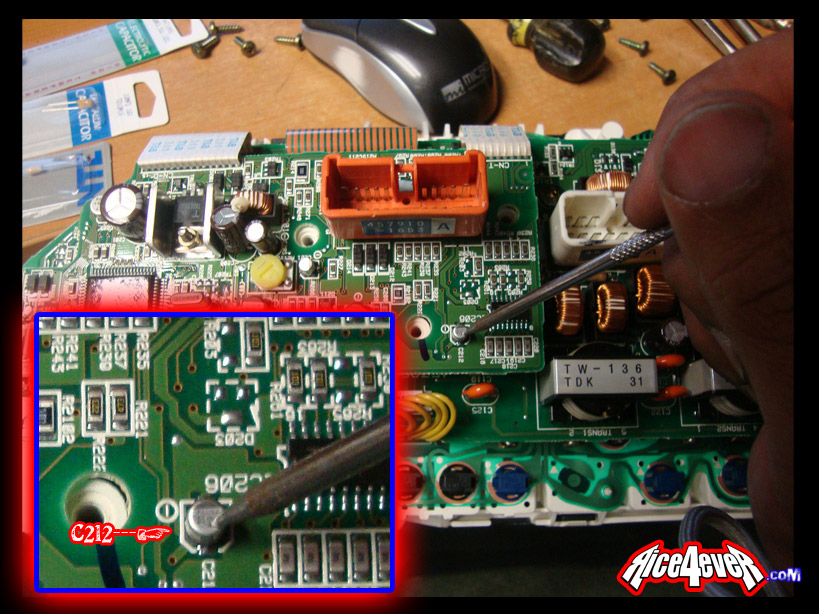
Here is my cluster. I just took it out and I'am ready to get to work! The whole job took me 12-15 mins, but I was a technician for like 15 years so please take your time!
Back of the cluster. take the white plastic cover off. It is held together with 10 or so screws!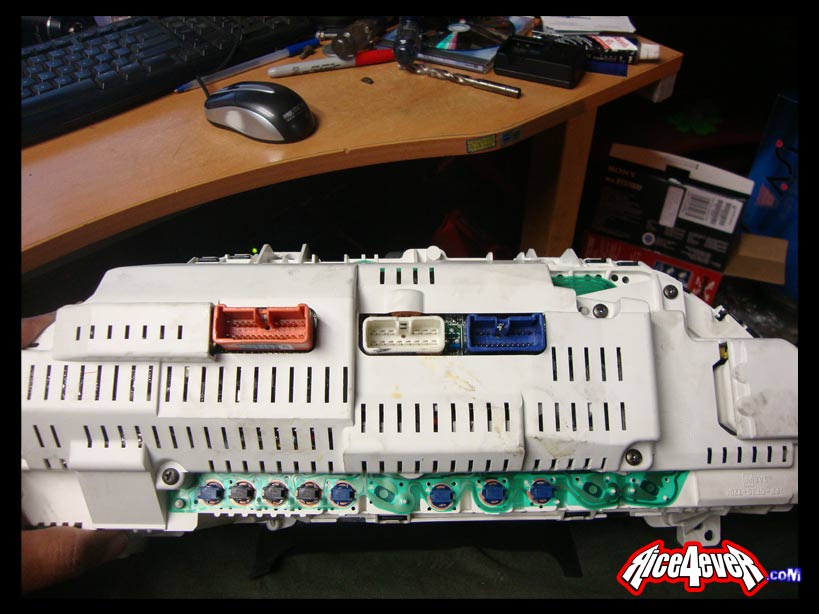
I bought these capacitors from Frys electronics. If you don't have a Frys near you then hop your !Removed! on www.Frys.com and order them by the part numbers provided below!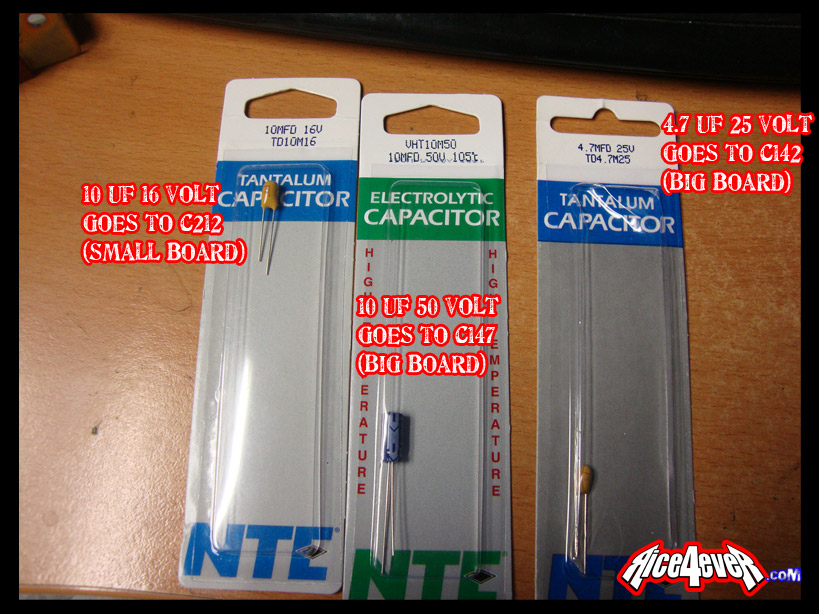
The labels with prices and part numbers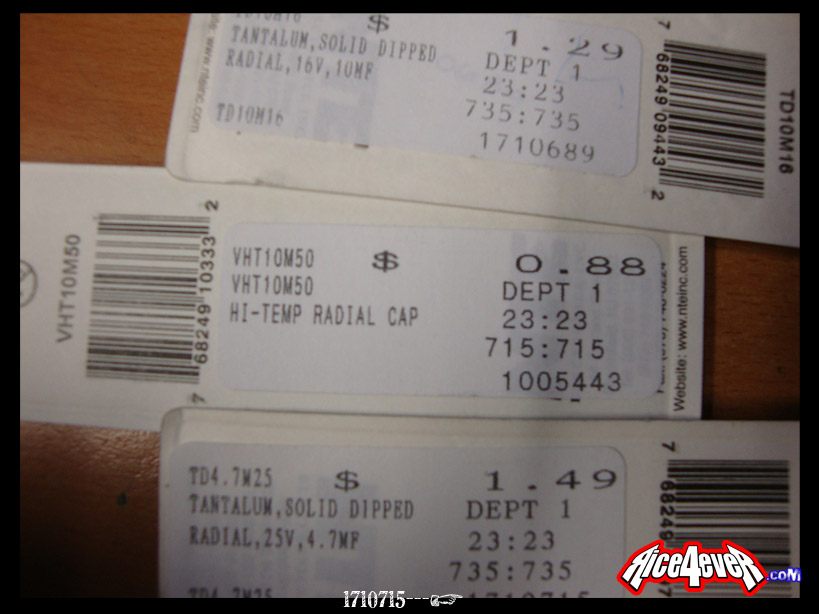
Unsolder (from the top side) capacitor from c212 that is located on the small board and replace with a 10 uf (10mfd) 16 volt capacitor.
Do the same for c142 and c147 located on the big board! C142 is to be replaced with new capacitor 4.7 Uf 25 volt and c147 is to be replaced with 10uf 50 volt.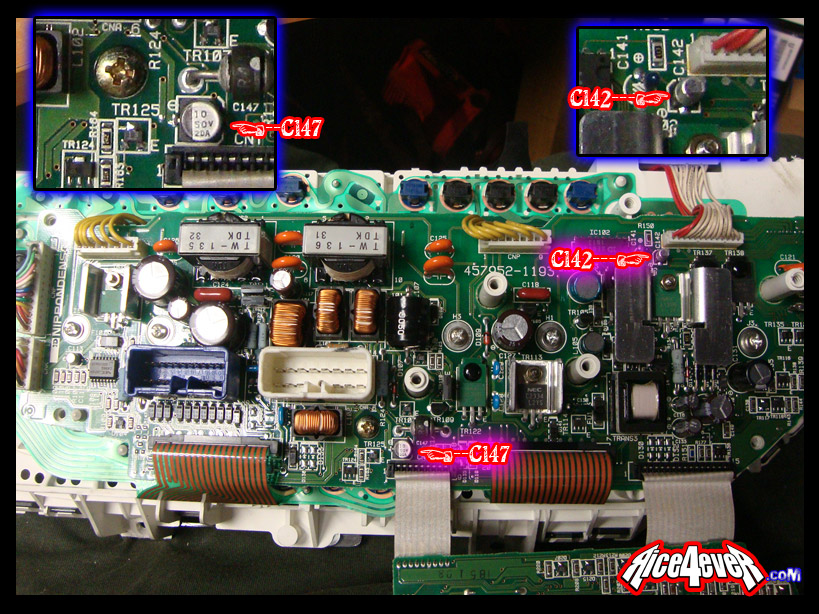
This capacitor is super small: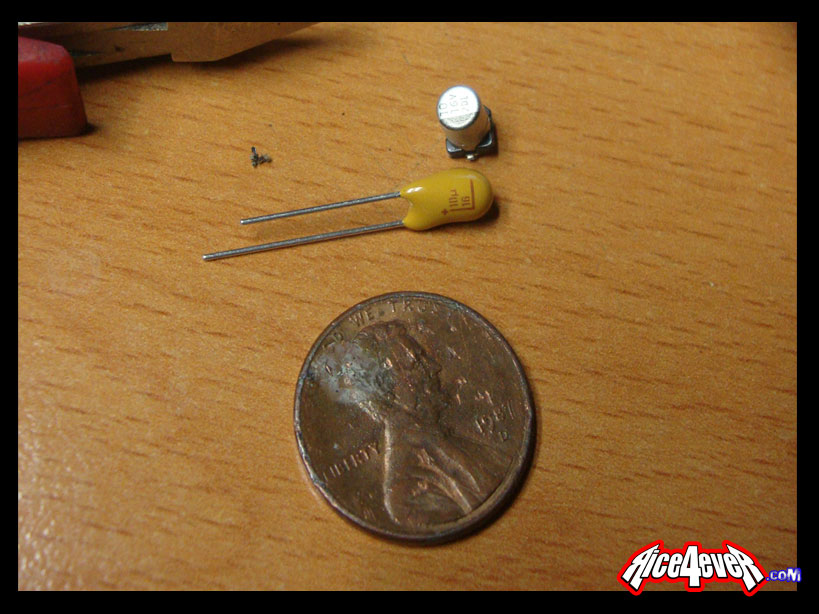
Bend and cut the legs into feet like the one below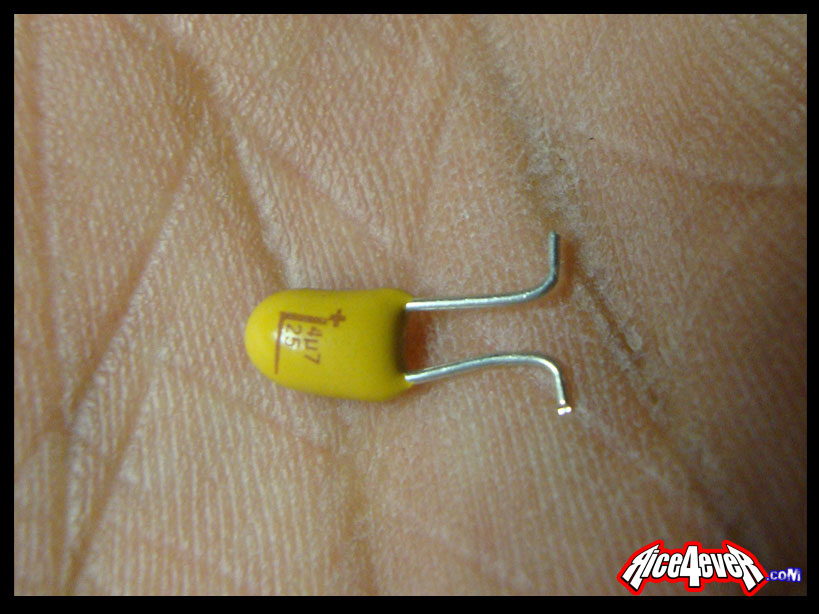
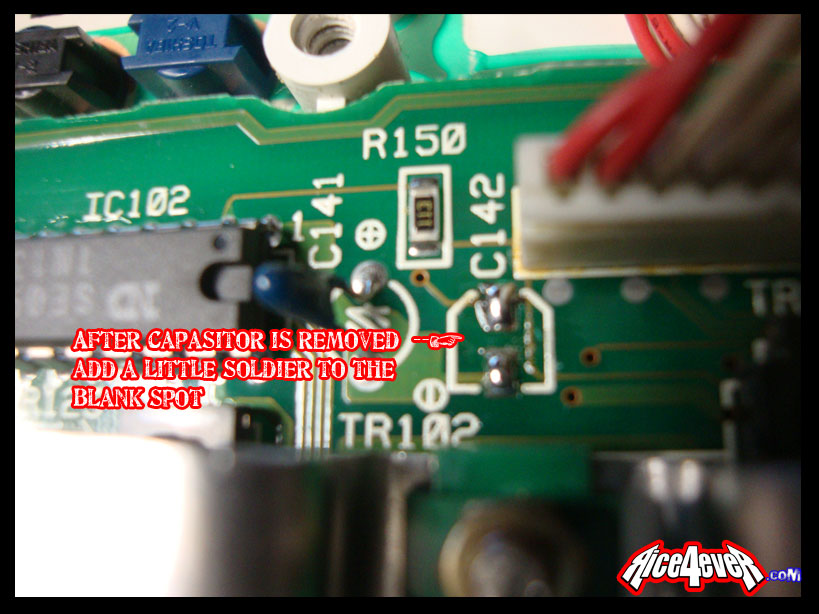
Now, solder on the new capacitor, but don't burn yourself with the iron!
Like the picture below says, I screwed up and ripped off the copper lead by rushing, so I took a probe and scratched the green coating off the board so that I could have a new spot to solder. Take your time, because the copper leads are fragile. You do not want to make this mistake.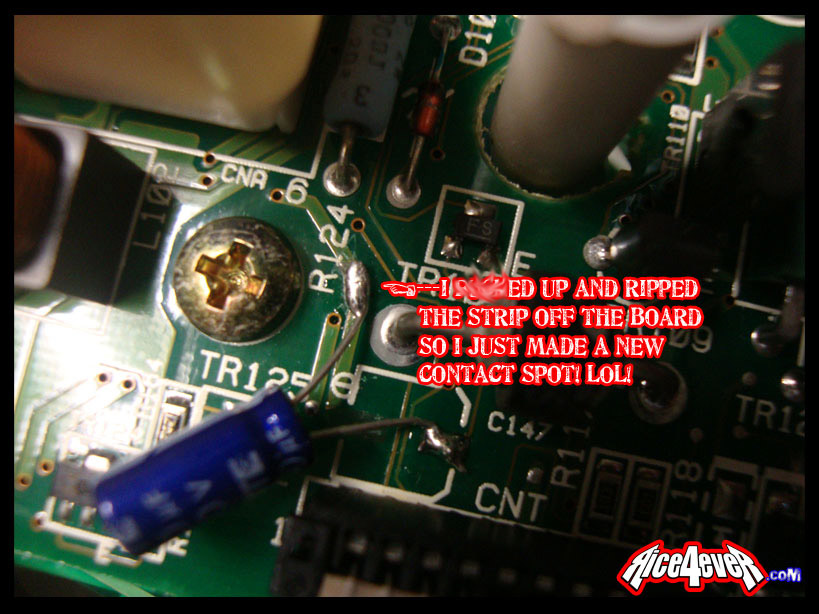
Looks great and doesn't flicker anymore, cold or hot! I hope I don't make the dudes that charge hella money on eBay mad.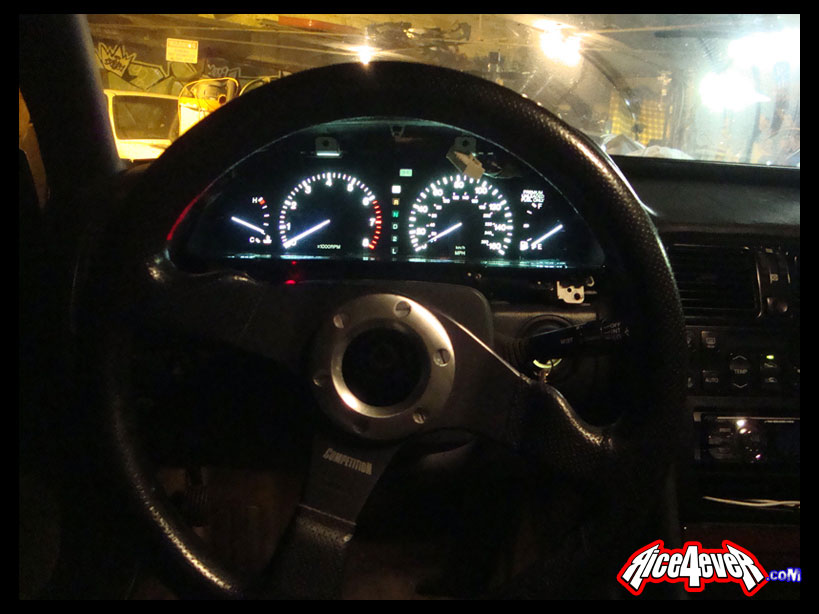
As always I had a blast teaching you something new!
Thank you for reading!
Rice
------
Source:
Part 1:
https://www.clublexus.com/forums/ls-1st-and-2nd-gen-1990-2000/514164-easy-93-94-ls400-3-00-cluster-flicker-and-gas-needle-fix-6.html#post8949589
Part 2:
https://www.clublexus.com/forums/ls-1st-and-2nd-gen-1990-2000/514164-easy-93-94-ls400-3-00-cluster-flicker-and-gas-needle-fix-7.html#post8949597
Part 3:
https://www.clublexus.com/forums/ls-1st-and-2nd-gen-1990-2000/514164-easy-93-94-ls400-3-00-cluster-flicker-and-gas-needle-fix-7.html#post8949601 -
Hello toothguy57,
It is possible. Check out this tutorial from LexLS:
http://www.lexls.com/tutorials/body/trailerhitch.html
The parts needed are linked in the tutorial and will cost around $110. I cannot vouch for myself, but it worked very well for him.
Note that you will need to modify some of the car's parts and perform electrical work. A few pieces, such as the lower bumper trim, were modified in the tutorial but could just be left off of the car instead (gives the option to revert to a stock appearance). I would recommend applying tape before cutting surfaces, such as the painted bumper, to prevent peeling or excessive damage.
If you're going to be towing very heavy items (like a boat), you may also want to consider a transmission cooler. I don't know of any details regarding the installation for that, but there may be resources around. -
Ah, okay. I was confused by the images and thought the car was still damaged.
After conducting further research, sites such as Kelley Blue Book value the car at around $4k in 'Good condition,' while an appraisal for a GS Sport design model in 'Very Good condition' is valued near $4.5k.
Considering you had the repairs completed and that the job looks like it was done very well, $5k does not sound like a bad asking price. However, I would be hesitant to go below $4k, because basic maintenance (fluids and filters) is relatively inexpensive and the car has low miles. If you list it for $5k or sell it this weekend, you could try to get the buyer to meet you in the middle at $4.5k, while keeping $4k as your lowest price. -
Sorry to hear about the accident; hope everyone was okay. I'm not as familiar with the GS models, but I thought I would chime in.
I don't know if there are options that are listed to come with the Sports design model, but it would be helpful if you listed what the car is equipped with (optional alloys, leather seats, heated seats, Mark Levinson stereo system, rear spoiler, etc?). Also, how rare is the Sports design model? What makes it different from a regular GS 300?
The biggest problem that you have is the front end damage. If someone wants to fix the car, they need to replace at least the front bumper, front bumper trim, hood, and grille. If the damage is bad enough, the radiator fans, radiator, and the radiator core support need to be replaced too. Does the car still drive without overheating?
Do you have a picture of the front of the car with the hood open? If the core support is damaged, it could be tough to get beyond $3500 - $4000 for the car, because repairs could be at least $2k-$3k to weld a new support in, replace all of the parts, and blend the paint. -
Excellent. Glad to hear you found the culprit.
That's very low miles for a Celsior - good find. Keep us posted on your progress. -
Okay. If there is no fuel pressure measured, go ahead and check the electronic fuel injection (EFI) fuse and relay in the engine bay fuse box:

Here is a diagram of the fuse and relay locations in that box. Note that this diagram is also on the underside of the fuse box cover, which can be removed by unscrewing the two screws that hold it in.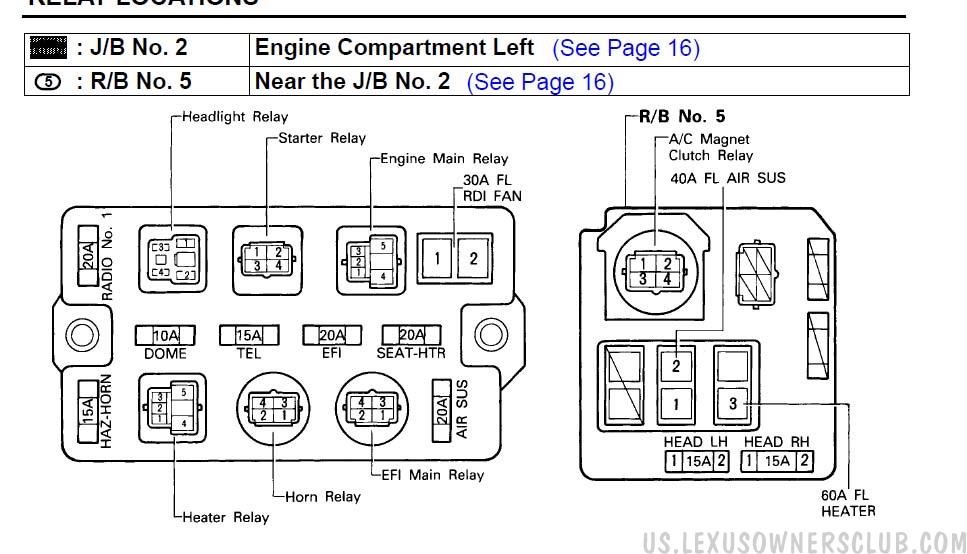
If these are good, go ahead and check the wiring that leads to the fuel pump. Here is an electrical diagram for the fuel pump system:
See ChrisFix's video that I posted for reference on how to do these troubleshooting procedures if you are not sure.. There are also plenty of resources online for relay, fuse, and wiring testing. -
Hi Moarpower,
Did you check for fuel pressure? There are a few steps you can take to determine if there is a problem with the wiring, relays, or the fuel pump itself.
See this if you don't know how to check for fuel pressure: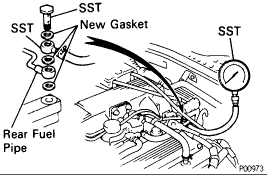
PROCEDURE

1. Verify the battery voltage is above 12 volts.
2. Disconnect negative (-) terminal cable from the battery.
CAUTION: Work must be started after 90 seconds from the time the ignition switch is turned to the LOCK position and the negative (-) terminal cable is disconnected from the battery.

3. Remove the union bolt holding the left hand delivery pipe to the rear fuel pipe. Remove the 2 gaskets.
CAUTION: Put a shop towel under the delivery pipe. Slowly loosen the union bolt.

4. Install the rear fuel pipe and pressure gauge to the left hand delivery pipe with 3 new gaskets and the union bolt. (SST 09268-45012)
Here are some useful videos for you: -
Even if the belt is fine, I would replace the timing belt on any LS 400 that is 1995 or newer. Despite the low mileage, the rubber is 21 years old on that car.
1990-1994 LS 400s had non-interference engines, while 1995+ LS cars have interference engines. This means that if the belt breaks on a 1995+, the pistons could smash the valves in the engine... This would cost a lot more than just taking care of the belt and pulleys.
If you have a shop do vehicle maintenance for you, see if you could get the seller to lower the price so you can pay for the job. You might as well consider replacing the water pump too while you're doing the belt, because it's a pain to tear down the engine multiple times. -
I had the same problem on my 1991. It is more than likely that the needle is loose and needs to be reconnected to the motor unit it is a part of.
The repair a delicate procedure, but it is doable. Take a look at my post here, where I explain a fix for this condition. This is specifically where the needle sits below the 0 marker when the engine is off.
If your needle does not sit below zero when the cluster is on or off (with the engine off), this solution may or may not work. If you attempt this procedure, take your time and make sure to keep the gauge cluster surface clean of oils, etc. -
Your car is in museum condition. I hope it goes to a good home that takes care of it as well as you and your wife did since new. I wonder if the Toyota USA museum would be interested... Good luck with the sale.
-
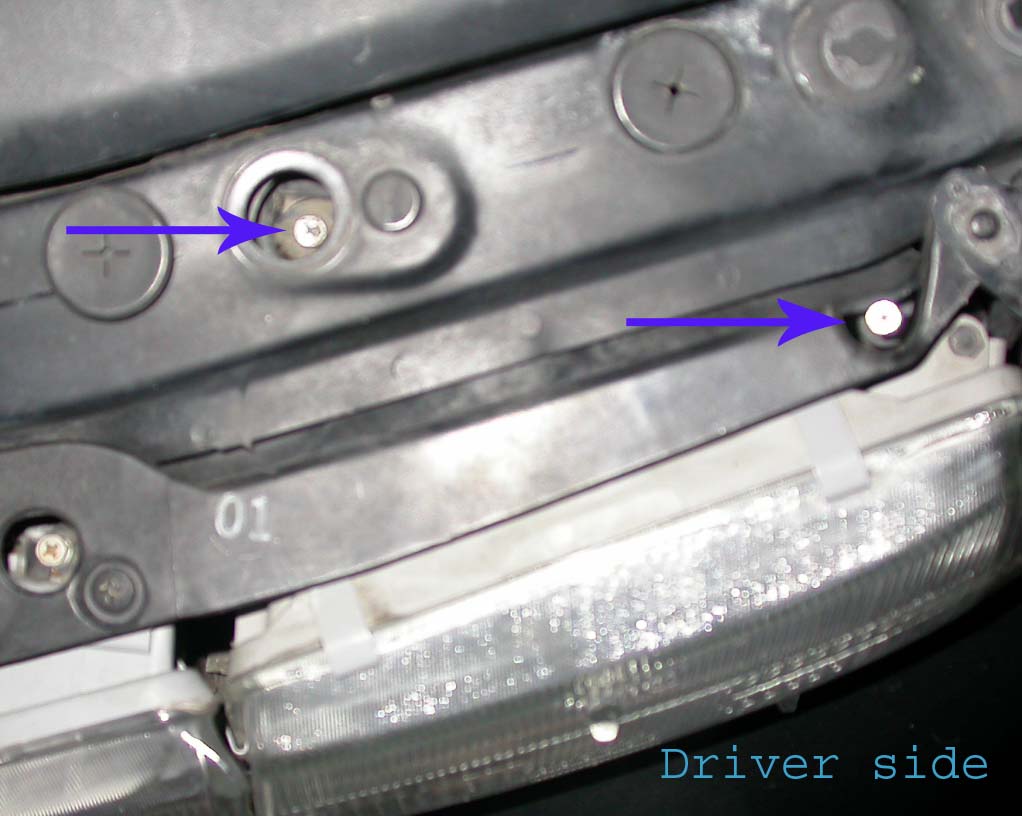
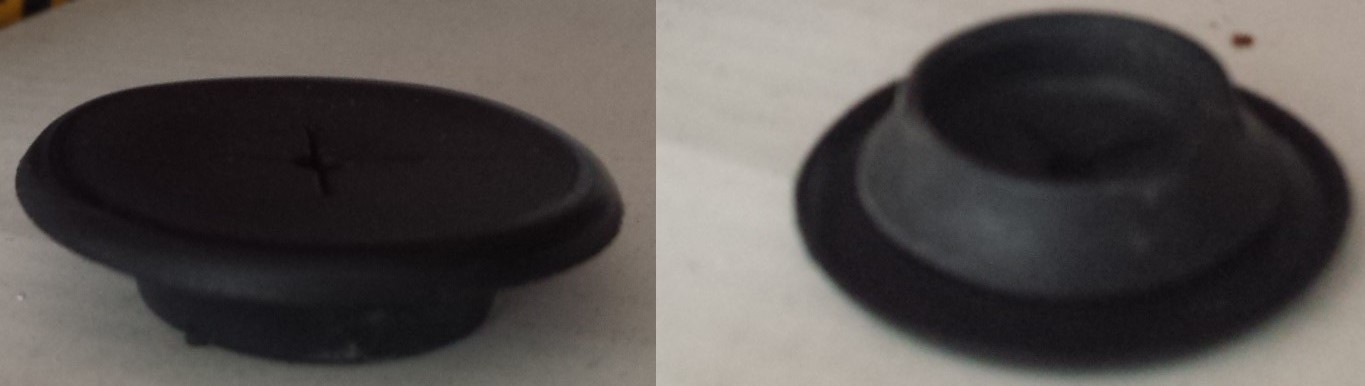
I went back to do the headlight alignment again. Here are some useful details for any UCF10/11 1990-1994 owners attempting this job:
To adjust the horizontal aiming of your headlight, remove the radiator core support hole plug, which will expose the A-bolt (see below diagram):
The hole plug in the radiator core support looks like this: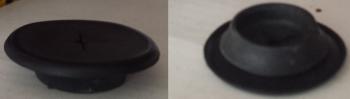
To remove this plug, simply slide your fingers under the outer edge, squeeze it slightly, and pull upward.
Once this is removed, you will see the horizontal adjustment screw (A-bolt) for your headlight:
Turning the A-bolt clockwise or counterclockwise will adjust the beam left or right.
[I did not notice a change in the beam pattern when I turned the A-bolt. If notice which way the light moves when the screw is turned clockwise, please reply to this post]
The B-bolt adjust the height of the headlight aiming. Turning the B-bolt clockwise will move the entire headlight and the beam upward, and turning the bolt counterclockwise will move the headlight down.
NOTE: It will take several turns in order to begin to notice a difference in beam pattern aiming and/or actual movement in the lens. If you don't see any changes after about 10 or more turns of your screwdriver, the adjustment gear might be stuck or broken. You can keep trying to turn it, to see if it changes. Do not rush the process, or you may strip the gears. You may hear some slight rubbing when rotating the B-bolt. -
On 4/3/2017 at 5:47 PM, Spartan0536 said:
I adjusted my headlights like this and it worked as you described, it looks like it only moves the bulb inside.
To properly adjust my headlights I did the 5 - 15 adjust method...
Adjust your headlights to have a level beam pattern at 5 feet, then adjust again using a flat matte backdrop (black or white, some people say one is better than the other) you finalize your vertical pattern and horizontal pattern to angle the beam at the center of the car.Hi again Spartan,
Just curious, did you have to turn the adjustment screw a lot to notice a difference in the horizontal beam aiming when you did your headlight alignment? I'm not sure if I'm seeing any difference in the headlight aiming, as I turn the screw clockwise or counterclockwise. Maybe it's already maxxed out in one direction and I can't move it anymore(?).
Also, did you notice if turning the adjustment screw clockwise moved the headlight left or right? This question is not as important as the previous one, but any help is appreciated!
-
I usually average around 19-20 MPG in my 1991. This is from approximately 40% city, 60% highway driving.
-
On 1/30/2012 at 10:38 AM, Scott183 said:
I know this topic is a few years old, but I found it on a Google search because I am another 1:1,000,000. The bigger problem is the car belongs to our customer (94 ES300). We did an intake gasket this past Friday. Vehicle came in with a working legit odometer (thankfully the tech recorded it before working on it, we also have service records that varify), the problem was not noticed until the customer picked up the car. When she called on the phone, I was convinced she had it on the trip setting. She brought the car back and we varified it had reset to 0. I figured maybe the lcd had partially burned, until she hit 100+ miles this weekend and all three digits have kept recording properly. We can only chalk this up to the battery disconnect during the intake job. Now I'm scrambling trying to find a fix. If anyone knows of a fix, please pass it along. Thanks, Scott
Here is a DIY fix that was also posted on the Club Lexus forum at some point in time.
Note to all readers: It is ILLEGAL to alter the mileage on your odometer to reflect differently than the actual mileage on your vehicle without disclosing this information. I nor the creator of this video take responsibility for any consequences as a result of your actions. If you are performing this DIY, it should be to set the mileage to match that of your vehicle, should the original be lost or if the cluster is swapped with another.Full documentation here: https://www.clublexus.com/forums/es-1st-to-4th-gen-1990-2006/740730-diy-odometer-reprogramming.html
-
Wow, thank you very much for all of the information, Spartan0536! I did not know those details about halogen bulb illumination. I'm sure this is going to help plenty of other owners with different setups, too.
I hope to get the chance to do the headlight alignment on my car soon.. -
Hi Squirralien,
Here is a fix for the airbag light. It's simple and just requires jumper wires.
As for your cluster, only 1993-1994 clusters are compatible. I don't know of any swaps from other model years.-
1
-
-
Hello,
I have been searching online recently for more details about the headlight alignment procedure, as I would like to check and re-align the headlights on my 1991 LS 400. However, I have been quite confused by the results and would like some more clarification about the process.
As described in the shop diagram image I attached, the A-bolt is for horizontal adjustment, and the B-bolt is for vertical adjustment. Do both of these bolts move the actual headlight lens or just the bulb inside? What I mean by this is, when you turn the A-bolt, can you see a visible change in the headlight moving left or right (with the lights off), and when you turn the B-bolt, can you see the headlight itself moving up or down?
Of course, I will be aligning the lights based off of where the beams are hitting a wall, opposite the front of the car, but I don't want to make the lenses look crooked as a result.
Also, when removing the rubber cover on the radiator support for the A-bolt, I'm assuming you can pull it from the top using your fingers(?).
Any clarification on this subject would be much appreciated. Thanks!
Note, the second picture of the actual headlight is from this thread.


Leather seats rips ( grey)
in 90 - 00 Lexus LS400
Posted
If you're looking for OEM replacements, this is the cheapest set of leather seat covers available that I could find, which also look just like OEM. They were made using another owner's 1993-1994 seat covers as a template, so they are intended to fit like factory.
https://www.lseat.com/products/1990-1994-lexus-ls400-ucf10-custom-real-leather-seat-covers-front.html
Installation will need to be done on your own, of course.