


ait109
-
Posts
8 -
Joined
-
Last visited
Content Type
Profiles
Forums
Events
Gallery
Store
Articles
Videos
News & Articles
Posts posted by ait109
-
-
A couple of different threads on this in the past, but no one has figured out what the problem is. Replacing the control switch on the dash doesn't fix this. I had no control of my right mirror and my driver mirror would only go left/right when pressing up/down. I had this problem for several months and recently I noticed that the mirrors were magically working again.
Good luck.
Ed
The passenger window has no problem working, it will adjust up and down when I reverse and I can still adjust it from the control but the drivers side has completely stopped working, I have to roll the window down to adjust it. Any ideas as to what the problem could be and how to fix it?
-
i have to replace the CV Boots too, is it a big hassel? i've heard that the brakes have to be taken off, this and that has to be taken apart in order to put the boots in, is it true?
My garage said it was cheaper to replace the front axles than it would have been to replace the boots.
-
2000 LX470 with 110K. Has never left me stranded. But did recently spend several thousand dollars at my indy shop (whom I trust) to do 90+105 k service (timing belt water pump), replace front axle, fix power steering leak, replace leaking shocks and other misc maintenance items. Also spent time to replace steering column lock assembly when it broke in my driveway.
Only outstanding issues are an exhaust manifold leak and side view mirrors that I can't seem to adjust anymore.
-
Which "cup holders" are you referring to: The ones under the woodgrain flip up lid that are at the same level as the shift gate or the ones under the padded center console storage lid?
The former should have rubber flaps that are connected to arms that can swivel.
The latter is useless and is sitting in my garage somewhere.
Ed
Hello everyone. New to the forum - but more importantly - a new Lexus owner. Just purchased a cherry 02 LX470. One detractor is the ENORMOUS cup holders. If I bought a Big Gulp every morning it would be OK - but I just use a standard sized tumbler from home. I've already spilled. Thoughts, suggestions and comments welcome. Thanks!!Are there not adjustable arms in the center divider that swing out to hug the mug? Mine are that way.
Ahh.....Nope. Just 2 'holes'. Regular sized cans, drinks, etc. fly around and spill. Sounds like I need to find the adjustable arms. Ideas?
-
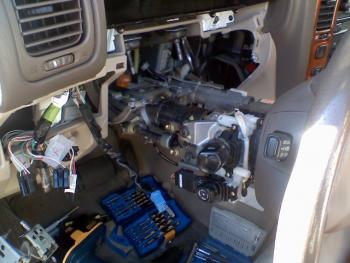
I just completed this job and want to say that this post was pretty darn helpful. Here are some additional tips to make this go smoothly.
You will need 10mm and 12 mm socket for most of the bolts. You will need a deep 14 mm socket to drop the steering column (more on this later).
Slide the power seat all the way to the back to give yourself room before you disconnect the battery.
- Part numbers are same at Toyota and Lexus dealers.Braket assembly/Steering Column Lock Assy: 45280-60510
If you prefer OEM Steering Lock Bolt: 45897-12020 (qty. 2)
Aftermarket Cap Screw Bolt (Allen head on it) M8 X 1.00 X 20mm (qty. 2)
I picked up the SCLA from the local Toyata dealer who had a 25% off parts coupon. It ended up being cheaper than the lowest internet dealer that I could find. I bought the 2 cap screw bolts from Home Depot.
To replace you'll need to remove the black snap-on panel below speedometer then remove the screws securing the dash panel below the steering wheel. Behind the dash panel is a steel plate.Be sure to remove the 4 screws holding in the hood release and fuel door release handles - lift the handles and you will see them. That will allow you to completely remove the plastic panel.
Behind the plastic panel is a steel panel that needs to be removed (4 x 12mm) and then you will see the steel plate attached to the bottom the steering column.
Remove that and remove the steering column covers by turning the steering wheel to access the screws. You'll see that the SCLA is secured by 2 break-away bolts.Remove the black plastic duct that runs underneath the steering column. There is a single screw that holds it in place, remove the screw then wiggle the duct out.
You do not need any special angle drills nor do you have to remove the entire steering column. Simply drop it. This is very easy and will save you a lot of trouble. Take a look at the base of the steering column and turn the steering wheel so that the u-joint at the bottom is positioned such that the column can pivot straight down. Then remove the 4 nuts holding the steering column up (using the deep 14mm socket). The steering column will then pivot on the U-joint with the steering wheel resting on the drivers seat. I was then easily able to use a regular cordless drill and regular length bits on the bolts.
 Use a straight awl to make a dimple in the 2 bolts and then drill it out starting with a small drill 5/32” then 3/16” then 7/32” about a ¼ “ deep or a bit more till the head of the breakaway bolt snaps off…allowing the SCLA to be removed.
Before drilling, note that there is another bolt on the top of the SCLA. Note how it is all the way in and flush. The bolt is actually a pin that aligns the various parts of the steering column and lock assembly. You will need to make sure that it goes back in flush.
Also note that you will be creating a lot of little metal shavings. These shavings can interfere or damage other gears that are in the column. Do what you can to keep the shavings out of the other areas.
Make sure your drill bits are nice and sharp, and you will be able to drill out the two bolts pretty quickly. When I felt that I had drilled enough, I inserted a screwdriver into the drilled out bolt and used a hammer to tap on it until the bolt head broke and the SCLA dislodged.
Remove the broken SCLA and remove the ignition switch & key fob electronics; Ignition Cylinder (this comes off with the key in ACC position and pushing down on a pin on the casing and pulling the cylinder out); and install into new SCLA.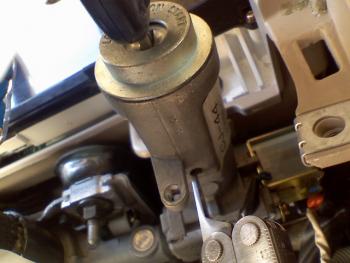
When removing the electronics on the REAR of the SCLA, note that it is keyed and can only go back on if the ignition is turned just right. The same goes for the key cylinder. Insert a pair of needle nose pliers into the SCLA to turn the blade to the position that is required. HOWEVER, be aware that if the position is off by 180 degrees, then the SCLA will lock at the wrong time - that is that the steering column will not lock when the ignition is off and WILL lock when the ignition is on. I found this out later.
Attaching the new SCLA was the most frustrating part. The thingy that the SCLA bolts up to has some springs in it that push it away from the steering column, putting it just out of reach of the 20mm bolts. I wonder if slightly longer bolts (25mm?) might have been easier to use. Also keep in mind the alignment of steering column for the bolt on the top of the SCLA as well.
Put the steering column back on, reattach the battery and start her up. Turn the steering wheel to opposite ends to check that it doesn't catch/lock when the ignition is on. Drive around the block a few times to be sure. If the steering wheel does lock when it is not supposed to then you need to turn the blade in SCLA by 180 degrees. It is a tight fit, but you can do this without dropping the steering column. Remove the electronics from the rear of the SCLA and remove the key cylinder. Use your needle nose pliers to reach into the SCLA and turn the blade 180 degrees, then put everything back together. Take it for another test drive to verify that the locking mechanism is working properly.
If all is good, then close up the patient and go get a beer.
It took me about 4 to 5 hours total. That includes a lot of time trying to figure out the best way to reach the bolts, trying to get the new SCLA back on, and figuring out the reversed column lock situation. But knowing what I know now, the job should take about half of that time.
And from now on, make sure you turn the steering wheel to relieve any pressure off the steering wheel lock before turning the ignition.
-
Yeah... I'd like to know if it's an easy install too.... mine is curved, loose, black with grease that will not stop, and just plain sloppy....
If anyone finds a good deal on eBay or other online stores.... I'd like to change mine out
My wife found a antenna on ebay (36 dollars), it even came with easy to follow instructions.
I had to replace the antenna mast a few years ago. I also went the ebay route and it was extremely easy. Basically unscrew the ring on top, extend and then pull the old antenna mast out, stick the new one in, done.
Ed
-
Hi, I have an 07 lx470, lately the antanae won't retract all the way in. An suggestions before I take it in for service? thx.
The Antenna mast can be removed by unscrewing the locking ring on top. Pull the antenna mast out and you will likely find that the long plastic thingy with the teeth on it has broken.
I bought a replacement mast on ebay and followed the instructions to install it. Easy.
Note that I couldn't figure out how to remove and disassemble the entire power antenna unit in order to find and remove the broken plastic piece so it is probably still inside. But this was a few years ago and I have had no problems since.
Ed


Right Front Wheel Speed Sensor
in 98 - 07 Lexus LX470
Posted
Your height control sensor might be loose or detached. When the vehicle is parked at a stop does one end of the truck higher than the other? One time I ran over debris on the highway and my truck started to get very bouncy. I took it to the dealer and they said that the debris knocked the sensor loose. They reattached it and it was aok.