

BoaR
-
Posts
130 -
Joined
-
Last visited
Content Type
Profiles
Forums
Events
Gallery
Store
Articles
Videos
News & Articles
Everything posted by BoaR
-
Xm Splice (hardwire) Into Oem System Casette Deck
BoaR replied to BoaR's topic in Audio / Video / Electronics Forums
Phew ! Got it :D Thats what it was in the end. Ground loop fault, meaning that you would get a loud incredibly annoying hum/buzz soon as you connect the stereo jack output to the unit. The solution was to get a ground loop isolator. a sort of little box that goes =|box|= and the two lines coming out are RCA jacks. you just plug everything together like --xm output wire--> =|ground loop protection box|= --> modified stereo (the capacitors etc..) That being said, if I ever have to do this again I will save about 40 bucks in extentions and connectors (chalk it up to the cost of future knowledge this time), instead of soldering a 1.8mm stereo jack as the other end of the capacitor modified wires (originally it goes capacitors -> stereo jack plug) I would just take the wires and do 1 wire left & right (like normal) directly into each their own FEMALE RCA plugs. why female? the ground loop isolator has male male pins out both ends. so it would be super easy to just plug in after eliminating 2 extra connectors. Also your system will need this part anyways even if you want to swap out the xm to ipod etc.. But it's always 2 steps forward in hindsight eh? haha ------------------------ So if you want to do this project, follow the steps above. Also I strongly suggest just doing the capacitor mod with female rca plugs at the end instead of the stereo jack. as the output is 2 male rca's that you can just Y back with a 5 buck extention into a stereo jack to play anything. (xm, ipod, mp3 etc) Hope this helps everyone. Thanks Jim for the links that made this possible ! B) -
Xm Splice (hardwire) Into Oem System Casette Deck
BoaR replied to BoaR's topic in Audio / Video / Electronics Forums
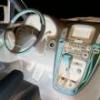
Well, The project is nearing the end. Long long road (if you are even thinking about attempting this - start early in the damn morning, because you WILL finish very late at night). I need to tweak the system a bit to get rid of a hum (I'm thinking its a ground loop fault.) but in general everything is working. Few tips if you are planning to start this. -> Yes it works, and is possible, you just need a nice day (garage) and lots of time. -> multimeter (voltmeter) life saver. beg borrow or steal one. you WILL need this. -> HOT soldering iron with very fine tip. dont think of using a *BLEEP*ty one that cant get hot enough. 400deg+ is required for clean precise soldering. If you screw up in the radio you just blew everything. the board circuitry is tiny and needs you to pay great attention. some fine nose pliers might help you out too if you have chubby fingers. watch that you dont blob on the solder and accidently jump the circuit paths. Also I put some tape over and around the connections (thin strips) to make sure they dont touch anything. BE GENTLE. -> Big blocks of wood to jam and lock the wheels. depending on your year of car, the key might need to be Acc/ON to move the shifter into neutral etc. very dangerous as the car can/will roll. block lock the wheels and feel a bit safer. mine is a '95 and it required the key turned to move the shifter. -> good lighting. annoying as hell reaching around in the guys of the stereo hole. (I used a hang garage light, opened the moonroof and hung it up there.) -> PRINT the link above. for the SC radio capacitor thread. don't be an idiot like me down in a garage needing to google up the thread on a cell phone. -> PRINT a googled stereo jack wiring/diagram. how to wire in the ground etc.. or at least read all about it before. -> PRINT a googled radio console removal for your year of car. there is 1 site that always comes up in google that is good. -> get multi guages of wire. I prefer solid core, but stranded is fine. you need a heaver guage to extend your cig lighter socket. and smaller guage to do the stereo jack plug. -> get spare 15A CAR fuses in advance. (3-4 minimum). I blew 2 in testing the 12v circuit. end of wires touched because I was not carefull and insta-blew the fuse under the steering wheel. It's the radio blue fuse that goes. -> Get spare 2A 250v glass tube fuses (come in packs of 3 in the hardware department of canadian tire and cost $1.50). These are for the stupid cig adapter that comes with the XM radio. (the one that will convert 12v to 5v for the unit. The fuse is a piece of *BLEEP*, replace it right away. unscrew the end, flathead to muscle the 2 halves apart, and you can see where to pop the fuse. DONT LOSE THE SPRING when unscrewing it. My fuse in the adapter blew instantly, and caused me an hour of searching why the hell nothing was working. save the headache, pop and replace yours right away. -> When splicing into the capacitors in that other thread. guy mentions blue dots. on my unit there were NO dots. they are soldered like <faceplate> |pin| <back of unit> hard to describe, when you open it you will see instantly follow his images. use the pin facing the rear of the radio. leave the one near the front UNtouched. and yes you need the capacitors dont rip them out. -> dollerama VELCRO sticky backing circles, strips. this will save you TONS of time with the antenna, wire hiding etc. Get some electrical tape while you are there and some small zip ties. grab a garbage cassette adapter to destroy while you are here. Overall that is the heads up so you dont have to go running out halfway through cuz something broke. The most annoying problem I had was the 12V rewiring electrical problems. After doing your extention, I strongly suggest testing to make sure you have 12v coming out. (on my adapter it was the blue/white wires supplying the power out. but TEST your's first before snipping etc.. its hell on earth to snip, trim, solder, getting my cig lighter moved to under the cubby to hide all the connectors and wires, especially after you do it all you find out the 12v isnt even getting to your new outlet. the antenna was velcro'd to the 3rd brake light INSIDE the car. our windows are so angled back that its far out. glass doesnt affect it, seems perfect as it is. You need to place a gutted casette in the player, hit tape and then your stereo wired in plug is activated. (else you will play double sound). I need to still solve the hum ground problem (im almost positive its that) and will post up more details once that is done. project was a big one, but im happy its nearly done and is working "in general". as with anything needs some tweaking but hey - thats what long weekends are for eh? ;) -
Xm Splice (hardwire) Into Oem System Casette Deck
BoaR replied to BoaR's topic in Audio / Video / Electronics Forums
Hmm I see what you mean thats true.. I guess I'll be hooking into the capasitors after all lol. The casette drive doesnt make noise on mine.. maybe your's is just totally finished. (you play lots of mixed tapes? lol) Thanks for the ideas guys, if anyone has more please post them up. :) -
Xm Splice (hardwire) Into Oem System Casette Deck
BoaR replied to BoaR's topic in Audio / Video / Electronics Forums
Thats pretty much exactly the style of thing I was looking for, thanks ! It gives me an idea of just how much trouble this will be to pull off. Should be fine :P if you happen to land on anymore info anyone please post it up. :) EDIT: hmmm reading everything over again makes me think... If the setup is going something like |casette| -> |processing| -> |capacitors| -> |AMP| then instead of inserting the 2 wires(*) inside the unit here: |casette| -> |processing| -> |*capacitors*| -> |AMP| then why not just run them directly to just before the amp, or insert them directly at the amp level here |casette| -> |processing| -> |capacitors| -> |**AMP| as it is pretty much the same thing... only thing would be to find out on the amp pinout which is the casette IN pin numbers and see if I can put it directly there. what do you think ? -
Bit of help if you can guys. I was trolling through both forums for more info and managed to figure out what the hell im up against here. Long story short I have a xm module, the antenna/power hardwire is easy to figure out. What I wanted to do is pop opened the center dash radio unit, use something like the out AUX RCA home kit wires they give you for the unit (its sort of a 2.5mm to red/white rca adapter) to snip the rca plugs off the end and hardwire splice them directly into the area that would normally feed the casette adapter. In my head this would be working something like: XM radio -> output wire -> rca ends snipped -> fed to snipped casette wires (soldered together) IN the dash -> making the car think that the signal when you push the casette button is coming from the "casette" in the slot. Think this would work ? or am i overlooking something totally obvious? If the deck wiring is a bit much you think I could find the pinout to the amp, and splice the out of the xm radio unit directly to the "imput" of the casette there? All in all the goal would be keeping everything as OEM looking as possible, no aftermarket showing, and allowing the cd and xm to be used. hardwired obviously for best quality. Thanks for a quick brainstorming, as I plan to start working on this saturday :)
-
When I was shopping around up here (canada) , I saw a few 92-95's that had 410k on them. The cars were a bit beat up but overall more than drivable (we are talking some rust here and there, a few dings, torn seats etc....) the owners were slacking majorly on upkeep but meh their car not mine. Besides the engine trouble the 92's were having that eventually needs to be replaced, overall they will last a long time. hehe just look at any civic from the same year, wait thats right you cant cuz they have all fallen apart :P
-
They tried this on mythbusters btw... and being fed from a storage tank directly the engine couldnt run :P It's just not possible yet without adding thousands of dollars from the ground up. As for water it doesnt produce an "explosion" alone to make the pistons turn, so thats out too. hehe All in all nothing they say that just bolts onto your car will give you the OMG 100000000 miles to the gallon everyone claims it will. and even if it did actually up your milage by 1 or 2, whats the point ? you are wasting more time trying to get that 1-2mpg more than it would take you to pay the 2 bucks and forget about it. There are some cars (army) being tested to run directly on combustable gas, but regular cars will never, for the time being, be seen with that due to accidents and a big "boom" ;)
-
yes yes yesyesyesyesye.... I rather not take any chances seeing as its a quick 2 second to do, not to muck up my deploy airbag light.
-
One day I hope to live in a city where people dont take/break stuff like yours :( mirrors, antenna's, logo's are constantly being messed with here. my friends saab had his little roof shark fin busted off just last week *sigh* and as for the static thing, ahh you used a switchbox. makes sense actually. once you have xm why would you bother with standard fm radio hehe. is your headunit the OEM or a aftermarket though? did you mean this is how you set it up before installing your aftermarket? and that being asked did you use your actualy car antenna to pull the signal? or the little square xm one that is in the kit.... I dont see how you could swap them if its the standard antenna...
-
no supposedly the memory accepts up to 4 different keys. nobody I know actually has 4 keys to test this but the net info says thats what it is. Are the ID's paired to the car? like if one works is the other the same batch or same number? maybe it's just that.
-
I just returned a XM kit i bought yesterday actually. for that reason as a matter of fact. unless you hotplug it into the AUX jack then you'll have static no matter what you do. kinda sucky for those not wanting to add in the ipod kit or mod the oem stereo. another thing is the damn antenna. even with the very strong magnet attaching it to the car, I had (some) little difficulty muscling it right off the top. If someone was determined then off it goes without that much hassle. and that will end up with you rebuying another antenna, undoing your trims again and repassing the wires. bah no thanks not for a simple radio. I'll stick with a mp3 player and the jack ;)
-
Depends on the ID's guys. lexus keys are made so that if you loose them you pay out the nose due to security. if anyone could buy the key off ebay and go open another persons car with it, kinda defeats the purpose no ? your ID needs to match what the car was using originally. thats why its so expensive. Those steps are correct though. so if you have a key to reprogram, it wont hurt anything trying. nothing lost nothing gained type thing. if its not the right ID it just wont work. simple !
-
move steering down, look on the HUD upper black backspaced part, 2 little flip screw covers. pop them down, undo screws, remove frontplate, 4 corner indented screws holding cluster. unscrew those, remove wiring in back, enjoy. remove the neg battery term before starting or your airbag needs to be reset @ dealership for the nice tune of 1k $
-
hmm ok so your model is the same as mine. just the volume knob. on my friends 92 he has no volume knob but a on/off button. I'm kinda stumped, should be working. its a factory alarm though - maybe needs a lexus doctor dealership checkup. anything factory im very hesitant to bring to reg shops (JUST to have "checked" I mean. pay the 35 bucks and have the lexus gents verify the prob you know? ) Cuz its a built in alarm I would do that. as there is really not much you can poke around to see. =/
-
hmm thanks for the pics and info ! I can say the same for vancouver hehe, my cousin lives there and its a wonderful city! I guess I'm going to go yellow then for the contrast, I'll look into some H3 ultra brights for the car. They aren't hard to swap out ?? Imma need to find my manual again !
-
hehe you are over in vancouver no ? I guess closer to the coastline I would have to revise my statement, as there would be mixing air over the mainland. I'm across the flatlands in montreal ^_^ It's all city here heh. we really never have any fog. you think yellow would be nicer with ultra whites? you have a HID kit, and if they are 4.3k's then I know waht they look like. nice lights, are your fogs the factory yellows? or did you swap in some brighter ones? Thanks for the tips ;)
-
'95 es300 before we begin ;) ok so I've swapped out the standard low beams with some ultra whites. They look great and totally give the car a really nice look. (I could have went HID but meh.... not ready for that just yet other more important things to mod the car with) I was playing around with the fogs yesterday and realised they look like crap haha! compared to the new lights ugh... icky looks. not cool I did some checking, and its H3's you need for the car. bon! factory are white, but I know my friends has yellow on his 92.. I really cant decide if I should get a yellow or white kit ! It's mainly for looks, as up here in the great white north we have almost no fog... it happens like once every 3 years we see fog for a hour or so. hehe So I guess the real question is what you guys think will look best on the car? whites? yellows? another color maybe?? also if they are any weird random things that I should know about while swapping the fogs out. Thanks in advance !
-
Front Bumper Replacement On 97 Es300
BoaR replied to Lexus876's topic in 92 - 06 Lexus ES250/300/330
Then it will be hilarious when you bill him for the 2 grand repaint job eh ? I would. friends like that you dont need <_< -
Why Does Everyone Pick On My Poor Lexus...
BoaR replied to BoaR's topic in 92 - 06 Lexus ES250/300/330
Ahhh all the evil things one can do eh ? Makes me warm and fuzzy inside knowing that you all love your cars as much and just hate it when people have no respect ^_^ -
Thats the thing jstnlyrr, The car is not a car that can be souped up like a civic. Parts dont really exist for that - because its a luxury car ! The faster you get that into your head the easier the transition will be. Obviously as with anything, some people that can bend a pipe will be able to whip up some incredible things for -any- sort of car. luxury or not. But understand that they are very few and far between, and they will have very unique cars due to the parts they made themselves. You bought a luxury car, its all about style and class not speed and power. it has some grunt, but dont expect to add a few things and be on par with a 5.0 shelby mustang ! It will never happen. At most from the very few mods you can add on, you will gain max 10hp.... wow! that will bring you from like 188 to 190! omg stop the press! Its not meant for that. just take care of the car, and enjoy the smooth and classy ride. This is waht we are all trying to explain to you. :)
-
to the left of the steering colum, on the panel there is a lock/unlock button for turning the alarm on and off. is that activated? or deactivated rather ? hehe seems silly but I hit my friends by accident the other day while we were working on the car and we were scratching our heads for a bit afterwards ;)
-
dude 330k is nothing to be honest. Ive seen a few in my area running well over 480k purring like kittens... these cars last and last long. Unless its something major that will just run you thousands more than the car actually was bought for, they are totally worth repairing. If for some reason the repair outweighs the cost - part the car out. the parts can easily recoup your costs !
-
Why Does Everyone Pick On My Poor Lexus...
BoaR replied to BoaR's topic in 92 - 06 Lexus ES250/300/330
you know, I'm the type of person that will spend a million dollars just to get back at someone. More to show them the level of person they messed with <_< I like your cement idea... but a bin only? heh Just happens that I work around construction... and a cement mixer backing into his basement window is a very real "accidental" possibility. 6 tons of cement will be quite annoying to jackhammer out... Bah some people eh ? no respect ! -
take it to a lexus dealership. get the quote from the horses mouth first. then someone you trust to see the diff in $$. if its a couple of bucks only - i'de do it at the dealership. rather have lexus people work on my lexus type thing. you get the idea ;)
-
sorry i didnt see your reply. so cables are there, hidden and in bubble wrap only. changer should be left side when opening the trunk a bit behind the wheel fender thing. big square. If it isnt there, time to call up the junkyards for one to plug in !

