

BoaR
-
Posts
130 -
Joined
-
Last visited
Content Type
Profiles
Forums
Events
Gallery
Store
Articles
Videos
News & Articles
Everything posted by BoaR
-
well thats an interesting quote. thanks for the info. I guess the milage was what drove down the settlement price. but its actually not a bad check... still a shame about the car, but congrats on the baby lexus. ;)
-
I'll toss in quick that mkeeney is pretty much right. thats what to look for. if you are "stuck" then find a camry mechanic. the cars are literally the same thing. ;)
-
He meant the sound his car is now making due to having no pipe. not that he "had" vtec... bl2k400, when you say flex pipe do you mean the flange? its like under passenger side front about where their feet would be, looks like a springy mesh accordian type metal flexy piece ? If this is the same thing you are talking about on my old 95 i had it die on me too. because the exaust system was actually made 1 piece the "fix" would cost 1.2k and be replacing the entire front to muffler type thing. The other option was a locally private guy doing flange replacements of sorts. i had rang him up and he said he could make a custom piece that would fit, the only thing i would need to do is cut both ends off the car, remove the old one, and have the new piece welded in its place. that cost was going to be about 280 bucks. hope that helps!
-
so what was ammount written on the final check to you for? it gives a good idea of the ongoing current settlement values :P
-
What a sad way for a car to go. sorry for the loss. but one part i dont understand... his insurance not yours is filing for totaled? though it was yours that had to do that? also he hit you... shouldnt it be that you can demand to your insurance they repair the car? then just charge his? not on the up and up of all the insurance wonders around here. but seems to me your car, not your fault, hes gotta fix all the damage no ? (his insurance etc etc w/e) worst case i guess you can always part it out... im looking for front seatbelts if you do :P
-
97 Es300 Cabin Filter Access Panel
BoaR replied to Enola Straight's topic in 92 - 06 Lexus ES250/300/330
the two "round" type clips near the gas pedal pull straight out about 1/2 an inch then you need to slide the entire thing backwards to "unlock" the front clips. the bar inside behind there, pushthe top pins together then pull straight UP then out towards the gas pedal. the 3rd gen have 2 filters inside. search my posts just wrote up what/how btw like 2-3 weeks ago. -
98 Es300 50K Miles Cel - Autozone Can't Read Ecu
BoaR replied to aja8888's topic in 92 - 06 Lexus ES250/300/330
wow thanks actually mkeeney never though of looking on amazon for that. muuuch cheaper there. time to return mine and re-order :P -
98 Es300 50K Miles Cel - Autozone Can't Read Ecu
BoaR replied to aja8888's topic in 92 - 06 Lexus ES250/300/330
local shops have them for sale. Up here canadian tire carries like 4 different types. im sure down there most shops will have them too. http://www.canadiant...r.jsp?locale=en walmart in canada has them too, so down south must stock them also. http://walmart.ca/de...categoryId=1864 generally they all do cost about 150-250 bucks though. so that part wasnt "really" a scam lol. they are a bit pricey. -
really sorry for the late reply. got caught up in work there bah. it idols about the same. from neutral about 1k rpm, and when the ac is turned on it jumps like 1 little bar... neglectable really. sorry that that doesnt help very much but at least you know it could very well just be from the leak. =/
-
Help/advice Requested Re: '98 Lexus Es300 - Hid & Fog Lights.
BoaR replied to TAMEDV8's topic in 92 - 06 Lexus ES250/300/330
Not to long ago I installed hid's for my main lights and planning on doing the fogs in a week or two. (for the fogs to get access you need to remove the wheel well guard 4 screws then the side blinker to gain access. or if you have access to a full garage lift to completely raise the car properly, you can remove the underbumper splash guard) Generally, any HID kit should come with instructions. any non piece of crap one anyways. basically what you need to do is check the H7 bulb for base thickness because thats the only issue i had with my slim kit. the light fit fine, but the OEM lexus snap closing pin had nothing to push up against to firmly lock the bulb in place. || || || -check- --This-- --part-- if its super thin base, you will need to do the steps below. if its thick, then just remove the bulb itself by unsnaping the secure pin and replacing with the HID and re-locking the snap pin. I removed my entire light housing due to this problem (hid base bulb was too thin). to do that, pop the hood, the plastic guard needs to be removed. there are 2 star screws holding the side blinker lights in place. undo them then PULL the blinker straight out towards the front of the car. it will unsnap. inside the little hole there will be a bolt. undo this + the top bolt to completelty remove the light housing. once loose carefully disconnect the wires. unsnap the securing wire holding the bulb, put the HID one in, and i placed a homemade spacer after the hid bulb to make sure the clip was pushing down to lock it in place. pass your wires through the hole, using the rubber water guard to seal it up (should be around your kit wires by default and the rubber piece cant even be removed from them). reverse the steps to get the lights back onto the car. omiting re-pluging the light wiring, but replug the blinker wire. once that is done, your ballast needs to be connected and thats it. red/red blue/blue then ballast connecter to H7 connector of the lexus wire. DONT PUT THE BALLAST ON ANYTHING THAT CANNOT STAND SUPER HEAT. it heats up like a mthrfcker. im not even joking (i have the 35w slims installed and it will feel like lava burned your hand if you touch them after a while). unless you want a hole through your winshieldwasher tank etc... dont attach it to anything like that. I ziptied mine "air mode" / "frame" to the car itself. battery side to the actual car frame bar that runs down, and passenger side making a semi bridge between the winshield washer tank and the fuse relay box. so it is firmly "suspended taught" between them. its really harder than it sounds (if you dont have HID kit instructions). in all honesty first time i did my own hid install ~ total time 1h for passenger side fighting with it because i didnt know the spacer wasnt fat enough until i pulled the light housing. and only 10min for driver side after knowing wtf i needed to do. ;) If you want pics i can go take some later to help you out. just let me know. :) -
Err depends if the dipstick for the fluid has both the hot/cold markings (on each flat side) offhand i cant remember for the '96 sorry. just pull it and look. if its cold then cold, hot then hot ;) regardless its pretty much the same thing. ive checked it both ways hot you just leave the car running in park while checking it after driving for a bit.
-
hmm well if you know there is a leak somewhere then that needs to be fixed regardless. as for the idol speeds, its like midnight here atm, but when i go outside tomorrow morning i can try it for fun to see for you. idoling with the ac on/off etc.. that is unless someone gets to it before and posts up. :)
-
igbeserk is pretty much right. the belt has nothing to do with anything actually "inside" the engine metal block at all. anyone including yourself can open the hood and go see for yourself without a mechanic even close to you. you need to open the hood to get to the oil filter to change it anyways. if you look to the left of the engine you will see a few belts, your alternator, water pump etc.. if it looks like a dog chewed the belt, to put it in simple terms - time for a new one, and decently quickly enough. timing belt = car moving lol. when you change the timing belt 99% of the time you do your water pump at the same time as it pretty much is in the same area/has to be removed during the belt change. at a toyota dealership about 500-700, at a lexus dealership about 1000, mom and pop garage about 400-500 etc etc... advantage of the lexus and the ES is that its pretty much a camry. if a mechanic can do a camry then its the same for your car. price side too
-
Ah SW, noted ;) Tho ive been using these same pads for like 3 years now, 4-5 swaps per car, and havent touched the rotors yet. regardless, thanks for the info. I got the box, the ones i use are called ProMax ceramic pads. ordered them from my local autoshop. 22 bucks a set with tax. http://www.autopartsdepot.ca/ceramicdiscbrakes.shtml Info is info, work fine for my old 95 and my current 98 ES. :)
-
K this is a weird one, and not quite sure what to think. just gonna ask for a heads up before i do my usual me thing and tear the entire steering colum apart to try and find the problem. the turn signal "bar" that you pull up or down to put on your turn lights... makes a sort of plastic squeeking noise on the down pull (left blinker light) but not on the up pull (right light) The noise itself is 100% coming from the bar itself, at the base where it connects to the steering colum.. and my real question is the type of noise its making... its a cross between a squeek and a sort of eeeeee noise for a half second while engaging the signal. its weird kinda hard to describe. If anyone has ever heard a slight crackle of 2 live wires in electricity kinda squeeking it sounds like a cross of that and plastic scraping on itself making the noise. now before i go squirting wd40 or something into it.... I doubt its electrical, because the fuses and volts seem to check out. no loss of current, nor any non-functioning lights... Ideas?? anyone happen across this before?? (98 es btw) Thanks. :)
-
Actually i just did my pad replacing while i had the wheels off to paint the calipers and disk edge (looks total wow now hehe bye bye rust) I bought ceramic pads that were not OEM at all. cost me like 22 bucks for each set, front and back. Still have the boxes in my trunk actually. when i go outside later ill grab them to post up the info. Im all for paying for quality, but when something is cheaper and it works just as well (my car stops hard when i slam the brakes for instance) I dont see why i need to spend money on formula 1 quality pads :P Self install. slight annoyance of them not "quite' fitting into the snap in slot tabs. dremel fixed that in 2 seconds with a grind tool to scrape a tad off one tab. didnt have to remove much at all and typing this makes it sound worst than it was lol, anyways... They dont make any noise at all, and were a decent ez mode change. had these same pads actually on my other ES and never had any problems either. just apply the grease, slap them in, done and done. I'll update the post in a little while. :)
-
Lay off the caps. nobody wants to read wall block text. Cd changer. scrap yard. (if your lucky 40bucks. if you arent 100bucks) before you go nuts, make sure you just arent placing the cd's in "upsidedown" by accident. the lable goes downwards into the tray slot and you should be looking at the bottom of the cd while putting it back in.
-
How Do I Replace The Cabin Air Filter For 95 Es300?
BoaR replied to bjjulian's topic in 92 - 06 Lexus ES250/300/330
(they call it the habitacle filtre btw for the inside the car one) Just did this in my 98. Had done it in my friends 92 and my old 95 also. All of them were in the same spot pretty much. ********************** Read everything below. in reality its really easy and like 3 steps. but im going into detail just in case ********************** Driver side. pull the carpet in the direction: center console towards the driver door. pass under the gas pedals etc. In back of the gas pedal you have a wire connector: YOUR CHOICE if you want to unplug it or not (i never needed too but some people are not nimble enough) (remove BAT NEG cable if you want to unplug this wire) If you dont unplug this, you do not need to undo the bat cable. When the carpet is removed. where the center console is you will see white plastic paneling (if you are looking at the gas pedal its to the right side) The center large plastic piece comes off first. (2 snaps in line with the stickshift side, then it slides forwards off the mini rail towards the seat) The air filter is located semi behind/in back of this panel. it sort of hides it. in the very back of that panel area, there will be a thumb thick hand length white plastic bar/clip type thing. Squeeze the 2 pins at the top of the bar, pull slightly away from the backing and LIFT UP. the bottom part slides out of a little slot at the bottom of this bar. This is the filter hole. If there is a filter already there, pull it (99% of the time the filters bend in the center to fold for entry because they are too long and the space is too tight) Get a shop vac if there is no filter and just an empty hole. you will have sticks and leaves all cramming up the space and need to get it out. (modify a paper towel tube on the end of the shopvac to get in there properly if need be) Now you can install your new filter, and reverse the steps. ******** For 97-01 years you have 2 filters in that hole. once you pull the first one out, look for a flat tab above the empty slot to pull the 2nd one down, then out. they both sit on each other in that hole. ******** Note about what filter to buy: every year annoyingly seems to have randomly changed the size of the damn filters. NONE that you can buy at stores like walmart etc will fit. dont waste your time. They will all be either too wide or they dont bend in the middle to fit into the tight space. you need to order one. Canadian tire. have them look for the right filter size for your year. then tell them to special order it from their "high preformance" division. (I laughed a little at this when the guy said it). they get it in 2 days. costs 23 bucks+ tax. Best way not to waste gas looking for the $%^#$% filter for 4 days. Hope this helps! -
coathanger is the best bet if you dont wanna pay. technically you dont even need to pull the handle from the inside either, just the lock slider. there is a little indent on all of them that you could just make a L shape at the end of the hangar and hook the edge, you should ahve enough force then to poke it left or right in a sliding motion. it wont relock instantly this way and you'll ahve a few seconds. your alarm prob wont sound off either. if not - locksmith from the yellow pages. isnt the wallet key for the trunk only? that would work to squirm into the car though ;)
-
instead of posting all your emails, just upload the PDF to a service like this -> http://www.2shared.com/ then LINK it into the thread. that way everyone can grab it and it will stay live. thanks.
-
It's generally like the front door panels. you pop the door handle circular trim using a flat screwdriver, undo the screw there. there shoud be a tiny hidden popout in the hand hold (where you grab to open/close the door) under that is the other screw. on each flat front / back edge of the door there are plastic screw "hide" covers. pop them for the last screw. note the back screw covers are actually plastic screws also. a dual-use. those come out all in one piece. once all the screw parts are out, a firm grip at the BOTTOM of the door trim, pull straight out 2-3 inches with a decent ammount of force. once all the bottom is unsnapped the entire panel slides UP towards the glass window. its hard to describe but its held at the glass by a V shaped metal full length clip. thats why you do the bottom trim first and slide it up. or else some broken fingers are in your very near future trying to get it off from the top ;) enjoy ! its a lot easier* than it sounds describing it in all honesty. total 5min job to rip the panel off. ^^
-
you are very unclear about what you want removed for starters. the entire shifter, the trim, the center console lights, the cig part. then you mention bulbs..... list goes on. spice up your post by adding what you are trying to do exactly. if its anything that im thinking, search some of my recent posts for entire center removal tips. until then we await your detailed description ;)
-
Power Adapter Inside Of Center Console
BoaR replied to finecateyes's topic in 92 - 06 Lexus ES250/300/330
http://us.lexusownersclub.com/forums/index...st&p=376897 ;) -
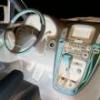
Seach under my name for the xm radio mod. in a few of those posts are links to removal of the console. I had to pop it to re-wire the lighter to hidden status under the dash for always-on power to the xm unit (and now spliced for my gps too). Essentially its 2 things you need to check - fuse or the wiring. the 12v is actaully tied into your radio fuse. the blue 15A one under/left of the steering wheel section of fuses. I know this for a fact because when (like an idiot) i accidently touched wires and grounded the lighter when trying to adjust it. a nice pop and burnt fuse was the result. I needed a 4 pack of fuses to complete the mod lol. get a voltmeter. will save you tons of time. as there are a few possible reasons its not working. could be the fuse, the wiring that got cut from the compartment opening/closing (wires are hidden on the edge of the tray underneath, I could see them getting snipped by the edge if the alignment was askew) or it could be the plug end itself. volt meter will allow you to test all of those things and quickly narrow it down. replacement is actually easy. a hour or 2 at most if you dont have a clue about wiring/soldering. 20min at most if you do. part is sold at autostores as female cig plug. cost 4.99$ CAD up here for mine. removal is easy. slim trim under the radio between the radio bottom/cupholder pop out edge.. small screwdriver to pop it off. under that trim is 2 screws, remove them. **** SET YOUR EFFIN BRAKES AND HAND BRAKE + LOCK YOUR WHEELS **** you need to sadly move your shifter to a lower gear to remove the trim around it. or else it will be super tight and scratch the hell out of anything you touch while you are trying to take it off. you dont want the car rolling while you are removing a wood trim!!! THERE IS NO WAY AROUND THIS so just do it. now, the big panel around the shifter slide a screwdriver under the bottom of the trim where the top of the handbrake normally rests, pop it up, twist sideways and remove the entire thing. 2 screws just under the ashtray bottom edge remove them. take the TOP of the ashtray part, slide it towards you, then lift it out straight up. no scratches to anything. yay! now you can disconnect the wires, volt test or change the piece out. hope that helps :)
-
Extending The Range On The Fob
BoaR replied to capnfred's topic in Audio / Video / Electronics Forums
maybe just change your battery in the fob? It opens much further than that. I can be an easy 8-10 feet away and it will chirp opened. Note that even if you extend the range, it re-locks in a certain time delay (I think its 30sec) so if you dont open the door by then, kinda defeats the purpose :P


