paulo57509
-
Posts
228 -
Joined
-
Last visited
-
Days Won
25
Content Type
Profiles
Forums
Events
Gallery
Store
Articles
Videos
News & Articles
Everything posted by paulo57509
-
How mechanically inclined are you? Attached is the general procedure for a '98. Yours should be similar. SA-62 Rear Drive Shaft - Components.pdf SA-63 Rear Drive Shaft - Removal.pdf SA-70 Rear Differential Side Gear Shaft Oil Seal - Components.pdf SA-71 Rear Differential Side Gear Shaft Oil Seal - Replacement.pdf
-
2000 LS 400 stops running intermittent does this.
paulo57509 replied to jerryparks's topic in 90 - 00 Lexus LS400
What is the exact code stored (Pxxxx)? Did this issue and code start out of the blue/after the timing belt change? Who did the work? Did spray cleaning the MAF solve the issue? Inspect the electrical connector to the MAF. -
If the lug nuts are properly torqued the wheel will hold the rotor in place. It wouldn't hurt to install the rotor screws. Make sure the parking brake shoes aren't dragging. Is the parking brake properly adjusted? Adjust the shoes at the wheels and then the pedal (if necessary). BR-46 Parking Brake - Reassembly.pdf BR-8 Parking Brake - On Vehicle Inspection.pdf
-
Typically, white smoke indicates moisture or water (black smoke would indicate fuel, blue smoke oil). A little white smoke is normal when you first start the engine after it has been sitting overnight and soon goes away after condensation in the exhaust system has evaporated from the exhaust heat. If you're getting a continuous, huge cloud of white smoke that doesn't go away after a few minutes of warm-up, I would suspect you have a head gasket issue.
-
Weird headlight blocker half circle thingy?
paulo57509 replied to grandpa_spec98's topic in 90 - 00 Lexus LS400
There is no easy way to remove the glare shield. Unless you want to cut the headlight assembly open and attempt to glue it back together. Why would you not want to stick with HID? Those LED retrofit bulbs are garbage. Especially the ones sold on ebay. I tried them on 4/5 of our vehicles and I've gone back to the stock bulbs. My experiences: Bulbs are DOA. Dead bulbs after 6-8 months. Flicker Scattered light everywhere but on the road. Excessive glare to oncoming traffic. Cooling fans causing radio static. Sketchy connectors. -
Weird headlight blocker half circle thingy?
paulo57509 replied to grandpa_spec98's topic in 90 - 00 Lexus LS400
I think he's referring to the glare shield that's inside the headlight assembly. -
White smoke indicates at best, moisture which is typiclly normal. At worst, you may be leaking coolant into the combustion chambers. Have you checked your coolant level lately?
-
More details required. Which tube? Take and post a photo if possible.
-
It's either driveline or wheels/tires. At what speed (engine/road) does the vibration occur? Does the vibration change when you're on the throttle or off or no change? Try swapping the spare at each corner to see if the vibration changes.
-
Fuel tank venting & internal corrosion of fuel lines
paulo57509 replied to Jay M. Blaine's topic in 90 - 00 Lexus LS400
These are the only search sites that I know of for unobtanium parts. You need the Toyota/Lexus part numbers. I've had luck with finding Acura parts, but long shots, at best. https://www.rearcounter.com/ https://www.partsvoice.com/ You might try: https://www.amayama.com/en -
Need injectors, any suggestions?
paulo57509 replied to grandpa_spec98's topic in 90 - 00 Lexus LS400
Sorry to hear about the employment situation. This economy is effecting most everyone in bad ways. For future reference, see attached. SF-22 Injector - Removal.pdf SF-23 Injector - Inspection.pdf SF-25 Injector - Installation.pdf -
Need injectors, any suggestions?
paulo57509 replied to grandpa_spec98's topic in 90 - 00 Lexus LS400
Only thing I can add is in regards to the removal of the intake manifold. I've found that any 1UZ (engine still in the chassis) that has an intake manifold with the ACIS, the manifold needs to lifted straight off the engine in order for the vacuum reservoir, vacuum switch, etc. to be able to clear the front coolant crossover and the manifold mounting studs. Because of the lack of clearance at the firewall, I have never been able to remove the manifold without removing the front coolant crossover first. Remove the manifold nuts and bolts. With your third hand, raise the front of the manifold to get wrench clearance to the crossover fasteners. Remove the crossover. Remove the manifold. Reassembly in reverse order.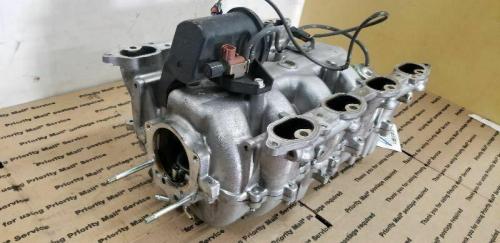
-
Need injectors, any suggestions?
paulo57509 replied to grandpa_spec98's topic in 90 - 00 Lexus LS400
It's a PITA to get to the rear of the intake manifold to take out that bolt. The engine shown below is a JDM engine so the main harness is routed to the passenger side. You can unbolt the plastic harness housing from the coolant crossover but it's not going to get out of the way. You might be able to separate the plenum from the lower manifold; if you remove the ACIS actuator diaphragm it may give you enough room. I don't know if you can just bend the fuel line out of the way. The tubing may fracture.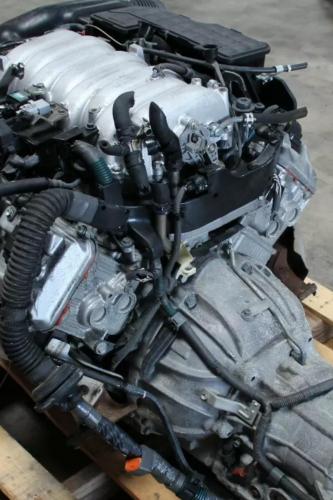
-
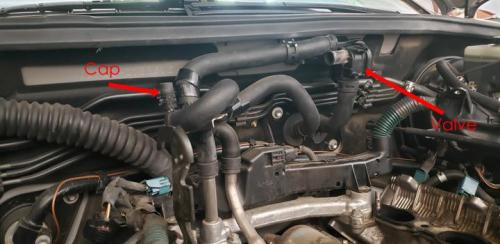
I think that cap is actually a left over tap for some funky hot water defroster.
-
Need injectors, any suggestions?
paulo57509 replied to grandpa_spec98's topic in 90 - 00 Lexus LS400
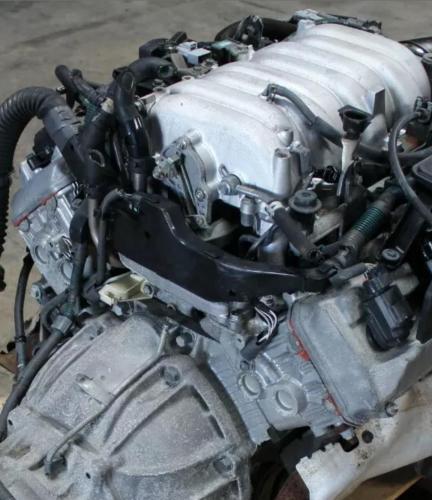
You can replace the injectors individually. The only difficult thing is getting the fuel line out of the way; there's a bolt that in the back of the manifold that might be hard to get to (I did it with the manifold removed). There are special seal washers used at the pulsation dampers that you can only get from Toyota.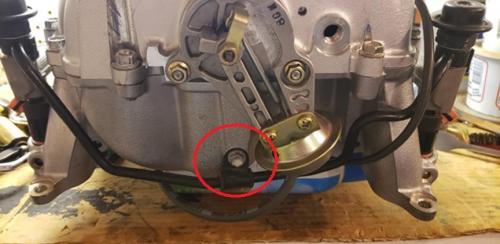
-
Check that the heater control valve located on the firewall is working. When you adjust the temperature, the cable that's attached to the valve should move.
-
Need injectors, any suggestions?
paulo57509 replied to grandpa_spec98's topic in 90 - 00 Lexus LS400
If you're replacing the four rear injectors (5-7 and 6-8) be sure to swap over the foam insulators and plastic retainers to the replacement injectors. -
There's really no way around having the car immobile for a length of time. Just getting to the cams to remove them is more time than replacing the timing belt. I had the cams out of mine back in November. I could have measured the shim OD for you. Not to rub your nose in it. The attached spreadsheet may be helpful. It will at least limit the number of trips to the dealership - you know exactly what shims you'll need. I used a similar one when I did my 4-valve Ducati (which BTW is a bigger PITA than a Toyota). 1UZ Shim Under Bucket Calculator.xls
-
Relevant schematics are attached. These are directly from Toyota Information Services for the 1998 LS400 model year. Use with discretion. Personally, I'd avoid tapping into a circuit attached to the Multiplex Comm System. It's most likely safer to tap into a switched circuit at the ignition switch as suggested elsewhere. Simply because this is way upstream of any vehicle control ECU's. You'll find the ignition switch in the 66 - Power Source attachment. 66 - Power Source.pdf 163 - Multiplex Communication System (Communication Bus).pdf 165 - Multiplex Communication System.pdf
-
I took a quick glance at the interior lighting schematic and it appears every interior lighting or motor circuit is constant +12v, switched by the body ECU. You most likely need to find a circuit that is at the ignition switch. Attached is the 1998 Power Source wiring schematic. I'd look for a circuit that is controlled by the ignition switch; find the switch and work outwards. Unfortunately, this makes for a lot of wire routing. I would take the car back to the installer.
-
It's P/N 81740-50080, Side Marker Light (not illuminated). No longer available new. Best bet is either a wrecking yard or ebay.
-
It helps to have a part number in hand. Here's the parts for under the engine: https://parts.lexusofroseville.com/a/Lexus_2000_LS-400/_65510_6731402/SUSPENSION-CROSSMEMBER--UNDER-COVER/431420-5102.html And the HVAC ducts: https://parts.lexusofroseville.com/a/Lexus_2000_LS-400/_72801_6723079/HEATING--AIR-CONDITIONING---CONTROL--AIR-DUCT/431420-8715.html
-
Let's see.... Q1 - Why did you replace the battery? Q2 - Did you disconnect the battery when you replaced the alternator? 1. Put a volt meter across the battery (if you have one). What's the meter read? It should read >12 volts. If it doesn't, use your jumper box or recharge the battery with a plug-in charger and see if the starter cranks. Once you get the engine running, put the volt meter across the battery again. It should now read close to 14 volts (confirms the alternator is working). 2. Remove the negative cable first and then the positive. Clean the battery terminals and cables with a brush:or a piece of fine emery cloth. Re-connect the cables; positive first then the negative. 3. Unlikely this would happen (would be a crazy coincidence) but there is a starter relay that can go bad. When this happens the starter won't operate.
-
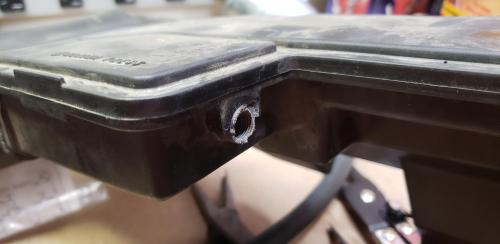
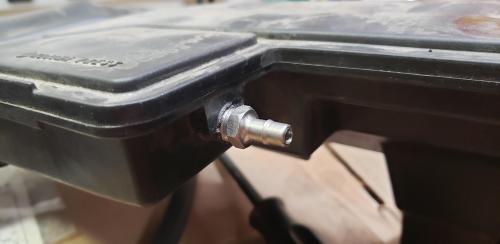
No sealer/sealant was used. I didn't use a gasketed/sealed fitting because there's no flat surface on the resonator box to affect a seal.
-
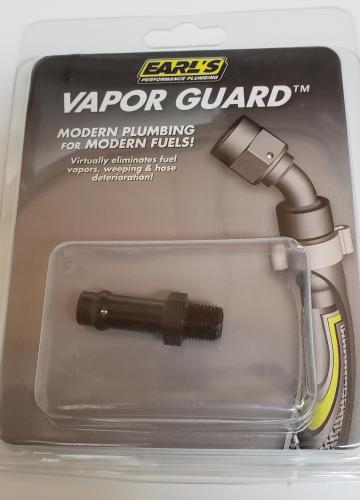
Being stuck for new parts, I would take a chance on the repaired nipple. I had to repair a hose nipple on mine: 1. Thread hole (gently!) with a 1/8" NPT - no drilling required. 2. Hose barb. Procured from McMaster-Carr. Depending on which hose barb is broken, you can probably fine a barb that will fit the hose and the resonator box hole. Looking for a new assembly... Here's the search engine that Lexus of Pleasanton used when looking for some heater hoses for me late last year: https://www.partsvoice.com/ Here's another parts search engine that's not as "robust" but it works: https://www.rearcounter.com/ Edit / Correction: I used this hose barb. Earl's P/N 781662ERL (3/8" barb x 1/8" NPT). The rolled barb makes it easier to remove the PCV intake hose for maintenance.