Vikin9
-
Posts
26 -
Joined
-
Last visited
Vikin9's Achievements
")


-

Hot Running After Heater Valve Replacement
Vikin9 replied to Oro's topic in 93 - 05 Lexus GS300 / GS400 / GS430
I retread your post. You're right, my symptoms were slightly different. One thought would be to flush the cooling system; preferably back flush if possible. There are very small passages (~3 mm) in the head gasket that could easily get clogged and could cause hot spots (??). We didn't have "no heat" from the heater until after the first "boil over" from the overflow tank. In the course of trying to figure out my problem, I gravity fed water through the heater core (from the valve to the passenger side). Very little water flowed through (i.e. clogged). We hooked up water fro a faucet to in the other direction and gradually turned it up in the reverse direction flowing into a clean bucket. A small amount of debris came out and eventually it flowed through pretty freely. It didn't seem like enough to clog it, but the heater works fine now. BTW, Rock Auto had the cheapest overflow tank and it fit ok. I could not see any indication that my head gasket "blew." But I had bubbles in the radiator and rapid overheating after I replaced the thermostat and cap. My son says the gauge never hit the red zone so it apparently didn't overheat. The only other explanation is a warped head. I just got mine all put back together tonight. It ran OK, so we'll see over the next few days. If you don't have bubbling in your radiator, I would take it somewhere that has a flushing system and get them to back flush it for an extra long time. Not just drain and replace, but flush it through for awhile. I doubt that this would have gotten out the rubber bits from my failed thermostat gasket, but it might work if yours is clogged with something else. Good luck. -
Hot Running After Heater Valve Replacement
Vikin9 replied to Oro's topic in 93 - 05 Lexus GS300 / GS400 / GS430
I just experienced almost this same saga, crumbling overflow tank and all. How was the thermostat seal? I wound up replacing the head gasket and resurfacing the head. It showed blown head gasket symptoms. The head gasket is metal, so it didn't really "blow," Instead, I think driving hot, even if not pegged, warped the head just enough to allow blow-by into the cooling circuit. I'd like to hear an experienced mechanic's view, but I think running it hot damages the aluminum head pretty easily. Also, my heater valve was questionable, but I decided to wait until I was sure the problem was fixed. Mistake. It blew on the second drive, with the fitting just crumbling and dumping the new coolant. Another tow home. I just replaced it and hope to have it back on the road tomorrow. We'll see. In case you're interested, here is my story: http://us.lexusownersclub.com/forums/topic/78663-1995-gs300-overheating-boiling-coolant-in-reservoir-cold-air-from-heater/ -
How does a DIYer go about efficiently adjusting the valve clearances on a shimmed valve engine? Specifically, how do you get all the shims that you need? I need to adjust 14 of 24. That's a lot of shims to buy. Background: I just finished replacing my head gasket at 207K miles (link below). I replaced the valve guide seals while I was in there. On reassembly, my valve clearances are a few thousandths below tolerance (.006 in min). That's a little tight for the exhaust side. Should I worry about that? Of course I should have measured all the shims while the cams were out, but that wasn't my focus. Now it's running and I want to go back and adjust the valves. In my younger days, I wrenched at a Honda motorcycle dealer. For a valve adjustment, we exchanged shims from a large stock and charged a base rate plus a per valve fee. Easy process versus doing it at home. Has anyone done this job at home? Are shims a dealer only item? Are there aftermarket sources or used shims available somewhere? Do you find an independent Lexus shop and beg them to exchange them with you for cash? Do you take it apart, measure each shim one by one, put it back together, order the parts, repeat? Is an aftermarket adjustment tool like the Schley tool on Amazon an acceptable tool or is the factory tool a "must have?" This is a daily driver and I can't live another month down a car. I've searched all over the forums and the web and don't find anything of substance on this topic. I'd be grateful for any advice? Thanks. Cooling Problem/Head gasket Thread: http://us.lexusownersclub.com/forums/topic/78663-1995-gs300-overheating-boiling-coolant-in-reservoir-cold-air-from-heater/
-
Closing the loop... The cause of my overheating problem was a deteriorated thermostat seal that broke into pieces and clogged three small coolant passages in the head gasket. The flow blockage must have been enough to overheat and warp the head. The head gasket looked ok, but there must have been just enough clearance for coolant to seep into the cylinders. My teenage son didn't think it pegged the gauge, but it must have ran too hot or hot for too long. As mentioned above, this had classic blown head gasket symptoms. Replacing the head gasket on this car is not a do-it-yourself project for the faint of heart. It took me a month of long weekends. The intake manifold assembly has several difficult to access bolts that were hard to get out and back in. Perhaps they intend you to pull the engine for this, but this isn't an easy engine to work on even with an ample collection of metric tools. The head bolts are easy to strip the hex heads because they are very tight, "torque-to-yield" bolts. Stripping the first one caused panic. I learned that just loosening them warps the head, even if you do it gradually, in the specified sequence. I'll post a video on how I got them out when I finish editing. I had a local machine shop pressure and vacuum test and resurface the head. There are lots of sensors with connectors that are stiff and brittle. Removing them without breaking them takes patience. And there are many vacuum lines and hoses to keep track of. Take lots of pictures. Also, the heater core also was nearly clogged with small bits of rubber (back flushed). Looks like it's finally fixed. Lessons learned: Flush and replace coolant regularly along with cap and thermostat - maintenance is always cheaper than repair Put each phase of fasteners in labeled zip lock bags or poke them into cardboard to keep their orientation AllDataDIY has been adequate until now, but I broke down and bought the factory manual (eBay) Replace every gasket, hose and seal that you can. A full kit is the way to go. RockAuto was a good source for affordable parts, except the "full" gasket kit didn't have about six gaskets and seals that I think it should have had. I have a couple of other issues to sort out now. I'll do some research and/or possibly start new threads. I'm really grateful for this forum, the knowledge shared here and the advice from several of you. Great resource. Thanks!
-
Thanks. That's a good idea to backflush the heater core. I also have to figure out how to flush the cylinder block. I now have the head off and there is no obvious sign of head gasket failure. But there were a couple of small holes between the block and head that had "black gunk" sticking out. When I picked at one, a half inch piece of rubber pulled through. Then I remembered that when we replaced the thermostart, the seal was deteriorated and no longer intact with parts missing. At least three of these flow holes were clogged. Hard to believe that this would cause my overheating problem, but that's all I can find. I'm sure I'll find more pieces in the heater core though. The consolation is that there is no way I could have cleaned this out if I had not disassembled it this far. And although the engine wear looks good, It needs new rubber and gaskets. So, I'm replacing all the coolant hoses and got a full engine gasket kit to replace every gasket and seal I come to. Time to go clean parts.
-
Thanks Water flows freely through radiator. Thermostats (old & new) open in hot water (>~190F) Heater core flow seems restricted but passes. Going to rig up a back flush circuit. Now I'm thinking its a head gasket. Quickly overheating from cold start Large bubbles in radiator neck with cap off But: Plugs all look the same. No visual sign of coolant in oil, or oil in coolant. Didn't notice any white smoke. Any thoughts? Also, how do you test compression when you have to disassemble the top half of the engine compartment to get the plugs out?
-
Overheating and No Heat from Heater (A/C cold OK) 1995 Lexus GS 300 is overheating and cold air is coming from heater on any setting. Replaced radiator cap, thermostat and coolant. Tried to burp air by jacking front and pinching and tapping hoses. No drips under car. Car starts and runs fine. Radiator and water pump replaced in last two years. Tearing apart cooling system now. No clogs found yet. Flow passages are clean with no corrosion inside. 207K Miles Son heading to school, saw steam from right of hood. Pulled over. Coolant boiling over from reservoir overflow. Radiator cap fell apart when removed. Nearby JiffyLube replaced cap and topped up coolant. OK on next drive ~10 miles (heater may have switched been off). Driving home (cold outside, heater on), same problem – steam exiting from now cracked (crystalized) reservoir, temp rising above normal, no heat. Stopped before overheating both times. Replaced thermostat (though it tested OK). Flushed and replaced coolant. Test drive: same problem: steam, boiling coolant in reservoir, no heat, temp rising above normal. After cool-off, started and let idle with radiator cap off until hot. Boiled over at cap quickly. Upper radiator hose hot. Lower one cool (clue?). Relatively new pump must have failed. Tore apart to inspect pump. Looks perfect. Clean inside. Water flows freely through radiator. Mechanical fan spins normally. Heater core valve removed; actuates fine but nipples brittle and slightly cracked. Can’t tell how the cable is supposed to actuate (servo?). No controls on dash seem to move it. This car has had exceptional heat and A/C that have never been a problem. Maybe overheating and no heat are separate problems, but too coincidental that they happened together. Next: check electric fans and try to flush heater core History: 185K New water pump (w/timing belt). New coolant. 171K New radiator and cap. Plastic housing cracked at upper seam 100K Bought used I’ve searched the forums and the web, but still baffled. Quality time together, but son wants new car. Have AllDataDIY, but would like to get an overall cooling system diagram if anyone has one.Any ideas or help would be appreciated.Thanks!!
-
That's great! Thanks for the quick replies.
-
Will 06 GS wheels fit my 95 GS? Is the offset the same? Or do I need to use a spacer? It looks like they will fir but I can't find any definitive answer on what the offset is. Any help would be appreciated. Thanks.
-
1998 Gs400 Rear Seat Removal
Vikin9 replied to rdcusmc's topic in 93 - 05 Lexus GS300 / GS400 / GS430
On my '95 GS, the rear seat bottom comes out simply by pulling up firmly on the front of the seat assembly. There are two male wire forms that must be removed from their receptacles by pulling upward. They plug in so it's a tight fight, but up is the direction they go. Then the seat just lifts out. -
About a year ago, I tried BFGoodrich® g-Force T/A KDW 225/55R16's on my stock, chrome-wheeled 95 GS 300. They ride nice and looked great. However, they are wearing fast. And worse, now 12K miles later, the outside edge of the driver side rear tire is completely bald. The passenger side is wearing evenly. Is rear alignment required on a first gen GS? Any other ideas what's wrong?
-
Anyone Replaced The Starter Or Contacts On A Gs?
Vikin9 replied to kino1161's topic in 93 - 05 Lexus GS300 / GS400 / GS430
I had mine replaced by a reliable independent shop that I use when I don't have time to tackle it myself. It was a Bosch starter and it ran me about $450 P&L. -
I went with BFGoodrich® g-Force T/A KDW 225/55R16's on my stock chrome-wheeled 95 GS 300. I got 'em from Costco. They look and ride really nice. It's too early to tell on treadwear, but I like them a lot and get a lot of compliments on the car.
-
Stock Chrome Rims Leaking Air
Vikin9 replied to ChaosOrion's topic in 93 - 05 Lexus GS300 / GS400 / GS430
Why don't you just put a little "stop leak" in there? Only your tire technician will ever know. -
Cup Holder Comes Out Of Slot When I Use It?
Vikin9 replied to kino1161's topic in 93 - 05 Lexus GS300 / GS400 / GS430
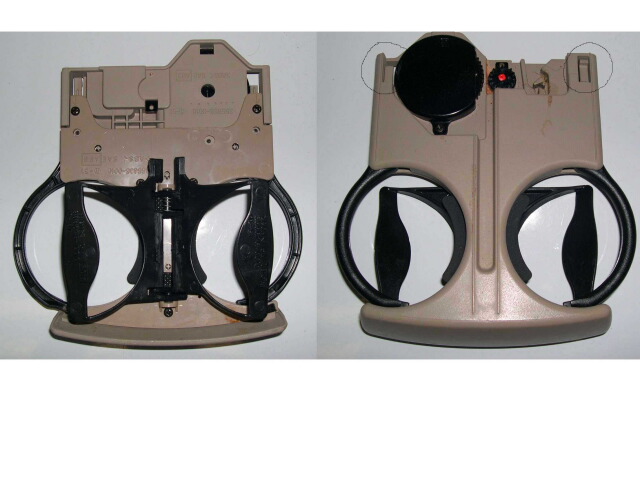
Here's a photo of my cupholder assembly that I took to try and find a used replacement. From this you can see if you have the same assy. The tabs that hold the assy in are circled in the upper right view. Basically, I made a flat wire form to replace these tabs that broke off. As I mentioned earlier, after many trials, the eventual material that worked was the flat metal piece that holds the rubber wiper blades in place (which I'd just replaced). I'll try to describe the part feature by feature. At one end is a triangular bend (like a numeral "4" laying flat) that serves as the locking tab. It's critical that the locking surface is the correct length and height. Then the part has a 90 degree twist with a slight offset. I made this feature by putting the part in a soft jaw vise and carefully twisting it with a crescent wrench. Then there is flat section that goes between a plastic screw boss and the side of the tray. Finally, there is a loop that wraps around the screw boss. I made this feature by wrapping the stock around a screwdriver shaft. Finally, the pieces were epoxied in place. Make sure you know how the pieces go back together, so you don't create an interference. One of the bosses has a spring on it so you have to avoid that one. Although the two sides are similar, the parts are still fairly different (e.g length, offset, etc.). It cracks me up that we're going through all this for a lousy cupholder. Maybe someone will help me with a fix like this for my side window trim that's starting to separate. I hope this helps. Good luck.