jeffls400
-
Posts
46 -
Joined
-
Last visited
Content Type
Profiles
Forums
Events
Gallery
Store
Articles
Videos
News & Articles
Everything posted by jeffls400
-
I am motivated to sell the car soon...make me an offer!
-
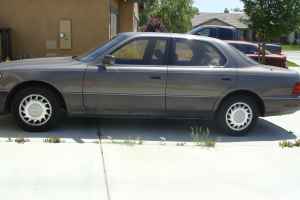
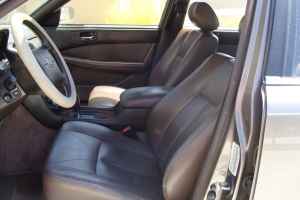
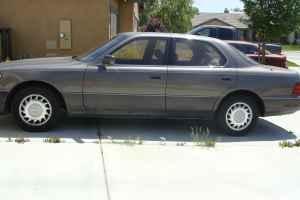
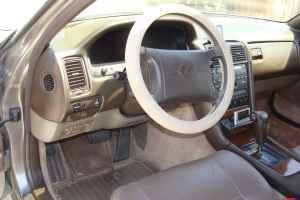
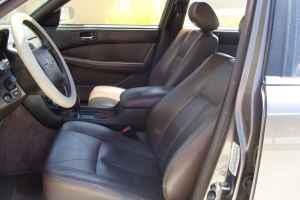
For sale is my personal vehicle, a 1991 LS400. The car is Dark Taupe Metallic, with Taupe leather interior. Equipment includes: Dual Front Power Seats with Driver Memory CD Changer Chrome OEM Wheels Car has 255,XXX miles and drives well. Known issues: Fading paint on Hood, roof and trunk Power moonroof does not work A/C works, no driveability issues and has a very clean interior. Clean title and no accidents. Asking price is $2,500 and is negotiable. Thank you, Jeff
-
Front Main Seal Replacement On 1991 Ls400 Question
jeffls400 replied to _mach_'s topic in 90 - 00 Lexus LS400
Hi mach, You will have to pull the crankshaft balancer and crank sprocket. It is a tap-in type seal. Timing belt is removed in process. Good luck, Jeff -
Great news and glad to help. Jeff
-
+1 on having a shop rebuild it. I had mine done last summer with fantastic results. Good luck. Jeff
-
The spec is 80 ft-lbs. Such a weird occurence, having such a robust bolt snap. Good luck. ;) Jeff
-
Don, Thanks for the data points on your car. When did your starter go out? As I read your story, I see that most of your problems are with remanufactured / aftermarket parts and less than stellar service folks. Exactly my experience!
-
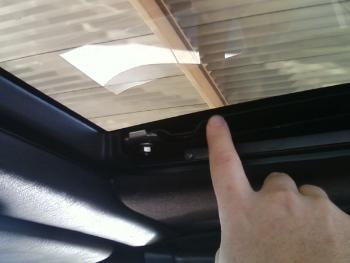
I apologize for the cell phone picture, the trim has already been removed here. The trim is easily pried off using a small screwdriver. The passenger side is shown here, as viewed from the driver's seat. The shims are removed by loosening the nuts, one of which is shown here. Hope this helps. Let me know if you need anything else...would you mind giving us some history of your car...309k is certainly impressive. Jeff
-
Shims are used that provide adjustment for the moonroof glass relative to the surrounding sheetmetal. The interior trim panels on the left/right sides of the glass are held on by clips and once removed, you can see the four studs/nuts that hold the glass to the frame and location of the shims. The shims should be cheap and easy to find, considering how many Gen I LS400s I saw last week at a self-serve salvage yard here in SoCal, courtesy of the Cash for Clunkers program. :(
-
Yellow Light With Exclamation Mark On
jeffls400 replied to Nanu's topic in 04 - 09 Lexus RX330 / RX350 / RX400h
+1 Bet it is the spare. -
135,000 Miles '91 Ls400 -- Camshaft And Valves Leaking Oil
jeffls400 replied to LS400Luver's topic in 90 - 00 Lexus LS400
Jerry - Glad to see my thoughts and sentiments are echoed by someone of your knowledge and experience. I was going to send my speakers out, but based on your post, I will do them myself. LS400Luver - I am reasonably certain that your car has many more miles ahead of her. My 1991 has 228K and is driven 100+ miles a day. For new tires, I would suggest looking at the Kumho Ecsta Platinum LX tires. They are at a good price (I got mine from the Tirerack) and are the proper V-rated spec; I have been very pleased with them. My instrument cluster was having illumination issues (needles flickering) with a sticky speedometer. I found a unit from a local Pick-a-Part for $20 that works perfectly. All I had to do was swap the mechanical odometer from my old one to the "new" one. -
A/c Out, Tech Said There's A Leak In Hose '92 Ls400 Need Help
jeffls400 replied to JTom's topic in 90 - 00 Lexus LS400
Hey JTom...one option is to have that hose repaired for about half the cost of a new one. They will replace the rubber hose with a new section, crimped to the tubing with OEM style crimps. See below for a link to my post that details my issues. I had the same problem with my "discharge" or high-side hose from the compressor. AC Overhaul -
I replaced my instrument cluster recently, and the LED for the brake bulb malfunction that projects down on to the cluster is out...need to go pick some up from the junkyard. I lost all brake lights a couple years ago...the culprit was the lamp failure module mounted in the trunk. See my post
-
1991 Ls400 A/c Overhaul And R134a Conversion
jeffls400 replied to jeffls400's topic in 90 - 00 Lexus LS400
Hi VH, If I had a bet, I would say that your discharge hose at the compressor is leaking. It is nearly impossible to see the leak here, as the rubber hose is surrounded by a rubber sleeve, which obscures any visual observation. I got my leak checker on eBay...or you can use UV dye, which is added to special cans of R134a. Jeff -
I wanted to share my experience on refreshing my a/c system and converting from R12 to R134a on my 220k mile LS400. My decision to DIY was driven by the nearly $700 the local Lexus dealer charged to "repair" my a/c last year, only to give up when they could not get it to work for longer than a day. I began by replacing the evaporator and expansion valve. It is a labor intensive job, but definitely not out of reach for an average DIY mechanic. From there, I removed the Evaporator Pressure Regulator (sometimes referred to as a suction throttling valve) and disassembled it (six screws). After inspecting the rubber diaphragm for any tears or holes, I reassembled with PAG 46 oil and a new o-ring on the spring-loaded "piston". This o-ring is like a compression ring, so to speak. From there, I removed and sent out any rubber hoses (discharge and suction at compressor and the suction hose sections between the evaporator and the compressor) to be replaced at a local machine shop that repairs a/c hoses. I was very pleased with the quality of the work; the assemblies looked very much OEM, at a savings of over 50% versus the best online prices for new hoses. With the system this far apart, it was very easy to flush the remaining parts (ie the condenser and small miscellaneous lines) with a "flush gun", that can be purchased / rented at most auto parts houses. I then replaced the compressor with a rebuilt unit from a gentleman in Texas, who was a wealth of knowledge and provided a great product. The last new part was a new receiver-dryer. When all of the parts were ready, I reassembled the system with new HNBR (essential for R134a) o-rings, including several seals where two pieces of tubing thread together (the service manual refers to them as Brock joints) and use o-rings to eliminate leakage. After reassembling, I pulled a vacuum on the system with a small vacuum pump for about an hour and a half, to ensure that all condensables were removed from the system. The system held this vacuum for 15 minutes, meaning no leaks. I then added about 28oz-30oz of R134a to the system with a set of manifold guages, to ensure that the high and low side pressures were within spec. The center registers now deliver air at 38 degrees when the ambient temperatures are around 95 degrees. For those interested, here is a breakdown of the expenses involved: Parts Compressor: $200 (1yr warranty) Rebuilt Hoses: $150 Evaporator: $130 Expansion valve: $36 Receiver-dryer: $15 O-ring kit: $6 Parts Total: $537 Supplies R134a: $21 (3 12oz cans) PAG 46 oil: $9 (8oz) Supplies Total: $30 Tools/Equipment Manifold Gauge Set: $50 (may be rented/borrowed) Vacuum pump: $90 (again, rented/borrowed) Leak checker: $75 (optional, but good for piece of mind) I happen to own these tools, because I love to work on my own projects. Let me know if you have any questions. Jeff
-
Using compressed air is the Toyota recommended method. However, if the piston will not budge, it is definitely possible that you may be better off exchanging for a rebuilt / remanufactured caliper.
-
Hi - Had the same issue when rebuilding my calipers last fall. Place the non-stuck piston back in its bore, and fabricate a piece of wood that does not allow this piston to move in its bore at all when the air is applied through the port. Make sure the bleeder valve is completely closed, and try again to release the piston, slowly increasing the regulated pressure until the stubborn piston pops out. Just make sure you have a piece of wood in place to keep this piston controlled when it does break loose. It only took a couple of tries to release mine, and I would estimate the pressure was about 100 psi. Jeff
-
My Speedometer On My Lexus Ls400 Will Not Work
jeffls400 replied to IT_JR's topic in 90 - 00 Lexus LS400
Welcome to the Club! I had a sticky speedometer in my 1991 LS, that would not move in certain weather conditions or would stay in one place and a tach needle that was partially illuminated. My solution was to pull one from a self-service junkyard and swap odometers, so the mileage would be accurate. The cost was $25, plus the cost of some plastic polish to clean up the "screen" and the plastic odometer window. It works fantastic and with a little cleaning and sprucing up, it looks like a brand-new cluster. This would work for the 1990-1992 clusters, as I believe an electronic odometer made its appearance in 1993. LexLS.com has a great tutorial on removing and disassembling the cluster, and with help from the Factory service manual, I was able to test all bulbs and illumination before installing. Jeff -
:D Of all the cars I've owned (new and used), my favorites are my current 1991 LS400 and my 1992 Miata (sold-stupid!). A pair of the best engineered cars ever for their intended markets and customers. Great tutorial on the crank seal and LOVE the IS wheels on the LS. Very cool. Jeff
-
Part number is 00279-000T4 for a case of 12 quarts and 00279-000T401 for a single quart. If you find the right dealer, you'll be pleasantly surprised at how inexpensive you can acquire the fluid for, so no reason to struggle to find the Mobil equivalent...it will not be any cheaper, as you can find a Toyota dealer willing to sell a case of Toyota T-IV for less than $44. Jeff
-
I saw a Toyota dealer on eBay selling for a decent price by the quart or case. I would stick to the Toyota T-IV, based on personal experience.
-
The code 63, #2 solenoid malfunction, will most certainly require replacement of the #2 solenoid and is a reasonably common failure as the cars age. It is a quite simple job...removing the pan takes the most time. Sometimes, a solvent soak can free up a less than enthusiastic solenoid and has worked for me for quite a while now. I also recommend sticking with OEM for this part. See my post, #29 in the below link. The code 71 (EGR System Malfunction) troubleshooting takes up 8 pages in the Factory Service Manual. Common issues are a stuck EGR valve (not too common), leaking hoses (or the EGR pipe) in the EGR system, or a non-responsive EGR temperature sensor. I cannot believe that a Toyota dealer would not be able to properly diagnose this, as it only requires a multimeter and a hand-held vacuum pump to diagnose almost any Toyota / Lexus EGR system. http://www.clublexus.com/forums/ls400-foru...-problem-2.html
-
Water Tank Sensor Appears Leaking
jeffls400 replied to yidaitianjiaous's topic in 90 - 00 Lexus LS400
This sensor triggers your low coolant warning light. You can use those teeth or the notches to remove by turning with a flat blade screwdriver. Hope this helps. -
Water Tank Sensor Appears Leaking
jeffls400 replied to yidaitianjiaous's topic in 90 - 00 Lexus LS400
Most likely the o-ring that seals the sender to the tank is leaking. If you pull back the rubber cap, you can unscrew the sensor using the notches provided along the outer rim. Just make sure the tank itself does not have any cracks and then reassemble with the new o-ring, p/n 90099-14129, which will run you less than $2.00 from one of the online dealers. Jeff -
Good news! Thank you for the update and the details! My 1991 has similar symptoms (even though tube has different design.) Jeff