

.jpg.7a8b52ae7ecabd459f780854ca416b96.jpg)
wtruck
-
Posts
22 -
Joined
-
Last visited
Content Type
Profiles
Forums
Events
Gallery
Store
Articles
Videos
News & Articles
Everything posted by wtruck
-
.thumb.jpg.9147fa2b11e6419212350c77985896c6.jpg)
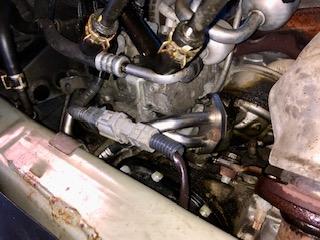
VVT Oil Line - 2GR-FE Bank2 -what about Bank1 ?
wtruck replied to wtruck's topic in 04 - 09 Lexus RX330 / RX350 / RX400h
2007 RX350 (FWD) - Lexus dealership told me the correct part number that I need is.... 15707-31030.....their part is $97 and Toyota part is $33.50 (15772-31030) The difference between these 2 parts? $63.18 Parts needed.... All Metal VVT Line from Toyota 15772-31030 https://www.amazon.com/15772-31030-To... Copper washers (rear, one-piece) 90430-16016 https://www.amazon.com/Toyota-90430-1... Copper washers (front, separate) 90430-16017 Power Steering high pressure line washers 44327-30030 https://www.amazon.com/Genuine-Toyota-Pressure-Stabilizer-Control/dp/B00IGCTXH0 Spoke with Merryfrankster (on YouTube ....and confirmed Toyota part number is correct (15772-31030) Found this post with still images and torque specs that was very helpful.... https://www.toyotanation.com/threads/diy-replacing-rear-bank-vvt-i-oil-line.432008/page-4 Fairly involved repair.... remove upper motor mount drain hydraulic power steering reservoir & remove return line remove cover for the bank1 VVTI oil line passenger wheel off and remove inner wheel well cover (need to remove driver wheel too) remove serpentine belt (and good time to replace) remove power steering pump the most cumbersome 2 bolts high pressure line (probably want to replace this crush washer/s also Part no 44327-30030) disconnect sway bar links (both sides left/right) When you're looking at the power steering pump you have to swivel and push (force) the pump UP and to the your LEFT. The 2 bolts have to be removed completely, the top bolt passes thru a dog-ear clip that the pump has to lift up and out, then you can remove the high pressure line. I found this video helpful for understanding steering pump removal, this gentleman had broken the dog-ear off the block of his motor..... -
I want to replace the oil pipe (line) on bank1 of my 2007 RX350 because it also has a rubber hose that is prone to failure. (see attached 15771M) I've been trying to identify the correct part (part#), Toyota/Lexus have a replacement part that is all steel and no rubber elbow. When I look at Lexus Parts sites I find (3) different part numbers 15771-31010 15707-31011 15707-31012 Toyota list part number.... 15772-31030 I've attempted to order the Toyota part number online from a couple of different site, but, they won't allow me to order the part. They require a VIN # and then say the part number doesn't match the VIN #. I.E. https://parts.lexus.com/p/Lexus__/Engine-Oil-Cooler-Line/62915783/1577231030.html So today I drove to a Lexus dealership. They told me the correct part number that I need is.... 15707-31030 ...and, this part cost $96.68 The Toyota part is $33.50 (15772-31030) Does anyone know if there is a difference between these 2 parts? Other than the dollar amount of $63.18 ????? RX350___15_03___ENGINE_OIL_COOLER.pdf
-
RX 350 - Brake Master Cylinder
wtruck replied to wtruck's topic in 04 - 09 Lexus RX330 / RX350 / RX400h
I've been reaching out to a few ole buddy's to see if I could borrow an OBDII scanner with ABS bleed functionality, but, all their scanners are like mine. I made an offer on eBay for a unit with ABS bleed, but, we could not agree on my price! Then, a couple of days ago we had a pretty good rain. So, I went out and found a deserted road, sped up to about 45 mph and locked the brakes up....once, twice, and a third time. For the past (2) days the brakes have been working fine.....no slow pedal drop. Next, I will perform an old fashion brake bleed with someone pumping the brake pedal and me under the car opening & closing the bleeder valves. -
RX 350 - Brake Master Cylinder
wtruck replied to wtruck's topic in 04 - 09 Lexus RX330 / RX350 / RX400h
Decisions, decisions.... replace master cylinder (@ shop $500) ABS bleed (@ shop $125) Now the $500 at a local shop to replace master cylinder also included the ABS bleed. But, to have an ABS bleed done on its own was $125. And, to replace the master cylinder myself is $130. If I purchase a scanner to attempt the ABS bleed on my own, most OBDII scanners with ABS bleed run about $150. Well, I decided to attempt the master cylinder replacement, and, to DIY in my driveway. Bench bleed went well, removal went well, and, even the install was not too bad. Test drive around the block, and, yes I'm still having the (very) slow sinking pedal.....so I have to assume that the master cylinder is/was not the problem. Now, buy a scanner.....or....take it to the shop just in case the issue is not the ABS bleed !!!!! -
RX 350 - Brake Master Cylinder
wtruck replied to wtruck's topic in 04 - 09 Lexus RX330 / RX350 / RX400h
This has been my 1st/only Lexus (purchased from individual) and I've only had one experience with a Lexus dealership (oil leak). I wasn't really impressed. And, I'm pretty much hands-on and always trying to learn. I'd had an issue with the front brake hose that would not connect back to the brake line (FP). I have replaced front brake hoses/calipers/rotors/pads on this vehicle. I have been wondering if air had gotten trapped in the ABS pump. I have bled the brake system multiple times.... normal brake pedal pump (2 people) Motive pressure bleeding (twice) Vacuum pump bleeding (once) I have no ABS dash lights on and have used my CenTech OBDII scanner to check for ABS error codes. No codes found. I found there are newer scanners that now activate an ABS Bleed to push any/all air from ABS pump/valves into the brake lines. Then you follow with a normal brake bleeding.. Rather than paying a Lexus tech I'm considered/shopping for a newer OBDII scanner with the ABS Bleeding function. Autel Maxicheck Pro (wired) Autel MaxiAP AP200 'C' (wireless dongle/works with smartphone) Foxwell NT630 (wired) -
RX 350 - Brake Master Cylinder
wtruck replied to wtruck's topic in 04 - 09 Lexus RX330 / RX350 / RX400h
And, in the tradition of the "American Way" (small, medium, and large) we always choose 'medium'. However, in this case I chose 'small' (the cheapest) adapter....Motive 1101 It did work ok but I did experience some leaks. I completed a brake fluid flush/purge. All new brake fluid and a successful test drive around the block. The next day a successful test drive to the doughnut shop. But, on the 3rd drive, with my wife, to the Dairy Queen drive thru I began experiencing the sinking pedal again. I have followed up with (2) additional brake bleeds of all 4 corners;, and, still I'm experiencing the sinking pedal. I will probably attempt to replace the master cylinder now. -
RX 350 - Brake Master Cylinder
wtruck replied to wtruck's topic in 04 - 09 Lexus RX330 / RX350 / RX400h
I want to flush/purge the brake system before trying to replace the master cylinder. I have a motive power bleeder, but, don't have an adapter for the Toyota/Lexus master cylinder. Does anyone in the forum have any experience or success using either of these 3 different power bleeder adapters with the Lexus RX 350 ? Motive 1101 Universal Adapter https://www.amazon.com/Motive-Products-1101-Cylinder-Adapter/dp/B000Q6UHQ0 CTA 7041 Master Cylinder Adapter https://www.amazon.com/CTA-Tools-7041-Adaptor-Toyota/dp/B005B4N6RY Power Probe BA10 Adapter https://www.amazon.com/Power-Probe-BA10-Adapter-Toyota/dp/B004IQ96RK -
I have 2007 RX 350 FWD with 213k miles. The brake pedal has begun to slowly press all the way to floor when I am stopped at traffic lights and stop signs. So, I suspect the master cylinder is leaking internally. I have checked brake hoses, calipers, fittings, underneath the power booster and master cylinder, and, not found any leaks. Does anyone have any experience replacing a brake master cylinder on the RX 350 ? I've not been able to find any videos that show the procedure, but, I did find a video for the Toyota Sienna that appears to be very close to what I'd expect.
-
Buying '07 RX 350. Head Gasket check...
wtruck replied to mitka's topic in 04 - 09 Lexus RX330 / RX350 / RX400h
I'm not sure about the foaming, there could be air in the system. As for the color, I believe that Toyota/Lexus coolant is red/pink. There's a particular bleeding technique for the 2GR-FE engine. This video is a great overview on the procedure. And the Car Care Nut in the video is located in Chicago....He just opened his own shop. Something to definitely check on the 2GR-FE is that the oil cooler line replacement has been done. Don't use a Dorman oil cooler line for this replacement! -
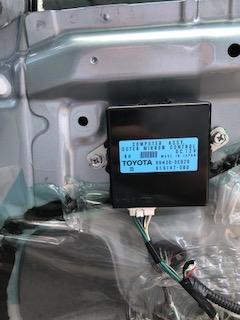
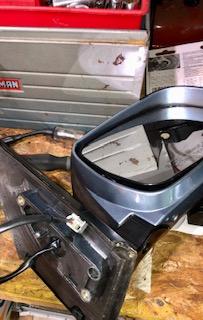
I noticed that my passenger side view mirror (RH) seemed a little loose, and, that the power movement functions were not operating. Fuses seemed to be ok so I decided that I would remove the door (passenger) panel see if I could tighten the bolts holding the mirror onto the door and test the wires with a multimeter for the power movement functions of the mirror. One of the mounting bolts had been cross-threaded. I successfully removed 2 of the 3 mounting bolts. This meant I had to pry the mirror off the door for the final/3rd bolt, which pulled the nutinsert (M6 bolt and nutinsert) from the mirror housing. And, I found that the power mirror wasn't plugged into the "Computer Assy Outer Mirror Control". Then, I saw that the plug on the mirror did not even match the connection on the Computer Assy Outer Mirror Control. Does anyone know what connection on this mirror goes to? is it for a different year or model of Lexus? Does anyone know if I can purchase just the correct connection for the Computer Assy Outer Mirror Control module? I could cut off the connector on the mirror and re-wire it to the correct connector. My wife said that I cannot purchase a replacement mirror....she said that I have spent too much $$ on the vehicle already.

-
FWD Rear wheel hub bearings
wtruck replied to wtruck's topic in 04 - 09 Lexus RX330 / RX350 / RX400h
I found a sway bar on Ebay, in Texas (rust-free).....[16MM. Part Number: 48812-48060], and, less than 1/2 price of a new one. After installing the sway bar and new sway bar links, I took a few test drives and continued to hear a slight humm from the rear. I wasn't sure if it was tire noise due to needing an alignment or possible rear wheel bearing. I removed the LH rear caliper & rotor and gave the hub a spin. I could hear the ever so low tone of the bad bearing. I ordered and replaced both rear wheel hubs/bearings. This ranks with one of the worst mechanical maintenance chores I can remember !! Of course, the wheel hubs were frozen/rusted into the knuckles and dust shields. After unbolting the hubs I used my Thor hammer and removed them from the knuckles, but, they were both still stuck/rusted into the dust shields. I removed all the emergency brake components (shoes, springs, pins, adjusters) and then took the hub & dust shields to the workbench. I used a bolt & nut/washers to make a press between the hub and dust shield. But, the 3/8 bolt & nut I used only lasted a few turns before stripping. Off to the hardware store, I purchased a #8 grade bolt & nut, then I used an old 1/4" drive socket as another spacer against the dust shields. I also knocked out all the lug studs, I didn't have to but it felt good! I used the #8 bolt/nut/washers/socket to press the hubs out of the dust shields. I put the bolt/nut/washers into one of the lug studs holes and would place the 1/4 socket against the dust shield and tighten the bolt/nut, then, I would loosen and rotate the rub move the nut/bolt/washers/socket to an alternate position....I generally used 3 different points (like a triangle) and pressed the hubs out of the dust shields. If you notice the 1/4" socket in the photo, it is pretty much destroyed from the pressure/stress. The #8 bolt/nut held up but certainly took a beating. Yes, the hum noise is now gone and the ride does feel much better.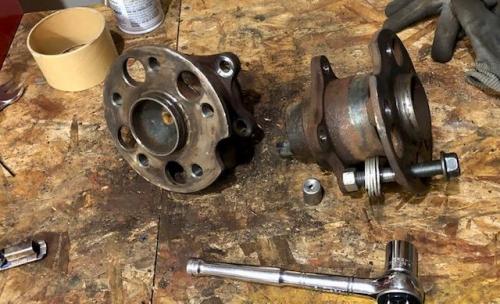
-
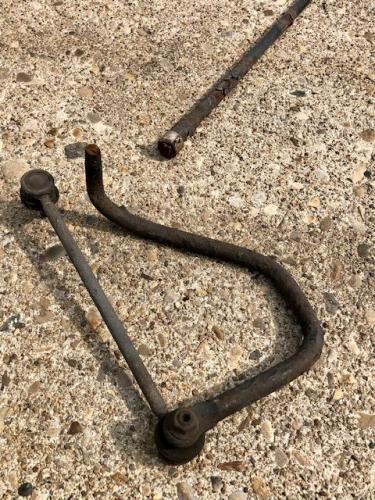
2007 RX350 FWD - Rear Sway Bar (broken)
wtruck replied to wtruck's topic in 04 - 09 Lexus RX330 / RX350 / RX400h
I found a sway bar on Ebay, in Texas (rust-free).....[16MM. Part Number: 48812-48060], and, less than 1/2 price of a new one. After installing the sway bar and new sway bar links, I took a few test drives and continued to hear a slight humm from the rear. I wasn't sure if it was tire noise due to needing an alignment or possible rear wheel bearing. I removed the LH rear caliper & rotor and gave the hub a spin. I could hear the ever so low tone of the bad bearing. I ordered and replaced both rear wheel hubs/bearings. This ranks with one of the worst mechanical maintenance chores I can remember !! Of course, the wheel hubs were frozen/rusted into the knuckles and dust shields. After unbolting the hubs I used my Thor hammer and removed them from the knuckles, but, they were both still stuck/rusted into the dust shields. I removed all the emergency brake components (shoes, springs, pins, adjusters) and then took the hub & dust shields to the workbench. I used a bolt & nut/washers to make a press between the hub and dust shield. But, the 3/8 bolt & nut I used only lasted a few turns before stripping. Off to the hardware store, I purchased a #8 grade bolt & nut, then I used an old 1/4" drive socket as another spacer against the dust shields. I also knocked out all the lug studs, I didn't have to but it felt good! I used the #8 bolt/nut/washers/socket to press the hubs out of the dust shields. I put the bolt/nut/washers into one of the lug studs holes and would place the 1/4 socket against the dust shield and tighten the bolt/nut, then, I would loosen and rotate the rub move the nut/bolt/washers/socket to an alternate position....I generally used 3 different points (like a triangle) and pressed the hubs out of the dust shields. If you notice the 1/4" socket in the photo, it is pretty much destroyed from the pressure/stress. The #8 bolt/nut held up but certainly took a beating. Yes, the hum noise is now gone and the ride does feel much better.
-
2007 RX350 FWD - Rear Sway Bar (broken)
wtruck replied to wtruck's topic in 04 - 09 Lexus RX330 / RX350 / RX400h
Yes, I'm hunting down used options. Does anyone know what the difference between a light green and an orange sway bar indicate? Looks like the stock FWD (with just a sunroof) calls for the light green sway bar which is 16MM. Part Number: 48812-48060 And, the models that have the moon roofs with multi panels of glass use the orange sway bar, which I believe is 17MM. Part Number: 48812-48070 -
The plan.... front struts front sway bar links rear struts rear sway bar links rear sway bar bushings Completed.... front struts front sway bar links rear struts And, why not the rear sway bar links & bushings you may ask ! While under the car, removing the brackets to the rear sway bar bushings, the entire sway bar fell out.....it had broken through completely in the drivers sides bushing/bracket. and, it had been broken for awhile because both sides of the break were thoroughly RUSTED. Now, to find a rear sway bar/stabilizer bar/anti-sway bar. Used - ebay - salvage yard New -dealer -looks like no one else has new sway bars

-
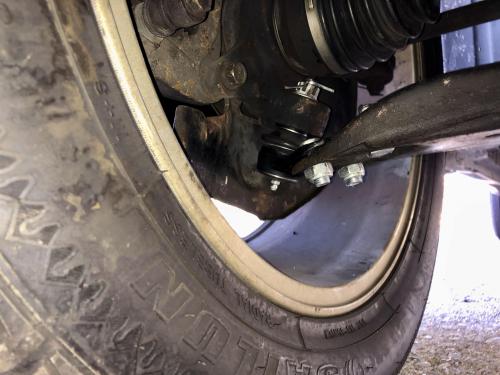
2007 RX350 FWD - Front Brake Hose
wtruck replied to wtruck's topic in 04 - 09 Lexus RX330 / RX350 / RX400h
Well, the RX350 has been in the shop. Weather turned on me so I sent it to the shop. One man shop and unfortunately he experienced some down time due to illness. He was able to cut the brake line, remove the brake fitting and re-double flare the brake line. But after replacing both front brake hoses it still continued to pull right when applying brakes. The problem was the ball joints. And, the old ball joints that were on the vehicle only had 2 of 3 mounting bolts holding them on….I can’t believe I hadn’t noticed that when I was looking at and working on front brakes.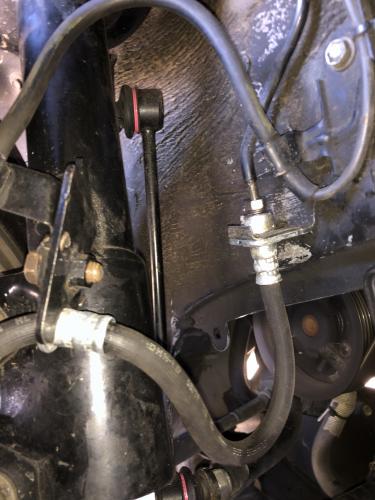
-
2007 RX350 FWD - Front Brake Hose
wtruck replied to wtruck's topic in 04 - 09 Lexus RX330 / RX350 / RX400h
I ran my VIN on THR, results were a little confusing. One result shows as Japan, but, another shows Canada. I believe it’s Canadian…aayy, it begins with “2T2” Mark WMI Manufacturer Brand Owner Country Code Country LEXUS 2T2 Toyota Motor Mfg Canada Inc (CAN) TOYOTA 2T Canada LEXUS JT1 TOYOTA (J) TOYOTA JT Japan LEXUS JT6 TOYOTA (J) TOYOTA JT Japan LEXUS JT8 TOYOTA (J) TOYOTA JT Japan LEXUS JTH TOYOTA (J) TOYOTA JT Japan LEXUS JTJ TOYOTA (J) TOYOTA JT Japan -
2007 RX350 FWD - Front Brake Hose
wtruck replied to wtruck's topic in 04 - 09 Lexus RX330 / RX350 / RX400h
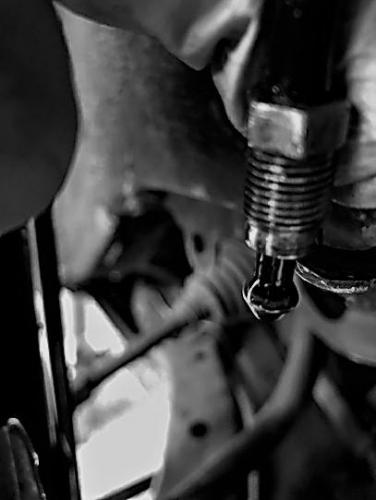
Yes, I'd watched those videos before I attempted to change the brake hose. The old brake hose really doesn't show any outward damage (211K miles). But, I wanted to attempt this simple/fast change (haha) to see if it would resolve the slight right pull I'm experiencing when braking. So, the brake fitting was awkward to pull out of the old hose after I had finished unscrewing the brake fitting. And, now the brake line will fit into the brake hose ok, but, the brake fitting appears to have been spread out by the brake line flare too far to allow it go into the brake hose fitting (the old brake hose or the new brake hose). I'm tempted to take a pair of pliers and crush/squeeze the end of the brake fitting.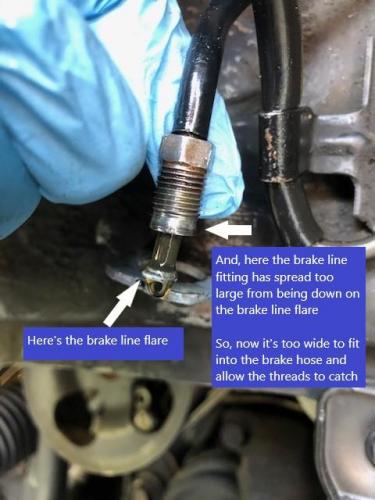
-
Over 200K miles and noticing an occasional pull to the right when braking, so, I decided to change front brake hoses. When i removed the front right hose (passenger), as I unscrewed the brake line fitting from the brake hose fitting, it seemed to not want to separate/uncouple. But, with some ample pressure it did finally pull apart. However, when I try to thread the brake line fitting into the new brake hose (fitting) the threads never want to catch. From a little research I was under the impression that the brake line fitting is a M10 x 1.0 thread. I went to Napa and tried to match a bolt thread into the old brake hose, it was not M10 x 1.0, but, 3/8 x 24...I purchased a bolt and nut with this thread pattern thinking that I could use the nut to run onto the brake line fitting to true-up and clean the threads of the brake line fitting. But, I cant get the nut past the flare of the brake line. And, it seems that there's a compression sleeve in between the flare of the line and the beginning of the threads that won't allow the nut past to even begin touching the threads of the fitting. Is there a trick to starting the brake line fitting into the brake hose? I cannot get the brake line fitting to start into either the OLD or the NEW brake hose.
-
FWD Rear wheel hub bearings
wtruck replied to wtruck's topic in 04 - 09 Lexus RX330 / RX350 / RX400h
Yes, I have a 12-ton hydraulic press. I've used it to press bearings in a Saturn front wheel hub assembly. I was thinking that I could just pull the rear hub assemblies to press out the old bearings, and, press in the new bearings. But, I cannot find just the rear bearings. I keep finding (online) just the wheel hub assembly with the bearing (1AAuto, RockAuto, Napa, O'Reily's, Autozone) -
I have been searching for wheel bearings for the rear wheels of a 2007 RX350 FWD, but, can only find the wheel bearing hub/and bearings together. Has anyone ever pressed out the rear wheel bearings from the hubs and just replaced the bearings and not replace the entire hub?
-
Oil Cooler Line - replacement
wtruck replied to wtruck's topic in 04 - 09 Lexus RX330 / RX350 / RX400h
I took the RX350 to Performance Lexus (Cincinnati) and they inspected the oil cooler line repair. They said that it is ok, but, that..... oil cooler throttle body O-ring was leaking valve cover gaskets had some seepage timing chain cover was/is leaking power steering line is leaking $4000 estimate I had the O-ring replaced on the oil cooler throttle body. When I returned home with the vehicle it immediately discharged antifreeze. I found that the radiator neck filler had broken its lower tip. I replaced the neck filler with Dorman 902-408. i.e. The neck filler has blown off one more time since replacing. I had left the original plastic seal on the throat of the radiator nipple that the neck filler connects onto, along with the new O-ring that came with the Dorman part. So, I removed the plastic gasket (and have now lost it). I plan to flush the coolant system this week along with a proper burping. i.e. -
I just purchased my 1st Lexus....used 2007 RX350 FWD The seller had just had Lexus dealership (Performance Lexus, Cincinnati) replace the oil cooler line due to oil leak. And, this is one reason I purchased the used vehicle. But after a week i was noticing oil leak and removed all the plastic under coverings. I also performed an oil change. I've noticed that the hardest to reach nut (on stud) holding the oil cooler pipes (in between the dipstick & oil pan) appears to keep collecting oil. This is making think that the dealer was not able to correctly torque this nut and/or not seat the gasket correctly. Can I, should I, contact the dealer to repair?
.thumb.jpg.9147fa2b11e6419212350c77985896c6.jpg)


