-
Posts
1,597 -
Joined
-
Last visited
-
Days Won
30
Content Type
Profiles
Forums
Events
Gallery
Store
Articles
Videos
News & Articles
Everything posted by sha4000
-

Question About Changing Cam Seals On 98 With Vvt-I
sha4000 replied to sha4000's topic in 90 - 00 Lexus LS400
Yeah I'm trying to put a write up together in word. I don't know if It can be as precise as your how-to but I'll try. I'm probably just going to link your TB tutorial and richardkwons Valve cover tutorial to get the engine opened up. I'll be posting all my pics and what I did too though. My drive belt is making more noise than normal I think though I hope I don't have to replace any of those pulleys anytime soon. I did scrub them all with soap and water plus lots of brake cleaner to get most of the caked up oil off. -
Is your car throwing any codes?
-

Question About Changing Cam Seals On 98 With Vvt-I
sha4000 replied to sha4000's topic in 90 - 00 Lexus LS400
Finally got it done. I made too many mistakes that I'll get into tomorrow. No leaks so far and the car started just fine. -

Question About Changing Cam Seals On 98 With Vvt-I
sha4000 replied to sha4000's topic in 90 - 00 Lexus LS400
I actually used your method the first time but i googled and read a post where the guy removed the tensioner to provide more slack for the belt. I kept having a problem when backing the left cam up that the belt would jump a tooth. It's pretty simple after the fact though. While backing the left cam I would hold down on the belt so It did not move. Then I pulled the belt with just enough force to keep it still while using my let hand to get the belt started on the right cam. Once it was on the right cam I could let go of the belt on the left cam and work the belt onto the right cam. The trick is that you have to get the right cam side of the belt on EVENLY around the edges and it will slide right on there. I know that in your tutorial you put the belt on you installed the tensioner but that was not working for me so I installed the tensioner after the belt was on like another guy did. I also used your method to torque the crank bolt. I was going to use my cam pulley holder tool but could not find the other bolt to screw into the holes. It would not have worked any way because that 1 bolt I did have did not even stand up to the torque of the power steering pulley. I'll get a pick of the bent bolt later. I can't find one of the nuts for the fan coupling though. I bagged EVERYTHING which is the best tip EVER but it must have fell out somewhere. I'll have to look around my various boxes and bags. The old belt only had 70k on it and all the teeth were good as well as the backside but it was showing some wear on the sides. I can't remember if it was an OEM belt though. -

Question About Changing Cam Seals On 98 With Vvt-I
sha4000 replied to sha4000's topic in 90 - 00 Lexus LS400
I had to remove the belt and get at it from the back. I removed the belt,pulley and front camshaft bearing cap. That was the only way to get at the back of the bolt with the tools I had on hand. I alternated with a pair of needle nose pliers and wire cutters for like an hour because they both kept slipping off the threads. When I got enough of the bolt out I put a pair of grips on it and it was smooth sailing from there though. I put the crank to TDC and then move it to the 50 degree spot and marked both cams plus put a mark on the timing cover to mark the 50 degree mark for the next TB job. Then I removed the tensioner and wiggled the belt off the passenger cam while watching the drivers cam closely. After getting the bolt out and putting it all back together minus 1 pulley bolt I just popped the tensioner back in there and torqued it without compressing it before hand. When I assisted on the first TB with a seasoned mechanic ( Yes he did most of the work ) I didn't remember seeing him compress the old tensioner so I figured it was ok. I rotated the engine several times and ALL the marks lined up perfectly. Do you think I should pull the tensioner back out and try to compress it first before re-inserting it? -
Glad your on the way to figuring things out. Seafoam makes everything better lol.
-

Question About Changing Cam Seals On 98 With Vvt-I
sha4000 replied to sha4000's topic in 90 - 00 Lexus LS400
Yeah I'm ordering the bolts now. Is it hard to reset the tensioner if the belt has to come off? Just thinking ahead. -

Question About Changing Cam Seals On 98 With Vvt-I
sha4000 replied to sha4000's topic in 90 - 00 Lexus LS400
Good info but I hit a major snag. It's all my fault I must admit though. I wrote down all the torque specs for the various bolts but made a mistake and put foot pounds instead of inch pounds for the cam pulley. Everyone knows what happens next. The first bolt snapped on the right pulley. I'm not even that *BLEEP*ed because the way my mind works is what's done is done now find a solution. I've been so focused on those cams that the stress made me make a mistake that I should not have made. To make matters worse the TB is on with tension and everything ( I wanted to confirm the timing which is perfect by the way ). Unless I can back bolt I will have to remove the belt to get it from the back. All that stressing about the cams to get undone by a little bolt lol. -

Question About Changing Cam Seals On 98 With Vvt-I
sha4000 replied to sha4000's topic in 90 - 00 Lexus LS400
Thanks landar I don't mind working outside as long as it's not freezing or burning up. I do miss my 2 car garage in Georgia but that's another store. Anyway I'm having the same issue as others before me. I can't get the TB on the passenger cam. I remember when I helped/watched do the first TB at 120k that the right cam actually moved clockwise but not actually turn when you pull on the ratchet. This time however it turns but doesn't actually remove the tension. Any ideals? And I'm well versed on your TB thread but a lil frustrated now. I wasted 2 days agonizing over turning the cam when there was nothing to worry about at all. I even found a thread today after the fact that would of helped me on day 2 of this job. It clears up the question of turning the cam. http://www.clublexus.com/forums/ls400/580161-how-to-turn-the-camshaft-pulley-to-match-timing-mark-on-the-belt-3.html?styleid=14 -

Question About Changing Cam Seals On 98 With Vvt-I
sha4000 replied to sha4000's topic in 90 - 00 Lexus LS400
I'll probably just cut the raised portion with a razor as that thought came to mind. A file would be good but I don't have one in hand. I'm taking lots of pics and will some sort of how to to make it clearer for others when changing the can seals. Even though looking back if you DO follow the FSM it should work just fine. Is Just that the manual can be confusing to some of us at times. -

Question About Changing Cam Seals On 98 With Vvt-I
sha4000 replied to sha4000's topic in 90 - 00 Lexus LS400
It's a small gash in the aluminum that is raised above the surface slightly. Maybe a mm or so. -
-
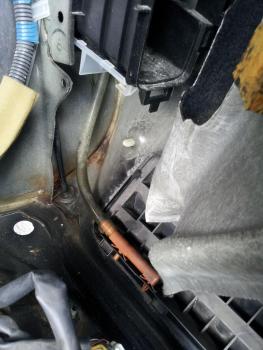
If you pull the trunk carpeting on the sides of the trunk you will see the drain tubes also. Then you can formulate a plan to come at it from the bottom.
-

Question About Changing Cam Seals On 98 With Vvt-I
sha4000 replied to sha4000's topic in 90 - 00 Lexus LS400
Does anyone think that this nick on the head is going to be a problem when installing the valve cover gasket? -
Is your check engine light on? If the cylinders were not firing properly it would trigger a code. If so go to aotuzone and they will pull the codes for free and give you a printout of the codes with a slight description, Then let us know what they say.
-

Antenna Repair If Replacing The Mast Doesn't Work!
sha4000 replied to Garo_mcc's topic in 90 - 00 Lexus LS400
In the US the 98-00 LS does not have an antenna mast it is built into the rear window. Where are you from Mile High Flyer? -
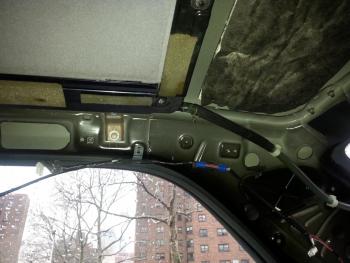
You should be able to move the trim that holds the headliner to at least see the rear sunroof drain tubes. The only way to see the actual rear drain holes is to remove the headliner.
-
Don't burn it lol. I know it seems like too much at times but just work through your progressions of diagnosis eliminating one thing at a time. Landar was correct that I did not think the seafoam would fix your issue but I waited for you to report back on your long term reliability of that method. Just keep reporting back with what your doing to eliminate possible causes and I'm sure we will get it straightened out. Sometimes these things take a very long time for DIYers because of the lack of diagnostic tools though.
-

Question About Changing Cam Seals On 98 With Vvt-I
sha4000 replied to sha4000's topic in 90 - 00 Lexus LS400
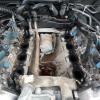
I'm actually in NYC doing it outside by my mothers housing complex since Your not allowed to work on cars in the development where I live. I can get away with doing light work that I can finish relatively quickly where I live but not major work like this where I have had the car jacked up since Monday. The good thing is that I grew up where I'm working and everyone knows me so it's not an issue. That's a good suggestion about the second bearing cap that I will try tomorrow. While it was raining I decided to clean up the pulleys and assorted pieces that had oil all over them so I will have a clean engine when it's all back together. The throttle body looks like it had oil init and I'm wondering how it got there. The reason why I think it was oil is that I could wipe it off with mechanic towels without applying any solvent. There was some carbon build up but not anything drastic. Here are some before and after pics. -

Question About Changing Cam Seals On 98 With Vvt-I
sha4000 replied to sha4000's topic in 90 - 00 Lexus LS400
-

Question About Changing Cam Seals On 98 With Vvt-I
sha4000 replied to sha4000's topic in 90 - 00 Lexus LS400
Well I got the courage up and turned the exhaust cam on the drivers side to get the markings and the service hole lined up. It gave some resistance and actually snapped back on the last half turn so I had to move it back forward again. Talk about nervous! But that is done and I hope it's Ok since there is no turning back now. So I loosened all the bearing cap bolts in the sequence that the manual tell you to do, then removed them but ran into another issue. When I tried to lift the front bearing cap which is the one in back of the pulleys and the OCV ( Oil Control Valve ) goes into the cam seal was stuck to the bearing cap on top. You'll see what I'm talking about in the pics. So since the seal is stuck to the bearing cap when I try removing the cap it also pulls the intake cam up with it. I tried holding the cam down with the wrench while pulling on the cap to see if I could separate them but it was no go so I left it the for the time being since it was starting rain. Some drops of water got on the cams from the slight drizzle before I closed the hood. Sort of like that annoying mist that gets on your windshield when it's not really raining yet. I hope that wont be an issue. -

Question About Changing Cam Seals On 98 With Vvt-I
sha4000 replied to sha4000's topic in 90 - 00 Lexus LS400
Yeah billy that is my exact problem too and then I have to head over to the other forum also. The good news is that I found that OCV filter no one could seem to locate. -

Question About Changing Cam Seals On 98 With Vvt-I
sha4000 replied to sha4000's topic in 90 - 00 Lexus LS400
Funny thing I could not log onto my account all day and this is not the first time it has happened to me. It kept telling me my password was not correct and then when I chose the forgot password to try to reset it it went through but I never recieved the email. I did that like 6 times. Now all of a sudden it's accepting my password. Any way once I complete this project I will def post all the pics and explained what i did wrong and right. This is real nerve racling lol. The guy that did it a couple of years ago is on my thread in the other forum and trying to be helpful but is real sketchy on the exact details which I hoped he would provide. So I'm most likely back trying to do it on my own unless his memory gets a lil better. I did find out that I have the wrong seals though and need to reorder so this job wont get finished until next week most likely but I'm cleaning up this mess and hopefully have this sorted out by the time they get here. I'm just going to turn the drivers cam to get the bolt in and see where it goes. I'm strictly following the manual at this point. My main worry is how do I line that cam back up when putting it back in it's spot? -

Question About Changing Cam Seals On 98 With Vvt-I
sha4000 replied to sha4000's topic in 90 - 00 Lexus LS400
I got the cable of it was really stuck on there so I had to bang it out from the rear of the lever. Thanks for the advice on reinstalling. I got in touch with a member of the other forum through email and he's supposed to get back to me on how HE did this job. -
What is this a dealer pretending to be an indie shop lol. Total parts for the job are around $300 and they want about $1700 in labor. That's about $170 an hour even if you use the book estimate. My advice is order the parts online from Amazon because you can get them quicker and find another shop that is not trying to rob you. Even if the cams are leaking they are a lot easier to do on your pre VVT-i 97 than on my 98 which i'm in the process of doing right now. Good luck.
- 2 replies
-
- water pump
- timing belt
-
(and 1 more)
Tagged with:


