sriddle1nh
-
Posts
8 -
Joined
-
Last visited
Content Type
Profiles
Forums
Events
Gallery
Store
Articles
Videos
News & Articles
Everything posted by sriddle1nh
-
Received some "preliminary" bad news today. '99 RX300, purchased it new, 295K miles, pampered, etc. Check Engine Light, I have an ODB Reader, P0304, ok, recently had Plugs and Coils replaced, hmmmm. Bore Scope used today after complaint of intermittent rough idle by Toyota Dealer. "Head gasket cracked", coolant under pressure test, increased coolant flow in cylinder 4# as seen thru scope. Looking for a good independent shop (INDY) dedicated to servicing Lexus in Boston, Manchester, Hartford area to double check and give me non-dealership costs to fix. Hopefully not cracked head....... Any assistance would be appreciated.
-
290,045 as of this morning, still runs great HOWEVER, replace the Transmission Fluid, pull out the metal screen, clean and put it back together @ 15K intervals, same with oil, 3K intervals.... Everything else by the book.... Purchased my '99 RX300 new, looking through my spreadsheet, throughout ownership, total costs to maintain, parts, etc. = $28, 334.
-
1999 Rx300 Door Lock Actuator Repair Less Than $15
sriddle1nh replied to indiana's topic in 99 - 03 Lexus RX300
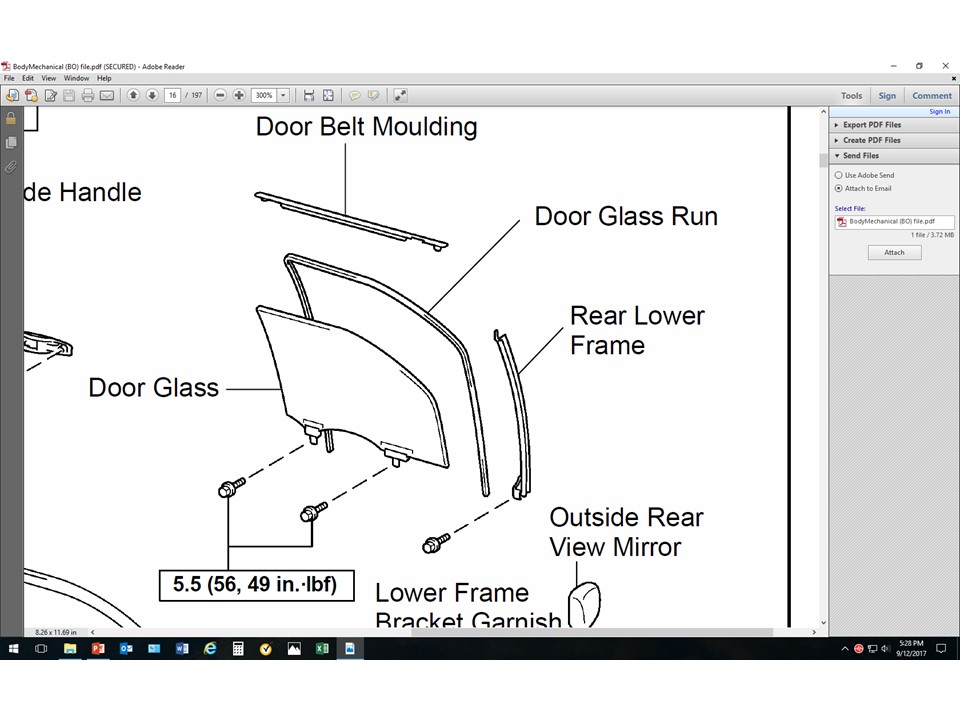
OK went to Dollar General and got a cheap Hand Held Mirror......... When I pulled the old Actuator I had to unscrew what is called the "Rear Lower Frame" (see attached Diagram)...Not too keen on how they named that part, it's actually the Lower Window Track with a rubber guide for the window to continue its slide downward into the door. That Lower Frame goes behind the actuator and you have to unscrew it in order to slide the actuator out. I didn't realize there was a small tab on the top of the Rear Lower Frame (see attached Diagram) that slides/connects into the upper frame (supporting the window when it is rolled-up) to keep the Window Upper/Lower Tracks aligned. I simply unscrewed the Rear Lower Frame, re-inserted the tab in the upper frame and re-attached the screw. ALL IS WELL.............
-
1999 Rx300 Door Lock Actuator Repair Less Than $15
sriddle1nh replied to indiana's topic in 99 - 03 Lexus RX300
TOOK A DIFFERENT APPROACH - Purchased a rebuilt '99 RX 300 Driver's Door Lock Actuator PN 690040-48020 (Left side) and a Trim Removal Kit on EBay. Watched several DIY YouTube Videos, one even in a foreign language I do not speak, then went to it. As with any new venture things always look so easy when you watch a professional do it. I organized all the removed screws into separate bags with locations annotated. Hardest things: (1) Removing the Woodgrain Panel that contains the window switches, it's not apparent how the top locking tab connects until you remove it. (2) Disconnecting the actuator cables that attach to the exterior knob, some videos said to simple reach up inside the door and unsnap the cables without any hints how to do it so I removed the knob and did-connected the cables while extending the knob assemble outside the car, not that hard but would have been nice knowing up-front..... (3) Nothing mentioned that there is a window track that wraps around the rear of the actuator that has to be unscrewed then swung-out in order to remove the actuator itself. On reversing the process and installing the replacement nothing addresses the Window Track you have to maneuver around......All seemed to go well, Door Locks work fine (like a new car after waiting 3 years to fix) then went to the bank drive thru yesterday... OH NO.....PROBLEM, window retracts about halfway then starts binding-up...........I quickly reversed the window direction, never to touch that again until I investigate further...In the next day or two I will remove the inside panel again.......... With this post I hope someone might have some experience with the Window Track and walk me thru how to realign it, no doubt I'll have to test the window with the panel off to ensure it's A-OK before sealing everything back up. Any suggestions would be greatly appreciated........ THANK YOU............ -
Seat Belt Assembly Removal vs. Potential Impacts
sriddle1nh replied to sriddle1nh's topic in 99 - 03 Lexus RX300
Filehorse......All can say is WOW, never thought cleaning the Nylon Seat Belt Webbing would result in a Good-As-New Retracting Seat Belt…… As the video instructed, I extended the belt all the way out then locked it with a clip. I added a small mixture of Lestoil and the Dawn Ultra Platinum to a 5 gallon bucket, filled it ¾ full with very hot water and then let the belt soak for three hours. I pulled the belt from the water, dried it off with a Towel then hit it with some Armor all Multi-Purpose Cleaner. Changed-out the water, added some Downy Ultra Liquid Fabric Softener and refilled with very hot water again. Let the Belt soak for another hour then a thorough rinse and fully dried…… Amazing !! Like the Driver's Door Lock Actuator, I waited way too long.......Thanks Again Filehorse for the TIP....... -
Seat Belt Assembly Removal vs. Potential Impacts
sriddle1nh replied to sriddle1nh's topic in 99 - 03 Lexus RX300
Filehorse, GOOD STUFF & Yes, I'll take a stab at that today before going down this other road................. -
Seat Belt Assembly Removal vs. Potential Impacts
sriddle1nh replied to sriddle1nh's topic in 99 - 03 Lexus RX300
Trevor, Thanks for your response. I have been roaming thru other Threads and saw similar Warnings. I learned about Capacitive Charges several years ago from an HVAC Rep working on an outside A/C Condensing Unit, big time charge stored as Start-Up Boost........ I sent a note to the author of the YouTube suggesting he add your comment. I've also been looking at the Lost Power Posts and see there's a process to get things back up and running, just wondering how having the negative terminal disconnected for say 4-5 days would affect things. -
Hi, I'm a new member but have followed this site for many years. I just replaced the Driver's Door Lock Actuator with a rebuilt unit I purchased from EBay. Last Fall I replaced the Mode Servo Motor and now I'm down to two items before the winter arrives. The Remove/Replace the Air Mix Servo and Remove/Replace a Non-Retracting Driver's Seat Belt. I've watched several YouTube Videos on how to remove the Seat Belt Assembly, seems pretty simple. I intend to physically take the pulled Assembly to "SafetyRestore", a Business based in Westfield, MA that refurbishes the Unit with a 24 hour turnaround. In the YouTube it has you disconnect the Negative Terminal to the Battery up-front, I've read WARNINGS about the Explosive Potential of these units. Additionally, it would be a good 3 day turn-around once the unit is removed until the refurbished unit is re-installed. I'm asking this forum for potential impacts with my approach, I have no clue how disconnecting the Seat Belt Unit's wiring harness will affect other elements within the vehicle. Could someone set me straight with regards to any potentials I am unaware of. I purchased my '99 RX300 new and now going over 2350K Miles, no rust and I always have the scheduled maintenance performed on-time, even do the Transmission Fluid and have the metal screen cleaned every 15 K since I only put 5 K a year on it. any Technical assistance would be appreciated.