


lexuseng
-
Posts
82 -
Joined
-
Last visited
-
Days Won
1
Content Type
Profiles
Forums
Events
Gallery
Store
Articles
Videos
News & Articles
Everything posted by lexuseng
-
Serious Door Lock Problem
lexuseng replied to lexuseng's topic in 93 - 05 Lexus GS300 / GS400 / GS430
Tomeniss, tried to PM you but unable to, probably need to update your profile. -
Water Leak When It Rains
lexuseng replied to somepeon's topic in 93 - 05 Lexus GS300 / GS400 / GS430
I don't have the answer but I have a 2001 GS300 that leaks in the same area. I have taken the panel down and found nothing. Also did the flushing of the drain holes in the corner where the sun roof is. The bizarre thing is that it only happens about once a year. I figure the sun roof wasn't closed completely but after a few of these I realized that isn't the answer. Someone suggested it might be the front window seal but I've always noticed it after the car has sat awhile. I figure one day the windshield will be replaced and maybe the problem will be solved. -
Serpentine Belt Tensioner
lexuseng replied to bplaney's topic in 93 - 05 Lexus GS300 / GS400 / GS430
The only thing I've ever judged is if the bearing felt bad. If it did, I replaced it, not the whole tensioner (about $170), just the bearing for the wheel (about $15). Does require removing the top timing belt cover to expose the 3 bolts holding the tensioner. I've never seen anything aoout the tensioner failing. -
About To Replace Lower Ball Joints At 109K Miles
lexuseng replied to bplaney's topic in 93 - 05 Lexus GS300 / GS400 / GS430
Can you supply a parts list for all the items needed for this job? Plus any special tools one should have. Do you need a front end alignment after replacine ball joints? -
Front Suspension Fixes And Fact
lexuseng replied to SKperformance's topic in 93 - 05 Lexus GS300 / GS400 / GS430
I agree, great write up. My 2001 GS300 has 110K miles on it now so this is something I am definitely considering now. About how long does this job take for the weekend mechanic? Other than brakes, I have never worked on the suspension so just wondering what level of skill you need. I have done more than a few timing belt changes and a few long block swaps but basically all the work I ever do is in the engine compartment. So on a scale of 1-10 with a timing belt change maybe being a 7 (hope I don't start a flame fest for that), where does changing the front arm bushing fall? Is there any "gotchas" that I should be prepared for (such as better have a 4' breaker bar for the crankshaft bolt and make sure not to use a 12 pt socket)? -
Problems With Timing Belt...maybe Not...
lexuseng replied to R30's topic in 93 - 05 Lexus GS300 / GS400 / GS430
If it happens to be the bearing for the serpentine belt, rather than spending $170 on the serpentine belt tensioner assembly, you can replace the bearing for less than $20. On my 2001GS300 it uses bearing part number 6203DUL1, can't say that will be the same for the year in question but the bearing is fairly easy to pound out and replace. I just did this, every once in awhile I could hear a squeal with windows down. With the serpentine belt off you can spin each pulley, you can usually tell if a bearing is bad. -
Serious Door Lock Problem
lexuseng replied to lexuseng's topic in 93 - 05 Lexus GS300 / GS400 / GS430
yeah that seems kinda silly to me also Well I guess you just have to get inside the door and study the workings to know that no locksmith could unlock this door. The mechanism was jammed, so hard that even when I removed the actuator, I could not un-jam by pulling on the cable. A slim jim had no chance, even if it could work on this type of cable system. The only other fix I heard of was someone took it to a body shop. They probably did something similar to access the lock. i guess i would have to see it but there should ALWAYS be a other route besides drilling a hole into the car, regardless you got it fixed and thats what matters sJust to be clear, I drilled through the handle, doesn't quite give you the same image as drilling a hole in the car. And you think I wanted to drill a hole in my handle?? Cost for a new handle, about $65. Cost for a locksmith, probably much more even if it was possible. And since you almost can't see the epoxy repair, the cost to fix this, $4. -
Serious Door Lock Problem
lexuseng replied to lexuseng's topic in 93 - 05 Lexus GS300 / GS400 / GS430
yeah that seems kinda silly to me also Well I guess you just have to get inside the door and study the workings to know that no locksmith could unlock this door. The mechanism was jammed, so hard that even when I removed the actuator, I could not un-jam by pulling on the cable. A slim jim had no chance, even if it could work on this type of cable system. The only other fix I heard of was someone took it to a body shop. They probably did something similar to access the lock. -
Is there a way to disable the key remote? My wife lost her keys (2001 GS300) in a large parking lot where she parks every day. To prevent someone from just strolling through the parking lot with the remote, is there a way to disable the remote temporarily?
-
Serious Door Lock Problem
lexuseng replied to lexuseng's topic in 93 - 05 Lexus GS300 / GS400 / GS430
You do need to remove the coupling from the old motor shaft and replace the coupling on the new shaft. This was not easy but check this link out, there's a ton of info on how to do this in this thread, post #214 has a good picture. Basically you need to support the coupling so you can pound the shaft out of the center of the coupling using a shaft of smaller diameter. That's the hard part. The easy part is using a vise to push it on the new shaft. http://www.clublexus.com/forums/gs-second-...ors-diy-15.html -
Serious Door Lock Problem
lexuseng replied to lexuseng's topic in 93 - 05 Lexus GS300 / GS400 / GS430
I finally was able to open the door. I studied the opposite good door and determined there was no way to slim jim the door but I was able to determine what I needed to do. I ended up drilling a 3/8” hole through the door handle to access the lock. I could post a picture of where you would need to do this but it would be posting a way to break in the car although most thieves would just break the window (I could post if there’s enough interest). I plugged the hole with black epoxy so it could be driven without looking hideous but it actually looks decent (good thing my car is black) so I may not replace the handle. I did take a picture of what caused the jam and have it posted here. This is the inside of the actuator. It is pretty apparent what the problem is. I couldn’t get it to un-jam until I took it apart. How did this happen? Well I hate to admit it but this was a unit that I took apart last summer to replace the motor. Worked fine for about 6 months then it locked up. The replaced motor wasn’t the issue but gluing the case back together probably was. I had carefully cut the case apart and the case is pretty intact and even with the case open, I couldn’t see how the case could deform enough to allow the worm gear to climb on top of the tooth. Everything fits tight. But with high temperature variations, vibration, Murphy’s law, it is obviously possible. I’m not the only one who has replaced the motor so is this just a fluke? I was very happy to save $200 but I have to share the bad with the good. So a word of caution to those willing to replace the motor instead of replacing the entire actuator, be very careful gluing the case back together. This time I added some self tapping screws along with the glue as shown. If it jumps again, then it wasn’t a fluke and I’ll buy a new one, at least I already have the have the hole in the handle. ;) One last note, I had mentioned in previous post that lifting the door handle helped manuever the actuator out (rear door). Now that I have done both rear doors and the right twice, lifting the door handle didn't seem to help this time. It just takes some patience to pull, twist, turning, to manuever the actuator out. You definitely don't need to take the door handle out first (which is very difficult to access with the actuator in place). gs_door_lock.ppt gs_acuator_screws.ppt -
2004 Gs 430 Dead Battery
lexuseng replied to orindaman's topic in 93 - 05 Lexus GS300 / GS400 / GS430
"Just follow the previous instructions from eatingupblacktop and myself, place your ammeter in series with the battery and start pulling fuses until the draw is less than .250ma (or 1/4 of an amp) which is the industry standard of "Acceptable Maximum" for module keep alive memory and radio memory, etc." If you're into the fuse box pulling fuses, you could just use your voltmeter in Amp mode and put the leads in series between each fuse terminal. That might be quicker to isolate which circuit is at fault. It would take some small probes but to make this easier, you could take a blown fuse and connect your leads to each half of the blown fuse (solder or alligator clip) so all you need to do is plug the fuse into each circuit. Not sure which method would really be easier since I haven't done this but another idea. -
REB, I just replaced mine, 99 GS-300 yesterday, got the display from dcfish and replaced it myself in less than 25 minutes start to finish, instructions were included. I'm pretty mechanically inclined needed a phillips screwdriver, 10mm. socket. It's actually pretty easy all for $140. If you need help let me know, I can walk you through it. You just need to get the LCD display from dcfish (he's a really good guy) and I received the display in couple of days. Sent payment through paypal. Regards, Blaise $140 for burned out 25 cent LED? I'm wondering if it is possible to disassemble the display unit to replace the burned out LED. Would another 25 minutes worth of labor allow someone to unsolder the bad LED and replace it? Is it a sealed unit or is the LED mounted to a circuit board that could be soldered (like your cell phone). Anyone want to post a picture of what the display unit internals look like? (not trying to take business away from dcfish, not everyone would be willing to take it to the next step, but $140 for a burned out LED is more than I'd want to spend. Don't have a burned out display yet but seems like a lot of 2001 are writing in). If it were that easy I would do repairs rather than replacements. It is a LCD not a LED. ;) Owners used to replace the entire headunit when there LCD burnt out for a considerable amount of $ more. Yes it's a LCD but isn't the part that is failing the backlight which is most likely a LED? Or are the segments actually disappearing? Like I said, hasn't happened to mine yet. There are 3 led's soldered onto the PCB board behind the LCD panel. The LCD panel fails and the digits no longer display. So no matter how the LCD is lit up you can't read it. When yours fails you know where I am. ;) Great, something to look forward to ;)
-
REB, I just replaced mine, 99 GS-300 yesterday, got the display from dcfish and replaced it myself in less than 25 minutes start to finish, instructions were included. I'm pretty mechanically inclined needed a phillips screwdriver, 10mm. socket. It's actually pretty easy all for $140. If you need help let me know, I can walk you through it. You just need to get the LCD display from dcfish (he's a really good guy) and I received the display in couple of days. Sent payment through paypal. Regards, Blaise $140 for burned out 25 cent LED? I'm wondering if it is possible to disassemble the display unit to replace the burned out LED. Would another 25 minutes worth of labor allow someone to unsolder the bad LED and replace it? Is it a sealed unit or is the LED mounted to a circuit board that could be soldered (like your cell phone). Anyone want to post a picture of what the display unit internals look like? (not trying to take business away from dcfish, not everyone would be willing to take it to the next step, but $140 for a burned out LED is more than I'd want to spend. Don't have a burned out display yet but seems like a lot of 2001 are writing in). If it were that easy I would do repairs rather than replacements. It is a LCD not a LED. ;) Owners used to replace the entire headunit when there LCD burnt out for a considerable amount of $ more. Yes it's a LCD but isn't the part that is failing the backlight which is most likely a LED? Or are the segments actually disappearing? Like I said, hasn't happened to mine yet.
-
REB, I just replaced mine, 99 GS-300 yesterday, got the display from dcfish and replaced it myself in less than 25 minutes start to finish, instructions were included. I'm pretty mechanically inclined needed a phillips screwdriver, 10mm. socket. It's actually pretty easy all for $140. If you need help let me know, I can walk you through it. You just need to get the LCD display from dcfish (he's a really good guy) and I received the display in couple of days. Sent payment through paypal. Regards, Blaise $140 for burned out 25 cent LED? I'm wondering if it is possible to disassemble the display unit to replace the burned out LED. Would another 25 minutes worth of labor allow someone to unsolder the bad LED and replace it? Is it a sealed unit or is the LED mounted to a circuit board that could be soldered (like your cell phone). Anyone want to post a picture of what the display unit internals look like? (not trying to take business away from dcfish, not everyone would be willing to take it to the next step, but $140 for a burned out LED is more than I'd want to spend. Don't have a burned out display yet but seems like a lot of 2001 are writing in).
-
Serious Door Lock Problem
lexuseng replied to lexuseng's topic in 93 - 05 Lexus GS300 / GS400 / GS430
All other doors work properly with remote or manual. This rear door is stuck in lock position. I plan on taking apart the good door so I can see what I can learn about the linkage that would cause it to get stuck in this position. Then maybe I can slim jim with the window down. I'm also thinking maybe when the weather warms up or with time/vibration it might cure itself. Just need it once so I can take the door apart. Just hoping. At least it's not the driver door. -
I wouldn't purposely take my 2001 GS300 out in the snow but during one of those snow storms we have here in Seattle during rush hour, where people abandon their cars on the freeway, my GS300 made it home on almost bald tires. In snow mode, it moved past stranded Beamers, fwd cars and even waved to a stranded state patrol on a freeway entrance ramp. So for a RWD car, it's not bad.
-
There are many postings on how to replace door actuators but what do you do if the door is locked and you can't get the door open to fix the lock? It is a 2001 GS300 and the child lock is not on (although it can't be checked right now and I have tried to open from the outside). The door lock is stuck in the lock position and if I force it to the unlock position, I still can't open the door from the inside or out (window still opens). When I force it to the unlock position, it does return to the lock position so I'm thinking the linkage is still connected but something is preventing it going to the unlock position. Obviously I have to open the door to have a chance to fix it. Does anyone know how to slim jim this door? It might be my only option.
-
I have a 2003 IS300 which I love. It is a fun car to drive, and incredibly reliable. However, there are a few things I do not like, and they may relate to your questions. I have the 5 speed manual transmission, and in my opinion it's a really lousy transmission and clutch. I've driven manual transmission small cars since the late 1970s, and this one is by far the worst shifting one I've owned - very difficult to shift smoothly, and the shifter itself feels sloppy. My impression is that Lexus offered a manual transmission in the IS300 as an afterthought, and didn't really do a "Lexus quality" job with the design. However, aside from not liking the way it shifts, I have had no trouble with the transmission. (I complained about this when I bought the car new, and the dealer let me drive a couple of other new ones to show that they're all the same way.) I think you really need to watch out in terms of snow and ice, although I can't say how it is with snow tires. My car is TERRIBLE in any wet or slippery weather. It is by far the worst car I've ever had in that area - very difficult to even drive in rainy conditions without tire slip. I have to suspect that it's partly due to the sport tires you have to use on this car - but I'm on my 4th set of tires now, each one a different brand, and it's had wet weather traction problems with all of them. In my opinion, you'd be happier with either front wheel drive or all wheel drive in that respect. As to repair costs, it's hard to say since the car never breaks!! I would agree with sport tires the car is scary when wet. I switched to Yokohoma's (from Discount Tire) about 6 months ago, what a difference! It's not just because of new tread either, my old tires had decent tread on them when I bought the car. My confidence in the rain has quadrupled, I use to have to drive like grandma in the rain.
-
Doing My First Is300 Oil Change..need Help
lexuseng replied to 03GraphiteIS300's topic in 01 - 06 Lexus IS300
The secret I found was to remove the single bolt that secures the transmission oil dipstick. Once that is loose you can maneuver the filter past the tube. A minute to remove the bolt saves 10 minutes trying to figure how the hell you got in the the last time! The effort to remove and replace the bolt is well worth it. I also cut and shaped some scrap tin metal I had to catch the oil from the oil filter and direct it down behind the engine where it drains into a second pan. Obviously the wide part goes under the filter. If I had to make another, I'd make it a couple of inches longer. Hopefully I don't screw up the attached picture.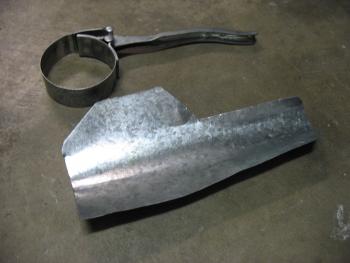
-
Interesting. Did you flush the brakes by yourself without using a brake flush kit or a second person? That would be great. Like I mentioned, I could not use my pressure bleeder, I guess that's what you mean by a flush kit. I did do mine without a second person but I think it would help if there was because you do want to watch both ends, one to make sure fluid is pumping and one to make sure the reservoir doesn't empty. That being said, I don't remember exactly the steps I took. Maybe you should do it and report your steps while they are still fresh in your head. Well I just did the rears again today so I thought I'd add this while it is fresh. I only got 30K miles on my rear pads, probably could have waited a couple of months but once you inspect them you might as well do the job. The rear pads are half the size so I guess that makes sense they don't last as long. So for a 2001 GS300, if you open the bleeder valve, turn the ignition on (don't start engine) and step on the brake, the electric pump for the brake system will pump the fluid out. It will pump as long as you keep the pedal down. It will drain the reservoir quickly but a warning beep will sound when the fluid gets low. So from topping off the reservoir to the beep, it took about 4 refills to drain about a pint of brake fluid out (I'm guessing a little over a cup out of each rear brake). The fluid looked pretty good so I didn't drain more. It does help to have someone step on the brake while you open/close the bleeder.
-
If you're willing to cut open the actuator case once you've removed it from the door, you can fix this for $1. It requires cutting open the case, replacing the $1 motor and gluing the case back together. The steps are outlined very well in clublexus.com. Search for door actuator in the GS forum. There are a lot of pictures and helpful postings that will just about take you step by step. I bought the motors off Ebay for $5 (you have to buy 5). It will take 2-3 hours to disassemble the door panel, remove the actuator, disassemble and reassemble the actuator and replace the door panel. I could probably do the next one in an hour. If you decide to do this, there is no shortcut to break open the case, you just have to carefully cut through the tongue & groove bond around the perimeter. If you pry, you will crack the case. You would still be able to make the repair, it will just look like a kluge. There's a lot of grease inside the case too (gears) so you don't want to get a lot of debris inside.
-
Interesting. Did you flush the brakes by yourself without using a brake flush kit or a second person? That would be great. Like I mentioned, I could not use my pressure bleeder, I guess that's what you mean by a flush kit. I did do mine without a second person but I think it would help if there was because you do want to watch both ends, one to make sure fluid is pumping and one to make sure the reservoir doesn't empty. That being said, I don't remember exactly the steps I took. Maybe you should do it and report your steps while they are still fresh in your head.
-
Am I reading this right? You don't need to do the manual brake press routine? There is an electric pump that will pump out the brake fluid? So I could just add new fluid, open up a bleeder valve, and then switch the ingition on? That would be very cool. Can anybody speak to this? I was the original poster but to tell you the truth my memory just ain't what it use to be. Hopefully someone that has done this recently will clarify. What I do remember on my 2001 GS300, with bleeder valve open on rear brake, stepping on pedal will do nothing. You have to turn ignition on to get fluid to flow. What I don't remember is if you have to step on the pedal with ignition on to get it to start to flow (ie does the system have to sense negative pressure). But there is definitely an electric pump that makes this easier than the 2 person "up/down" method. Just make sure not to run out of fluid in the reservoir when you do this.
-
90 K Maintenance And Leaking Water Pump Story
lexuseng replied to kurtk's topic in 93 - 05 Lexus GS300 / GS400 / GS430
This ought to make all the weekend mechanics out there very happy. Just did everything mentioned here for $450 in parts (including new thermostat, lower hose, air filter), OEM parts from Irontoad. A weekend mechanic could make between $100 and $200/hr doing this job! Sure beats the minimum wage I normally make working on cars. I guess it helps to be working on a Lex though.


