Leaderboard


Popular Content
Showing content with the highest reputation since 03/19/2017 in all areas
-
I was also sold this "invisible" ad on! Only to be told by the dealership "after" that it's not adjustable. So basically it's just a dimly lit thin strip! This should be included. Lexus could and should've done better!4 points
-
3 points
-
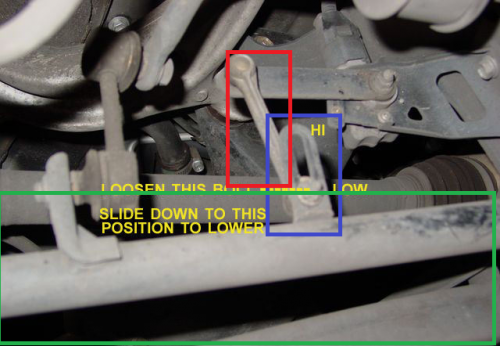
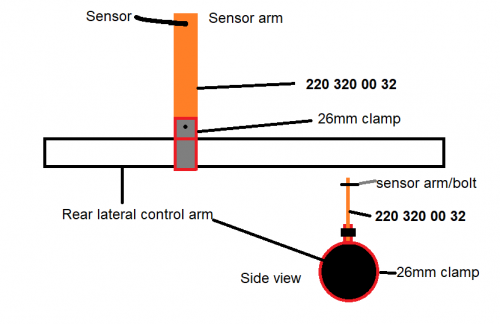
Hi. Some friends of mine suggested that I should post this here for more people to see. Hopefully it'll help people for years to come. You will need: About 50 bucks budget for the balljoint rod and the pipe clamp. Height sensor with bracket. 10mm wrench Washers that fit 10mm/M6 bolts. 10mm/M6 nuts Some smaller (8mm wrench) I own a 2001 LS430. The height sensor control arm's slider has rusted and become damaged over the last 19 or so years. The ball joint rod to the height sensor has also seized too. The height adjustment rod there in the red was seized, and the height slider in the blue was badly corroded and broken off. Rather than buy an entire control arm (green) this is an alterative method to repair it The arm is ~26mm in diameter. Buy yourself one of these pipe clamps in 26mm diameter. Or make one. Shouldn't be expensive. The hole needs to fit a M6/10mm bolt. Grind off the remnants of that slider from the control arm, and slide the pipe clamp over, and put your 10mm/M6 bolt and nut through and secure it in place where the slider used to be. Rather than using the control arm as a slider, we can instead use a sliding ball joint rod such as this one; This is a 220 320 00 32 from Mercedes - a height adjustment rod with a 8mm locking and a 10mm/M6 ball joint bolt. You can pick one up off eBay for cheap. Or find some other M6/10mm adjustable ball joint rod. Look at the diagram and try to imagine it in your head. This is what your bracket and rod/clamps should look like. One day I might snap a picture of what my repair looks like, but I hope you can make out what I mean via the diagram. This repair should be very easy. Maybe some sanding/grinding and surface preperation. The clamp will hold on tight and is easy to replace. The adjustable link rod will last longer and allow for easy adjustment, and less risk of corrosion damage. Hope this helps. This is a fairly easy job and took me less than 2 or so hours to do.
 3 points
 -
Did I mention this?..... I don't like the fact that our governments plan to force us to buy EVs. I wouldn't mind having one, as we already have solar panels and don't pay for electricity, but I think we should be able to choose what we drive (within reason).3 points
-
At the part store they run a load test on the battery that mimics a big draw. If it holds up to a certain voltage it means the battery itself is not weakened yet. As the battery ages it will weaken as in not be able to supply a given amount of cold cranking amps. When its cold the oil thickens some thereby making the engine have to work harder to rotate. Hence the term "cold" cranking amps. I'd say you should investigate why the check engine lamp is lighting up. It could be a sign of what is taking place to cause your car to struggle to crank over. The part store can often "read the code" and determine why the CEL is lighting. My gut tells me your voltage regulator in the alternator is hit and miss. A long time ago that was a little box on the fire wall or fender. These days they are inside of the alternator. It determines how much electricity goes to the engine to keep it running and to the battery to charge it. It only has to be off by a little to keep the engine running but not have extra to charge the battery. Another issue could be a parasitic drain. An out of the ordinary draw on the battery when the car isn't running. In my 04 GS 300 for example the CD changer kept trying to change discs and the seat memory kept activating. Now I could not hear the disc changer nor was the seat memory moving the seat, but they were drawing on the system leading to a weak or dead battery if I didn't drive the car every day. Yet another issue may be short trips don't allow the battery to charge enough. Example; start the car, drive to a store 10 minutes away, finish there, start car and drive 10 minutes to another store. Never giving the engine a good 30-45 minutes to charge the battery back up to the voltage used to start the car can also lead to the hard to crank or dead battery issue. Hope you find it soon and it's a cheap and easy fix.3 points
-
No reason to upgrade, Those stock wheels are Classic on the SC 😉3 points
-
But you love the Covid virus? 🙄3 points
-
I just installed the rr racing supercharger. It’s the only way to go bud3 points
-
That one is my son's new puppy. Her brother came home with me Chocolate lab mom, stranger in the night dad Yesterday they played all afternoon.

 3 points
 -
Purchase has been made!...I could not turn down the deal I got & the actual ES...2020 ES 350 'premium' with only 11k miles in Nebula Grey Pearl (windows are already tinted)....over 2 years of full factory warranty remaining; 1 owner, full service history & Lexus CPO. Our 'premium package' in Canada is equipped quite differently than our friends south of the border....with more features / standard equipment. Originally I wanted the UL package....but in these parts, they are very rare (I reached out to 17 Lexus dealers in a 400 mile radius of me...the UL units that are available are 5 to 6 k more & only about 20% are actually at Lexus dealers...the premium pkg checks 95% of the boxes I was looking for....as the expression goes 'don't look a gift horse in the mouth'. I literally have a 6 minute drive to work... I pick the car up this Saturday.3 points
-
I like it when I'm trimming a rose bush, grab one to place in a jar and while heading indoors the Mrs arrives from work so I hand her the rose. Or when I come from work and the dog greets me at the door, tail all wagging-like. And the parrot says "welcome home"…… Or when a nice breeze blows just as the grass cut chore is over and the Mrs brings out a tall glass of ice cold spring water. Or when a new baseball cap fits my noggin just right without adjusting it. Or I step on the bathroom scale expecting to have gained weight but the scale shows I actually lost a little. Or when my son and I went to do the first start after an engine swap, expecting a hard to start issue but ole bessy fires right up. Or when the lawnmover starts first pull……again. Or helping out old people. Or thanking a soldier/veteran. Or tipping the person at the toll booth. Yes I stop and pay in cash so I can do that. Or when the voicemail on your phone was not a robo-call and instead was a friend telling you "hello, here's my new phone number" Or when you sneeze and a perfect stranger says "bless you". Life is short. But smiling makes you live longer. Trouble with being dead is it lasts so long.
 3 points
 -
The cost of dental work, especially deep cleaning by laser and periodontal surgery, but also including implants.3 points
-
That's the view when I pull into the driveway after work. Unseen in the photo is the dog wagging his tail "it's that guy, he's back, yay!!"3 points
-
Update: I think I have got it after all the work, time, and money spent. I started checking again I found an unbelievable vacuum leak around lower intake manifold. replace gasket today runs great thanks for all of the support. something that simple fix. when the engine was swap the starter was replaced. The gasket moved or something apparently cause a vacuum leak. I had no idea a vacuum leak could cause random misfires. I was sure it was an ignition problem.3 points
-
Hi all, I believe I have posted here before a long time ago with my old LS430 LEX, I now have a 2007 LS460L with 110K on it now. I have owned it for a few years now, since 65K miles, and recently I started having acceleration/hesitation problems. I did alot of research, and didn't find very many good answers. I did have the transmission and engine ECU update flashed, with some improvement, but after that didn't solve the problem, I was convinced it was the cylinder head replacement deal, which was way out of my budget with 5 kids....and I thought it was ridiculous that a flagship sedan would need that kind of serious motor work with just 100K on it. Anyway, my mechanic suggested BG 44K fuel system cleaner, NOT available at places like autozone. He sells it for $28 per can, but I found on Ebay for $16.75 and up with free ship. First and foremost, I ALWAYS used quality, premium gas (Shell V-Power or QT), and Techron additive from time to time, so I was super unconvinced about his recommendation. I had even listed my LS for sale, again, convinced that the motor had cylinder issues after reading blogs about LS460 acceleration issues. Also, for the record, I have NO affiliation with BG or anything like that. THIS STUFF WORKS! It truly fixed my hesitation problems, completely. I am no longer selling the car, and am happy again, as it accelerates like it is supposed to. Feel free to read many other peoples reviews on this stuff, its amazing and really seems to work. After i drove it to wrok (25 miles one way) I thought i felt a difference, by the drive home, I KNEW I felt the difference, after the full tank, i was truly smiling. I have ordered 4 more cans for my other vehicles and boat, and suggested it to my friend with a ISF, my brother with an SC430, and my buddy with a Vette. I guess these LS460 cars are just picky after a while and maybe the injectors get gummed up? I don't pretend to be a mechanic, again this was suggested by my Lexus mechanic, After alot of depressing research with no real answer, just wanted to share my experience with any other LS460 owners, as it is a beautiful car, and I was disappointed in what I was thinking the problems I had. It was the best $17 I have recently spent, and if you are having similar weak/lack of acceleration or hesitation issues, i would say TRY IT for less than $20. I believe you can go to BG's site and find a local dealer, again, not autozone or O'Reilly or anything like that, says professional use only lol. Also, need a funnel, comes in a coke can basically. Just my 2 cents, hoping to help out any other LS460 owners out there depressed about their car, it seems most people just said they'd trade it in and buy a new one, but I'm not that rich :)
 3 points
 -
My Daily 😀
 3 points
 -
The Lexus brand cell phone that was a dealer installed option lowered the HVAC fan speed and muted the audio system while a call was in progress. I even connected an aftermarket Nokia CARK-91 phone system I installed in my second (2000) LS400 to mute the audio system but I didn't bother to connect it to lower the HVAC fan speed. Even when a Lexus phone system was never installed, corrosion of the factory installed cell phone harness in the trunk can cause HVAC and audio system issues.3 points
-
20 years ago I swapped a domain name for a Lexus. The love affair started and I am now on my 10th Lexus3 points
-
And Because We All Love Pictures 🙂


 3 points
 -
My Lexus is my weekend car. My daily is my 2009 Mazda 3i.
 3 points
 -
Just acquired a 97 LS400 with 5 keys, second owner, all original paperwork from the dealer including the peel away handbook that came with the car. Have the original window sticker even! Crazy come up from working on the car for a neighbor during the plandemic. Just like to say hi and start helping where I can here, been a tech for over 15 years professionally, 26 cars owned probably more including bikes. Hope to help out and be helped if inrum into some issues here on this new venture. Hope to add an air ride system in the future, tint, visors, etc. Who knows..2 points
-
2 points
-
I changed my oil but haven't changed the transmission oil yet. Haven't had any issues with it till recently. I have owned it for a few months now and it just started to act up by not wanting to shift into fourth gear. So it's been parked for the past week. i have just started reading so much on this vehicle that I'm excited then worried then relieved as I continue to learn more and more. I never had any issue so I would chalk it up to I must not know how to read the dip stick or did I understand it. I am so glad I found this group, the fact that I get replys with their past experiences or some what of a direction that helps. I'm waiting on a mass air flow sensor and new coils already did the plugs. Then with I forgot how many videos I must have watched, but I swear it took me longer to change out 2 of the back plugs then it's takin me on any other vehicle to do plugs, oil and filter for both engine and transmission. They make it so that you have to take your vehicle in to a dealer.2 points
-
I like to check when hot and one has gone through all the gears and back in park, Engine off and wait a couple minutes to settle :)2 points
-
According to Car & Driver magazine, Side note: I have a Samsung 23 Ultra and would NEVER switch to an iphone. My night photos are amazing, I have up to 10X optical zoom, and my stylus can be used to: Remotely advance PowerPoint slides Remotely take photos and videos, up to 30 ft away Translate embedded languages Zoom in to very small text that cannot be pinch-screened Create instant hand-written notes and drawings alone or within photos. I am thoroughly spoiled!🙂2 points
-
re: 400h Thank you for your reply. I'll have to jack it up and check. I happen to have a new crush washer for the drain bolt. I hope I can use that one.2 points
-
Hi all, been the better part of a year since I had reason to pop onto the forums. This post isn't looking for help, but instead offering some friendly advice on doing this job in a different way than the service manual describes (especially for those with back issues like me, because this way, the alternator comes out the top). I recently had my alternator drop out on my '98 LS400 (1UZFE VVT motor), and although I have the service manual, I decided to follow a different path with removing my alternator, because the service manual calls for complete removal of the power steering pump, which I found unnecessary. Instead, I followed the following steps (photos to come at a later date to make it easier to follow along) Tools you'll need- One each 10, 12, and 14mm wrench and socket. (One stubby ratchet or short 12mm wrench will come in handy, but isn't absolutely necessary) also a few extensions. Optional but recommended- One fan clutch removal tool. I have found that this style works best. https://shop.advanceautoparts.com/p/product/22983568 If you don't use a specialty tool like this, you will need a second 12mm wrench. Also recommended is a flex-head ratchet 1. Disconnect negative cable from battery and set away from the terminal to prevent accidentally shorting your electrical system later. 2. Remove all intake ducting, up to the throttle body. There are several vacuum lines attached, as well as a PCC hose. There are also a few 10mm bolts securing the intake. 3. Remove the cooling fan and fan clutch. There are four 12mm nuts holding the fan clutch on the pulley, and this is where you will use the removal tool (if you have it) to make your life easier. You can get away without a specialty tool with loosening each nut by tightening another, and on the last nut, using the box end of a wrench to gain some leverage on a stud where the nut has already been removed. You can pull the fan clutch out the top without removing anything else, just be careful not to hit into the radiator and damage any fins. 4. Remove the serpentine/drive belt. A 14mm wrench on the tensioner, and to loosen the tensioner, you rotate it in the counterclockwise direction. Slip the belt off the idler pulley, and after releasing the tensioner, you can remove the belt. 5. Loosen your power steering pump and reservoir- three 10mm bolts secure the reservoir, and three 14mm nuts and bolts secure the pump. Two fasteners are hidden on the bottom side of the passenger side cylinder head, right towards the front. A flex head ratchet works wonders here, otherwise you'll need extensions to get them from underneath the vehicle. You'll be able to use a ratchet on all these bolts, but not the 14mm nut securing the pump from the front, because it's blocked by the power steering pulley. You will NOT need to remove any hoses, but you will need to flex the reservoir around a bit to shift the whole assembly forward a few inches. 6. Now that the power steering pump is out of the way (it doesn't need to go far, not even off the stud it's mounted on) this is where you'll break out your stubby ratchet/12mm wrench. It's a bit of a tight squeeze, but you should be able to reach down from the top and pull off the rubber boot covering the alternator lug and loosen the 12mm nut securing the charging cable. 7. Once the charging cable is off, remove the bolt and nut securing the alternator to the block (both are 14mm). Now you can shift the alternator forward and access the wiring plug in the back. It's a standard pinch-and-pull removal, but mine, with 25 years of age and gunk, was stuck on pretty well. The last thing to remove is a wiring loom bracket for the oxygen sensor plug. This can come off with some persuasion, but it's ultimately easier to cut the electrical tape securing the wire to the bracket and removing the bracket once the alternator has been removed. 8. Remove the alternator! With the power steering pump shifted forward, you will be able to pull the alternator forward and off the stud, then straight up and out the top, without spilling a drop of fluids. Re-installation steps and torque values will be added to this post at the same time photos are.2 points
-
If you fail to timely replace your timing belt and water pump your engine could suffer catastrophic damage. Do it. Do it now. My mechanic charged $475 today for labor to replace the timing belt and water pump on my LS 400 with 174K miles. My AISN brand kit cost $189 from Sumit plus antifreeze and liquid gasket for a total of $300 for parts. The Stealership will rob you blind. I saw that my belt was cracked and my pump’s weep hole was crusty from leaking. It looks like I was a whisker away from shredding my motor. I’m glad I did it now and avoided killing my Lexus.2 points
-
I like giant Tonka toys
 2 points
 -
I like cherry Pepsi on occasion. That's about as close to whiskey as I'll go these days.
 2 points
 -
I like that it is Boating season here...Boat goes in next week 🙂2 points
-
The cost of gas and food...Thanks o'biden2 points
-
My company is Fuel Injector Specialists, located in Colorado. I own a 1990 LS400, and I"m not here trolling for injector business, but my advice (and experience) on these cars is this: The chance of you having 8 good injectors is just about nil. I've rebuilt plenty of these, and about 10 percent are not buildable -- the spray pattern goes sideways or they leak down. Denso from the factory. The quality of Bosch? Nope, but if you keep water out of the gas, the majority of the factory injectors will last forever, it's just that Bosch uses a higher quality rust resistant super hard stainless metal alloy. Bosch will not substitute for Denso, in this case. Alas. Rough Idle? One or two bad injectors. Same with hard start. Same with burned up catalytic convertors -- these cats will outlive the car, if they have the correct fuel ratio ahead of them. Pintle caps and seals and filters? All replaceable. Good injectors and these engines will purr. Factory shop manual (of which I just paid $350 for the complete paper set) infers that it is possible to pull these injectors with the intake on. Nonsense. Think ahead and buy the throttle body and upper plenum gasket from Rock Auto. You'll need both. As another hint, the bottom bolts on the throttle body are impossible to start without a flexible magnetic/grab hook retrieval tool. Invaluable. NAPA, $20. Best money you will ever spend. Eliminates many bad words. Put the head of the bolt on the tool, using only the magnetic function not the grab hook, then bend yourself way down to see the opening in the throttle body, insert the bolt, then slide the tool off at a 90 degree angle. Voila. You don't use this tool, and the bolt will drop into the valley. Ouch. Intake plenum off, but first, careful careful with all those hoses, and be even more careful with the hoses at the front EGR temp sensor, the one that has two plastic barbed outlets and screws in vertically into the cooling passage. Aw, forget it. These outlets all break. You will break yours. Remove the sensor (unobtainable now, and was $300 plus dollars anyway. What the?), go to Napa and buy some small plastic barbed tees, cut them to match the ones you broke off. If you can pull your broken originals out of the hoses, even better. Then, take some super glue, a powerful magnifier so you can see to match the broken edges up perfectly, and judiciously super glue the broken tee back onto the temp sensor. That means don't use so much super glue that you block the ports. You will check with a small drill bit when you are all finished anyway. That super glue's only function is to get the tee to stay on from whence it (they) departed. Not strong enough to be anything but a placement. Next, buy some J&B plastic mender epoxy. Squeeze out a small amount of this stuff from its double syringe, on a cardboard piece, and stir while counting slowly to 30. Daub this mixture onto the tee/sensor broken area, which you cleaned of course, covering all sides nicely, leaving the barb exposed. Set the sensor aside ( as mentioned, you pulled this sensor from the engine, right? 15/16 combo wrench. And drained the radiator to even make this possible? This only makes sense. Ahem. ) Set this sensor aside for 24 hours. In a warm room. Don't be tempted to readjust the tee outlets even slightly. That''s what the super glue was for. If you do, the epoxy strength will absolutely disappear. A day later this fitting will be bulletproof. Never seen an older LS where these aren't busted off. This sensor stops the EGR from working when the engine is cold, and lets vacuum pass when it's warm. Your engine needs this. The earth's atmosphere needs this. All of humanity needs this. You get the idea. Pull the intake. Put all those bolts in a container. They re-torque at 20 lbs or so. Not much. You set them somewhere under hood and they will fall off, never to be seen again. Passing children will learn new words. Now, you can easily reach the fuel rails. The supply line to the pressure regulator and the line itself has banjo bolts. Nice design, but each banjo bolt has a copper washer on top and bottom. Take a very deep breath, put on your glasses, and DON'T lose those copper washers. Factory shop manual insists you need to replace them. Not necessary. Available at NAPA if you do. The fuel rail holds the injectors in. The hardest part of injector service is removing the wiring clips from the injectors. The little tab pushes down, and the clip pulls off. Don't rush this step. Don't yank without being sure the clip is released. Push down, then pull up. If you successfully get all the clips off without breaking some you qualify for a trophy of some type. Perhaps an old bowling trophy, or a second place spelling ribbon, etc. Indeed, you are truly a master mechanic. Buy quality new injectors if you can, but you can't. Don't buy Ultra. Chinese garbage. Not worth the effort to toss in the recycle bin. Rock has rebuilds, but we kick back about 15% of them because they are defective, usually pattern problems. Or they leak down. Slow engine death. Perfect injectors and this old girl purrs. Oh yeah. There is a cold start injector at the bottom of the intake plenum. Unobtainable. We can clean and build them. If they're not rotted out. We are junkyard doggies. A proud thing. When the occasional first gen LS400 comes into the wrecking yards, we grab extra injectors, computer, complete padded dash and glove box door if possible (very rare), all the missing top engine shrouds, a mass air flow sensor, throttle position sensors (plural), door lock motors if needed, etc. Final note. Don't think you can upgrade from the Pioneer radio to the Nakamichi. Ain't like the Buick Riviera with Bose GOLD. All the good stuff is in the radio, not due to additional active amps in the door units. Nakamichi rear speaker is a monster, but needs its own amp in the back. Meaning the wiring harness. Meaning the wiring harness is completely different at the radio. Oh well. Life is too short. And Interior? Went with the Katzkin leather, $1000 plus. We shall see. Doesn't have that extra double pleat in the center, but we'll live with that.2 points
-
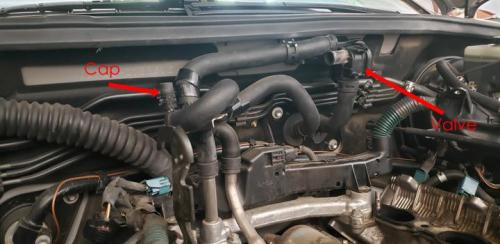
I think that cap is actually a left over tap for some funky hot water defroster.
 2 points
 -
My God, how old are you, 90?😏2 points
-
Insanely fast and frightening to other bike riders when you take off, in silence, from the lights, like Tron on Steroids!2 points
-
I just replaced my front pads and rotors with Akebono ACT870 and used Centric 12144122 rotors (the non-coated variety because I live in the south). The result was the exact brake feel and performance I wanted. Really impressed -- really made the car that much better. Easy tip in feel and overall modulation, much stronger braking performance than the factory pads and rotors I had, zero noise, no issues with vibrations. Really quite impressed with the Akebono pads and would recommend them to anyone here (with new or refreshed rotors, of course). Not expensive setup either and took me, what, a total of an hour to get done working slow. (Love this caliper design.) Nobody needs "performance pads" on an LS 430... common now. I race cars and laugh at the money people spend on brake pads for their regular daily driver car... you aren't lapping your LS 430 around Road Atlanta and all you're doing is introducing the potential for noise and premature rotor wear. One warning, though, the Akebono pads don't include hardware so be careful with the existing hardware (which is okay to reuse if it's in good shape... don't worry about it). Just be super mindful of the little cotter pin that you need to keep and reinstall.2 points
-
Because LFA's are one hell of a car 🙂 And we love Lexus 😉2 points
-
I agree gamalot. I have family who get their bamboo toilet paper delivered cross country via fossil fuel powered truck. As I type this it is highly likely that every room in their house has a light turned on. They come to my house and comment how hot it is in summer or cold it is in winter. They arrive in three compact hybrids instead of one sedan. They live by the ocean and complain the sea is rising. They fertilize their landscaped lawns then complain about plastic straws polluting streams. They moved away from areas run by high tax and spend politicians then vote for high tax and spend politicians in their community. I grew up when air conditioned cars were for the neighbor who had loot. Back then they had little wings you could dial in to circulate air throught the car so the vinyl seats weren't so uncomfy.2 points
-
Since the beginning of ownership, 4 months ago, my Lexus has been showing lights on the dash for: VSC, have checked by dealer Check engine Traction control off I would scan my car with your normal scan tool and it would read "camshaft position A actuator circuit". I ended up replacing both the sensor and solenoid on bank A. Neither of those things fixed the issue. $700 later, I replaced the timing control motor. More power, no lights and no issues. Passed inspection.2 points
-
problem solved after 3 weeks of on and off diagnostic. it was the crank sensor that failed and this was very difficult problem to diagnose because the crank sensor did work " to a degree ". previous owner sold me this car for 1200 with only 89k miles because 4 or 5 shops that she took this ES300 to couldn't figure out the problem including 2 Lexus dealerships and 1 of them even suggested a new/rebuild motor because they thought somehow, the compression loss after engine warm up while running. I've been turning wrench as a master tech since 2001 and never encountered this problem before. not sure as to unique problem, only for Toyota or not but it was hard problem for sure. if you want details of how and what way the sensor failed or any questions about leading up to my findings, let me know.2 points
-
Here's what I found about the one in Colorado https://www.ksedenvervenues.com/event-locations/ball-arena/club-lexus/ Looks like a cool spot to enjoy a nice meal with friends or colleagues. Welcome to the site.2 points
-
That's a great idea! If they are made of polyethylene or polypropylene, you can pour some acetone or cleaning alcohol in one if doing touchup cleaning. I use small cups to clean out glass eye droppers that I use to add dyes to my castings. These type of plastics are very chemical resistant so they can be helpful in may ways.2 points
-
If all these codes appeared at the same time it would seem they have a common cause such as a bad connection in the coil harness or the fuel injection harness. Ignition coils are a common problem with this generation RX but they would fail individually. Fuel pressure is another common source that would cause multiple misfires simultaneously. Here is a link which discusses the P0300 code for your Lexus and that might help. https://www.autocodes.com/p0300_lexus.html#disq I also would not discount the camshaft position sensors or the crankshaft position sensors as they can also create havoc with the engine control system. Given the age of the vehicle and the mileage you should think carefully before throwing a lot of money at the vehicle in search of the cause and then the repair. Good luck.2 points
-
Did something today...2 points
-
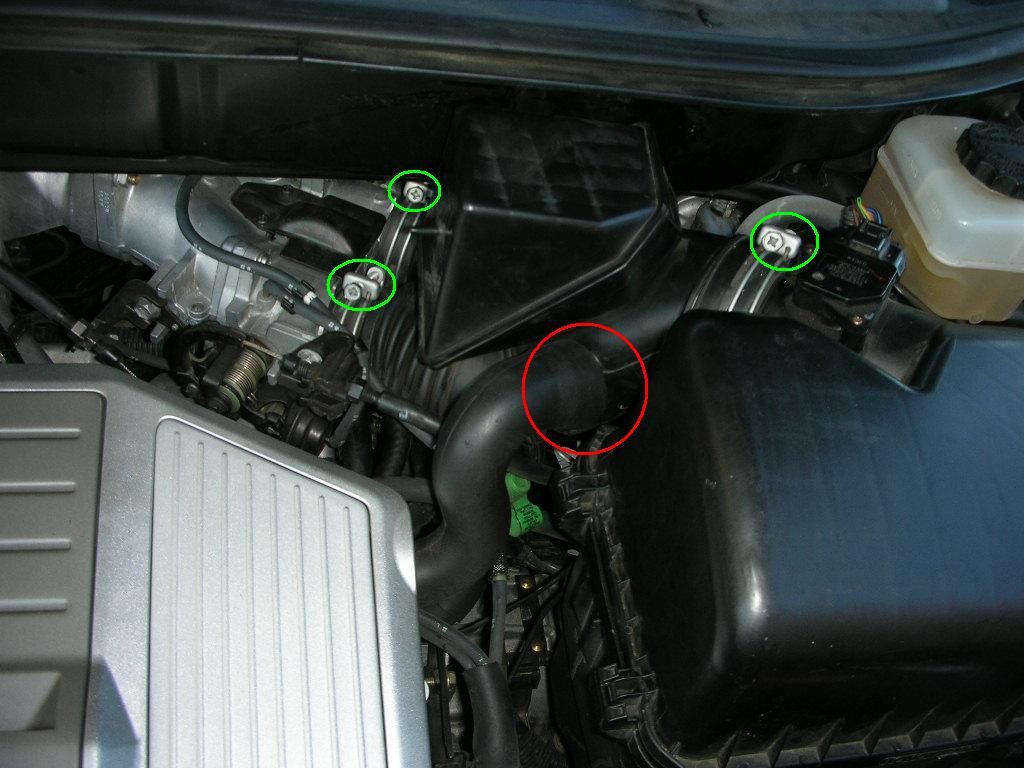
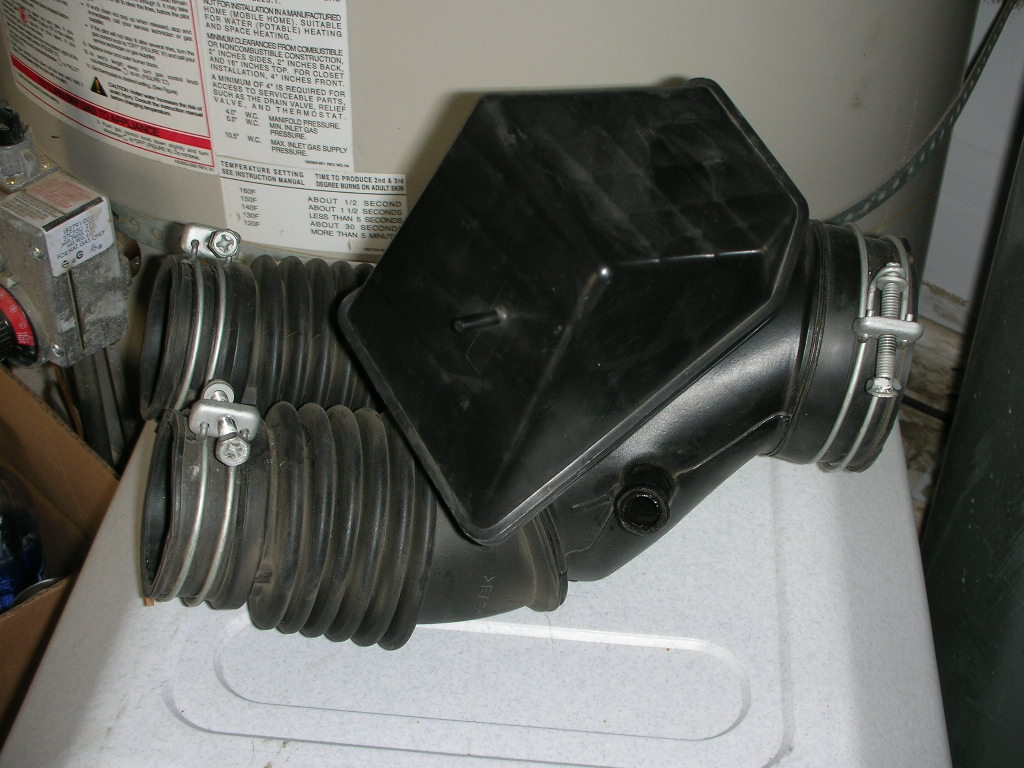
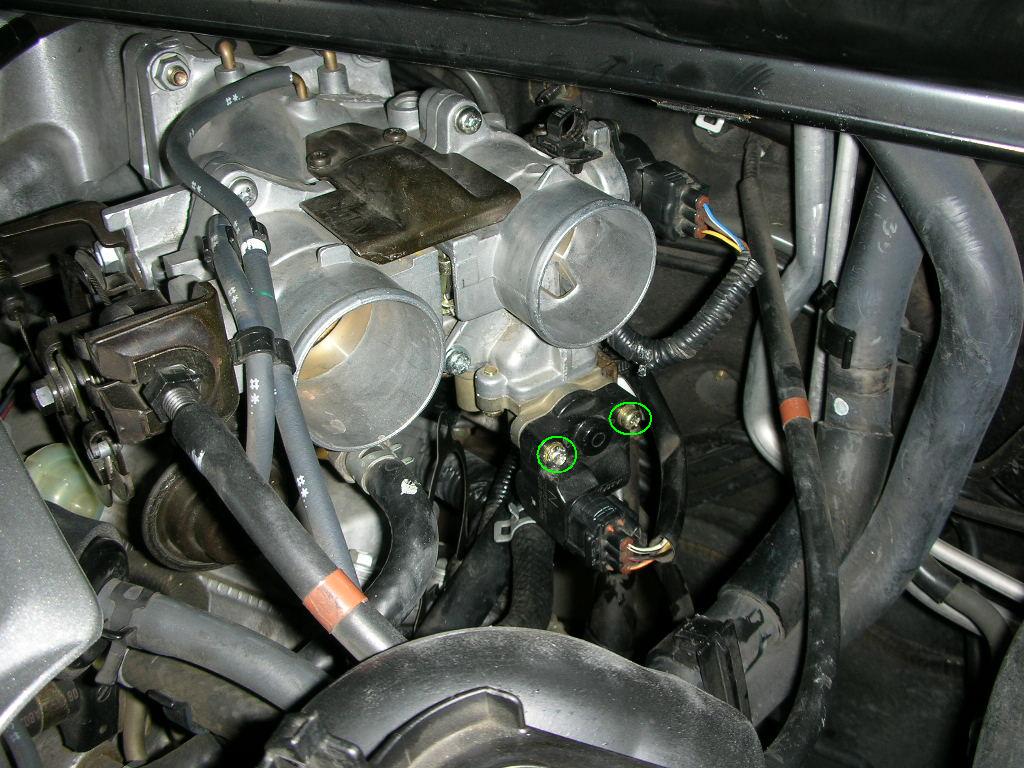
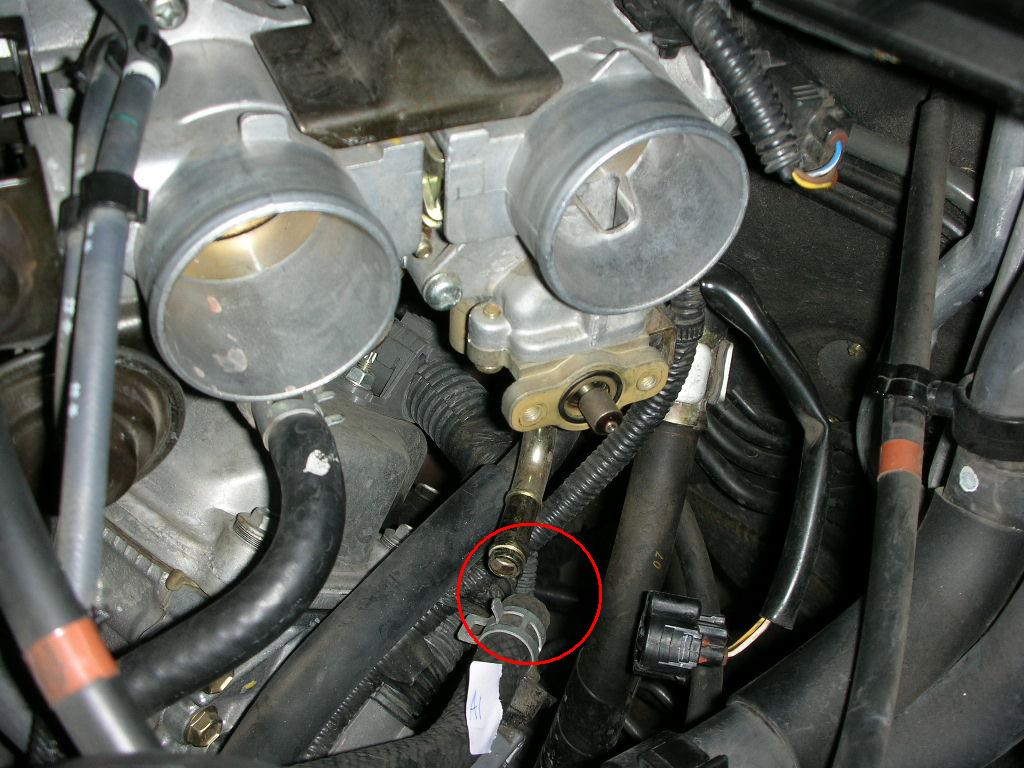
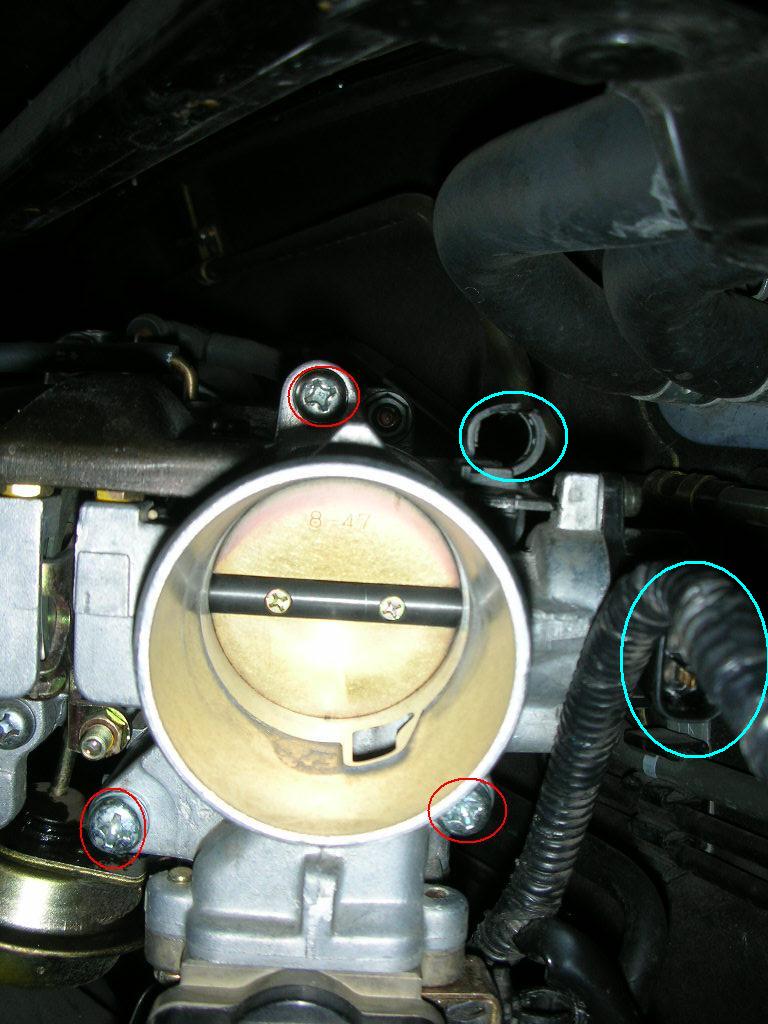
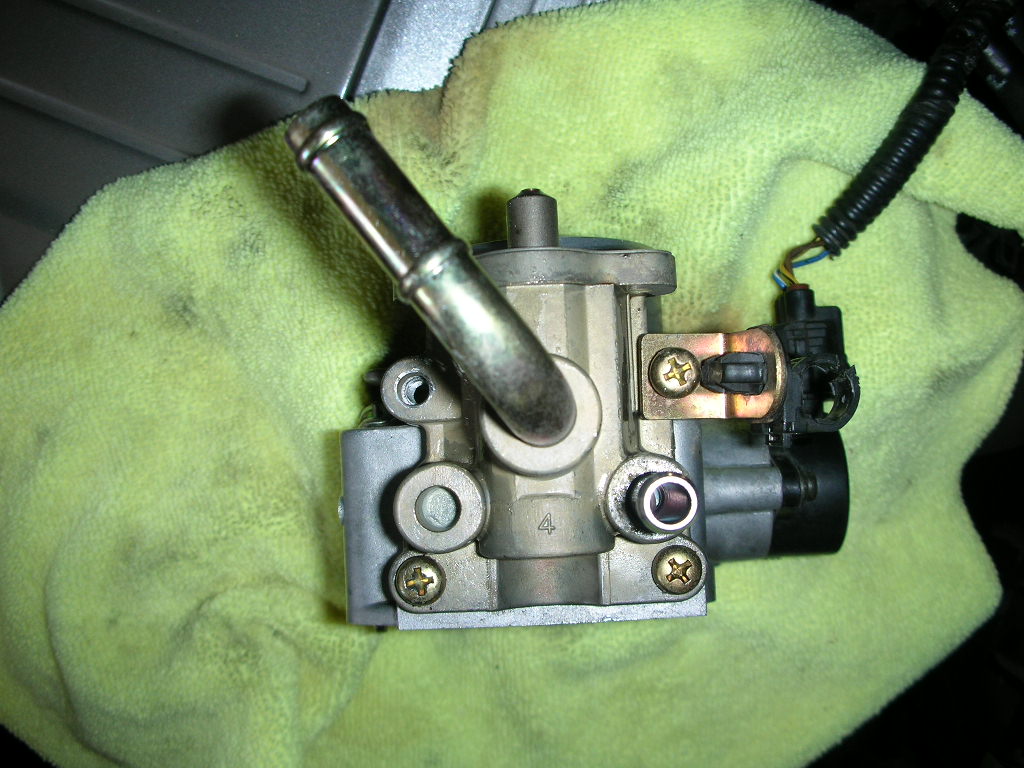
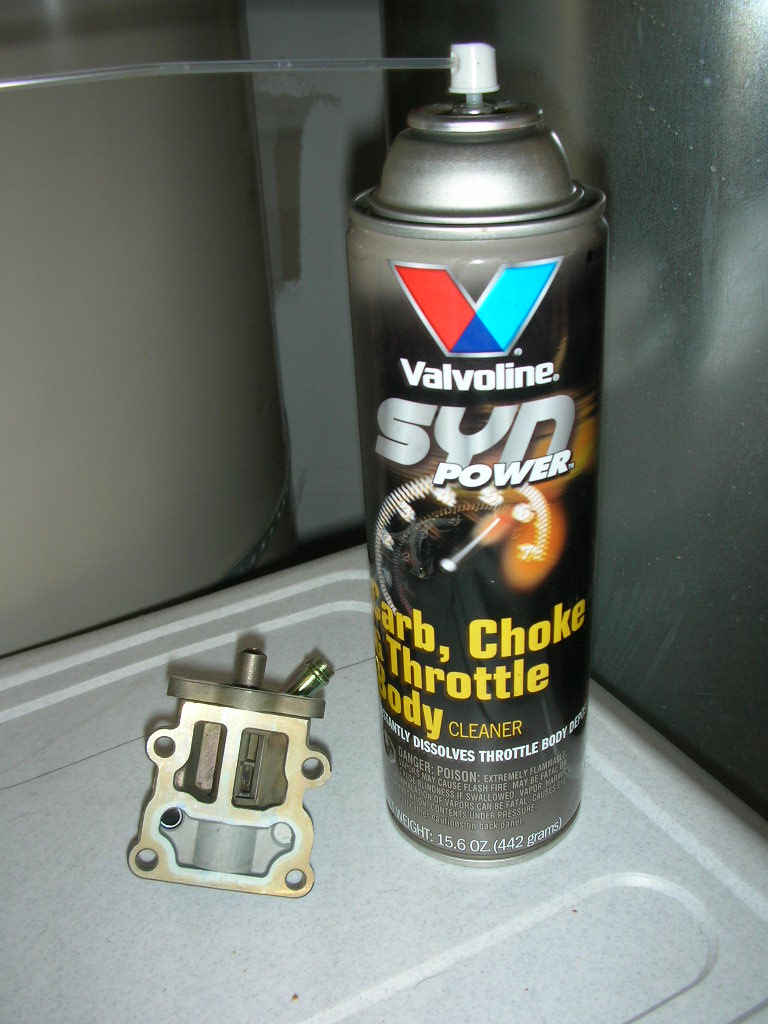
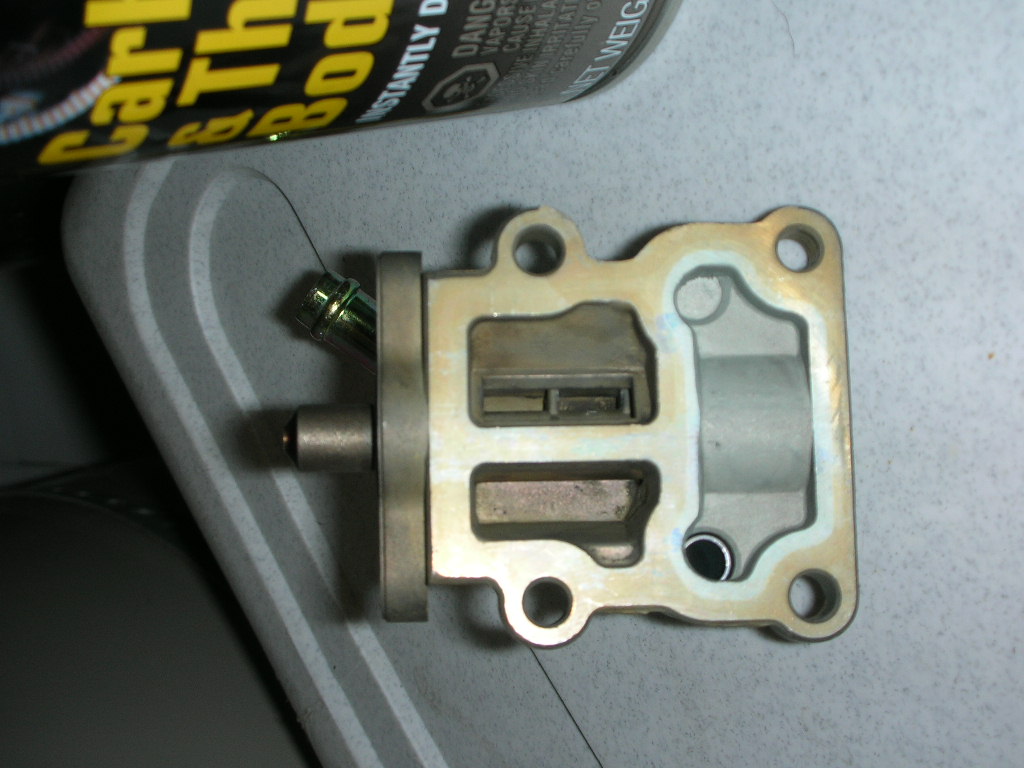
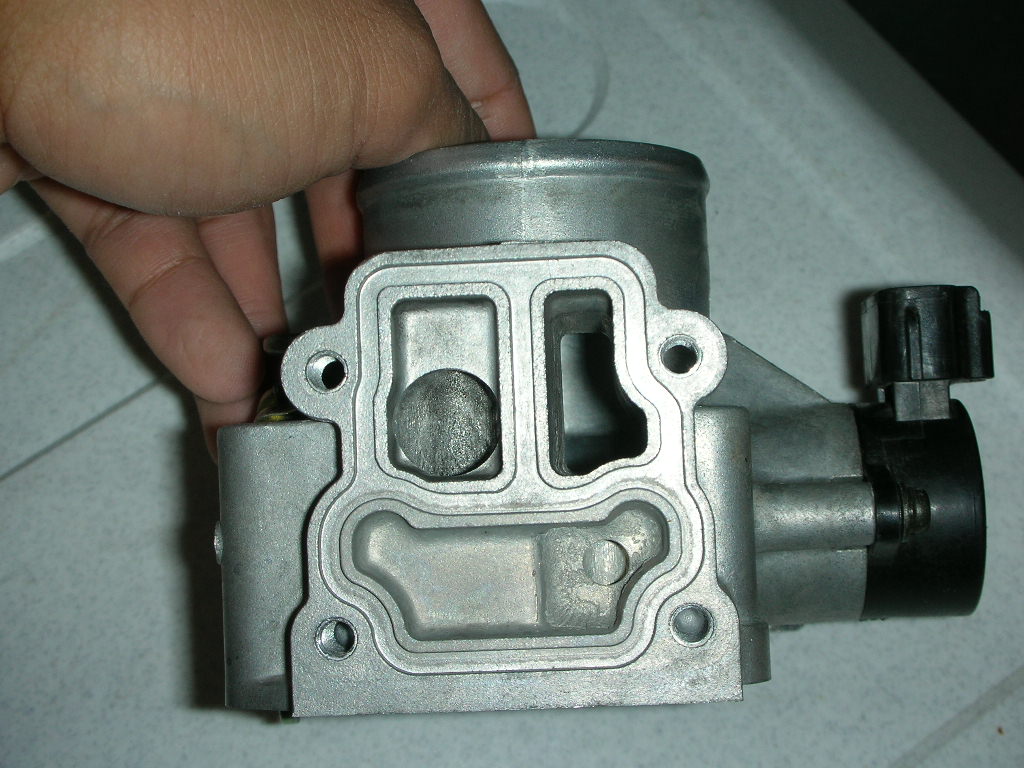
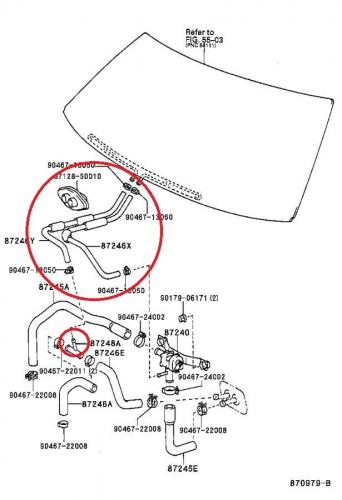
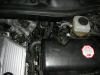
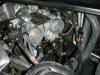
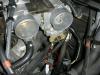
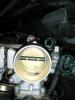
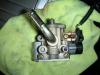
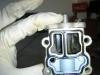
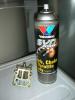
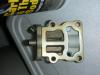
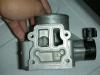
Hello Everyone, I know IACV has been a huge topic on the forum and I have found various pictures in the RX forum and ES forum on the idle air control valve (IACV) or as others call it the idle speed control valve (ISC). However, I have not found a "step by step" posting to date which definitively shows how to clean this thing so that my car stops giving me idling problems. Symptoms I have had included: - low and rough idling that would cause the car engine to start shaking after starting the car - this eventually got worse to the point that when I start my car, it would not idle unless I gave it gas - idling problems for me tended to occur more often after my engine was warm or had been sitting in the sun I hope these series of postings help you fellow LOC members out there. You've certainly helped me in the past so here's my two cents at this common problem. Additionally, the instructions I give are the way in which I have cleaned it myself. As you go about and attempt this, you may find better ways to do so. Please add and refine my instructions/terminology as needed. I am not a professional. I've only changed my oil, air filters, and conducted minor maintenance previously. The bottom line is that if you have the right tools, you should be able to do this. This discovery/ cleaning took me about 2 hours to do cause I ran into problems and there were major steps left out in previous postings that I’ve encountered read. The next time I do this, I believe I can get this done in about an hour or less. Tools Needed: 1) Tightly fitting Philips Screw Driver 2) Carb cleaner that is O2 sensor safe (I've seen CRC. I used Valvoline Carb Cleaner) 3) Locking Grip Pliers (definitely helped me remove the factory tight screws) 4) Small brush for cleaning 5) Towels for cleaning 6) Pliers (help removed brackets holding the hoses) 7) Latex gloves helps with limit the messiness. * I used the same gasket and did not replace it. No problems found. 1) Remove the hose that comes from the engine/motor that connects to the air intake hoses.( Hose is below in red – we’ll refer to this as Hose A) When you pull back the rubber hose covering, you will see that a metal bracket is holding the hose pretty tightly in place. Use the pliers to clasps the two metal pieces together to loosen the bracket and pull the hose loose. You can also do this by hand if it’s easier for you. 2) Upon removing the hose, you will want to remove the two air intake hoses. Loosen the three screws above in green and remove the hose. Below is a picture of the intake hoses removed. 3)After removing the intake hoses, I opened the lid to the air filter and moved this to the side of the car to create more working room. I believe there are two clips on the right holding the lid in place. Just pop the two clips and move the cover to the side. I also took out the air filter and temporarily moved this to the side. 4)After removing the intake hose, the throttle body/IACV/black electric coil is revealed. At this point, I removed the black electric wire from the black coil. Once the electric wire is removed you can remove the black coil from the IACV by removing the two screws. Note, the screws are factory tight so use a tight fitting screw driver to remove the screws. One of my screws was partially stripped from the dealership’s work, so I had to resort to my locking grip pliers which helped out tremendously. After removing the two screws, the black electric piece pops right off. When the black electrical coil is removed from the IACV, it exposes a small pencil sized metal stud. You will also notice a washer that sits on this stud. Don’t lose this washer. Take it and put it aside so it doesn’t fall off when you continue on in the next steps. 5)Additionally, I removed the hose coming out of the IACV. We’ll call this Hose B. This hose can be removed in the same manner by clamping the bracket and pulling the hose out. You will see that the hose is removed below. Below are pictures of before and after. 6)Here is where the fun begins. I initially attempted to remove the four screws attached to the IACV at this point, but found that after an hour, this would be nearly impossible to remove considering the location of the screws were in an extremely tight spot. The only way I would be able to remove the IACV is to remove right throttle body. Not as tough as it sounds. Three screws need to be removed to accomplish this. Again, be careful when removing the screws. Also you will see I removed another electric plug and I also cut a tie wrap. Once you complete these steps, the throttle body/ IACV comes out pretty easily. Note when you remove the throttle body, there will be one LAST hose connected to the IACV. Be careful when you remove this hose as radiator fluid may spill. Some of my fluid spilled out so I just refilled my coolant after I was done. 7)Below is a picture of the bottom view of the IACV. You now can EASILY remove the four screws connecting the IACV to the throttle body . In the picture below, I have already removed one of the screws. Once the four screws are removed the IACV and throttle body separate. Now you can clean both of them with your carb cleaner, brush, towels, cotton swabs etc…. Picture here is before I the cleaning with all the muck inside Pictures after I cleaned the IACV and throttle body This last picture is the post throttle body cleaning 8) Once you are done cleaning, just put back the throttle body/iacv the same way you took it off, and put everything back in reverse order. Ensure the gasket is in place. Also, ensure you put the washer back on the electric coil. Make sure you place hose A & B back and ensure the electric plugs are back in their original position. Once these things are in place, then it's all about putting the air filter/hoses back and you are good to go. If you have lost any coolant, make sure you refill it to a safe level. After completing this cleaning, my car starts up without any problem and idles as if I just purchased the car brand new. Replacing this at a dealership would have costed me $300-400 easily. Let me know if you have any questions. Cheers (Also, I tried to post these as separate replys, but the software combined all my replies into a single reply and did not keep them separated) *Edited the posting to have the pictures follow step by step in sequential order*


 2 points
 -
Hi Nathan. I apologize for not connecting with you sooner. I am always amazed at the depth of friendship and caring that can be built with someone you have never met nor never knew what they looked like. The LOC is a place where those who enjoy their hobby can find others who like swapping stories with like minded friends. Landar was a great part of the LOC and was a great source of Lexus info and technical help. Thank you for letting us share your journey. Paul2 points
-
I have NO connection with this automobile.... just showing others JDM RHD TOYOTA CELSIOR VIP SEDAN V8 LS400 JAPAN IMPORT TEXAS TITLE look: https://easttexas.craigslist.org/cto/6180839156.html
 2 points
 -
Fixed!! This is the Idler Pulley which is only attached to the front of the water pump. This water pump is driven by an internal idler pulley that operates from the timing belt. The Pulley was $80.00 at Lexus dealer, and I changed along with new serpentine belt. Took all of 10-15 minutes. Thanks for all who helped!!2 points