Leaderboard


Popular Content
Showing content with the highest reputation on 08/11/2015 in all areas
-
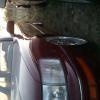
Well, by coincidence or not, my Mom was in town for a week and loves to grab a tailgate and manhandle it, likely a leftover habit from the good old days and the '86 Plymouth Voyageur we had growing up.... then the power feature on the tailgate stops working. Every fix I came across is basically: My tailgate is broken - Ok, push the button in the glovebox and try again. - Oh that worked, thanks. To be clear about the symptoms, the motor that grabs the door and pulls it tight still worked, but the one that raises and lowers the door was not doing anything. I'd get the 3 beeps sometimes, but that's it. So I decided to dig in. Here's what I'm looking at. Problem must be in here. So you can see I pulled down the headliner. I just got a finger in there by the actuator arm and pulled at it. It's held up towards the right side by a couple of these. Now when I looked in the mechanism, I saw that the arm that the motor drives had popped off of the pin for the door side arm. Looking at this pic you can just barely see that there's a small bushing inside the end of the motor side arm. That was actually still sitting on the pin when I first got in there but I took it and pressed it into the motor side arm with a pair of pliers. Also note that the pin has a small groove at the top, you'll need to get a C-clip in there. For reference, the C-clip I used. I had to push the motor arm back into the mechanism a bit to make room to get it back onto the pin, then pull the door down a bit and massage it to get the arm on there. Then pop the C-clip on. Surprisingly, I managed to get it on first try. Lubed up the struts on the tailgate for easy operation, opened and closed it a couple times manually ( I read somewhere this resets the system. Who knows. ) And viola! It works just like it's supposed to. This is the motor arm on the pin. Tools I used: I had to use the coathanger to pull the motor arm out from the very back of the mechanism when I started, it had pulled all the way in as if to close the door. Pliers to seat the bushing in the arm, and to seat the arm on the pin. Screwdriver to push the C-clip on. I hope this helps someone. I was motivated by fear of dealership service departments.1 point
-
I had a common problem with my right rear door actuator. It kept getting weaker and weaker slowing down and eventually not working at all. I did a search on Lexus actuator on ebay and came up with an inexpensive universal actuator which you will see below in the installation instructions. When I opened up the panel in the door it seemed to be near impossible to install this new actuator in any way. After dinking around trying this or that. I decided I would attach the actuator rod to the manual locking cam lever on the old actuator to try and make the new actuator work. This requires leaving the old non functioning actuator and parts in place. 1. Drill a hole the same diameter as the new actuator rod in the wider part of the manual locking cam lever on the old actuator right next to the where the manual locking wire hooks up to the old actuator cam lever. 2. Cut the new actuator rod to fit your application. Bend the new actuator rod end the same way the manual locking wire is bent. Grind the rod end a little thinner as it is tight under the locking cam lever and it will rub on the housing otherwise. 3. Have the new actuator attached at the other end of the rod first. Attach the rod through the hole you made in the cam lever the same way as the manual locking wire is attached. 4. Reinstall the entire door locking mechanism back in the door leaving the actuator hanging out the access hole. 5. Attach the mounting strap to the new actuator using 2 long bolts place 2 spacers or multiple washers between the strap and the actuator this way you can put the actuator just inside the access hole in the door (spacing it carefully not to interfere with the power window) thus allowing you to screw the strap to the outer door panel. 6. You will need to cut a little of the white thin plastic protector shroud on the old actuator to make good clearance for the new actuator rod coming out through the door access hole. 7. Adjust the new actuator for locking and unlocking slack before fastening the mounting strap with screws to the door. 8. Splice the 2 new wires into the 2 larger wires coming off the old actuator (splice them in don't cut the old wires) (You may have to reverse the wires (before soldering or crimping) to make sure you have them unlocking & locking in sequence with the rest of the door locks) It actually works better than the original with shipping it costs less than 15.00 for the parts. I used lock washers on the bolts. It would probably be good to use locktight on all screws. I have no pictures, but If you read this carefully you know it can be done and is not very difficult. I haven't tried this on the front doors yet, but will eventually have to. I hope it goes as well for me... At least it wors for the back doors. Good Luck to you!... Indi1 point
-
Sure the fan noise isn't from the seat fans? I heard a fan, couldn't find it until I found it was the seat fan. And yes, welcome to the Club, love having new people. Denny1 point
-
) ) ) ) I tried this today on my 92 ls400. Both my tach and speedometer wer resting below zero one the dash. Took this advice and pulled the cluster. (wich do this in a quiet place, the sounds were hard to hear) but after reassembly the guages work well again. The tach is still sticky but i can live with it..... Thanks for the idea!! Saved from buying sensors and a cluster which were my thoughts of how to fix itthanks again1 point
-
okay guys, I am going to give you a very constructive advice on how to fix this problem.first remove the cluster and if you do not know how go to lexls.com and follow the instructions.then remove the face cover .first grap the tach needle gently and pull untill you hear a pop,again be gentle and do not ge scared.once you hear the pop move the needle clockwise untill it pops again then gently release it.now move the needle slowly counterclock till you sit it over the zero an on the dot and make sure that it sits right on the zero.to check your work move it gently say to the mark 3 then let go it should snap right back to zero,once you have accomplished this ,you are rock & roll baby.the same thing goes for speedometer.back light is not working change cap 212,after making sure your cathodes are okay meaning the bulbs.if not you can get them at a very good price from plano lexus,they are awsome as far as price goes.gas guage slow change cap 142.while you are at it change any bad or weak bulbs ,be the warning ones or the indicator ones such as shifter position.by the way guys the cluster lexus has on the first gen is the 1992,because the psb are so robust,where the 1993 and 1994 are made a little bit on the cheapy side.this job should take about an hour if you how to handle things.good luck and let me know. please make a donation to lexls.com,this guy is great.may god bless his soul.1 point