
Leaderboard

Popular Content
Showing content with the highest reputation on 04/09/2013 in all areas
-
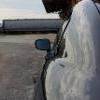
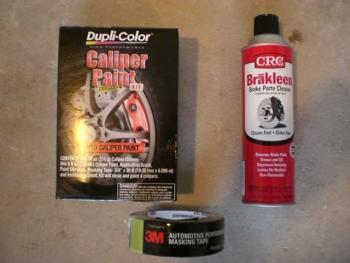
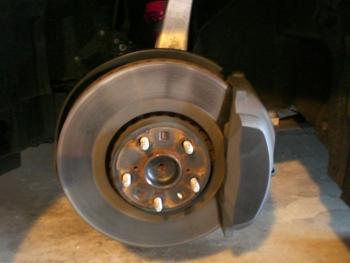
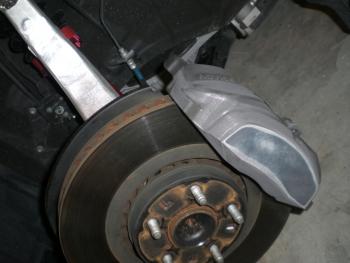
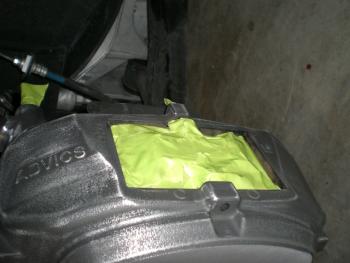
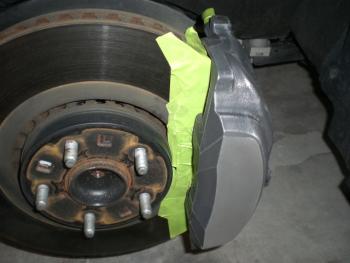
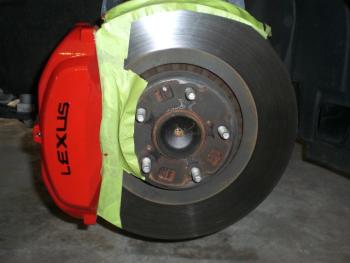
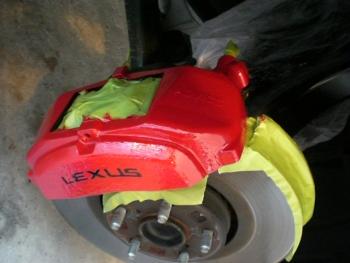
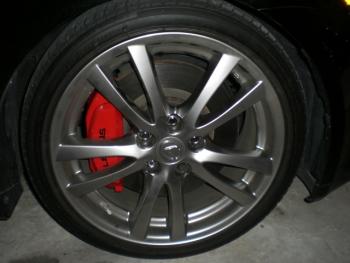
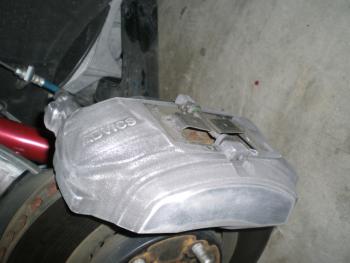
Here's a very budget minded mod that really adds alot of visual impact. There are several ways to go about this, and I'll try to cover those as I go along. I have done it several different ways, I just chose to do it this way this time. I really like the Stop Red color, but you can choose any color really. It's up to you. If you choose to use heat temp. spray paint, (Duplicolor is a popluar choice), in this case, I really suggest removing the calipers from the car, pulling the pads out, and taping it off to go this route. Alot more work, but if you want a different color, it's probably the best way to go, other than sending the calipers in to have them powder coated. I have done that also with great results. Usually will cost in the area of 35-50 bucks each to have them powder coated, unless you have a freind in the business to help you out there. So, I used a Ceramic Brake Caliper painting kit : You will also need a can of High Temp Clear coat spray paint, 4 peices of tin foil about 6"x6", and an extra can of brake parts cleaner. Your also going to need a few sheets of 120 grit sand paper, a roll of painter tape, some old towels, (clean), and optional Lexus caliper decals, some old newspaper, and a comfy low chair to sit on. :) 1) I use a floor jack and 2 jack stands for safety and lift the front 2 wheel off the ground. Remove the tires, and clean the calipers off. 2) Put the newspaper on the floor under the brake caliper and place the towels over the fender above the caliper and around the entire wheel well. Using the 120 grit sand paper, your essentially going to scrub the caliper off and make sure you get in those smaller areas where breakdust can build up. The better you do at this, the better the paint will adhere to the caliper, and the fewer chips and cracks will show up later. take your time, do it right now, and you won't have to come back and do it again later. Sand it down, and then "rinse" the caliper off with the brake parts cleaner. It should look like this: 3) Now using the painters tape, you'll need to tape off the parts you don't want to get paint on. Like the pads, clips, hoses and bleeder valve on both sides of the car. Taping both sides off now will give you the right amount of time to stay productive while waiting for paint to dry. 4)Replace the old newspaper on the floor under the caliper to be painted and put the 6x6 peice of tin foil on the front corner of it. I also taped off the rotor and the hub cause I can get a little messy. , But just make sure you don't get any paint on the rotor. It's a ceramic paint, and it can glaze the pad. So just be careful. 5) Using the brush apply the paint. I really reccommend a really light first 2 coats. Don't even try to make the caliper red yet. Just distribute the paint, evenly, and as thin as you can. With about 5 minutes between coats. Do this on the tin foil also. Then on the third coat, go to a medium thick coat. Wait about 15 minutes, then with the 4th coat, take your time and give it one last medium coat, along with the tin foil also, and try to get all the areas. If you go to heavy right away, it's going to loose alot of the nice sharp lines the caliper has. And it will have a strange coated appearance to it, rather than a nice clean finish to it. Don't glop it on. 6) You'll need to let the final coat harden for about 45 minutes to an hour. Don't wait any longer than that though. So, seeing as how you already taped off both sides, you should have plenty of time to go to the other side of the car and paint that caliper up now. Once you finished painting the other side, you can come back to this caliper. Now using the tin foil, test it to make sure it has hardened enouph to apply the decal. I use my finger and just press on it hard. If it leaves a print on it, then you may have to wait another 15 minutes or so. Using the painted tin foil to determine the paint is hard enouph, now apply the decal to the caliper. 7) Once the decal is on, now very lightly apply a very thin coat of the high temp clear coat. Wait 5 minutes, and give it another very light coat. Now wait about 10-15 minutes and give it another light coat. Then wait another 10-15 minutes and now you can give it several medium coats of clear with about 10-15 minutes between coats. the reason for going with super light coats first is if you apply a medium or heavy coat to the decal right away, it will saturate the edges of the decal and get under the adhesive, which will raise the edges of the decal up. And that's not going to look good. By keeping the caots light and thin, they will dry really fast and seal the decal first. Then you can give it some good medium coats after that. YOu also don't want any rund and drips at this point. So again, just be patient, and give it a few even coats. Now do the rear calipers the same way. The finish results:

 1 point
 -
From the album: Untitled Album
1 point


