Leaderboard


Popular Content
Showing content with the highest reputation since 02/28/2013 in all areas
-
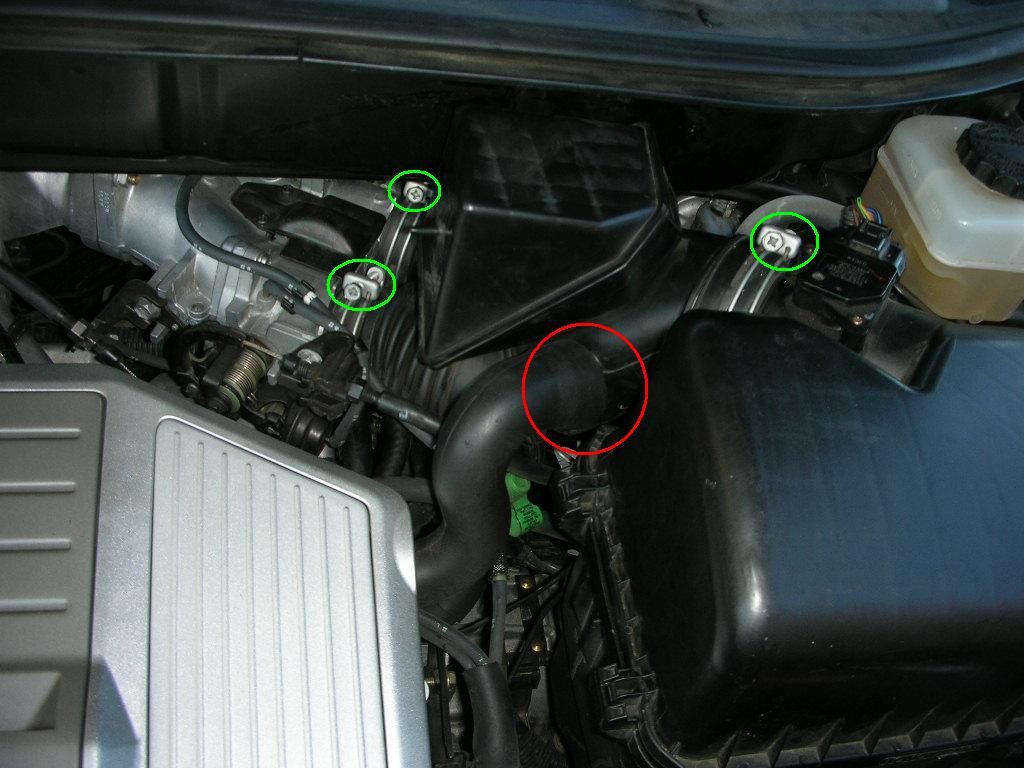
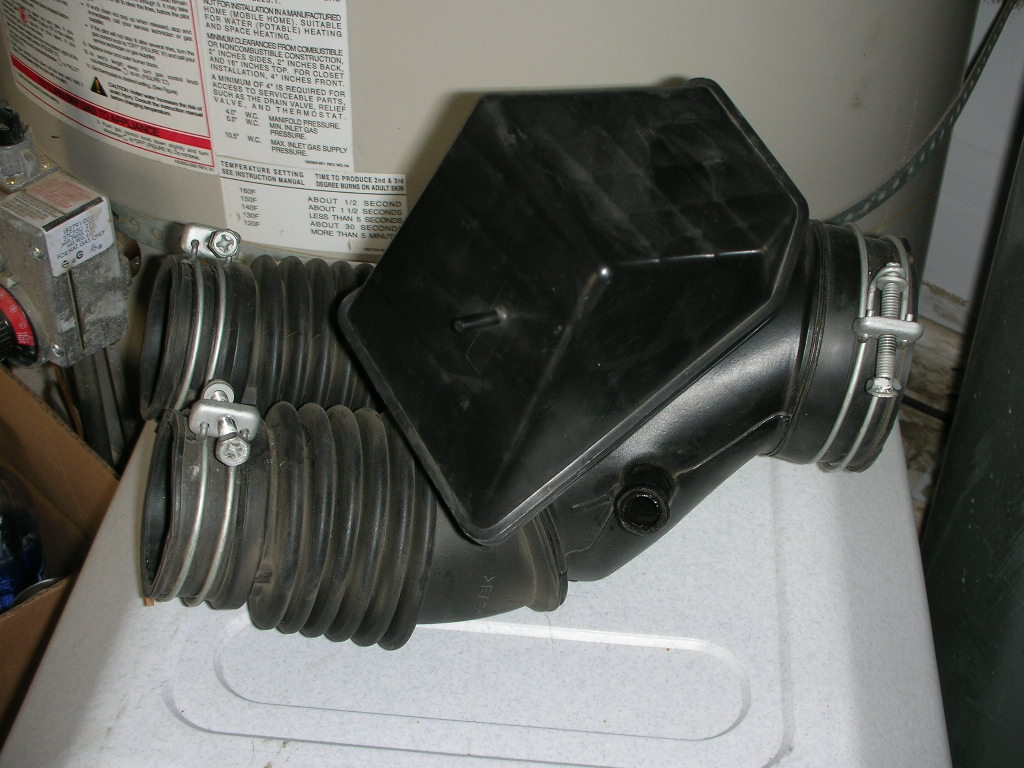
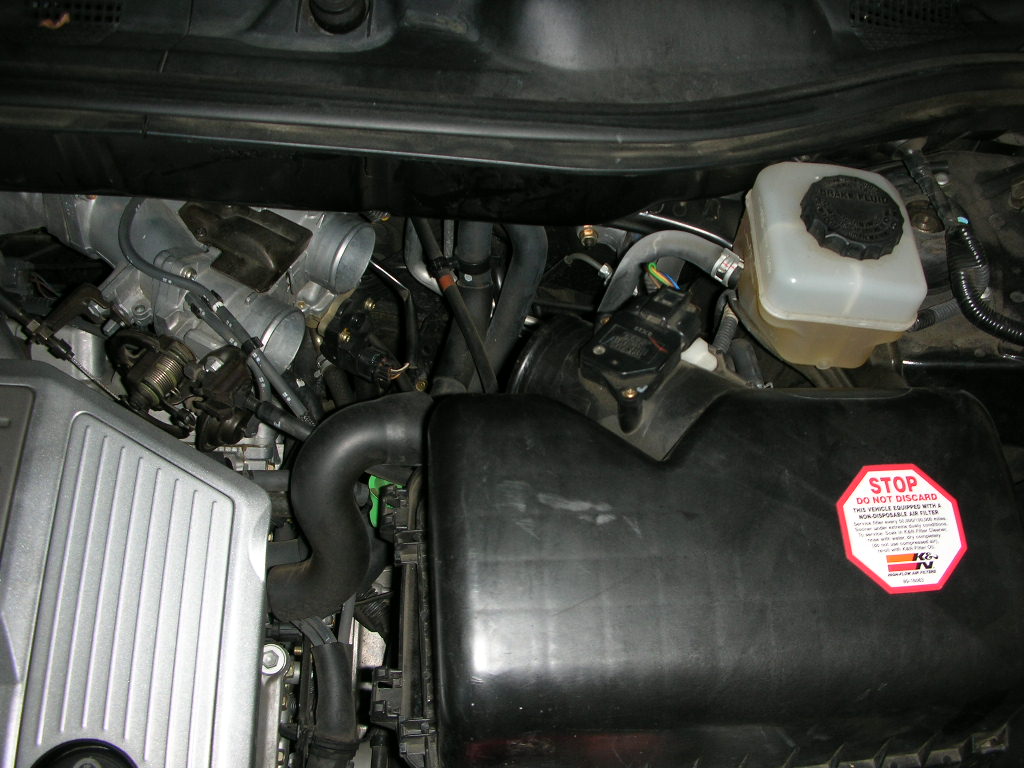
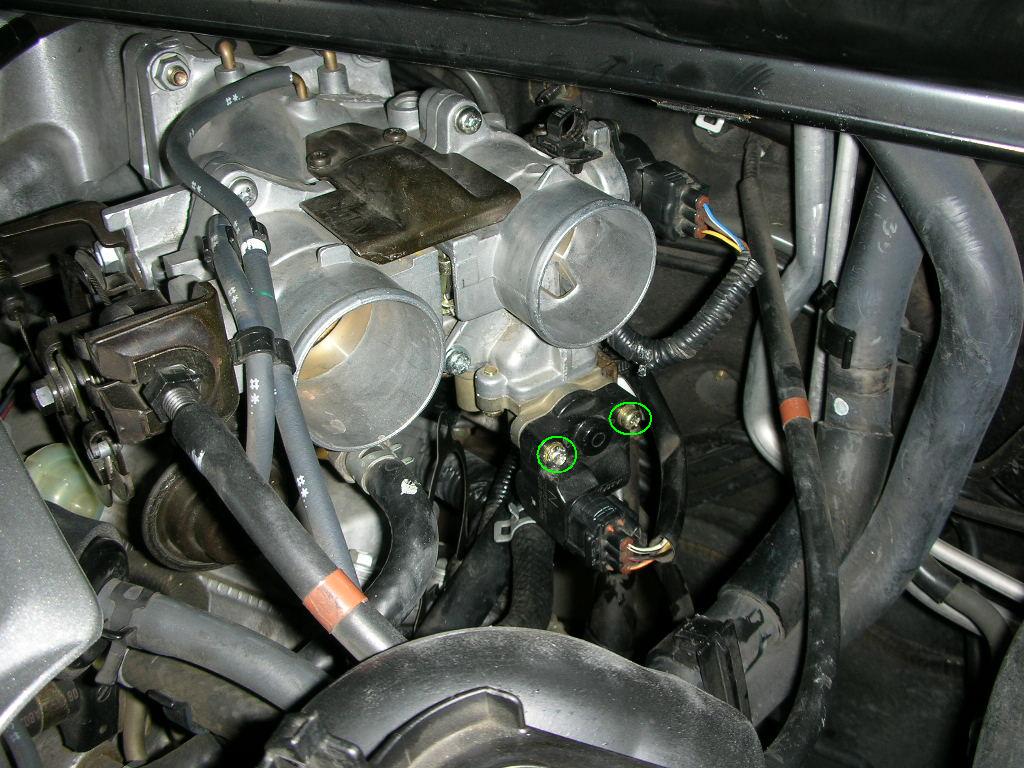
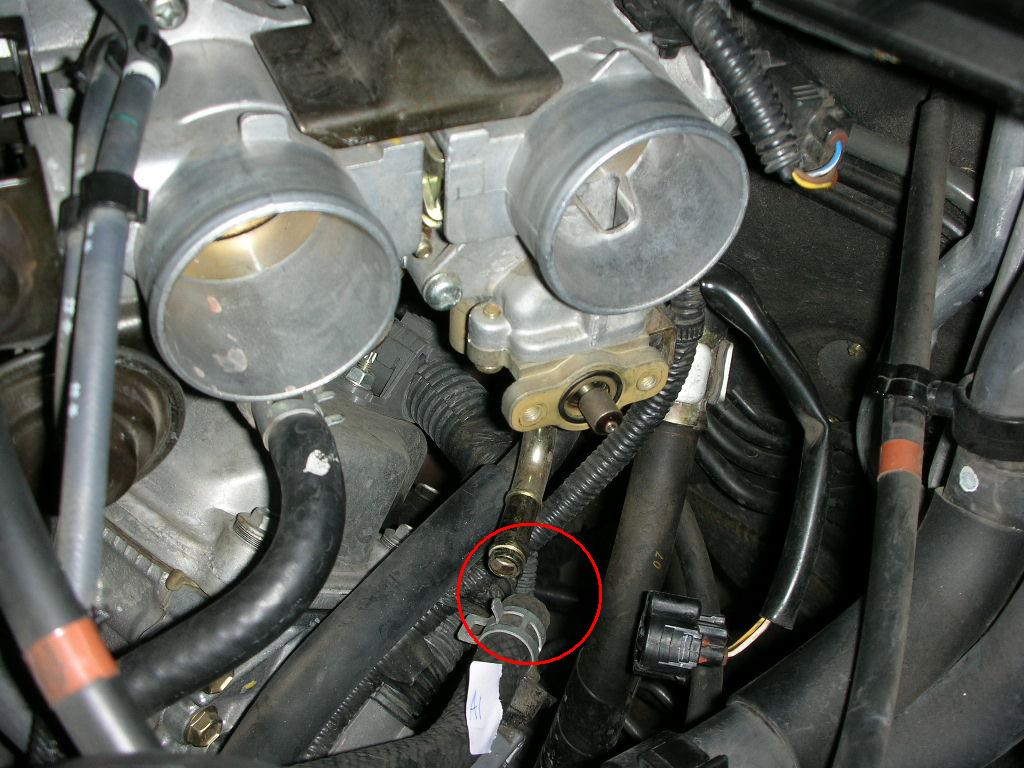
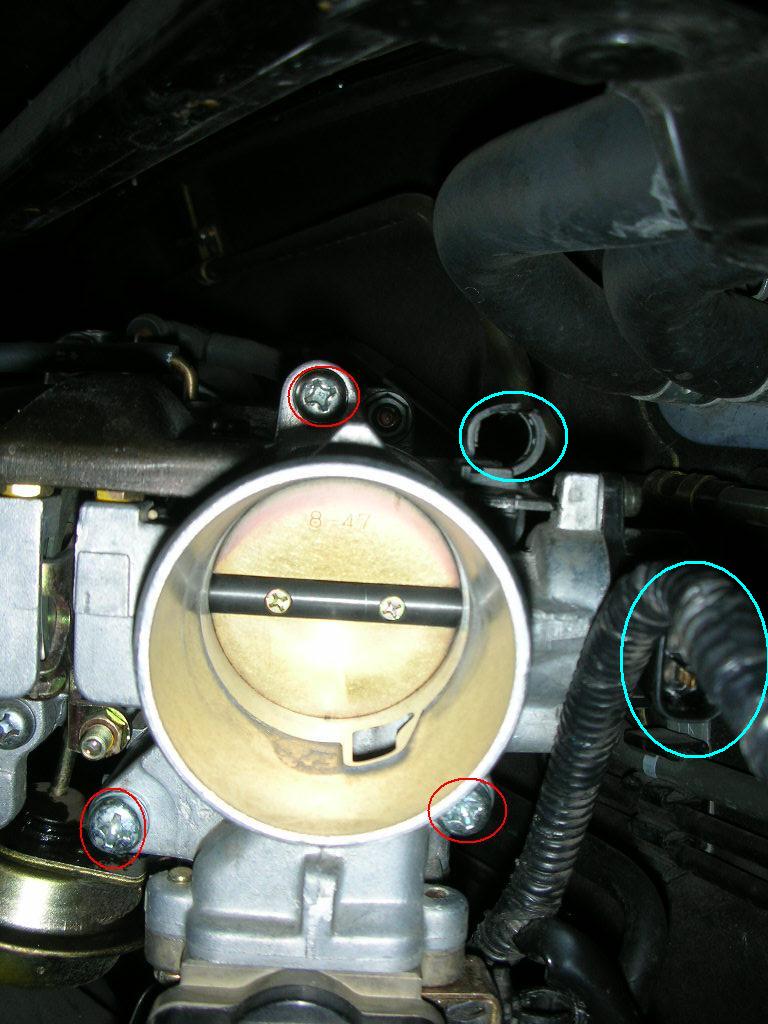
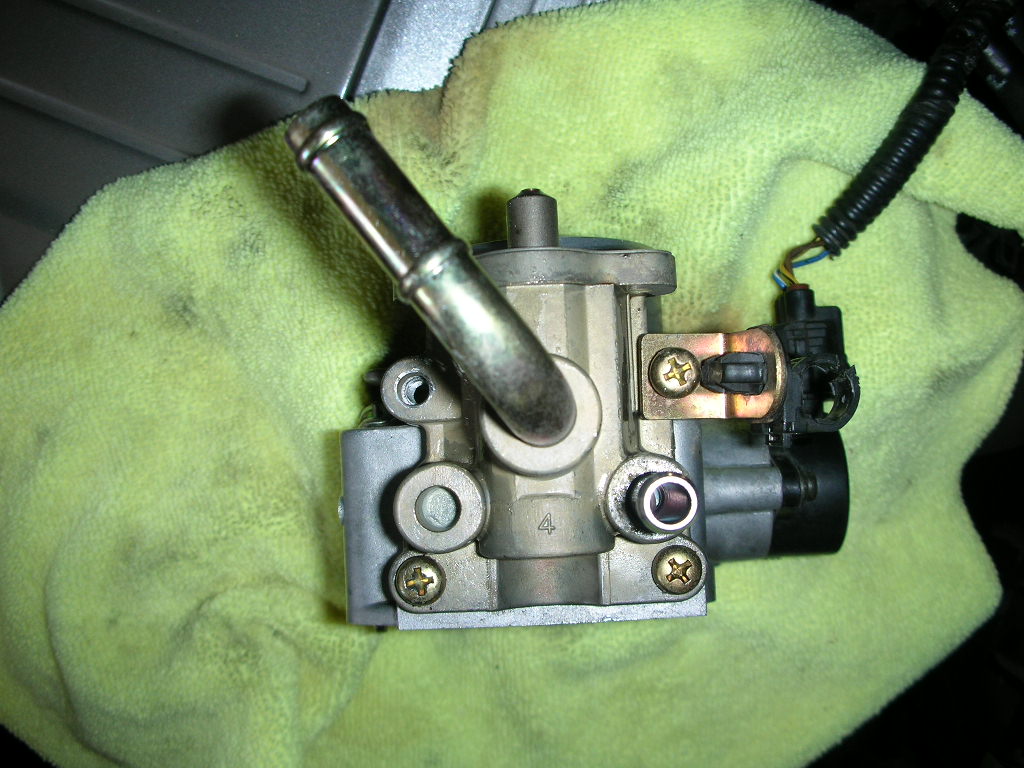
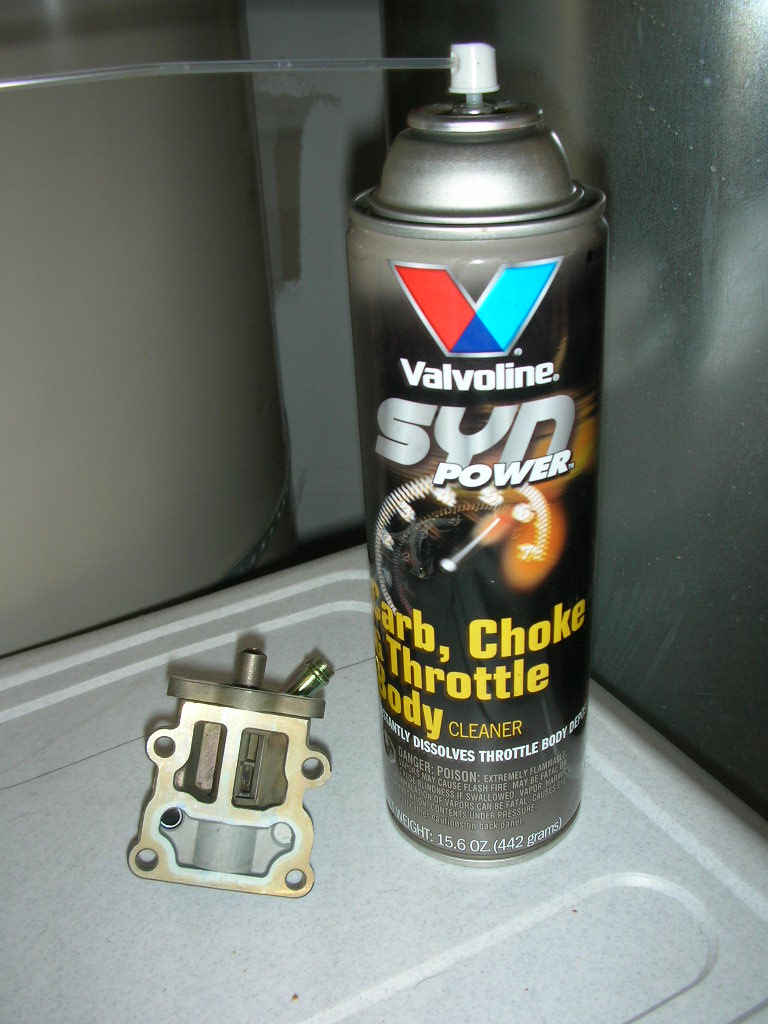
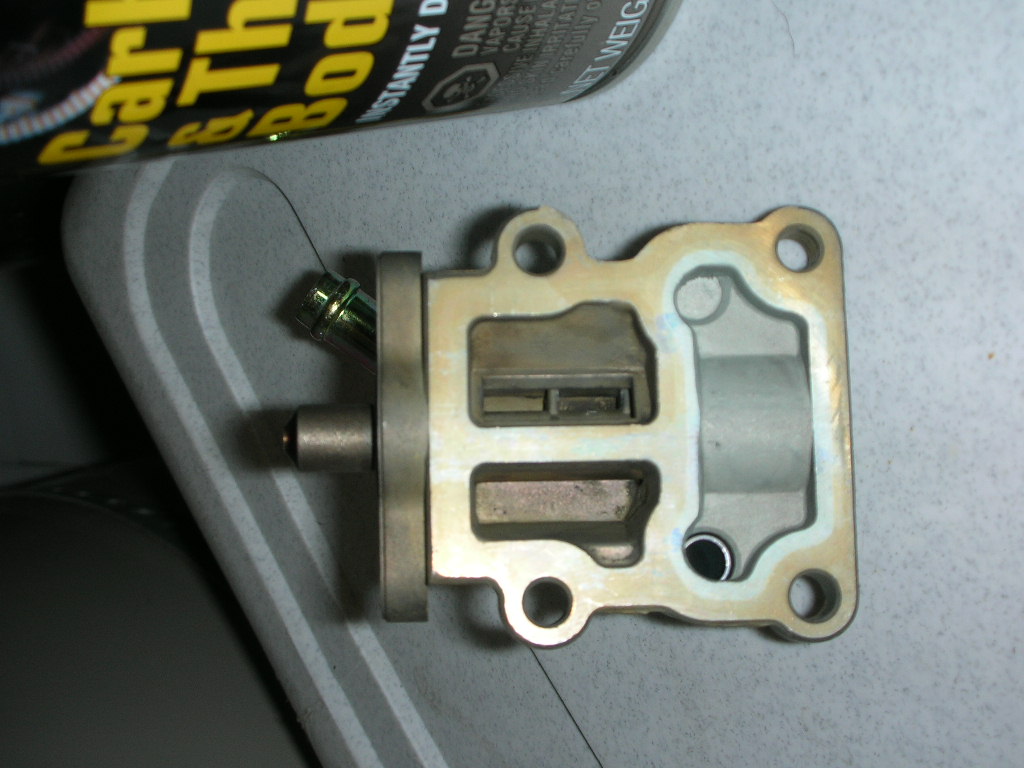
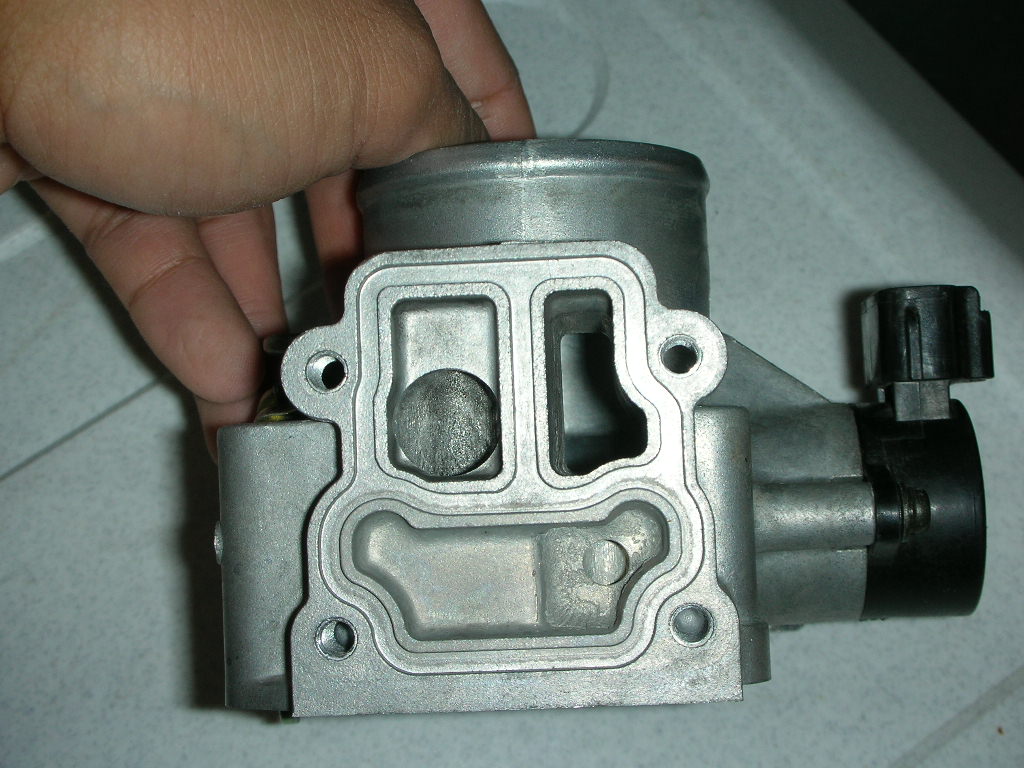
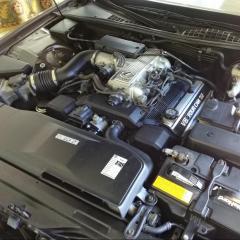
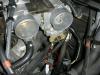
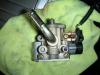
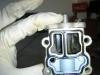
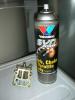
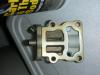
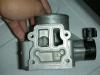
Hello Everyone, I know IACV has been a huge topic on the forum and I have found various pictures in the RX forum and ES forum on the idle air control valve (IACV) or as others call it the idle speed control valve (ISC). However, I have not found a "step by step" posting to date which definitively shows how to clean this thing so that my car stops giving me idling problems. Symptoms I have had included: - low and rough idling that would cause the car engine to start shaking after starting the car - this eventually got worse to the point that when I start my car, it would not idle unless I gave it gas - idling problems for me tended to occur more often after my engine was warm or had been sitting in the sun I hope these series of postings help you fellow LOC members out there. You've certainly helped me in the past so here's my two cents at this common problem. Additionally, the instructions I give are the way in which I have cleaned it myself. As you go about and attempt this, you may find better ways to do so. Please add and refine my instructions/terminology as needed. I am not a professional. I've only changed my oil, air filters, and conducted minor maintenance previously. The bottom line is that if you have the right tools, you should be able to do this. This discovery/ cleaning took me about 2 hours to do cause I ran into problems and there were major steps left out in previous postings that I’ve encountered read. The next time I do this, I believe I can get this done in about an hour or less. Tools Needed: 1) Tightly fitting Philips Screw Driver 2) Carb cleaner that is O2 sensor safe (I've seen CRC. I used Valvoline Carb Cleaner) 3) Locking Grip Pliers (definitely helped me remove the factory tight screws) 4) Small brush for cleaning 5) Towels for cleaning 6) Pliers (help removed brackets holding the hoses) 7) Latex gloves helps with limit the messiness. * I used the same gasket and did not replace it. No problems found. 1) Remove the hose that comes from the engine/motor that connects to the air intake hoses.( Hose is below in red – we’ll refer to this as Hose A) When you pull back the rubber hose covering, you will see that a metal bracket is holding the hose pretty tightly in place. Use the pliers to clasps the two metal pieces together to loosen the bracket and pull the hose loose. You can also do this by hand if it’s easier for you. 2) Upon removing the hose, you will want to remove the two air intake hoses. Loosen the three screws above in green and remove the hose. Below is a picture of the intake hoses removed. 3)After removing the intake hoses, I opened the lid to the air filter and moved this to the side of the car to create more working room. I believe there are two clips on the right holding the lid in place. Just pop the two clips and move the cover to the side. I also took out the air filter and temporarily moved this to the side. 4)After removing the intake hose, the throttle body/IACV/black electric coil is revealed. At this point, I removed the black electric wire from the black coil. Once the electric wire is removed you can remove the black coil from the IACV by removing the two screws. Note, the screws are factory tight so use a tight fitting screw driver to remove the screws. One of my screws was partially stripped from the dealership’s work, so I had to resort to my locking grip pliers which helped out tremendously. After removing the two screws, the black electric piece pops right off. When the black electrical coil is removed from the IACV, it exposes a small pencil sized metal stud. You will also notice a washer that sits on this stud. Don’t lose this washer. Take it and put it aside so it doesn’t fall off when you continue on in the next steps. 5)Additionally, I removed the hose coming out of the IACV. We’ll call this Hose B. This hose can be removed in the same manner by clamping the bracket and pulling the hose out. You will see that the hose is removed below. Below are pictures of before and after. 6)Here is where the fun begins. I initially attempted to remove the four screws attached to the IACV at this point, but found that after an hour, this would be nearly impossible to remove considering the location of the screws were in an extremely tight spot. The only way I would be able to remove the IACV is to remove right throttle body. Not as tough as it sounds. Three screws need to be removed to accomplish this. Again, be careful when removing the screws. Also you will see I removed another electric plug and I also cut a tie wrap. Once you complete these steps, the throttle body/ IACV comes out pretty easily. Note when you remove the throttle body, there will be one LAST hose connected to the IACV. Be careful when you remove this hose as radiator fluid may spill. Some of my fluid spilled out so I just refilled my coolant after I was done. 7)Below is a picture of the bottom view of the IACV. You now can EASILY remove the four screws connecting the IACV to the throttle body . In the picture below, I have already removed one of the screws. Once the four screws are removed the IACV and throttle body separate. Now you can clean both of them with your carb cleaner, brush, towels, cotton swabs etc…. Picture here is before I the cleaning with all the muck inside Pictures after I cleaned the IACV and throttle body This last picture is the post throttle body cleaning 8) Once you are done cleaning, just put back the throttle body/iacv the same way you took it off, and put everything back in reverse order. Ensure the gasket is in place. Also, ensure you put the washer back on the electric coil. Make sure you place hose A & B back and ensure the electric plugs are back in their original position. Once these things are in place, then it's all about putting the air filter/hoses back and you are good to go. If you have lost any coolant, make sure you refill it to a safe level. After completing this cleaning, my car starts up without any problem and idles as if I just purchased the car brand new. Replacing this at a dealership would have costed me $300-400 easily. Let me know if you have any questions. Cheers (Also, I tried to post these as separate replys, but the software combined all my replies into a single reply and did not keep them separated) *Edited the posting to have the pictures follow step by step in sequential order*


 6 points
 -
I was also sold this "invisible" ad on! Only to be told by the dealership "after" that it's not adjustable. So basically it's just a dimly lit thin strip! This should be included. Lexus could and should've done better!4 points
-
3 points
-
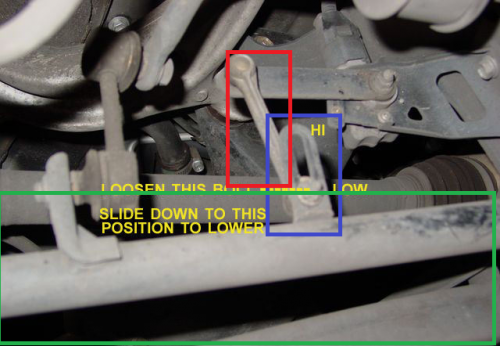
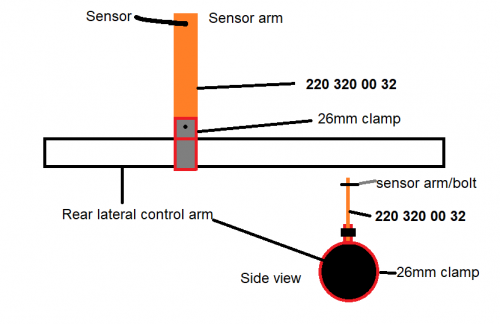
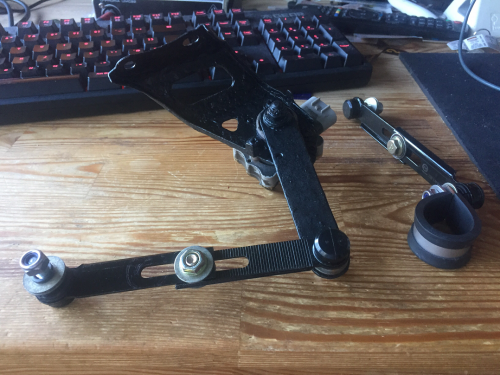
Hi. Some friends of mine suggested that I should post this here for more people to see. Hopefully it'll help people for years to come. You will need: About 50 bucks budget for the balljoint rod and the pipe clamp. Height sensor with bracket. 10mm wrench Washers that fit 10mm/M6 bolts. 10mm/M6 nuts Some smaller (8mm wrench) I own a 2001 LS430. The height sensor control arm's slider has rusted and become damaged over the last 19 or so years. The ball joint rod to the height sensor has also seized too. The height adjustment rod there in the red was seized, and the height slider in the blue was badly corroded and broken off. Rather than buy an entire control arm (green) this is an alterative method to repair it The arm is ~26mm in diameter. Buy yourself one of these pipe clamps in 26mm diameter. Or make one. Shouldn't be expensive. The hole needs to fit a M6/10mm bolt. Grind off the remnants of that slider from the control arm, and slide the pipe clamp over, and put your 10mm/M6 bolt and nut through and secure it in place where the slider used to be. Rather than using the control arm as a slider, we can instead use a sliding ball joint rod such as this one; This is a 220 320 00 32 from Mercedes - a height adjustment rod with a 8mm locking and a 10mm/M6 ball joint bolt. You can pick one up off eBay for cheap. Or find some other M6/10mm adjustable ball joint rod. Look at the diagram and try to imagine it in your head. This is what your bracket and rod/clamps should look like. One day I might snap a picture of what my repair looks like, but I hope you can make out what I mean via the diagram. This repair should be very easy. Maybe some sanding/grinding and surface preperation. The clamp will hold on tight and is easy to replace. The adjustable link rod will last longer and allow for easy adjustment, and less risk of corrosion damage. Hope this helps. This is a fairly easy job and took me less than 2 or so hours to do.
 3 points
 -
Did I mention this?..... I don't like the fact that our governments plan to force us to buy EVs. I wouldn't mind having one, as we already have solar panels and don't pay for electricity, but I think we should be able to choose what we drive (within reason).3 points
-
At the part store they run a load test on the battery that mimics a big draw. If it holds up to a certain voltage it means the battery itself is not weakened yet. As the battery ages it will weaken as in not be able to supply a given amount of cold cranking amps. When its cold the oil thickens some thereby making the engine have to work harder to rotate. Hence the term "cold" cranking amps. I'd say you should investigate why the check engine lamp is lighting up. It could be a sign of what is taking place to cause your car to struggle to crank over. The part store can often "read the code" and determine why the CEL is lighting. My gut tells me your voltage regulator in the alternator is hit and miss. A long time ago that was a little box on the fire wall or fender. These days they are inside of the alternator. It determines how much electricity goes to the engine to keep it running and to the battery to charge it. It only has to be off by a little to keep the engine running but not have extra to charge the battery. Another issue could be a parasitic drain. An out of the ordinary draw on the battery when the car isn't running. In my 04 GS 300 for example the CD changer kept trying to change discs and the seat memory kept activating. Now I could not hear the disc changer nor was the seat memory moving the seat, but they were drawing on the system leading to a weak or dead battery if I didn't drive the car every day. Yet another issue may be short trips don't allow the battery to charge enough. Example; start the car, drive to a store 10 minutes away, finish there, start car and drive 10 minutes to another store. Never giving the engine a good 30-45 minutes to charge the battery back up to the voltage used to start the car can also lead to the hard to crank or dead battery issue. Hope you find it soon and it's a cheap and easy fix.3 points
-
I just purchased a NX200T. During the test drive I did not realize the headrest was a little too far forward. It is sharply angled toward the driver at the top. I am on the shorter side at 5' 6 1/2" tall and have good posture. When I sit in the driver seat with good posture my head is pushed forward about 1/2". I have to lean the seat back so I am slouching to avoid neck discomfort. I asked my dealer, service center and the U.S. corporate office for advice. There was nothing they could do. Very disappointing. The worst part is that the headrest is available outside the US with adjustable forward and aft movement at 4 intervals. I asked a few after market car parts dealers for advice. I was told it is a common problem. I was given many solutions (get another brand car's headrest, cushions, heat the metal and bend the rods, padding, etc.). Some ideas were unsafe and of course illegal I thought. For now I put some 2" cushioning in the seat to bring the rest of the seat inline with the headrest. It is better but not quite there and makes my A/C venting fairly useless, & is a little dorky. After just having paid about 50K for the fully loaded car I want a professional solution to improve the headrest. So far I have not solved it. I am curious if anyone else has had this issue and solved it? Any advice is appreciated. I am 95% happy with the car/SUV and am looking for that last 5% of comfort/fit.3 points
-
No reason to upgrade, Those stock wheels are Classic on the SC 😉3 points
-
But you love the Covid virus? 🙄3 points
-
I just installed the rr racing supercharger. It’s the only way to go bud3 points
-
That one is my son's new puppy. Her brother came home with me Chocolate lab mom, stranger in the night dad Yesterday they played all afternoon.

 3 points
 -
Purchase has been made!...I could not turn down the deal I got & the actual ES...2020 ES 350 'premium' with only 11k miles in Nebula Grey Pearl (windows are already tinted)....over 2 years of full factory warranty remaining; 1 owner, full service history & Lexus CPO. Our 'premium package' in Canada is equipped quite differently than our friends south of the border....with more features / standard equipment. Originally I wanted the UL package....but in these parts, they are very rare (I reached out to 17 Lexus dealers in a 400 mile radius of me...the UL units that are available are 5 to 6 k more & only about 20% are actually at Lexus dealers...the premium pkg checks 95% of the boxes I was looking for....as the expression goes 'don't look a gift horse in the mouth'. I literally have a 6 minute drive to work... I pick the car up this Saturday.3 points
-
I like it when I'm trimming a rose bush, grab one to place in a jar and while heading indoors the Mrs arrives from work so I hand her the rose. Or when I come from work and the dog greets me at the door, tail all wagging-like. And the parrot says "welcome home"…… Or when a nice breeze blows just as the grass cut chore is over and the Mrs brings out a tall glass of ice cold spring water. Or when a new baseball cap fits my noggin just right without adjusting it. Or I step on the bathroom scale expecting to have gained weight but the scale shows I actually lost a little. Or when my son and I went to do the first start after an engine swap, expecting a hard to start issue but ole bessy fires right up. Or when the lawnmover starts first pull……again. Or helping out old people. Or thanking a soldier/veteran. Or tipping the person at the toll booth. Yes I stop and pay in cash so I can do that. Or when the voicemail on your phone was not a robo-call and instead was a friend telling you "hello, here's my new phone number" Or when you sneeze and a perfect stranger says "bless you". Life is short. But smiling makes you live longer. Trouble with being dead is it lasts so long.
 3 points
 -
The cost of dental work, especially deep cleaning by laser and periodontal surgery, but also including implants.3 points
-
That's the view when I pull into the driveway after work. Unseen in the photo is the dog wagging his tail "it's that guy, he's back, yay!!"3 points
-
Update: I think I have got it after all the work, time, and money spent. I started checking again I found an unbelievable vacuum leak around lower intake manifold. replace gasket today runs great thanks for all of the support. something that simple fix. when the engine was swap the starter was replaced. The gasket moved or something apparently cause a vacuum leak. I had no idea a vacuum leak could cause random misfires. I was sure it was an ignition problem.3 points
-
Hi all, I believe I have posted here before a long time ago with my old LS430 LEX, I now have a 2007 LS460L with 110K on it now. I have owned it for a few years now, since 65K miles, and recently I started having acceleration/hesitation problems. I did alot of research, and didn't find very many good answers. I did have the transmission and engine ECU update flashed, with some improvement, but after that didn't solve the problem, I was convinced it was the cylinder head replacement deal, which was way out of my budget with 5 kids....and I thought it was ridiculous that a flagship sedan would need that kind of serious motor work with just 100K on it. Anyway, my mechanic suggested BG 44K fuel system cleaner, NOT available at places like autozone. He sells it for $28 per can, but I found on Ebay for $16.75 and up with free ship. First and foremost, I ALWAYS used quality, premium gas (Shell V-Power or QT), and Techron additive from time to time, so I was super unconvinced about his recommendation. I had even listed my LS for sale, again, convinced that the motor had cylinder issues after reading blogs about LS460 acceleration issues. Also, for the record, I have NO affiliation with BG or anything like that. THIS STUFF WORKS! It truly fixed my hesitation problems, completely. I am no longer selling the car, and am happy again, as it accelerates like it is supposed to. Feel free to read many other peoples reviews on this stuff, its amazing and really seems to work. After i drove it to wrok (25 miles one way) I thought i felt a difference, by the drive home, I KNEW I felt the difference, after the full tank, i was truly smiling. I have ordered 4 more cans for my other vehicles and boat, and suggested it to my friend with a ISF, my brother with an SC430, and my buddy with a Vette. I guess these LS460 cars are just picky after a while and maybe the injectors get gummed up? I don't pretend to be a mechanic, again this was suggested by my Lexus mechanic, After alot of depressing research with no real answer, just wanted to share my experience with any other LS460 owners, as it is a beautiful car, and I was disappointed in what I was thinking the problems I had. It was the best $17 I have recently spent, and if you are having similar weak/lack of acceleration or hesitation issues, i would say TRY IT for less than $20. I believe you can go to BG's site and find a local dealer, again, not autozone or O'Reilly or anything like that, says professional use only lol. Also, need a funnel, comes in a coke can basically. Just my 2 cents, hoping to help out any other LS460 owners out there depressed about their car, it seems most people just said they'd trade it in and buy a new one, but I'm not that rich :)
 3 points
 -
My Daily 😀
 3 points
 -
The Lexus brand cell phone that was a dealer installed option lowered the HVAC fan speed and muted the audio system while a call was in progress. I even connected an aftermarket Nokia CARK-91 phone system I installed in my second (2000) LS400 to mute the audio system but I didn't bother to connect it to lower the HVAC fan speed. Even when a Lexus phone system was never installed, corrosion of the factory installed cell phone harness in the trunk can cause HVAC and audio system issues.3 points
-
20 years ago I swapped a domain name for a Lexus. The love affair started and I am now on my 10th Lexus3 points
-
And Because We All Love Pictures 🙂

 3 points
 -
My Lexus is my weekend car. My daily is my 2009 Mazda 3i.
 3 points
 -
Here are a couple of tips I have picked up regarding maximizing fuel efficiency 1. Replace the spark plugs if you have not already, I prefer NGK Iridium plugs 2. Look for Cooper CS5 Grand Touring/Ultimate Touring tires, they are excellent for these cars 3. Use OVERDRIVE on the highway or at speeds in excess of 60 MPH (most say 40-50 MPH, but in my car I have observed minimal difference at those speeds). Note that you can use Overdrive at all speeds and it will keep the RPM's down but from what I have learned at slower speeds this translates to negligible fuel economy gains. 4. Set your ECT mode to NORMAL and not PWR 5. Keep the RPM's as low as possible aka don't floor it 6. Make sure your wheels are balanced and aligned properly and that your tires are also correctly inflated. 7. Mythbusters proved this, KEEP YOUR CAR CLEAN, it does SLIGHTLY affect gas mileage for the positive. 8. Turn off your A/C system if you want, it does affect gas mileage slightly, but its also a comfort, not really necessary unless you want to maximize fuel economy. 9. In reference to replacing the spark plugs, you may also want to consider replacing the ignition coil, distributor cap & rotor, and plug wires if they have not been replaced in quite some time as they can lose spark and cause poor performance, this would be within a general tune-up. 10. Replace the fuel filter, this is commonly missed on every car, and they get NASTY, unclean fuel = bad performance. Also consider getting a professional fuel service done on your car, this can help too, especially if it has not been done in some time.3 points
-
Folks, and Forum Admin, Please make a separate section on the Forum for 2016 RX models. THese have had major changes since 2015. The engine has been tweaked, there are scores of safety improvements and the look is way different. I am sure the issues will be different as well. So please rename the 2010-Present section to say 2010-2015 and keep it separate from 2016 onwards. Thanks.3 points
-
I can answer that. Those zany Brits particularly like "mark" designations: https://en.wikipedia.org/wiki/Mark_(designation Maybe it is a longing for Jaguar sedan series names. In the UK, the model year ranges of the LS400 are referenced thusly: Series 1, Mark 1 = 1990-1992 Series 1, Mark 2 = 1993-1994 Series 2, Mark 3 = 1995-1997 Series 2, Mark 4 = 1998-20003 points
-
Replaced the Y pipe. Almost one month and no more problems.3 points
-
okay guys, I am going to give you a very constructive advice on how to fix this problem.first remove the cluster and if you do not know how go to lexls.com and follow the instructions.then remove the face cover .first grap the tach needle gently and pull untill you hear a pop,again be gentle and do not ge scared.once you hear the pop move the needle clockwise untill it pops again then gently release it.now move the needle slowly counterclock till you sit it over the zero an on the dot and make sure that it sits right on the zero.to check your work move it gently say to the mark 3 then let go it should snap right back to zero,once you have accomplished this ,you are rock & roll baby.the same thing goes for speedometer.back light is not working change cap 212,after making sure your cathodes are okay meaning the bulbs.if not you can get them at a very good price from plano lexus,they are awsome as far as price goes.gas guage slow change cap 142.while you are at it change any bad or weak bulbs ,be the warning ones or the indicator ones such as shifter position.by the way guys the cluster lexus has on the first gen is the 1992,because the psb are so robust,where the 1993 and 1994 are made a little bit on the cheapy side.this job should take about an hour if you how to handle things.good luck and let me know. please make a donation to lexls.com,this guy is great.may god bless his soul.3 points
-
So you can educate your dealership when they tell you they can't duplicate your problem. I'm slowly downloading more of these as I get them, so keep checking back. 1. Air conditioning poor peformance - AC002_05.pdf 2. Air conditioning sensors inspection - AC005_04.pdf 3. Headlamp condensation - BO003_07.pdf 4. Front brake squeal - BR001_05.pdf 5. Brake acutator abnormal noise - BR003_07.pdf 6. Malfunction indicator lights after brake pad change - BR006_06.pdf 7. Retrieving diagnostic codes (unfortunately this is with the Lexus diagnostic equipment) - EG009_05.pdf 8. ISC learning procedure (this is a good one to be used after drained or disconnected battery) - EG010_05.pdf -this TSB mentions using the Lexus diagnostic equipment but look for my other post for directions for the ordinary mortal who doesn't have the Lexus scanner 9. Rocking feeling at 70mph - EG013_07.pdf 10. Power back door noise - EL013_07.pdf 11. Zero point calibration after wheel alignment - L_SB_0015_08.pdf 12. Tonneau cover latch rattle - NV001_07.pdf 13. Vehicle pull/drift to right improvement - ST003_05.pdf 14. Cylinder head cover oil baffle caution - L_SB_0021_08.pdf 15. Upper/Lower windshield tick noise - NV005_06.pdf 16. Instrument panel rattle - NV002_06.pdf 17. 5W20 oil recommendation - EG006_06.pdf 18. Front seat squeak noise - NV001_06.pdf 19. TPMS diagnostics etc. - PG001_07.pdf __________________________________________________________ The following are not TSBs, but good information to have. FRONT AND REAR BRAKE EXPLODED VIEW (from and RX330, but I believe RX400 is the same) front_brake_component.pdf rear_brake_component.pdf STEREO REMOVAL rx_stero_remove.pdf DEALER SELECTABLE OPTIONS (wish I knew why Lexus made it so only the dealer can adjust these) rx400h_customized_settings.pdf VOICE TEL and NAV COMMANDS (if you can get the stupid system to understand you) 2007_RX400h_Voice_Commands.pdf LexusVoiceNavwTel.pdf2 points
-
I am an 2023 IS500 owner, for an almost $70,000 car, it does not have a place for your phone, Lexus did a very very poor job of not updating a 20 year old interior! I’m disappointed there’s no space for my sunglasses on the ceiling space, no wireless charger, wire coming from center storage, the speedometer display is so tiny, I had to take my eye off the road while driving. I’m totally disappointed with Lexus’s CHEAP DESIGNS! The ok thing is the V8 & the 1,800 watts stereo. Even the V8 @5.0 L. IS SLOW @ 4.4 Sec. (0-60mph)! 472 Horse Power should be under 3.5 sec., but Lexus blew it again with a slow 4.4 sec., not acceptable. I regret buying this new Lexus IS500, I should of buy a Mercedes AMG instead. The handling of the IS500 is barely sporty!!! Disappointing, Lexus did a lousy job of creating this new IS500!2 points
-
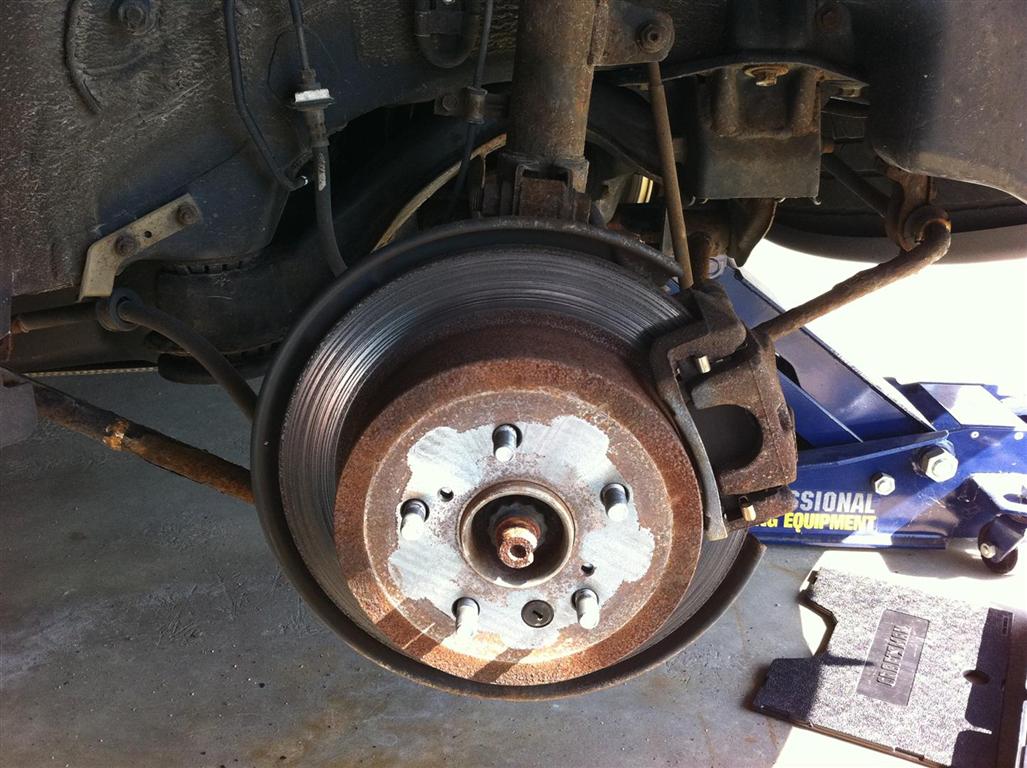
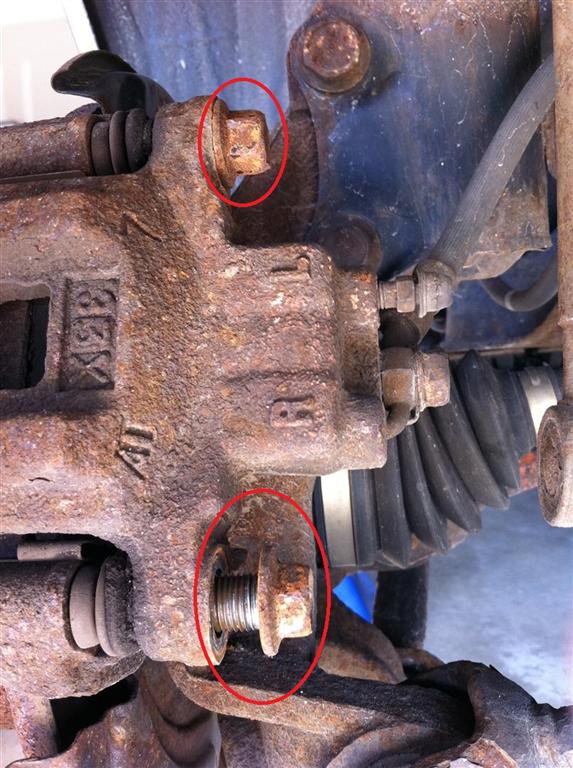
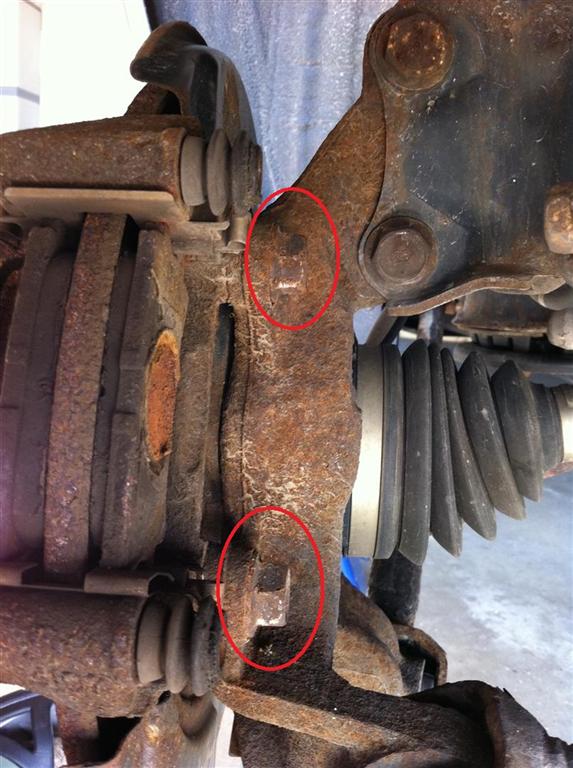
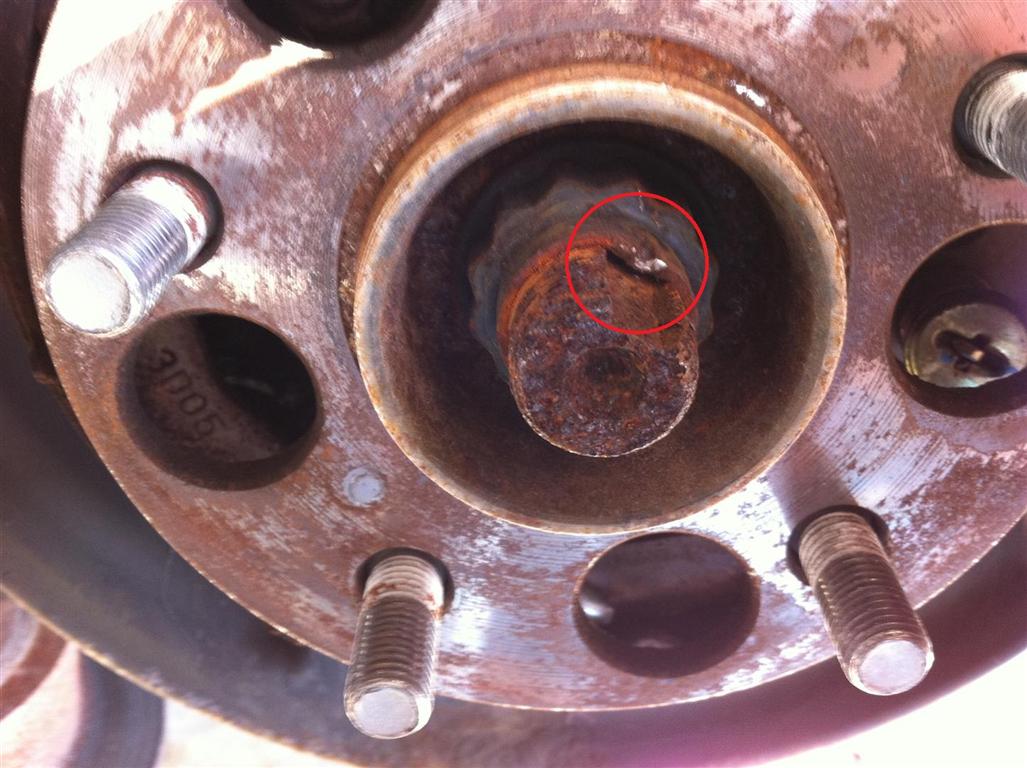
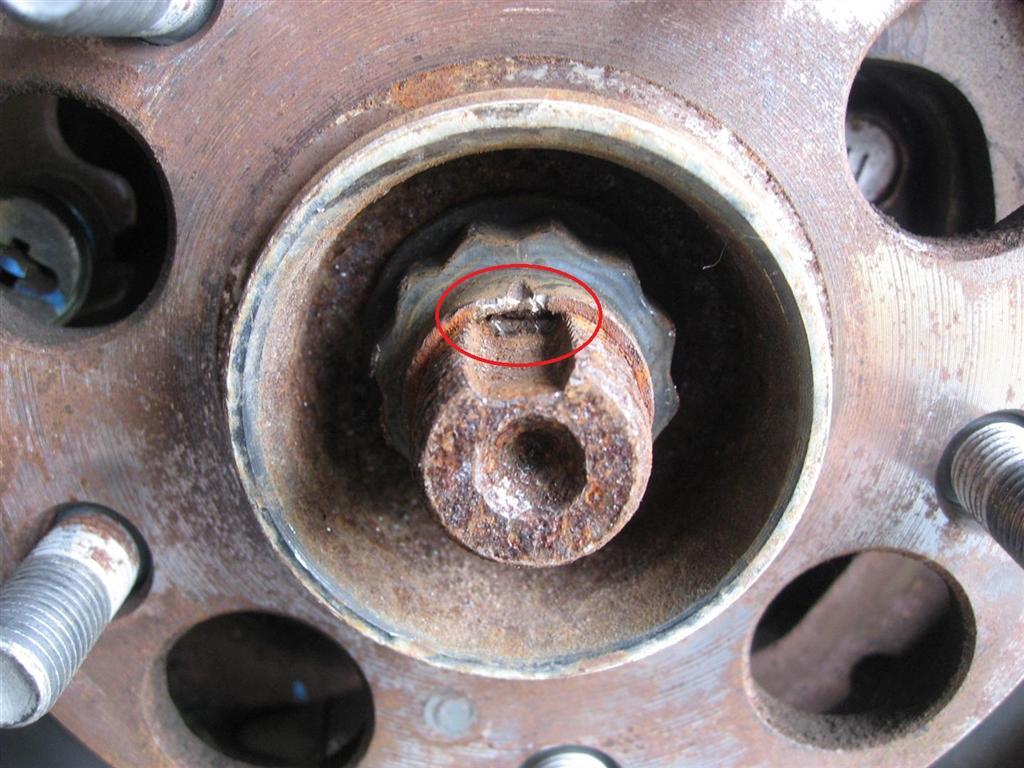
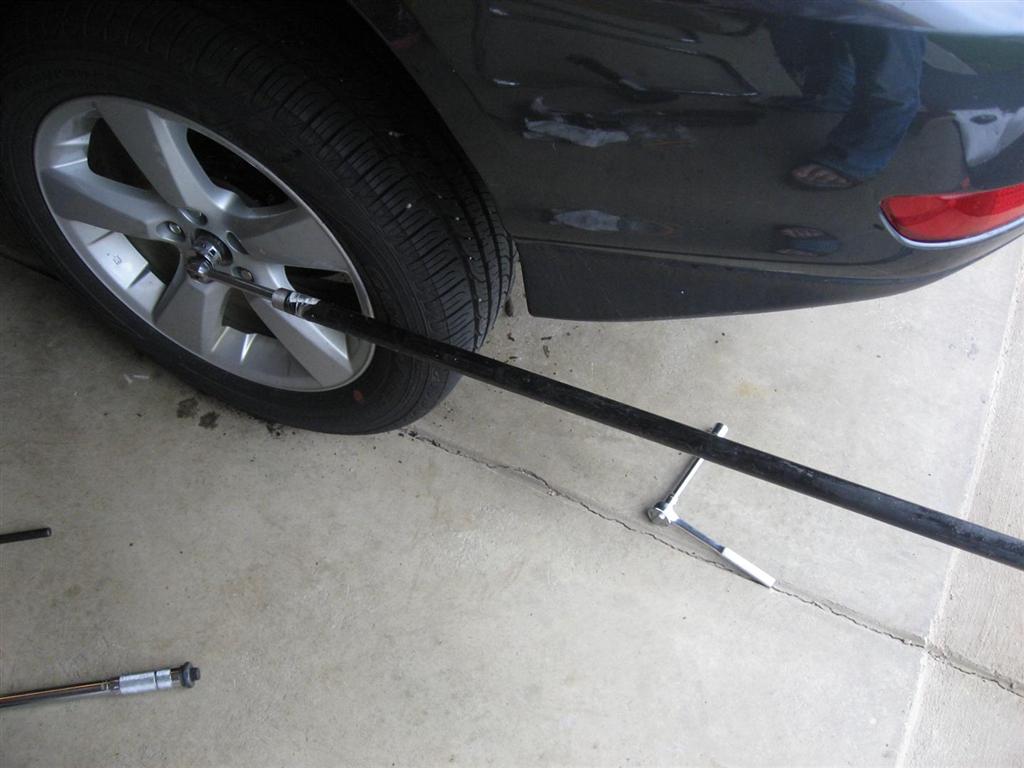
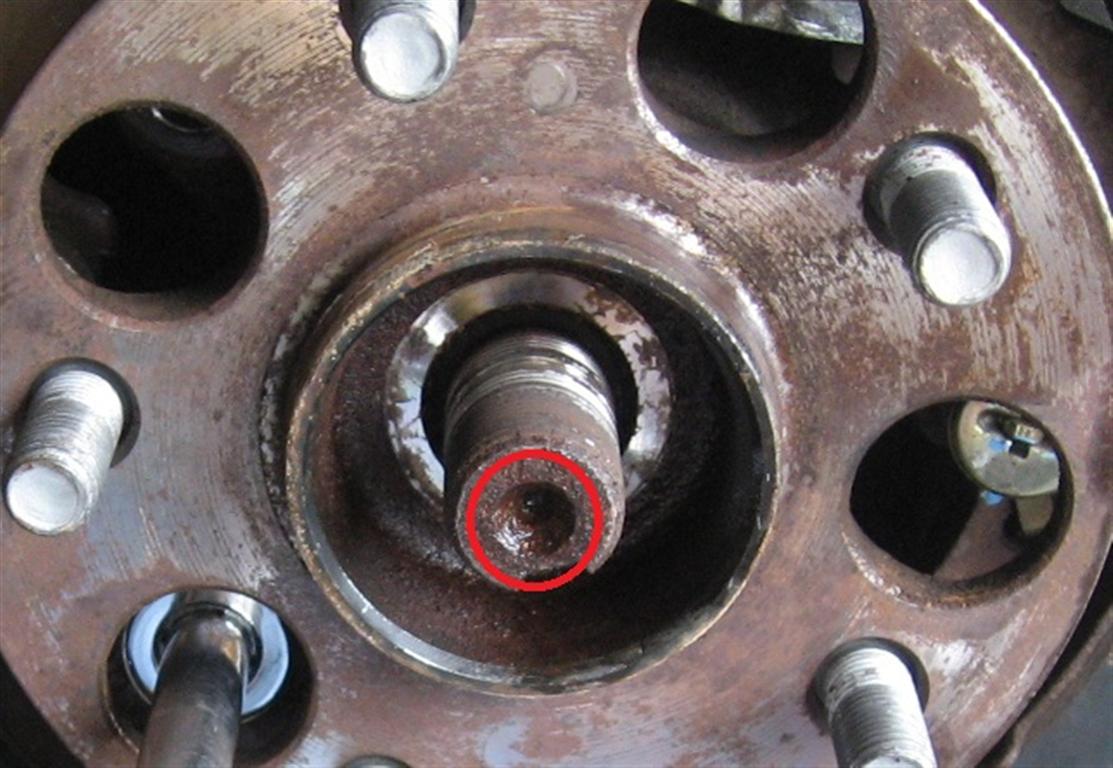
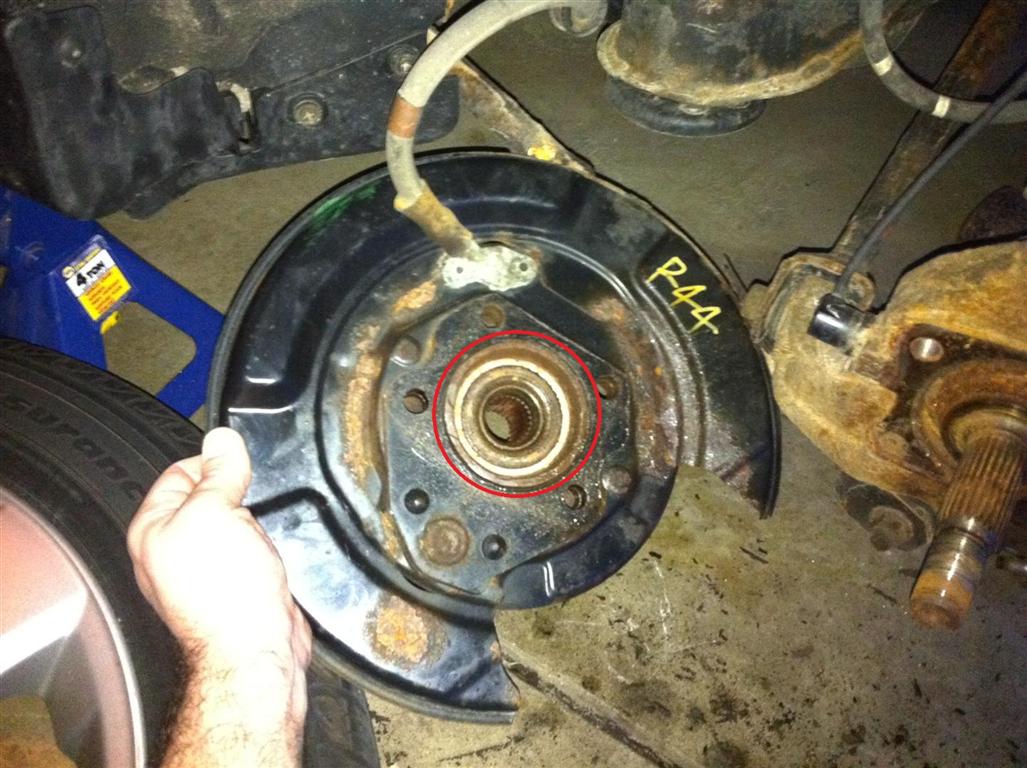
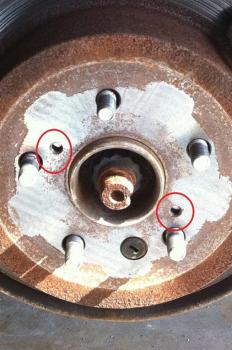
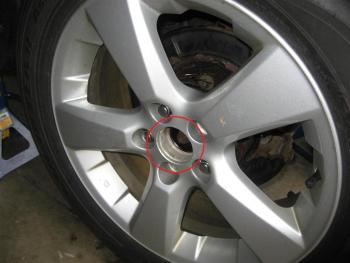
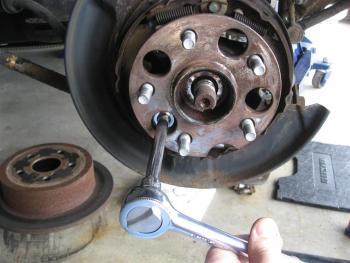
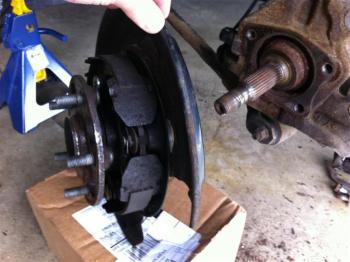
I put together this to help anyone trying to do this on their own. I just got done replacing my left rear bearing assembly on my 2004 RX330. I make the assumption if you are doing this you can at least take off your tire, caliper and rotor. I am not a mechanic by trade, but can do many of my own repairs. Some of the names of the parts I refer to may not be exact, but I will describe them as best as I can. I had some tips on this from my buddy, who is a former Lexus master mechanic. So props to Ron for the help! Some tools I would recommend having before you start: 1. 32mm 12 point deep well socket 2. Ball peen hammer 3. Large heavy hammer, such as a 3lb steel mallet. 4. A small chisel, strong flathead screwdriver or metal starter punch. 5. Hex head 8mm -- 1 25 x 50 mm bolt. Here is the part I am replacing. The specific one I purchased was the Koyo W0133-1890398, which is an OEM part. I would recommend getting OEM parts if you can afford the cost difference. Update: For all who have asked, the vehicle used in this tutorial is AWD (All Wheel Drive). http://www.partsgeek.com/catalog/2004/lexus/rx330/driveshaft_-ar-_axle/wheel_hub_assembly.html First, take off the tire. Remove the two bolts holding down the brake pads to the caliper. Next, remove the two bolts holding the caliper to the rotor. Now pull off and remove the rotor. If the rotor won't budge and you can't pull it off, you can screw the hex head 8mm -- 1 25 x 50 mm bolt into the front of the rotor in one of the the two holes pictured below. As you screw it in, the rotor will push against the assembly pushing off the rotor. Once the rotor is off, you will see the emergency brake with the hub assembly in the center. You will see a groove in the center of the spindle that is held down by a 12 point nut. The edge of the nut will be slightly bent down into the groove to prevent it from spinning. Using the chisel, screwdriver or punch, you will need to bend this back up so the metal is even with the circular shape of the spindle nut so that it can be unscrewed. Be careful here because you can mess up the threading on the spindle if you don't bend it back well enough. Once you have successfully bent the spindle nut back to the correct shape, stop. Next, remove the center cap on the tire and place the tire back on the hub. Firmly tighten the tire directly to the assembly with 3 or 4 lugnuts, but you won't need it to be completely tightened down. Lower the vehicle down to the ground so that there is only enough weight to prevent the tire from spinning. Do not completely lower the vehicle down. Alternately, you can place a pipe or rod in between the lugnuts and prop it against the wheel well or ground. Basically, you will need to prevent the assembly from spinning in order to break loose and remove the spindle nut. Using the 32 mm 12 point deep well socket, remove the spindle nut. You can place a pipe on the end of the ratchet to achieve more leverage to break the nut free. Once, you have broken the nut free and removed it, raise the vehicle back up, secure it and remove the tire. Slowly turn the assembly so that the holes in the front match up with the bolts securing it to the backing plate. You will have to do one bolt at a time and remove all four bolts. There is no need to remove or do anything to the emergency brake. Once all four bolts are removed, locate the divet on the end of the spindle. Center the rounded end of the ball peen hammer against the divet and using a heavy hammer, give it a few good hard whacks. You will definitely need a hammer with some weight, I used a 3 lb steel mallet. Do not simply use a hammer to hit the spindle directly. Using the round end of the hammer against the divet distributes the strikes evenly down the spindle. You will risk damaging the threading if you start beating at it with a hammer directly. You will start to see the assembly move forward about an inch or two. One of two things will happen here. Either the assembly will break free of the backing plate, which you will simply need to hit it up, down, left and right to slowly knock it loose and out. Or as in my case, the backing plate will separate from from the axle. You are almost there! Remove the backing plate from the spindle and prop one side of it against the ledge of the axle. Hold the other side of the plate with your hand. As long as you have the one end against the ledge of the axle, holding it with your hand will be more the enough to brace it. When I tried to prop the other side of the plate against my tire, it started to slightly bent the backing plate. Give the edges of the bearing a few good whacks with heavy hammer and the assembly will drop to the floor. Now just put everything back together in reverse! Last but not least, don't forget the bend the metal of the spindle nut back down into the groove once you tighten it back down.


 2 points
 -
Fixed! Put the transmission in neutral, took off the bolts and rotated the driveshaft. Tightened everything down and drove it and it was connected back the right way. Thank you to everyone for your help!2 points
-
https://youtu.be/vnOM7RfgP1A this is about as easy as diy projects come. No tools needed and instant results!2 points
-
Hi everyone, I want to you my latest addition to my RX330. A custom design and fabricated prerunner bar with a skid plate. Going to add lights in the future.
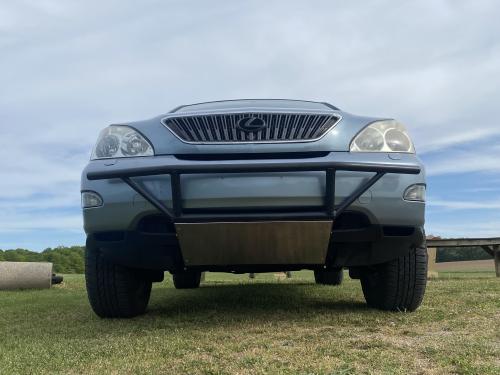
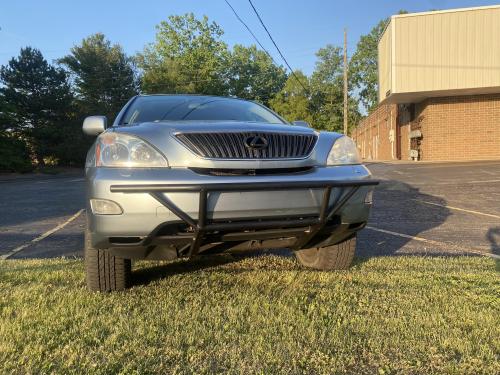
 2 points
 -
If you fail to timely replace your timing belt and water pump your engine could suffer catastrophic damage. Do it. Do it now. My mechanic charged $475 today for labor to replace the timing belt and water pump on my LS 400 with 174K miles. My AISN brand kit cost $189 from Sumit plus antifreeze and liquid gasket for a total of $300 for parts. The Stealership will rob you blind. I saw that my belt was cracked and my pump’s weep hole was crusty from leaking. It looks like I was a whisker away from shredding my motor. I’m glad I did it now and avoided killing my Lexus.2 points
-
Before pulling the bulbs, you should look for a change in voltage on the meter with and without the lights/audio on. If fact, what I typically do when performing a quick test, observe the meter as you switch each component on...one by one. If the brake lights are showing a large dip on the meter or with everything on together you are dropping below 13 volts...you have a problem. It's rare, but you could have a bulb that's not lighting up and instead shorting out. If the charging system stays above 13.5 under full load than I'm leaning towards a problem with the wires coming from the battery or loose/corroded battery terminal. Most of the situations that I've worked on where there seems to be an electrical demon and all the tests are good...It's usually something like a poor body ground.2 points
-
But then again, the RZ 450e with a 0-60 of 5.2 sec. would be great for mountain climbing, but the rumored range of only 225 miles and an out-the-door loaded price north of 70K would qualify it as a novelty. But, then, there’s a lot of money floating around California, where Lexus would be pushing / sending expensive electrics anyway.2 points
-
A new one can be found here.... I have used this supplier from their Japan located warehouse. worked well. https://www.amayama.com/en/part/toyota/81740500802 points
-
Welcome to the Lexus Owners Club Events forum section Its been a while since this section has seen the light of day, so thought it was time to revive it now that we have freedom of movement pretty much in most parts of the free-world. Got an event planned or just want to share one you are attending? Feel free to post up any national or local events relating to Lexus or even just events that will host Lexus cars amongst others. (please note: the Moderation Team reserve the right to remove any content that goes against Lexus Owners Club rules at any time)2 points
-
I have always been in the Toyota family. The pandemic has made it hard to find the Toyota I wanted and I know Lexus IS the fancier side of Toyota. They are dependable cars and I need something that’s safe and will last a long time. So I am getting my RX 330 tomorrow!2 points
-
The 4th of July is upon us once again. While most folks frolic about on the 4th doing the typical American thing……you know, drink beer, eat too much, get sun burned and watch fireworks, one of my coworkers has set out for New York. He is a young engineer from Afghanistan who helped the US forces rebuild stuff over there after things got destroyed after 911. At first he said it was not so bad. But at one point his life was threatened by hostile forces for siding with what he says they call "the great Satan". He said members of his family were brutally killed in order to teach him a lesson. The US government gave him the opportunity to bring his wife and kids to America. So this 4th of July he, his wife and children are going to travel to New York to witness the statue of Liberty. He told me that after being in America some 4 years his wife no longer fears running over explosive devices or being hit by sniper fire and wants to travel to "the big apple" he said in broken English. I will raise a toast of apple juice this year to him and folks like him who truely know life under tyranny. I hope everybody reading this enjoys the 4th this year now that the pesky virus seems to be largely under control. I'll stay home and help keep a labrador calm who gets nervous when the fireworks explode. He's 11 this year so he doesn't have that many more days left and I sure don't want him spending any of them in panic mode. I'll hook him up with a hot dog off the grill while we sit out back and watch a small bonfire. Happy 4th everybody.2 points
-
Based upon what I've seen on news stations, New York is a very dangerous place right now. You might want to suggest that your friend be armed when walking around the city. But hey, it's got to be better than Chicago! Have a great July 4th. The weather is perfect here.2 points
-
Many have questions on how to program the Homelink buttons. It is in the owner's manual but sometimes it may be confusing to understand the terminology. I've summarized what the manual states, and hopefully this will help anyone in the future (as I have in the past already hehe) "Ok. Delete the codes in the homelink then try this. (To delete, hold down the first and third buttons at the same time, hold for about 30-60 seconds till the light blinks really fast. Release and check if deleted if the light blinks at a slow but steady pace. That means there's nothing stored on that button) Hold down the garage door button and the homelink button u want programmed. Once the light changes from a slow blinking light to a rapid blinking light, release both buttons. Then go to the garage door openner and (this is different for all garage door openners) push the "learn" button ONCE. Within 30 secs, press the same button u programmed 3 times, and it should work."2 points
-
Well, by coincidence or not, my Mom was in town for a week and loves to grab a tailgate and manhandle it, likely a leftover habit from the good old days and the '86 Plymouth Voyageur we had growing up.... then the power feature on the tailgate stops working. Every fix I came across is basically: My tailgate is broken - Ok, push the button in the glovebox and try again. - Oh that worked, thanks. To be clear about the symptoms, the motor that grabs the door and pulls it tight still worked, but the one that raises and lowers the door was not doing anything. I'd get the 3 beeps sometimes, but that's it. So I decided to dig in. Here's what I'm looking at. Problem must be in here. So you can see I pulled down the headliner. I just got a finger in there by the actuator arm and pulled at it. It's held up towards the right side by a couple of these. Now when I looked in the mechanism, I saw that the arm that the motor drives had popped off of the pin for the door side arm. Looking at this pic you can just barely see that there's a small bushing inside the end of the motor side arm. That was actually still sitting on the pin when I first got in there but I took it and pressed it into the motor side arm with a pair of pliers. Also note that the pin has a small groove at the top, you'll need to get a C-clip in there. For reference, the C-clip I used. I had to push the motor arm back into the mechanism a bit to make room to get it back onto the pin, then pull the door down a bit and massage it to get the arm on there. Then pop the C-clip on. Surprisingly, I managed to get it on first try. Lubed up the struts on the tailgate for easy operation, opened and closed it a couple times manually ( I read somewhere this resets the system. Who knows. ) And viola! It works just like it's supposed to. This is the motor arm on the pin. Tools I used: I had to use the coathanger to pull the motor arm out from the very back of the mechanism when I started, it had pulled all the way in as if to close the door. Pliers to seat the bushing in the arm, and to seat the arm on the pin. Screwdriver to push the C-clip on. I hope this helps someone. I was motivated by fear of dealership service departments.2 points
-
Does anyone know where to get a good used or rebuilt clock/climate control for 92' LS 400? The LCD display turning black seems to be a very common problem. I have checked with many auto-wreckers, they either don't have any left or are in the same condition (turning black). I had heard there were some retired Air Force personnel in California that rebuilt them. PS: Given the number of problems, one might think that Lexus would step in and do a recall or sell rebuilt units, $800+ for a new one is a bit steep. thanks, bob2 points
-
Did something today...2 points
-
Hey guys i made a small video on how to replace the plastic coolant tees that get brittle with age and can crack / leak / break / leave you stranded. Its a fairly straight forward process, everything is covered in the video from tools to parts. If you have any questions let me know. Parts needed for this job: (1) Gallon of coolant - PN# 00272-1LLAC-01 (2) Coolant Tees - PN# 87248-60460 Optional, highly recommended parts for this job: (1) Coolant hose - PN# 87245-6A220 (1) Coolant hose - PN# 87245-6A210 (1) Coolant hose - PN# 87245-6A190 (1) Coolant hose - PN# 87245-6A180 (1) Coolant hose - PN# 87245-6A800 (1) Coolant hose - PN# 99556-201552 points
-
Thanks for the heads up! It seems once they get you past the warranty period they don't care. It's all about business and they will wait until a class action. It used to be if you took care of your car, it would last AND look good! I'll reconsider putting so much $ in a car in the future. Best of luck to you too!2 points
-
well I broke down and went to discount tires and bought a set of Michelin Latitude Touring HP tires for my 99 LS... I got 235 55 17's and I hope they hold up the rest of my life.... I am wanting to get it all fixed up for my wife.. now dont get me wrong, I am not planning to leave earth, but at 82 and not in good condition I just want to be ready.
 2 points
 -
Also, if you're interested in either screen mirroring with/without Bluetooth and adding video (maybe a reverse camera), a great company called NavIKS makes a device that will allow these function... check it out... http://www.ebay.com/itm/Fits-Lexus-SC-430-2002-2010-Navigation-Video-Interface-Add-TV-DVD-Backup-Camera-/251336118498?hash=item3a84ccd0e2&vxp=mtr HDMI Connection http://www.ebay.com/sch/i.html?_from=R40&_trksid=p2050601.m570.l1313.TR4.TRC2.A0.H0.Xnaviks.TRS0&_nkw=naviks&_sacat=0 Wifi Connection http://www.ebay.com/itm/NAVIKS-Wireless-Smartphone-Mirror-Interface-iPhone-Android-Compatible-/252058905983?hash=item3aafe1ad7f&vxp=mtr2 points
-
The GS300 has a saddle tank with a hump in it where the drive shaft passes through. It sound like the fuel from the passenger side of the take is not being transfered over to the side that has the fuel pump in it. A simple test would be the next time you run out of fuel remove the back seat and then the fuel sending unit from under the passenger side rear seat. If you see a lot of fuel then it is not transferring. There is a tube that comes from the passenger side to the fuel pump assembly on the drivers side. A device on the fuel pump assembly creates suction to bring the fuel across. If this device is broken or the line is kinked it will not work. Ben2 points