sebastor
-
Posts
62 -
Joined
-
Last visited
sebastor's Achievements
")


-

Alternator / Voltage Regulator Voltage ? 90 Ls400
sebastor replied to sebastor's topic in 90 - 00 Lexus LS400
Thanks you Sir. Much appreciate your help. -
Hi guys. I just replaced battery as it was bad. I previously had parasitic draw which i believe it was car alarm completely discharging (300mA) my battery overnight. I have grounded alarm and alarm is no longer active (bypassed). I did test for parasitic draw and i see only 0.15 mA so i believe it's all good here from what i can tell for now. Now when i was testing my alternator whether it's working correctly i see that under idle engine and FULL electrical load heat on high, lights on, radio on and rear defroster on my voltage shows 11.7v and when all electrical off its back to ~12.3 When i increase rpms to 1,000-1,500 rpms voltage jumps starts going up to 12.6-14.00 so that tells me alternator is working and charging during driving but i'm curious if under idle if it's working properly. I know there is voltage regulator and i wonder if under idle what it should show for this particular car? Is there voltage regulator in 1990 LS400 that would under idle only regulate 11.7-11.9v and would start charging only when rpms are increased or is alternator weak and going bad slowly. Wouldn't want to buy a new one unless needed? I have Innova 3320 multimeter which may or may not have (+) or (-)~1v variation. This is not Fluke so not sure what the margin of error on this device is. Or could be accurate. Not sure. It uses only auto ranging when setting on 12v testing. Thought i would be specific here about device too. This multimeter has 4.5 starts rating on amazon and supposedly is as accurate as Fluke Thank you in advance guys for your help :)
-
Thanks Paul. Actually CEL and track just came back on after a day of driving so i guess i should change it. I think after i cleared CEL from ECU (inj fuse) it takes little bit for ECU to learn that there is still an issue so i think that code never really cleared as i only temporary reset it. It's my best guess.
-
Guys so i changed right side o2 and CEL and Track light went away after i reset ECU. The left side i could not get it to unscrew. It may need to come down to torching it red hot and then trying it. For that i would have to go to my mechanic and pay him. Question though. Is old left o2 delivering correct into to ecu since it's 25 yrs old and right one is new. The way i understand it right size delivers correct into and left doesn't. Not sure how o2 works. Is old left o2 good still meaning its working right by delivering correct info if no codes show or is it just getting by and should be changed anyway. I'm asking cause i'm trying to figure out if it's worth extra money to dish out if left side ECU reports no trouble but then again i don't know how o2 works. It may be just getting by for now? Thank you in advance for your advise.
-
Thanks Bob. I bought special o2 wrench for $15 so not bad price. I don't want to money around anymore with 3 point wrench. I stripped little bet of thread of the o2 sensor that i unscrewed so no big deal as it will be replaced anyway. Other thread is ok. I have returned apwi as thread was different. Ordered Denso and currently waiting for both tool and sensors. Hopefully that will get rid of my CEL. Thanks for all your help guys. I will update the thread with my findings and if it fixed CEL.
-
Just heads up for anyone ever want to use APWI AP465. It doesn't fit as thread is different. It would not screw it. I will be returning it for Denso which i think is OEM manufacturer of lex o2. Also 7/8 wrench strips o2 thread so if you have a chance go with 22mm instead of 7/8. on 7/8 there is play where on 22 there is none or very little that is noticeable. I got right one off and i stripped screw thread but left one wound't budge and 7/8 was sliding on o2. I will have to get 22mm and smash the other end with sledge hammer to fit pipe onto it for leverage. Unless someone has a clue otherwise. I also had a tool but tool was too short to it was useless too. I'm thinking of getting cat get hot and try it before it cools off to spread the metal a bit. I sprayed it with liquid wrench but in past i had no luck with pb bluster so i won't count on that. 7/8 in = 22.225 mm which explains stripping of thread on o2. Correct tool is 22mm only not 7/8
-
Thanks brother. I will call them tomorrow and ask. If AWPI comes in pair i will get that as that's nice price for both. If not then i will probably go with denso as its OEM or Walker part as tutorial suggests. Still thinking which one to go with tho.
-
Thanks Paul. Can you tell if APWI comes in pair, 2 sensors. It says Right and left if i'm reading this right? The way i read Denso it's only one correct?
-
There is also this. It shows two parts 8946524050, 8946550010} so i'm not clear if this means 2 sensors right and left or just left. ? DENSO Part # 2344211 {#8946524050, 8946550010} OE Style Upstream; DENSO is the O.E. Manufacturer / Oxygen Sensor More Information for DENSO 2344211 Point to Zoom OE Style Illustration Details Porous PTFE Filter - Allows atmospheric oxygen to enter the sensor without permitting water or engine contaminants to seep into the casing. Robotic Laser Weld Aluminum-Oxide Trap Layer - Keeps silicone and lead outside the ceramic elient through DENSO's exclusive design, preventing damage to the platinum electrode. Stainless Steel Housing - Resists corrosion and contamination with a rugged, watertight body. Double Protection Cover - Maintains proper unit temperature for quicker response times and protects the ceramic element against silicone and lead poisoning. Features Corrosion-resistant stainless steel construction PTFE filter blocks efficiency-robbing contaminants Refined zirconia element improves sensor response Benefits Superior design maximizes engine performance and fuel efficiency while reducing fuel consumption and harmful emissions First Time Fit® delivers the right part the first time Ensures smog test compliance Common O2 Sensor Locations: Alternate/OEM Part Number(s): 8946524050, 8946550010 DENSO Warranty Information 12 month. IMPORTANT A/C COMPRESSOR WARRANTY NOTE: In order to ensure that proper warranty credit is issued if needed, the compressor installation instructions must be adhered to. All compressors returned for defect must show proof of purchase of an Orifice Tube/Expansion Valve, Drier, and A/C System Flush or a Work Order showing the purchase of these items and that the system was flushed.
-
Thank you. Would this sensor work. According to rockauto it would and it fits 90 lex ls400. I'm assuming this buy gets me 2 sensors. One right and one left the way i understand. One concern i have is that in pic it shows 5 wires. I've seen only 4 on walker product. Would that work. It looks according to description that i won't need to splice wires with this sensor as plug is oe fit. Am i reading this right? Thoughts guys? Thank you in advance. So the way i understand upstream means main (not sub) oxygen sensor? APWI Part # AP465 Upstream Right Upstream Left http://www.rockauto.com/catalog/moreinfo.php?pk=3425883&cc=1187456&jnid=356&jpid=3 More Information for APWI AP465 APWI Oxygen Sensor Features: Catalyst Sensor element is made with highly pure and concentrated platinum paste imported from Germany. This will result in increased sensor life. Wire Supplied with high temperature nickel plated Teflon wire with Dupont material. Wires protected with fiberglass protective sleeve. Rubber Made with Viton Flourine rubber boots. Viton is water resistant and will decrease oil steam and vapor residue. Sensor Body • Made with high temperature stainless steel for long sensor life. Frontal Tube • Double layered with high quality stainless steel imported from Germany. Increases life expentancy of the sensor. Connector • OE direct fit connectors. No consolidations. Hex Nut • Improved Hex nut design for easier grip and installation. NOTE: Part number prefix will tell you how many wires each sensor has. AP1 = 1 Wire AP2 = 2 Wires AP3 = 3 Wires AP4 = 4 Wires AP5 = 5 Wires Common O2 Sensor Locations: APWI Warranty Information 12 months / 12,000 miles
-
Thank you. That helps. Oh i forgot about under cover. Is main o2 considered upsteam or downstream and what is the difference between the two. When i look at o2 listing is states both so not sure which is right one. Should i go with Walker or Bosch for same price? I think Bosch is OEM for lex correct? I see some are 2 wire and some are 4 wire. Did anyone had this with track light and had track light go away after o2 service? Does anyone here have Gen1 Lex service manual in pdf that someone can post. That would be greatly appreciated.
-
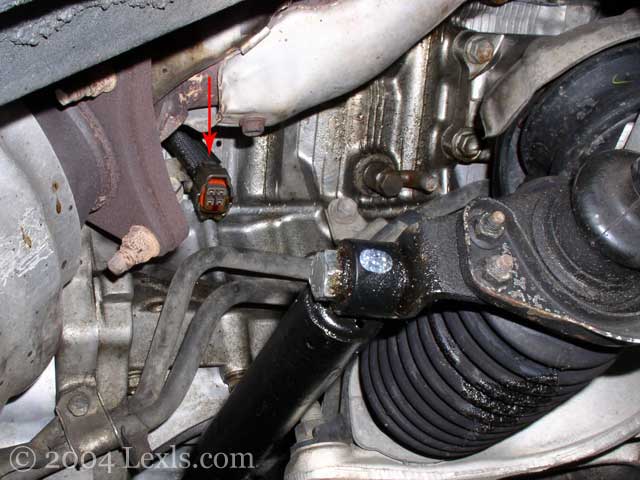
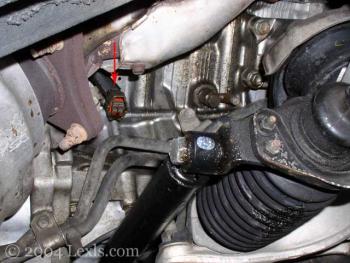
Hi guys i have 90 lex ls400 and i get code 28 and track light is on as well. Track light just keep blinking when i pull the code infinitely fast but CEL shows code 28. I'm assuming track light will go off once i fix code 28 but i don't know? I also pulled track light code and it's 51 (ECU issue). From what i've read that shows because CEL 28 lights up. I'm assuming track light will clear once i fix CEL 28 code with sensors. If anyone had similar issue please confirm. But main question is where are 2 main oxygen sensors located on 90 lex ls400 I was looking at this tutorial but i think it only shows first one and not sure what RH and LH mean. Right hand or right header? Then tutorial jumps right away to harness disconnect so i don't see where LH oxygen sensor is located. BTW where should i be looking for those sensors at driver or passenger side and by what major engine part? Thank you in advance http://www.lexls.com/tutorials/EFI/mainoxygensensor.html 3a) Unscrew the RH main oxygen sensor using a 22mm or 7/8" wrench. Here you can see that there is just enough room to use a standard 22mm or 7/8" wrench. If your sensors are original it will probably take a little extra elbow grease to get them out. 3b) Unscrew the LH main oxygen sensor. This side is a little harder because the steering rack is in the way, but a standard wrench still fits.

-
Sorry for being clueless bro. lol. RMD that was my second thought that it's differential but tranny is not smooth as my previous ls. It's slightly jerks sometimes. Not smooth other words. I checked tranny fluid and it's not dirty. I mean it's golden but not dark brown. So what does that leaking diff mean for me i guess? What cost am i looking at and how do i replenish the fluid in diff ? Would being low mean jerking when putting in gears or is that strictly related to tranny? Would flushing tranny resolve jerking issues also ? Sorry for throwing a lot of questions but mechanical portion is not my strong side.
-
Hi guys. What is leaking here? Is this bad and how bad? What do i need to do what are parts costs ? If you can provide as much details i would really appreciate it. Also i included an extra pic of rusting and welded muffler pipe? Why is that welded. My older by mileage lex mufflers were in great shape not rusty and welded. BTW is this surface rust? What is condition of this weld job and pipe itself. What should i expect from this. This is first in row muffler not second one. Thank you in advance. Leakage of what ? Why is the muffler so rusty and what's with the weld job?
-
Instrument cluster clock/climate control
sebastor replied to bobsvilla's topic in 90 - 00 Lexus LS400
@fsuguy. Hi Mike. I have local source by where i live. It's made from way better glass that will outlive most of our cars. The numbers and letters are crisp and nice font as you can see. I like it. Led bulbs also got from him. As for soldering it's little bit of precise, patient work. I have been soldering for over 10 yrs so i would say my skills are great. Use to soldier actually much smaller circuit boards. A lot of guys will actually reuse the board solder which is a mistake as that solder is oxidized, dirty and does not contain rosin anymore which leads to cold joints that will not conduct electricity and worst might separate from board. I take old solder off, apply flux to clean surface and reapply solder with 40% rosin core which guarantees hot good joints. After i'm done i clean rosin off the board with toothbrush which is dipped in alcohol to take rosin off the board. Rosin is slightly acidic but cleans board off of oxidized particles and also guarantees hot joints as solder sticks to rosin like magnet. If anyone is interested i can complete the entire job with parts for $175 ...if anyone is interested. If you choose to do it yourself Mike good luck. :-) It feels so much better to have this replaced. My next project is broken antenna and also wanna clean seats & condition seats.